With Stable Diffusion DreamBooth, you can now create AI art generation images using your own trained images.
For example, you can generate images with yourself or a loved one as a popular video game character, as a fantastical creature, or just about anything you can think of – you can generate a sketch or a painting of your pet as a dragon or as the Emperor of Mankind.
You can also train your own styles and aesthetics like aetherpunk/magicpunk, or maybe people’s facial expressions like Zoolander’s Magnum (I haven’t tried this yet).
Stable Diffusion is one of the best AI art generators, which has a free and open-source version that we’ll be using in our tutorial.
Google Colab is a cloud service offered by Google, and it has a generous free tier. That’s what we’ll be using to fine-tune Stable Diffusion, so you don’t need a powerful GPU or any strong hardware for this tutorial.
Table of Contents
- Quick Video Demos
- Use DreamBooth to Fine-Tune Stable Diffusion in Google Colab
- Test the Trained Model (with Stable Diffusion WebUI by AUTOMATIC1111)
- Upload Your Trained Model to Hugging Face
- FAQ
- Troubleshooting
- Conclusion
- Very Useful Resources
Quick Video Demos
Training Multiple Subjects on Stable Diffusion 1.5
This is a quick video of me fine-tuning Stable Diffusion with DreamBooth from start to finish. In this example, I’m fine-tuning it using 10 images of the Sandman from The Sandman (TV Series) and 10 images of Aemond Targaryen from House of the Dragon.
The following are two more video demos training a single subject on a model rather than multiple subjects on the same model. This is because when training multiple similar subjects on the same model, like faces of the same gender, they might get blended together.
Training Aemond Targaryen on Stable Diffusion 1.5
Training Sandman on Stable Diffusion 2.1

Sidenote: AI art tools are developing so fast it’s hard to keep up.
We set up a newsletter called tl;dr AI News.
In this newsletter we distill the information that’s most valuable to you into a quick read to save you time. We cover the latest news and tutorials in the AI art world on a daily basis, so that you can stay up-to-date with the latest developments.
Check tl;dr AI NewsUse DreamBooth to Fine-Tune Stable Diffusion in Google Colab
Prepare Images
Choosing Images
When choosing images, it’s recommended to keep the following in mind to get the best results:
- Upload a variety of images of your subject. If you’re uploading images of a person, try something like 70% close-ups, 20% from the chest up, 10% full body, so Stable Diffusion also gets some idea of the rest of the subject and not only the face.
- Try to change things up as much as possible in each picture. This means:
- Varying the body pose
- Taking pictures on different days, in different lighting conditions, and with different backgrounds
- Showing a variety of expressions and emotions
- When generating new images, whatever you capture will be over-represented. For example, if you take multiple pictures with the same green field behind you, it’s likely that the generated images of you will also contain the green field, even if you want a dystopic background. This can apply to anything, like jewelry, clothes, or even people in the background. If you want to avoid seeing that element in your generated image, make sure not to repeat it in every shot. On the other hand, if you want it in the generated images, make sure it’s in your pictures more often.
- It’s recommended that you provide 10 images of what you’d like to train Stable Diffusion on to get great results when training on faces.
- A note on training multiple subjects:
- Training multiple subjects of the same gender on the same model is very likely to lead to blending between them. You may notice Sandman having one eye a bit different, which he “inherits” from Aemond’s eyepatch.
- To mitigate the blending of multiple subjects, the author of the notebook (TheLastBen) recommended using UNet_Learning_Rate: 2e-6 instead of the default 5e-6. However, he recommends training a subject on a separate model to get the best results.
Resize & Crop to 512 x 512px
Once you’ve chosen your images, you should prepare them.
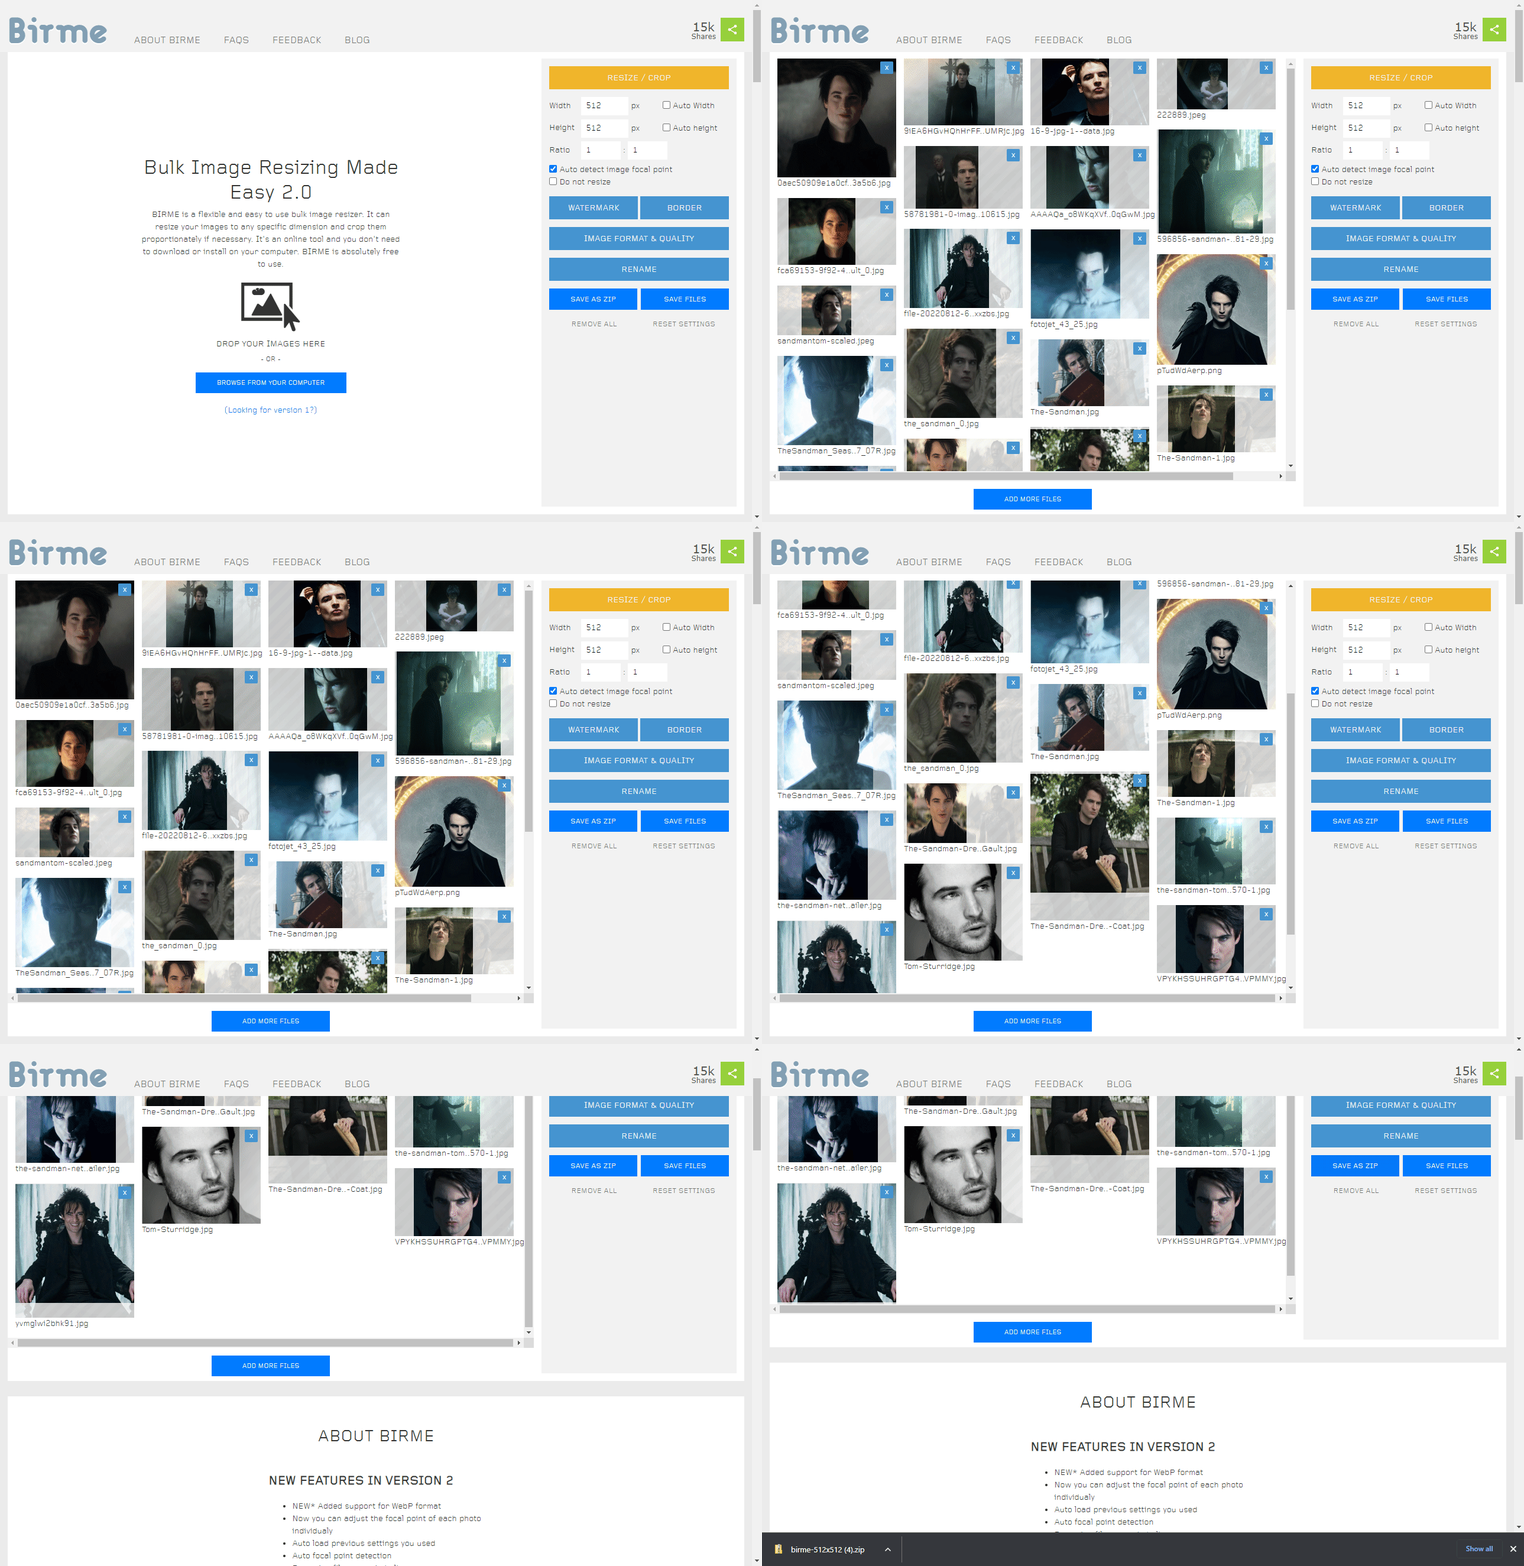
First, we need to resize and crop our images to be 512 x 512px. We can easily do this using the website https://birme.net.
To do this, just:
- Visit the website
- Upload your images
- Set your dimensions to
512 x 512px - Adjust the cropping area to center your subject
- Click on
Save as Zipto download the archive. - You can then unzip it on your computer, and we’ll use them a bit later.
Renaming Your Images
We’ll also want to rename our images to contain the subject’s name:
- Firstly, the subject name should be one unique/random/unknown keyword. This is because Stable Diffusion also has some knowledge of The Sandman from other sources other than the one played by Tom Sturridge, and we don’t want it to get confused and make a combination of interpretations of The Sandman. As such, I’ll call it
Sandman2022to make sure it’s unique. - Renaming images to subject (1), subject (2) .. subject (30). This is because, using this method, you can train multiple subjects at once. If you want to fine-tune Stable Diffusion with Sandman, your friend Kevin, and your cat, you can give it prepared images for each of them. For the Sandman, you’d have Sandman2022 (1), Sandman2022 (2) … Sandman (30), for Kevin, you’d have KevinKevinson2022 (1), KevinKevinson2022 (2) … KevinKevinson (30), and for your cat you’d have DexterTheCat (1), DexterTheCat (2) … DexterTheCat(30).
Here’s me renaming my images for Sandman2022 in bulk on Windows. Just select them all, right-click one of them and click Rename and give it what name you want, and click anywhere to finish the renaming. Everything else will be renamed as well.
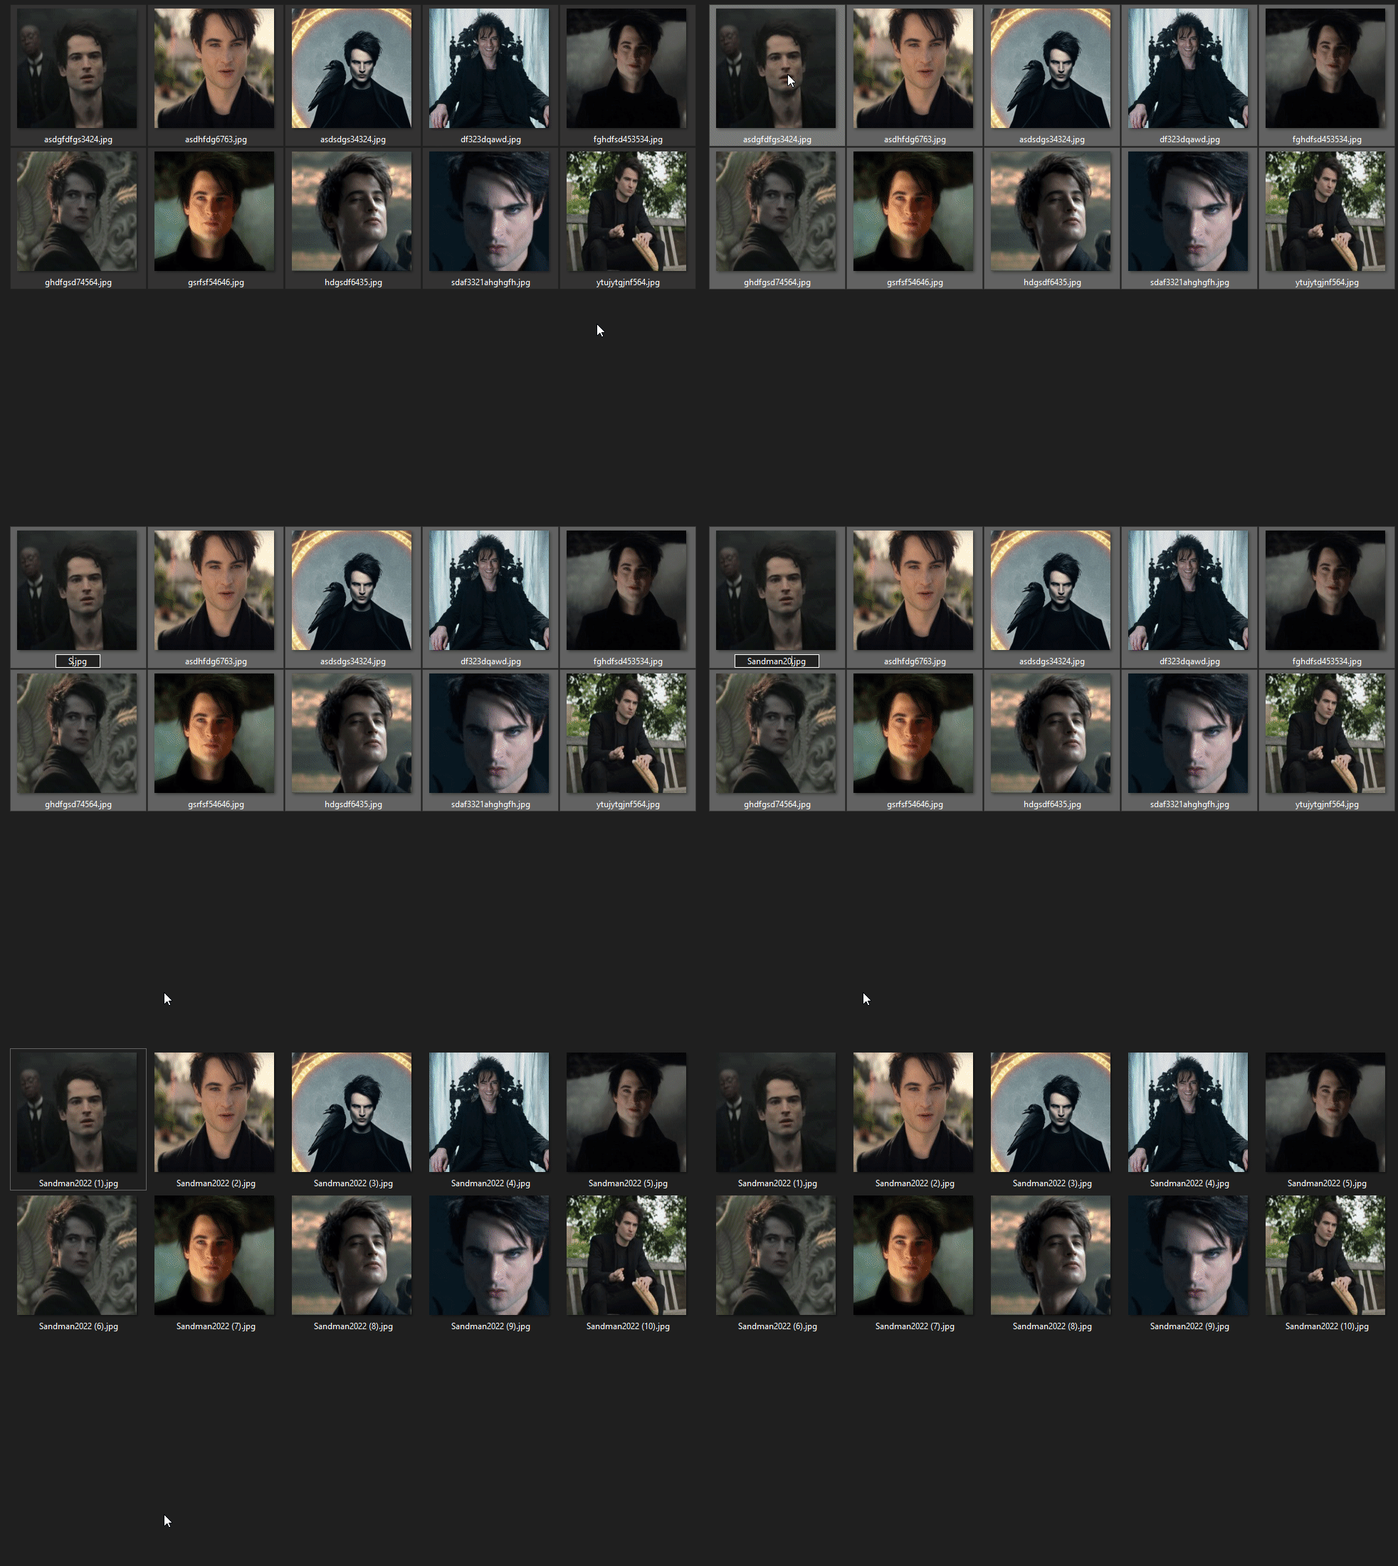
When it’s time to upload my images to DreamBooth, I’ll want to train it for Sandman2022 and AemondHoD, and this is how my images will look like:
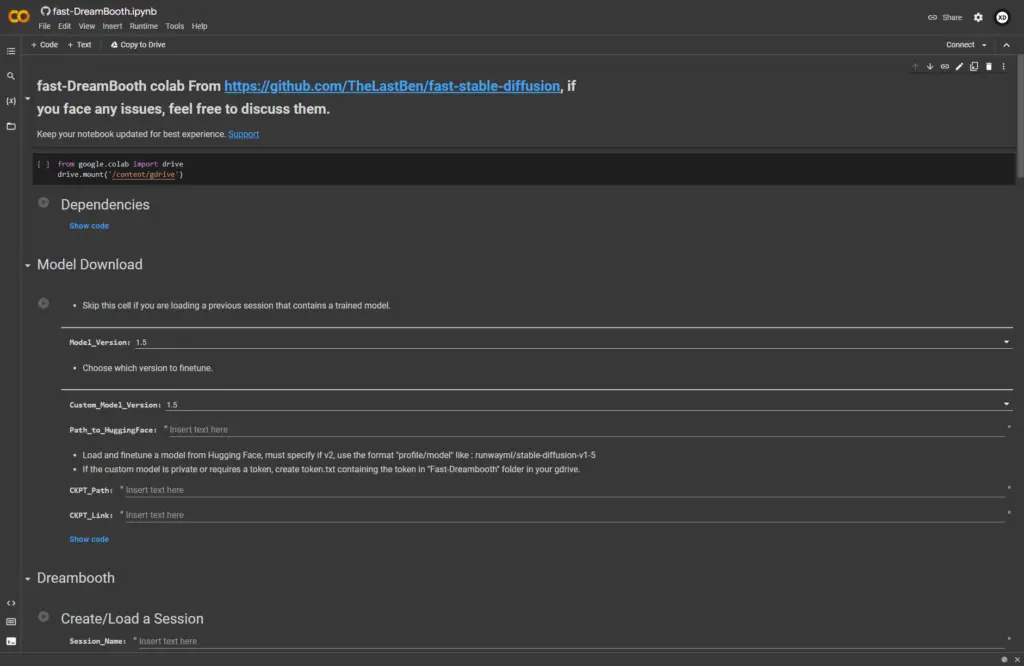
Open Fast Stable Diffusion DreamBooth Notebook in Google Colab
Next, we’ll open the Fast Stable Diffusion DreamBooth Colab notebook: https://colab.research.google.com/github/TheLastBen/fast-stable-diffusion/blob/main/fast-DreamBooth.ipynb
Enable GPU
Before running the notebook, we’ll first have to make sure Google Colab is using a GPU. This is because GPUs can process much more data than CPUs and allows you to train our machine learning models faster.
To do this:
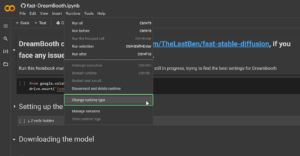
- In the menu, go to
Runtime > Change runtime type.
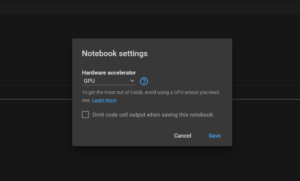
Runtime > Change runtime type - A small popup will appear. Under the Hardware accelerator, make sure you have selected GPU. Click
Savewhen you’re done.
Hardware Accelerator > GPU
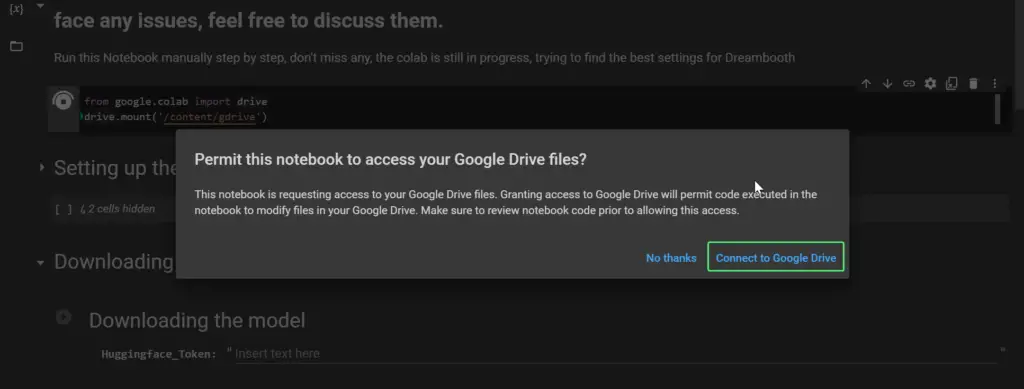
Run First Cell to Connect Google Drive
By running the first cell, we’ll start connecting our notebook to Google Drive so we can save all of our files in it – this includes the Stable Diffusion DreamBooth files, our fine-tuned models, and our generated images.
After running the first cell, we’ll see a popup asking us if we really want to Connect to Google Drive.
After we click it, we’ll see another popup where we can select the account we want to connect with and then allow Google Colab some permissions to our Google Drive.
Run the Second Cell to Install Dependencies
Next, just run the second cell. There’s nothing for us to do there except wait for it to finish.

Run the Third Cell to Download Stable Diffusion
Next, we’ll want to download our Stable Diffusion model. This is the base model that we’ll train. You’ll notice that there are 3 default models available when clicking the Model_Version dropdown:
1.5: This is still the most popular model. It knows many artists and styles and is the easiest to play with. Most custom models you’ll find are still trained on 1.5 at the time of writing.V2.1-512px: V2.1 is the latest base model available. It excels at photorealism, but it’s more difficult to use, and it’s had a lot of artists and NSFW content taken out. If you know how to use it, you can get some excellent results. 512px means that it can generate 512px images, which you can then upscale to a higher resolution. I recommend checking out this Reddit thread discussing 2.1 vs 1.5 to get a better idea of the differences between them.V2.1-768px: This is similar to theV2.1-512px, however, it can generate 768px images. This means that they’ll have more detail than 512px ones. This will require more RAM, however. (This model hasn’t worked for me on Google Colab free)
If you just want the base model, just select one of the versions from the dropdown and run the cell.
If you want a custom model, then you’ll need to choose the custom model version and provide the path to it.
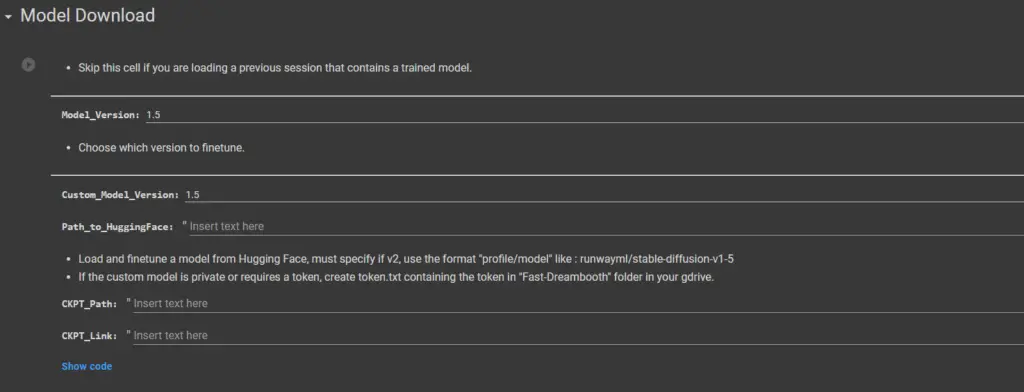
Custom Models:
-
- Custom_Model_Version: Custom models are also trained from base models. For the notebook to know the algorithm to use when training the model later on, it will need the model version it’s trained on (
1.5,V2.1-512px,V2.1-768px). Make sure to get this right. - Path_to_HuggingFace: If you want to load and train over a different model from Hugging Face than the default one, you can provide the path to it. For example, if you want to train Stable Diffusion to generate pictures of your face but in Elden Ring style, you could get this already fine-tuned model https://huggingface.co/nitrosocke/elden-ring-diffusion. The path you should provide is what comes after huggingface.co. In our case, that’s
nitrosocke/elden-ring-diffusion - CKPT_Path or CKPT_Link: If you already have an existing Stable Diffusion model that you’d like to fine-tune, you can provide the path to it in
CKPT_Pathinstead of the HuggingFace Token. Alternatively, if you have a Stable Diffusion model, whether it’s a link to any online.ckptfile or if it’s a shareable Google Drive Link, you can input it in theCKPT_Linkfield.
- Custom_Model_Version: Custom models are also trained from base models. For the notebook to know the algorithm to use when training the model later on, it will need the model version it’s trained on (
Setting Up Dreambooth
We can now get to setting up DreamBooth.
Here, we’ll input our Session_Name. This will be the name of the trained model that we’ll save. This is where you’ll input previous sessions to load them, should you want to fine-tune them further. It can be anything you want.
Important: Don’t use spaces in the session name. Instead, use _ or -.
Run the cell after you input the session name.
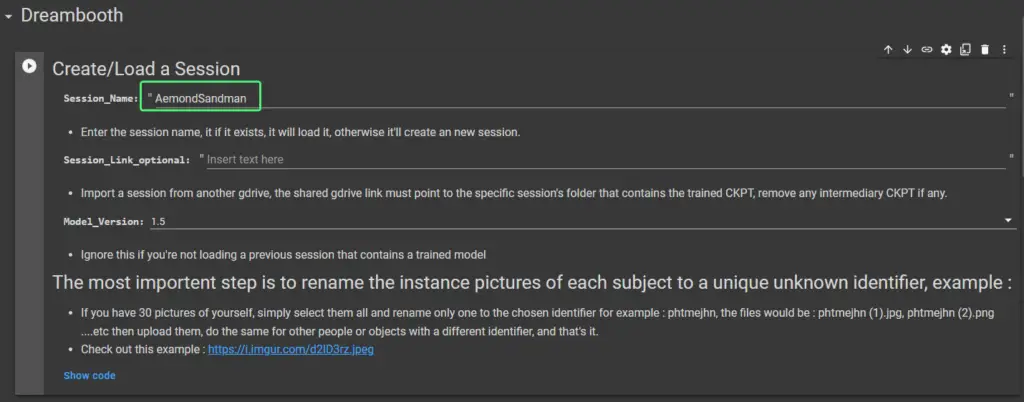
Notes:
- Session_Name: This will be the name of your session and of your final model. You can name it anything. If you provide a name that doesn’t exist it will create a new session and if you use a name of a session that already exists in your Google Drive in
My Drive > Fast-DreamBooth > Sessionsthen it will ask you whether you want to overwrite it or resume training it. - Session_Link_optional: Instead of providing the Session_Name you can provide the path to the session. For example, the path to mine will be
/content/gdrive/MyDrive/Fast-Dreambooth/Sessions/Aemond_Sandman. - Model_Version: If you’re loading a previous session with a trained model, then select the Stable Diffusion version of that model.
Upload Your Instance Images
Next, you’ll see the Instance Images cell. This is where we upload our images.
If you run it Choose Files button will appear, allowing you to upload images.
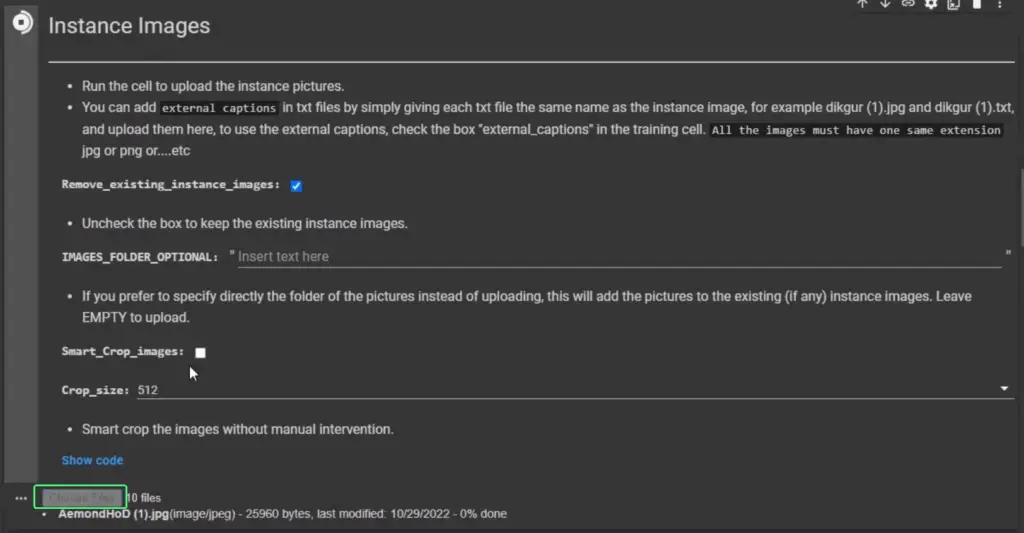
Additional Options:
Remove_existing_instance_images: If you already uploaded some images but want to remove them to run the cell and upload other images again, then that’s whatRemove_existing_instance_imagesis for. If you want to keep the previously uploaded images, then uncheck that box.IMAGES_FOLDER_OPTIONAL: If you have a folder on your Google Drive that already contains your images, then just provide the path to it and then run the cell, instead of uploading the images from your computer.Crop_images: Check this if you haven’t already cropped them yourself. They’ll be cropped in squares, and you can set the crop size yourself. It’s left to 512 by default because 512 x 512 px is the usual image dimension used.
Start DreamBooth
Finally, we can run DreamBooth. We have a few configurations here.
The Training_Steps are what we care most about.
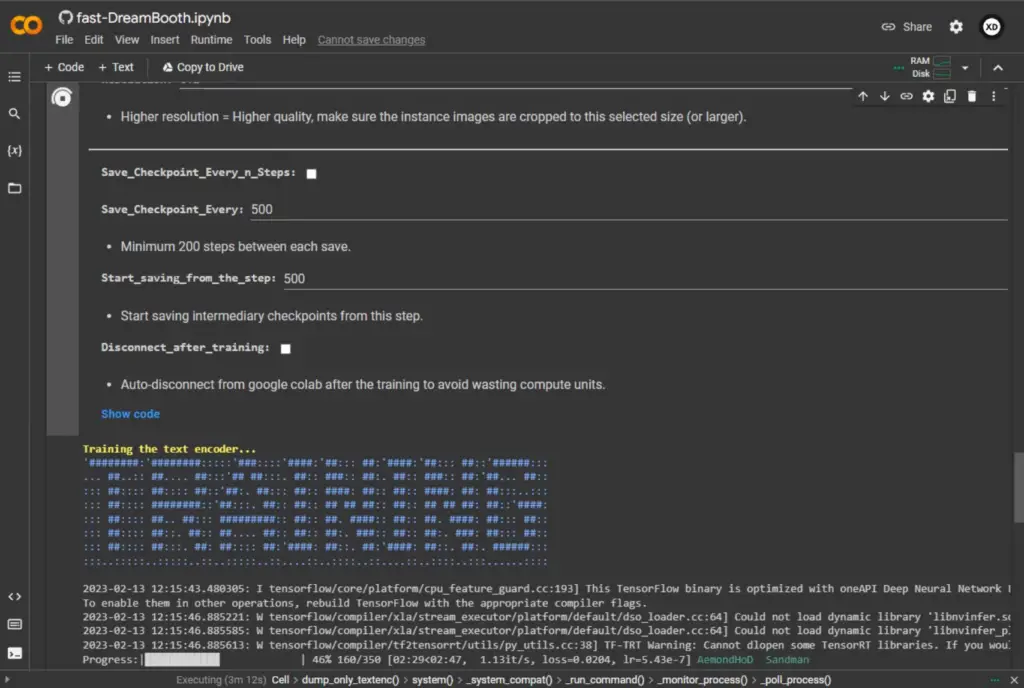
Training_Steps: The most important thing we can do here is set the training steps. We’ll want to set the total number of images we’ve uploaded multiplied by 100. I uploaded 10 images of Aemond and 10 images of the Sandman, so that’s a total of 20 * 100 = 2000. So that’s 2000 steps. If the model isn’t good enough, you can pick up where you left off and further train it.
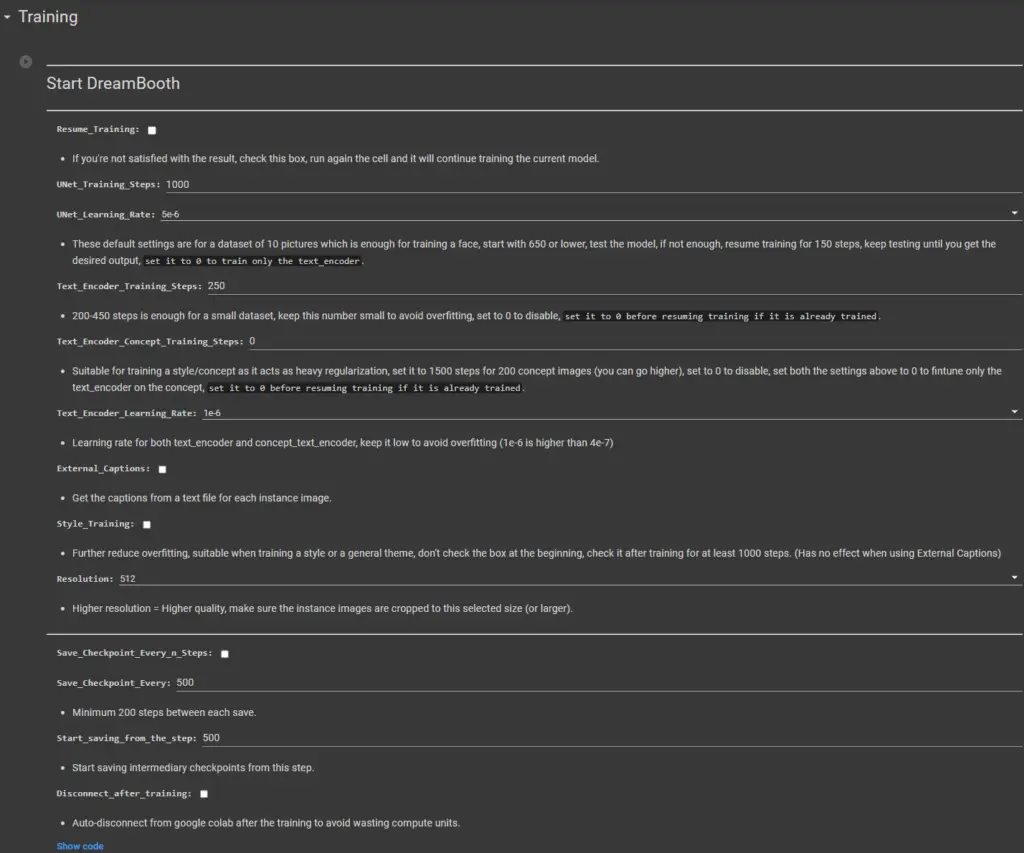
You most likely won’t have to touch these options if this is your first time, but we’ll still explain them just in case:
Resume_Training: You’ll check this box if you want to continue training the model after you’ve tested it.UNet_Training_Steps: These are the training steps (also referred to as iterations or epochs) that the model undergoes during the training process. Each step involves passing images through the model, computing the loss, and updating the model’s weights to improve its performance.UNetis a popular neural network architecture that Stable Diffusion uses to identify the different components within an image. A neural network architecture is like the blueprint that tells the computer how to connect all its different parts so it can learn how to draw the lines correctly.
UNet_Learning_Rate: The learning rate is how quickly a model learns. More on learning rate below.Text_Encoder_Training_Steps: The training steps for the text encoder. More on what the text encoder is.Text_Encoder_Concept_Training_Steps: This is if you’re using concept images. Read about what concept images are below.Text_Encoder_Learning_Rate: The learning rate for the text encoder. More on the learning rate below.External_Captions: To use external captions for images just write a.txtfile with the same name as the corresponding image, and upload the.txtfiles along with the images. Read here about captions here.Style_Training: This is for when you’re training styles. I’m not sure what different it makes yet. Will update when I do.Resolution: The resolution of the images you’re training the model on. I have only tested with 512px.Save_Checkpoint_Every_n_Steps: This option enables you to save the fine-tuned model at different points during the training. This is useful if you suspect that the number of steps you’ve set is too many, and it will overtrain Stable Diffusion. Overtraining is where the model will end up generating almost exactly the pictures you gave it, which means it won’t generate original work.Save_Checkpoint_Every: the model will save the model each X steps you set. If you set it to500it will save it at500, then1000, then1500and so on.Start_saving_from_step: this is the minimum amount of steps from which DreamBooth will start to save the model.
Disconnect_after_training: You may want to leave it to train the model and forget about it. Google Colab free might not let you use a GPU for the rest of the day if you use it for too long, and Colab Pro uses up units. If you know you won’t be around when it’s done training, then best check this box.
Finally, you can run the cell when you’re done with the options.
This can take a while. In my case, 2000 steps took about 35 minutes with Google Colab free, using an Nvidia Tesla T4 GPU and decreased learning rate. If you’re training only one subject with default settings, then it should take you about 15-20 minutes.
Where Your New Model is Stored
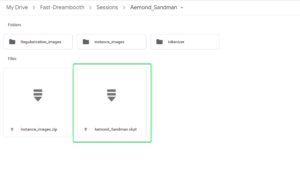
When it’s done, you should find your model in your Google Drive. For example, here’s where Aemond_Sandman.ckpt was saved with default output folder settings. This should be My Drive > Fast-DreamBooth > Sessions > Your_Session_Name.
Test the Trained Model (with Stable Diffusion WebUI by AUTOMATIC1111)
After the training cell has finished running, we can test our new fine-tuned Stable Diffusion model.
This notebook comes with Stable Diffusion WebUI by AUTOMATIC1111, which is the most popular implementation of Stable Diffusion, and offers us a very convenient web user interface.
We have a few options:
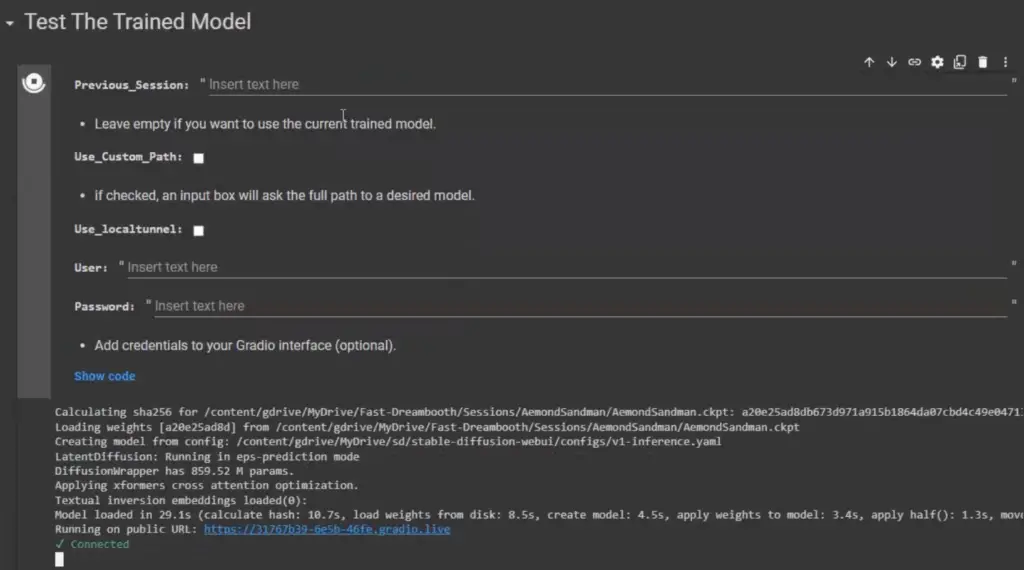
- If you have just fine-tuned Stable Diffusion for the first time (this is us, most likely) and want to test your newly created model, then just run the Test the trained model cell. No need to fill out anything.
Previous_Session: If you have previously fine-tuned a different Stable Diffusion model that you want to test, then insert thePrevious_Session. Since I’m assuming this is our first time, you can leave this empty.Use_Custom_Path: If you have a model you want to load that’s in some folder in your Google Drive, then checkUse_Custom_Path, and after you run the cell, you’ll see a field to provide the path to your model.- You can leave
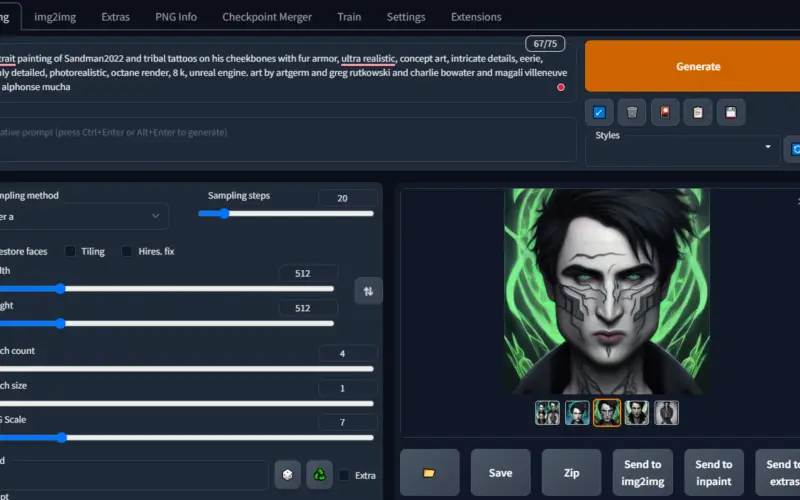
Use_localtunnelunchecked. This is how our link will be generated for us to access the Stable Diffusion WebUI. When unchecked, it uses the servers of Gradio.app to generate a URL, as you see in the screenshot above. If it’s checked, then it uses a service called localtunnel. We have both these options available in case one of them doesn’t work.
When you run the cell, it will take about 5 minutes for Stable Diffusion WebUI to be ready to use. When it’s done, you’ll see some URLs like https://31767n39-6e5b-46fe.gradio.live when Use_localtunnel is left unchecked, and https://fancy-spies-punch-34-150-175-108.loca.lt when leaving it’s checked.
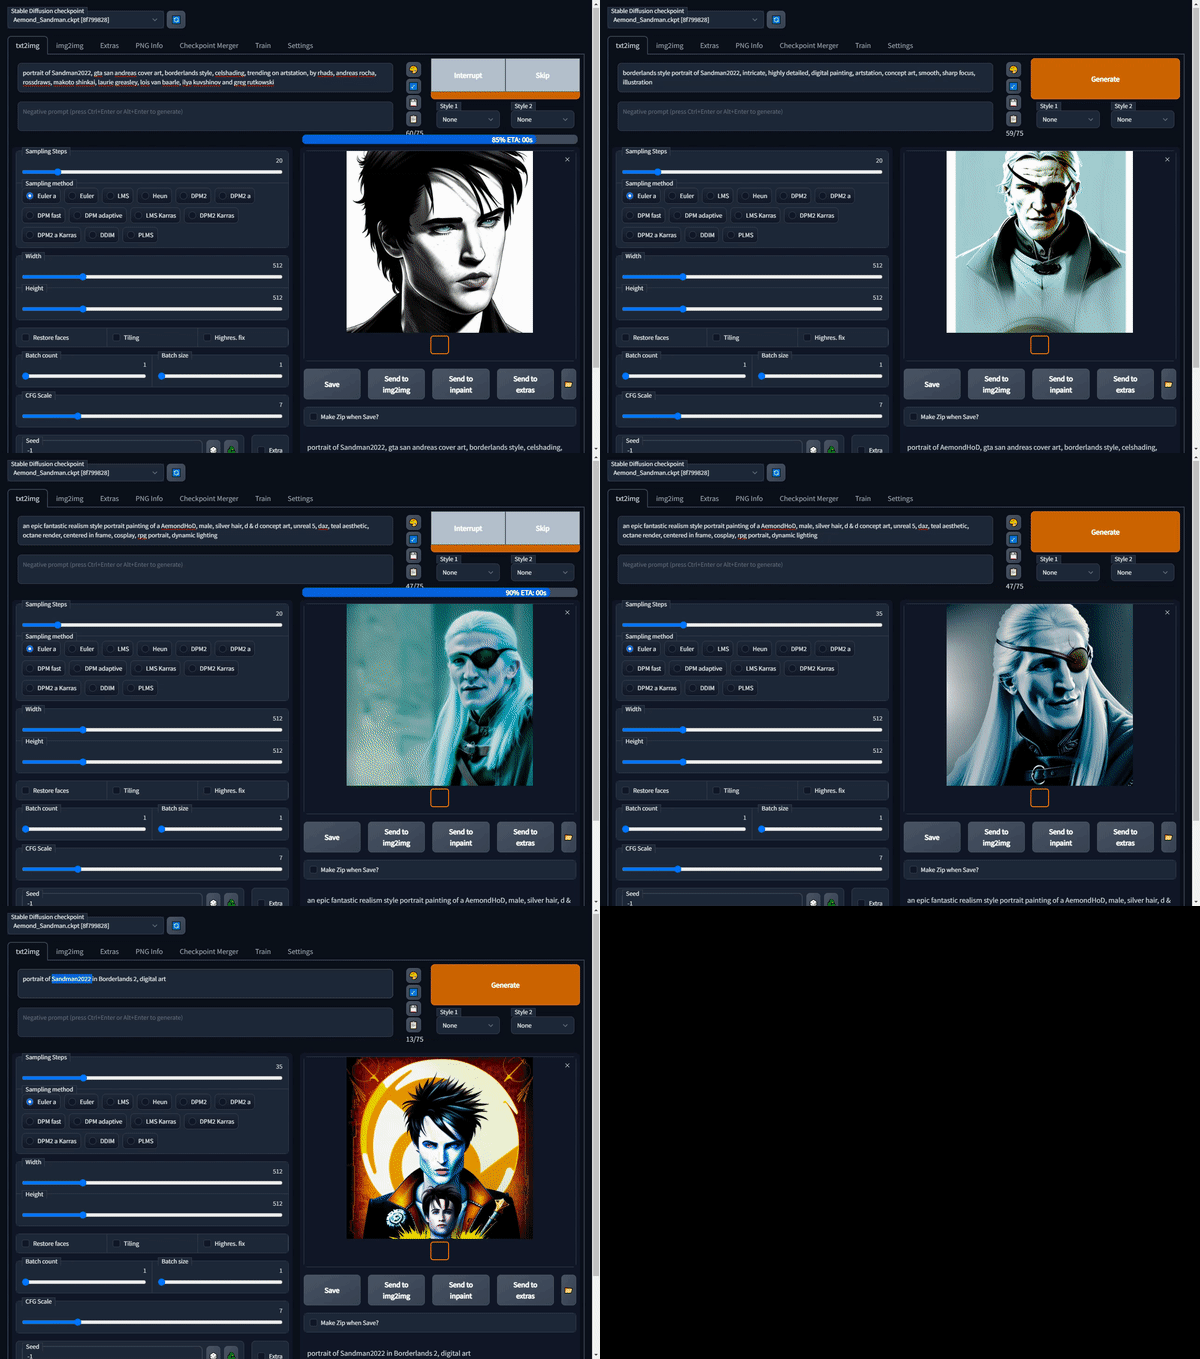
Click it, and then you can start using Stable Diffusion to generate our images. The user interface will open in a new tab, and you can start generating images right away.
Where Generated Images Are Stored
Images are stored by default in your Google Drive in My Drive > sd > stable-diffusion > outputs > txt2img-images.
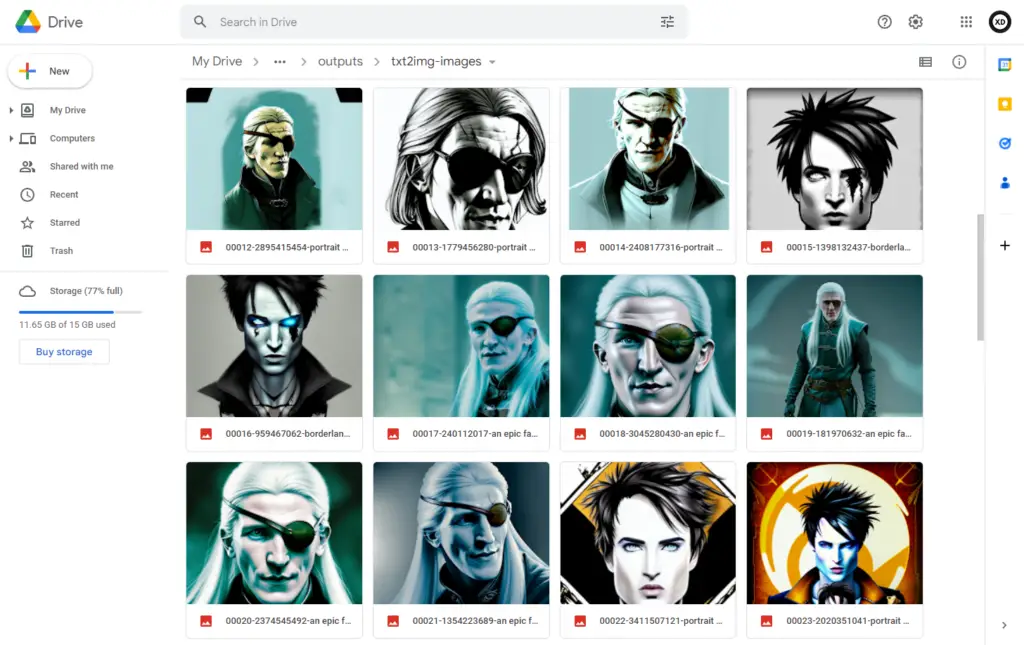
Upload Your Trained Model to Hugging Face
You can also upload your trained model to Hugging Face, to the public library or just have it privately in your account. You can change it to public later on.
To do this, you’ll have to use a Hugging Face token that has WRITE role. Simply create a token and set the role to WRITE.
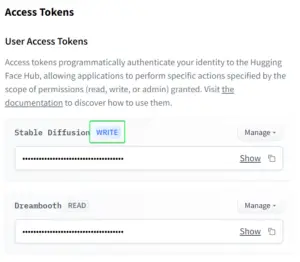
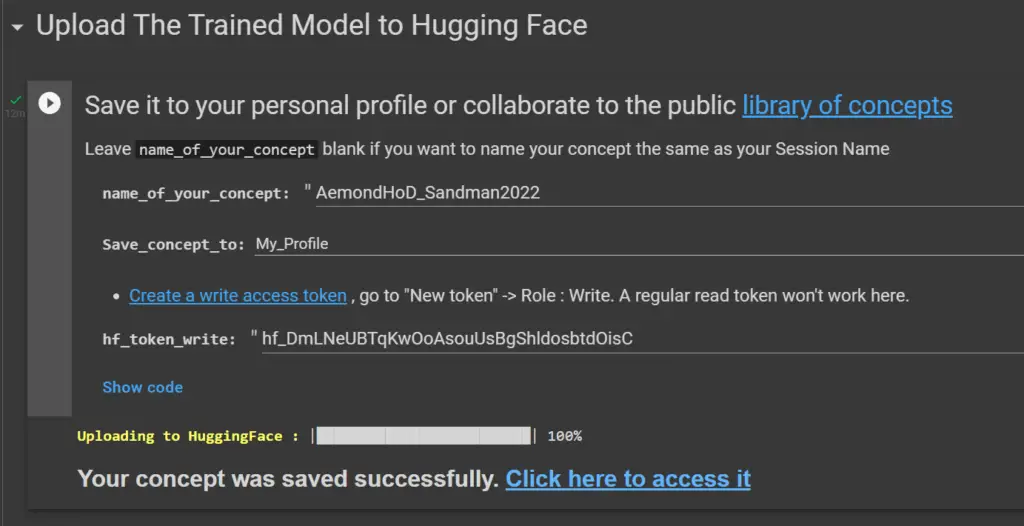
In the Upload The Trained Model to Hugging Face cell, you’ll have the following:
- name_of_your_concept: This will be the name of the model you upload, and it will show up in your URL as well. For example, https://huggingface.co/ByteXD/aemondhod-sandman2022.
- Save_concept_to: You can select between your profile (by default, it will be set to private) or the public library.
- hf_token_write: This is your Hugging Face token. Make sure it has its’ role set to WRITE.
Run the cell when you’re done. It will take ~10-15 minutes to finish uploading. When it’s done, it will output a link to where you can access your newly uploaded model.
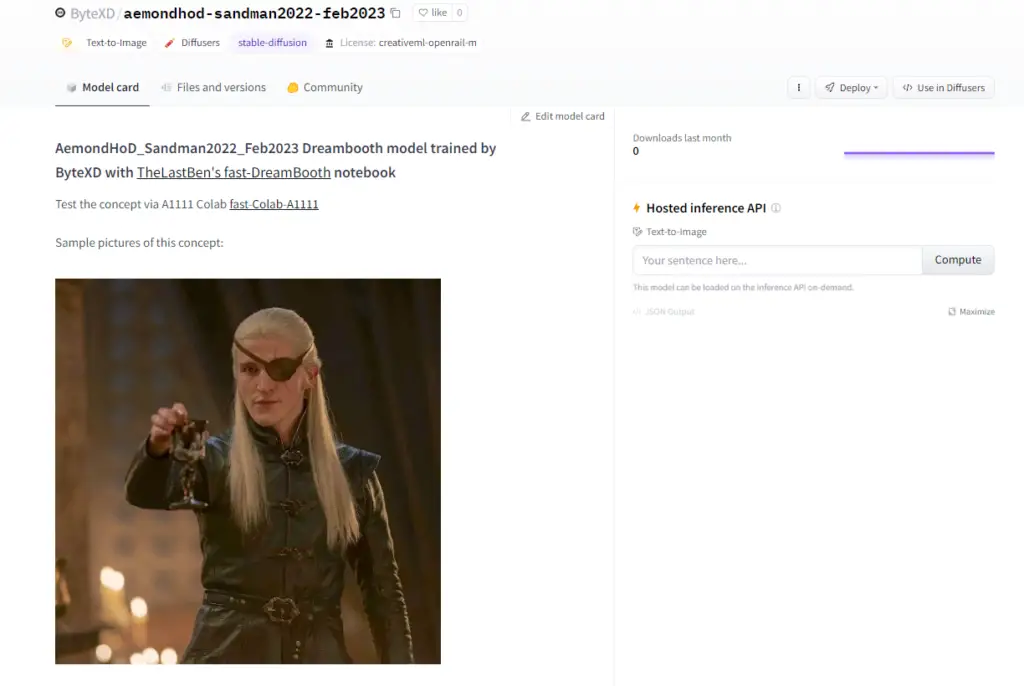
This is what it looks like: https://huggingface.co/ByteXD/aemondhod-sandman2022-feb2023. To make it publicly accessible, go in the model’s settings section and click on Make this model public.
FAQ
What is a .ckpt file?
The .ckpt file extension is commonly used for checkpoint files, and the file is also referred to as the weights of the model. Although not exactly accurate, we can think of it as the model file. Checkpoint files are used to save the state of a program or process at a particular point in time.
What is the learning rate, and how does it affect generated images?
The “learning rate” is a tuning parameter that determines how quickly a model learns from the data during training.
Imagine you are trying to learn a new skill, such as playing the piano. If you practice too slowly, you may not make much progress, and it may take a long time to learn. On the other hand, if you practice too quickly, you may make mistakes and not really learn the skill well. The learning rate in machine learning is similar – it controls how quickly the model learns from the data.
A high learning rate means that the model will learn more quickly from the data, but it may also make more mistakes and not learn the best representation of the data. Conversely, a low learning rate means that the model will learn more slowly but may be more accurate in the long run.
A lower learning rate is not always better. In some cases, it may be better to have a higher learning rate and more steps, for example.
To find the best learning rate for UNet and text encoder, I recommend checking what others are saying from their experiments or experimenting yourself.
What is the text encoder in DreamBooth?
What are concept images in DreamBooth?
Prior preservation loss proved as a weak method for regularizing stability’s model, I implemented concept images to replace class images, and they act as heavy regularization. They force the text encoder to widen its range of diversity after getting narrowed by the instance images.
Example: you use 10 instance pictures of a specific car in a garage using the identifier “crrrr“, without concept images. At inference, most of the output when you use the term “crrrr” or even car will be a car inside a garage, because the terms car and garage are overwritten by the embeddings from the instance images when training the text encoder.
Now you start over with the same instance images, but this time you add 200 concept images of different cars in different places, you set the text_encoder_concept_steps to 1500 steps, and now the text encoder receives more information about the token “car” and able to put it in different situations. At inference you will get relatively diverse situations for the car whilst keeping the same characteristics of the trained car.
TL;DR: Concept images are like class images but during training, they are treated as instance images without including the identifier and trained only to the text encoder to help with diversity and variety.
The filename doesn’t matter for concept images or the resolution. All that matters is the content of the image.
Troubleshooting
In this section, we’ll address some common errors.
ModuleNotFoundError: No module named ‘modules.hypernetworks’
As of writing this, this error should be fixed. If you’re encountering it then we’ll want to do a clean run of the DreamBooth notebook. To do this:
- Delete your
sdfolder in your Google Drive, located atMy Drive > sd.- Important – Back Up Previously Generated Images: If you previously generated images, back them up. They are located in
My Drive > sd > stable-diffusion > outputs. They’ll be deleted if you don’t back them up.
- Important – Back Up Previously Generated Images: If you previously generated images, back them up. They are located in
- Then make sure you’re running the latest Colab notebook (in case you were running one saved to your Google Drive) https://colab.research.google.com/github/TheLastBen/fast-stable-diffusion/blob/main/fast-DreamBooth.ipynb.
That’s it. Now it should work. We just had to do a fresh run of the DreamBooth notebook without the previously stored files.
Next, if you were interrupted before getting to train your model, you can continue with the instructions below.
ImportError: cannot import name ‘VectorQuantizer2’
To fix this:
- Run the following command in any cell:
!pip install taming-transformers-rom1504
- Then restart the runtime by going in the menu to
Runtime > Restart runtime. - Now, if you run everything again, it should work.
Next, if you have already fine-tuned your model, to get back to testing it quickly, follow the instructions below.
If You Just Trained a Model but Didn’t Get to Test It Because of an Error
If you got an error in the last cell Test the trained model , fixed it, and now restarted the notebook, you don’t have to go through the training again.
- Just run the first two cells (
Connect to Google DriveandSetting up the environment) - After that’s done, go to the
Test the trained modelcell and just insert yourINSTANCE_NAMEfrom earlier (Sandman2022 in my case) orUse_Custom_Path(if you have it somewhere else other thanMy Drive), and run the cell and it should work. When you trained the model earlier, it got saved in your Google Drive, so now the notebook will just load your fine-tuned Stable Diffusion model.
Conclusion
In this tutorial, we covered how to fine-tune Stable Diffusion using DreamBooth via Google Colab for free to generate our own unique image styles. We hope this tutorial helped you break the ice in fine-tuning Stable Diffusion.
If you encounter any issues or have any questions, please feel free to leave a comment, and we’ll get back to you as soon as possible.
Very Useful Resources
- A Discord Server for Stable Diffusion DreamBooth – This is a Discord community dedicated to experimenting with DreamBooth. It can be of great help in better understanding how to use DreamBooth to get desired results, such as how to better design prompts and other troubleshooting tips, so I highly recommend it! Also, fun fact: one of the moderators is Joe Penna (Mystery Guitar Man), who many might know from his very popular YouTube channel years ago.
- Lexica.art, OpenArt.ai, Krea.ai – these are search engines for Stable Diffusion prompts, along with their resulting images. They are fantastic for inspiration, and you can easily get some great results by using them.
- Civitai.com – this is a hub where you can find/share Stable Diffusion models.
- The Wiki for AUTOMATIC1111’s Stable Diffusion WebUI – The web interface we’re using when generating images has many features, as you might have seen. This wiki is the documentation for all those features, and it gives us a great overview of how to use the interface. I highly recommend you check it out.






Thank you very much for this
Hi! Thank you for your feedback! Glad to help!
getting this error when running “test the trained model”. it was working yesterday
Traceback (most recent call last):
File “/content/gdrive/MyDrive/sd/stable-diffusion-webui/webui.py”, line 32, in <module>
import modules.hypernetworks.hypernetwork
ModuleNotFoundError: No module named ‘modules.hypernetworks’
Hi Dave. Thank you for pointing this out. I’m looking into it and will get back to you with a solution.
Hi Dave. Turns out this has been fixed. I’ve added a short section on this. First to fix the error. And then to pick up where you left off to get straight to testing the model.
Let me know if this works? Thank you!
I only have a 3080 10 GB can I run this? The other options don’t work for me because I have very little space on my C: drive and can’t install WSL and python and all these other choices. It doesn’t seem to say what the system requirements are here and seems to work magically from your example.
Hi. Thanks for commenting. This tutorial is for using it on Google Colab, which is in the cloud, so you don’t have to have strong hardware. I haven’t tried it out on my local PC. You just go here https://colab.research.google.com/github/TheLastBen/fast-stable-diffusion/blob/main/fast-DreamBooth.ipynb, and it will be like you’re using Google Docs, but for Python.
Let me know if that helps? Thank you!
How can I continue training a ckpt file I already created?
Where would I put it or transform it into the files I need?
(In the collab)
thank you!
Hey there. At the end of the training, I get an error. It simply says “something went wrong’
Here’s the last few lines of code: Any idea what might have went wrong and how to fix it?
Hey there. At the end of the training, I get an error. It simply says “something went wrong’
Here’s the last few lines of code:File “/usr/local/lib/python3.7/dist-packages/accelerate/commands/launch.py”, line 354, in simple_launcher
raise subprocess.CalledProcessError(returncode=process.returncode, cmd=cmd)
subprocess.CalledProcessError: Command ‘[‘/usr/bin/python3’, ‘/content/diffusers/examples/dreambooth/train_dreambooth.py’, ‘–train_text_encoder’, ‘–pretrained_model_name_or_path=/content/stable-diffusion-v1-5’, ‘–instance_data_dir=/content/data/SteveJP’, ‘–class_data_dir=/content/data/Man’, ‘–output_dir=/content/models/SteveJP’, ‘–with_prior_preservation’, ‘–prior_loss_weight=1.0’, ‘–instance_prompt=photo of SteveJP Man’, ‘–class_prompt=a photo of a Man, ultra detailed’, ‘–seed=45576’, ‘–resolution=512’, ‘–mixed_precision=no’, ‘–train_batch_size=1’, ‘–gradient_accumulation_steps=1’, ‘–gradient_checkpointing’, ‘–use_8bit_adam’, ‘–learning_rate=2e-6’, ‘–lr_scheduler=constant’, ‘–lr_warmup_steps=0’, ‘–center_crop’, ‘–max_train_steps=1500’, ‘–num_class_images=200′]’ returned non-zero exit status 1.
Something went wrong
Hi. Apologies for the delay. Did you manage to fix this in the meantime?
Hi, I have the same problem
Same problem here
Hello. Thanks for commenting.
Does it happen after it finishes training, or you run the cell, it does a few things, and then you get this error?
Same problem here, it happens just after clicking “run”
Hi, I’m trying to test a previously trained model, but keep getting the error: ImportError: cannot import name ‘script_callbacks’ from ‘modules’ (unknown location)
Hi. I haven’t encountered this error so far and tested the latest notebook recently.
When I get an error I check “Update repository” so it updates to the latest version before running the Stable Diffusion WebUI. Have you tried that by any chance or did you fix the issue in the meantime?
Hi. Great article, thank you.
How to bypass the error “ImportError: cannot import name ‘script_callbacks’ from ‘modules’ (unknown location)” when testing the trained model?
Hi. I haven’t encountered this error so far and tested the latest notebook recently.
When I get an error I check “Update repository” so it updates to the latest version before running the Stable Diffusion WebUI. Have you tried that by any chance or did you fix the issue in the meantime?
This probably will work. Now I have the issue that I cannot connect to a GPU backend due to usage limitations.
I can connect without GPU, but I suppose it won’t work, correct?
Yes, it won’t work without a GPU unfortunately.
figured it out, you have to check the box “update repo” to successfully run from drive
Nice! Glad to hear. Thanks for the update!
Hi Im a total newbe , I made my pictures, but where and how do I upload the images?
Hi. Thanks for commenting. I see the notebook was updated with a new method that I haven’t covered in the tutorial. I’ll update this today.
Regarding uploading images – a small button Choose Files should appear after you run the Instance Images cell.
You can either press it and then navigate to where you have your images and select them all.
Also, I see that you have to rename your pictures to something like
your_unique_keyword (1).jpg,your_unique_keyword (2).jpgetc. Then when you use stable diffusion you’d useyour_unique_keywordto describe who you have in your picture. In my case it’s Sandman2022.Please make sure you have your images renamed like that, replacing
your_unique_keywordwith your own keyword.If you have any more questions please let me know! Your feedback is really useful because I want the article to be easy to understand and not very beginner friendly.
I’m getting the following error with a saving regimen of every 500 steps starting at step 500. I’ve successfully trained models previously, so I don’t know what I’ve done:
Steps: 2% 499/27200 [08:09<7:14:05, 1.03it/s, loss=0.0131, lr=1.97e-6] SAVING CHECKPOINT: /content/gdrive/MyDrive/mustaf_mv_session_1_step_500.ckpt
Traceback (most recent call last):
File “/content/diffusers/examples/dreambooth/train_dreambooth.py”, line 733, in <module>
main()
File “/content/diffusers/examples/dreambooth/train_dreambooth.py”, line 701, in main
if args.train_text_encoder and os.path.exists(frz_dir):
UnboundLocalError: local variable ‘frz_dir’ referenced before assignment
Steps: 2% 499/27200 [08:38<7:42:06, 1.04s/it, loss=0.0131, lr=1.97e-6]
Traceback (most recent call last):
File “/usr/local/bin/accelerate”, line 8, in <module>
sys.exit(main())
File “/usr/local/lib/python3.7/dist-packages/accelerate/commands/accelerate_cli.py”, line 43, in main
args.func(args)
File “/usr/local/lib/python3.7/dist-packages/accelerate/commands/launch.py”, line 837, in launch_command
simple_launcher(args)
File “/usr/local/lib/python3.7/dist-packages/accelerate/commands/launch.py”, line 354, in simple_launcher
raise subprocess.CalledProcessError(returncode=process.returncode, cmd=cmd)
subprocess.CalledProcessError: Command ‘[‘/usr/bin/python3’, ‘/content/diffusers/examples/dreambooth/train_dreambooth.py’, ‘–image_captions_filename’, ‘–train_text_encoder’, ‘–save_starting_step=500’, ‘–stop_text_encoder_training=2720’, ‘–save_n_steps=500’, ‘–pretrained_model_name_or_path=/content/stable-diffusion-v1-5’, ‘–instance_data_dir=/content/gdrive/MyDrive/Fast-Dreambooth/Sessions/mustaf_mv_session_1/instance_images’, ‘–output_dir=/content/models/mustaf_mv_session_1’, ‘–instance_prompt=’, ‘–seed=96576’, ‘–resolution=512’, ‘–mixed_precision=fp16’, ‘–train_batch_size=1’, ‘–gradient_accumulation_steps=1’, ‘–use_8bit_adam’, ‘–learning_rate=2e-6’, ‘–lr_scheduler=polynomial’, ‘–center_crop’, ‘–lr_warmup_steps=0’, ‘–max_train_steps=27200′]’ returned non-zero exit status 1.
Something went wrong
Hello. Thank you for commenting and apologies for the delay. This seems to have been an issue that has been fixed on the day same day.
Hopefully you got it to work soon after posting this.
No the issue persists
I have trained two models and want to use them in checkpoint merger. But only one of them is in the list. What should I do to make both models appear in the list? Unfortunately in the video I did not understand how to do it. Thank you very much for your work.
It works just great. But how do I name the files if I want to teach SD not a face, but an artist’s style, which is not in the dataset?
Hello. Apologies for the delay in responding.
It has now been updated to give you an option to select whether your style “contains faces”.
I have just tested it by training it on magic steampunk cityscapes and called it aetherpunk_style and seems to work well https://imgur.com/a/8VL02QY
Hi
I’m getting this error when I try to test the model – everything up to this point seemed to work fine
“Warning: Taming Transformers not found at path /content/gdrive/MyDrive/sd/stable-diffusion/src/taming-transformers/taming”
Help!!!
Hi. Thanks for commenting. Can you run this in any cell and try testing it again after?
Thanks for your help, everything is working great now thanks, quick question, can you combine 2 different subjects in one image using this method? sandman and the other guy for example
Nice. Glad to hear. I hadn’t tested it until now. I’d say it works.
that looks awesome thanks!! I was thinking more along the lines of having both subjects in the same image, it just combines them when i try
Oh, I see now. Yes, I’ve had the same issue and haven’t found a solution for it yet.
I haven’t tried enough to get it right, so maybe there are some prompt and settings tweaking that could get it working, but I can’t say for sure.
yeah same, its inpredictable, sometimes you get a great image but for every great one there are maybe 6 bad. I’ve tried tips from different forums but you cant bank on it. If you have hours to kill you’ll get some good ones, occasionally
Hi, great tutorial. I got an error whe testing this with EMA version of the model. How that could be solved. Thanks.
Hello. I haven’t tried the EMA version of the model, however I can try it out. What is the error you’re getting?
Hi there! Big question.
Once I have my model ready and trained (I’m currently setting up a new one with over 100 pictures for reference), can I use my local stable diffusion webUI client with my custom model? If so, how?
I’m asking because, if I can, I’d rather leave the free space for someone who wants to use Collab for themselves.
Hi! Thanks for commenting. Yes you can. The model is a
.ckptfile that you can download to your computer.The model you just trained with DreamBooth should be located in
My Drive > Fast-DreamBooth > Sessions > MyTrainedModel(where MyTrainedModel is what you named it)Then, if you place it in your Stable Diffusion folder on your computer, it should work. The folder where the models are located is something like
stable-diffusion-webui > models > Stable-diffusion.Then when you’re running the Stable Diffusion WebUI you can select the model you want to use from the top left dropdown in the interface.
Let me know if it works or if you have any issues?
Thank you!
Hi,
I am able to download the Model (cpkt-file) from my G-Drive to my computer, but I do not have (or don’t find the Stable Diffusion folder on my computer (Mac).
And also, I don’t know how to get the local file in the StableDiffusion Web UI – the dropdown only contains a single entry and no way to link/open a local model…
Hi, thanks for commenting. I haven’t used Stable Diffusion on a Mac. Which one did you download? The one by AUTOMATIC1111?
This was probably a misunderstanding of mine. I thought you could use to local web-client also locally/without being connected to a runtime.
I have downloaded a Stable Diffusion Mac App from https://diffusionbee.com/download and it works quite nicely so far.
Oh, I see. I’m glad to hear it worked out!
hi, thanks for the guide. everything works. but I have encountered such a problem. after some time, the resulting web UI throws a 404 error. How can I fix it?
Hi. Thanks for commenting. I haven’t encountered this. Have you also tried checking the
Use_Gradio_Servercheckbox?Perhaps that won’t have 404 issues after a while.
Forgot to attach an image.
I didn’t check the box. I’ll try with him (as I understand it). Thanks for the answer
Thanks for this detailed guide!
I seem to struggle to train a subject with the latest version that has ‘Enable_text_encoder_training’ checkbox and a percentage value below.
I have tried repeatedly with different values for ‘Train_text_encoder_for’ ranging from 10 to 100 and I keep getting bad results.
I can’t tell whether I should train the model further (already trained for 3000 steps with 16 images).
The results either don’t look like the original subject or it’s impossible to stylize. In no case it is accurate.
Worth noting that I have previously managed to train 3 different models/subjects with 10-14 images each and the results were stellar!
Hi. I’m not very clear on the text encoder training either, but I was reading this article the other day https://huggingface.co/blog/dreambooth and it seems like also training the text encoder can make a big difference.
Not sure if this helps, but it’s good to know that it makes a difference.
Thanks guys!
Hi! Thanks for commenting! Glad to help!
Hi I run the “Downloading the model” then have error, how to fix??
Hi, can you run the following in any cell and try downloading it again?
hey, It’s work! can continue the following step
Nice! Glad to hear!
one more question: when the section off, reconnect will resume to default, need run again those step, can save to google driver?
like this, I have save each 500 step, but it can’t find previous setting
I believe you have to run everything again. And in the in the
Session_Nameyou have to put in the session name you previously used. Similar to loading a saved game.after finish the training will creat a .ckpt file, later can i load the file again to another account or for later test?
Hi, I already trained model, success load seccion, but can’t creat WebUI link, how to fix it?
Hi. Can you try again, but with
Use_Gradio_Serverchecked?Hi, now can load the webui, but have some different show in the picture, don’t have the progress bar and just run back to google.colab.
is that the This share link expires in 72 hours?
Hi Thanks very much for this tuto!
I got a problem when in the image upload step: when I select the images and click the upload button, I got an error “MessageError: RangeError: Maximum call stack size exceeded.” .
Do you have an idea how I can fix it?
Thanks in advance.
Jonathan Vaneyck
Hi, you go the the link https://birme.net and resize picture to 512 x 512px?
Yes I have used this website to resize all my pictures to 512×512 px. In addition, I have formatted the name as described in the tuto.
I have found the issue… it is the weight of the image. If the image exceeds 100 kb, I get the error. So by decreasing the weight, the upload succeed.
Thanks! >50kb in my case
i keep getting this issue when trying to start the Training any idea how to fix?
Hi Ethan. Apologies for the late reply. Did you manage to get this fixed?
sir I got the same error How do i fix this?
Hi. This is a awesome tutorial. Can you please make a tutorial on SD 2.0 with Google Colab in Automatic1111?
Hi, thank you for commenting. Will do as soon as a solution appears. Right now I see there are issues with just running regular image generation with AUTOMATIC1111 and SD 2.0 on Google Colab free.
I’ve kept looking for solutions since the SD 2.0 announcement. As soon as I find something I’ll leave a reply here and that should notify you.
Hi, thanks for the amazing tutorial!
I’m getting the following error when I try to run webui.py.
Any idea why?
I just run the entire notebook with no changes.
Can it be about the images?
Thanks!!
Hi. Apologies for the delay. I suspect that error only happened yesterday, after a certain update to the notebook. I think it should be fixed now. Did you manage to get it to work?
I am having the same error. And after the update, it still does not work. Do you know can I fix it? Thanks in advance
Me too!
Hi. Thanks for commenting. I fixed it by deleting the
sdfolder and running the cell again.If you have any models saved in the
/sd/stable-diffusion-webui/modelsdirectory, be sure to move them out ofsdfirst, and you can put them back later.Let me know if that works for you?
When deleting
sd(or disconnecting/reconnecting and refreshing the page) I’m now able to run the cell, but no option to run the server is presented. Instead I see the following:LatentDiffusion: Running in eps-prediction mode
DiffusionWrapper has 865.91 M params.
Downloading100% 3.94G/3.94G [01:37<00:00, 40.5MB/s]
^C
LatentDiffusion: Running in eps-prediction mode
DiffusionWrapper has 865.91 M params.
Downloading100% 3.94G/3.94G [01:37<00:00, 40.5MB/s]
^C
I now get this error when creating new sessions. I get the feeling TheLastBen is making lots of changes right now for SD2 🙂 https://github.com/TheLastBen/fast-stable-diffusion/commits/main
I see. That’s always a possibility I also keep in mind. I’ll try later and get back to you.
I’m getting the exact same thing. Tried twice, and happened both times just a few minutes ago. Are you also trying to use SD 2.0?
Yes SD 2.0. I tried 1.5 again to check, and got a different error (: Will try to recreate it so I can share here
I’m now following this to get to this colab notebook, but again when starting the gradio app I run the cell but nothing appears, see image below
I think this is a TheLastBen issue as it seemed to work fine a couple of days ago, and there have been no commits merged in AUTOMATIC’s repo in this time. So I’ve created an issues here https://github.com/TheLastBen/fast-stable-diffusion/issues/824
Ah there is another issue posted for this here https://github.com/TheLastBen/fast-stable-diffusion/issues/794
Oh, you previously managed to train SD 2.0 and then ran it Google Colab Free using AUTOMATIC’s repo?
I kept on trying to use TheLastBen’s variant to keep things simple so that I could update the tutorial with a simple solution.
Fixed deleting sd folder (or in my case renaming). Thanks!
Hi. Thanks for commenting. I also had that error today. I fixed it by deleting the
sdfolder and running the cell again.If you have any models saved in the
/sd/stable-diffusion-webui/modelsdirectory, be sure to move them out ofsdfirst, and you can put them back later.Hello. Apologies for the delay! You probably fixed it by now, so leaving this here for posterity.
I fixed it by deleting the sd folder and running the cell again.
If you have any models saved in the
/sd/stable-diffusion-webui/modelsdirectory, be sure to move them out ofsdfirst, and you can put them back later.Hi, Thank you very much for the excellent tutorial, I get an error when fine-tuning using SD 2 and trying to test the trained model as below:
File “<ipython-input-10-b1a5bc118eb8>”, line 187
NM==”True”:
^
SyntaxError: invalid syntax
any idea what the problem might be?
Hi. Thanks for commenting. I don’t know what it could be. I’m currently getting errors with SD2 myself and haven’t managed to train any models yet. I’ll leave a comment here, notifying you when I’m able to.
Hi, one question ask:
I create a training model run 80000 step and I save a checkpoint at 40000 step, can resume training at 40001? is choose the “Resume_Training:“?
Hello. Yes, it will resume training at 40001.
(Although 40000 steps seem like a lot. I think you may overtrain the model. Then again, you probably know best.)
I choose resume training, but it still form step 1 to train…..
(since I use 850 pictures, so at least X100)
I understand. I never trained on so many pictures so I don’t know what the results will look like.
It sounds like you have a serious project. I hope it works out well.
Out of curiosity, why so many images? Are you training something like 30 different people in one session, each with 28 pictures?
just two people…..can reduce train step, for example 850×50
the photo show the GPU machine stop run 🙁
Did it stop at step 39425?
Also have you trained it on 30 images of each person and results weren’t good enough?
Hi ! Super usefull content 🙂 Thank you very much.
I’m trying to customize Shoes from this brand shoes53045.com.
I gave around 40 pictures, and the results are really impressive.
However, it’s hard to have very creative results. Prompt is almost no taken into account.
Is there something to set up before the TRAINING ?
Thank’s
Henri
Hi, thanks for commenting, and thank you so much for the kind words!
Yes, it’s a training thing, and this has happened to me at times as well. How many steps did you train it on, and what was the value for
Train_text_encoder_for:?Also, what Stable Diffusion version did you use? 1.5 or 2.0? (The one in this tutorial is 1.5 because 2.0)
[duplicate comment]
I created a python script to rename all files within a directory. Because renaming files manually sounds like hell.
import os import re #set the directory os.chdir('/home/PATH/Pictures/PATH') #list the files in the directory files = os.listdir('/home/PATH/Pictures/PATH') #loop through the files for file in files: #find the number in the file name num = re.findall(r'\d+', file) #convert the number to an integer num = int(num[0]) #increment the number by 1 num = num + 1 #convert the number back to a string num = str(num) #find the extension ext = re.findall(r'\.\w+', file) #create the new file name newfile = 'XFILENAMEX (' + num + ')' + ext[0] #rename the file os.rename(file, newfile)Hi. Thanks for commenting and for the script. On Windows, if you select everything and right click -> rename, then edit the name on a single file, it will rename every file you selected, like in this gif
I believe Mac has a similar functionality. And Linux has Rename All.
Does it not work for you?
Hello! I have trained 2 models some weeks ago and everything went fine, but now when I trying to train, I get errors (..json.decoder.JSONDecodeError: Expecting ‘,’ delimiter: line 12 column 3 (char 284)). the code on fast-DreamBooth has change from last time I used it.
Anybody know what i´m doing wrong?
thx
have you solved the problem?
met the same question
follow this:https://github.com/TheLastBen/fast-stable-diffusion/issues/997
Something went wrong. Could you explain the solution in more detail?
“A Discord Server for Stable Diffusion DreamBooth – This is a Discord community dedicated to experimenting with DreamBooth. ”– this invitation link is invalid now, how can I join this Discord?
Hi. Thanks for commenting. Updated the link. You can join here https://discord.gg/ReNsdBHTpW
This link doesn’t work either.
Hello. I’ve updated the link. There shouldn’t be anymore issues now.
Hey, wondering if there’s room for an update in the article for the few seeings that have changed since? Learning rate is now an option which is very important.
Hi Jhong. Thanks for commenting. I’ll update it in the following days. Was on a tight schedule the past few days due to the holidays.
Hi EdXD,
Fab article and colab notebook, I was able to run it with ease. You also explain everything clearly which is great.
I can see that you said you’ll be updating the article soon as there are new features added. Can I ask you include something on captioning images when you update?
And one further question, when training would you recommend avoiding training on objects and styles together?
Thanks!
CP
Great tutorial thanks – just coming fresh to this & a newbie – all works until I try and upload image instances and it loads the first image and then the error below. I’ve tried smaller images but didn’t work – can you help please? Thanks
· thomas.jpg(image/jpeg) – 58846 bytes, last modified: n/a – 100% done
· thomas1.jpg(image/jpeg) – 68448 bytes, last modified: n/a – 0% done
—————————————————————————
MessageError Traceback (most recent call last)
<ipython-input-17-0bc75dc439cd> in <module>
83 elif IMAGES_FOLDER_OPTIONAL ==””:
84 up=””
—> 85 uploaded = files.upload()
86 for filename in uploaded.keys():
87 if filename.split(“.”)[-1]==”txt”:
3 frames
/usr/local/lib/python3.8/dist-packages/google/colab/_message.py in read_reply_from_input(message_id, timeout_sec)
100 reply.get(‘colab_msg_id’) == message_id):
101 if ‘error’ in reply:
–> 102 raise MessageError(reply[‘error’])
103 return reply.get(‘data’, None)
104
MessageError: RangeError: Maximum call stack size exceeded.
Hi, just to add, I managed to get it to work by adding the photos to Google Drive, and then applying the link rather than uploading them directly from my Mac, not sure if that helps anyone else?
Hi. Apologies for the delay. Thank you for commenting and thank you for mentioning this. I also had this same issue at some point and I think I solved it by either uploading the images directly into drive or by unchecking
Smart_Crop_Images.Hi I run the “Downloading the model” then have error, how to fix??
I am getting the same error 🙁
Thank you bro, I thought it’s going to be really hard to do that with collab, but it’s super easy actually.
Hi. Thanks for commenting! Glad to help!
I think TheLastBen deleted the colab and created a new one, can you check please the link. Thank you
Hi. Thanks for commenting! It looks like the link is working https://colab.research.google.com/github/TheLastBen/fast-stable-diffusion/blob/main/fast-DreamBooth.ipynb. Or are you referring to a different link?
Thanks, I found it too
Thank you!
Glad to help!
It is not working. I get the following error in the test phase. all other steps worked well.
Traceback (most recent call last):
File “/usr/local/lib/python3.10/dist-packages/aiohttp/client_reqrep.py”, line 70, in <module>
import cchardet as chardet
ModuleNotFoundError: No module named ‘cchardet’
During handling of the above exception, another exception occurred:
Traceback (most recent call last):
File “/content/gdrive/MyDrive/sd/stable-diffusion-webui/webui.py”, line 22, in <module>
import gradio
File “/usr/local/lib/python3.10/dist-packages/gradio/__init__.py”, line 3, in <module>
import gradio.components as components
File “/usr/local/lib/python3.10/dist-packages/gradio/components.py”, line 34, in <module>
from gradio import media_data, processing_utils, utils
File “/usr/local/lib/python3.10/dist-packages/gradio/processing_utils.py”, line 23, in <module>
from gradio import encryptor, utils
File “/usr/local/lib/python3.10/dist-packages/gradio/utils.py”, line 38, in <module>
import aiohttp
File “/usr/local/lib/python3.10/dist-packages/aiohttp/__init__.py”, line 6, in <module>
from .client import (
File “/usr/local/lib/python3.10/dist-packages/aiohttp/client.py”, line 59, in <module>
from .client_reqrep import (
File “/usr/local/lib/python3.10/dist-packages/aiohttp/client_reqrep.py”, line 72, in <module>
import charset_normalizer as chardet # type: ignore[no-redef]
File “/usr/local/lib/python3.10/dist-packages/charset_normalizer/__init__.py”, line 24, in <module>
from .api import from_bytes, from_fp, from_path
File “/usr/local/lib/python3.10/dist-packages/charset_normalizer/api.py”, line 5, in <module>
from .cd import (
File “/usr/local/lib/python3.10/dist-packages/charset_normalizer/cd.py”, line 9, in <module>
from .md import is_suspiciously_successive_range
AttributeError: partially initialized module ‘charset_normalizer’ has no attribute ‘md__mypyc’ (most likely due to a circular import)
Add a code cell before the one that is failing with:
!pip install cchardet
Then run it before re-running the one that failed.
I trained a model on my photos, named them all as “dkoreiba (1).jpg”, “dkoreiba (2).jpg” etc.
All steps went well. But when I generate a picture using keyworkd “dkoreiba” images are nothing like me. I mean, it generates landscape instead of my face.
I repeated all training twice and have same results.
How can I figure out if the keyword is triggered at all? I guess it’s not. If so, how to debug it?