Auto-GPT is an experimental open-source application that shows off the abilities of the well-known GPT language model from OpenAI.
It uses GPT 3.5 and/or GPT-4 to perform complex tasks and achieve goals without much human input.
Auto-GPT links together multiple instances of OpenAI’s GPT model, allowing it to do things like complete tasks without help, write and debug code, and correct its own writing mistakes.
Instead of simply asking ChatGPT to create code, Auto-GPT makes several AI agents work together to develop websites, create newsletters, compile online pages based on user requests, and more.
This level of independence is an essential feature of Auto-GPT, as it turns the language model into a more capable agent that can act and learn from its errors.
Key Observations
- Auto-GPT may hold great potential due to its innovative approach and the problems it aims to solve. However it’s still experimental, under development, and currently difficult to get substantial results (at least based on my experience).
- Despite the current challenges, there’s reason for excitement around Auto-GPT due to its potential and the vast number of developers working on it (100k+ GitHub stars). This collaborative effort greatly increases the likelihood of a breakthrough, transforming the software into a powerful and game-changing tool in the near future.
- Although Auto-GPT is highly talked about, its experimental nature poses challenges for users. The learning curve and potential issues require patience and persistence, as the developers work to refine and improve the software.
- Many people have not yet been able to achieve practical results with Auto-GPT (I know I haven’t). This is due to the software’s experimental nature, limitations in its current state, or the complexity of the tasks users attempt to accomplish.
- Many online resources, including tutorials and articles, may use hyped-up titles to create excitement around Auto-GPT, even if they don’t provide comprehensive demos or substantial outcomes. So, don’t worry if you’re struggling with it, as even those discussing it may not have fully harnessed its capabilities yet.
Quick Demo Running Auto-GPT
This is a quick demo of me using Auto-GPT to find topics for my Linux blog. I don’t go through with it until the end because it would take some time. But this should give you a good idea of what Auto-GPT can do.
You can give Auto-GPT tasks such as:
- Improve my online store’s web presence at storexd.com (not a real site)
- Help grow my Linux-themed socks business
- Collect all competing Linux tutorial blogs and save them to a CSV file
- Code a Python app that does X
Auto-GPT has a framework to follow and tools to use, including:
- Browsing websites
- Searching Google
- Connecting to ElevenLabs for text-to-speech (like Jarvis from Iron Man)
- Evaluating its own thoughts, plans, and criticisms to self-improve
- Running code
- Reading/writing files on your hard drive
- And more
This push for autonomy is part of ongoing AI research to create models that can simulate thought, reason, and self-critique to complete various tasks and subtasks.
In this tutorial we’ll install Auto-GPT on your local computer, and we’ll also cover a bit on how to use it and some additional considerations.
The steps are laid out in a beginner friendly way, so you don’t need to have in-depth programming knowledge to set it up.
If you’re not familiar with Python, Git, or JSON syntax you may feel a little intimidated, but you can still run it just the same. The process will probably seem a bit confusing until you’re up and running.
Requirements
To run Auto-GPT, the minimum requirements are:
- Pretty much any modern device. Even a low spec laptop or small server.
- Python 3.8 or later and Git installed
- An OpenAI Account and API Key. If you signed up less than 3 months ago you likely have $18 credit, otherwise you likely need a payment method connected.
- Optional: If you want the AI to speak you also need an ElevenLabs.io Account and API Key
(Optional) Set OpenAI Usage Limit
Please keep in mind that your OpenAI API account charges you based on usage. Given that Auto-GPT aims at being autonomous, it may be tempting to let it do it’s thing without supervision, however sometimes it may throw errors repeatedly and will use up your funds.
Auto-GPT asks you what you want to do at every step by default, however you can also let it do it’s thing for a number of steps or you can enable continuous mode, which you should be careful with.
A good idea is to set usage limits in OpenAI https://platform.openai.com/account/billing/limits.

You can set lower limits than mine. Auto-GPT doesn’t use many tokens. I’ve used it multiple times and I’ve only used $1.59 over the past week.
Install Python
Python is a versatile programming language that’s user-friendly and widely used for AI projects like Auto-GPT. Even if you’re not familiar with it, no worries!
You only need to install Python to run Auto-GPT.
To install it use this short tutorial that shows how to install it for Windows/Mac or Linux https://python.land/installing-python.
Install Git
To install Git go here (it’s a simple tutorial) https://github.com/git-guides/install-git and follow the instructions corresponding to your operating system.
Git is a tool that helps developers keep track of their code, collaborate with others, and handle different stages of a project. Imagine it as a smart “undo” and “redo” button that makes organizing your projects a breeze.
GitHub is an online platform where people store and share their projects, making it easy for others to access, contribute, or learn from them. Auto-GPT is one of these projects.
For our purposes, you just need to know how to download a Auto-GPT, or “pull” it, from GitHub.
After installing Git on your computer, we’ll show you how to grab the Auto-GPT repo in a few easy steps, so you can start using it in no time.
Install virtualenvwrapper (Optional)
I also recommend using virtualenvwrapper to install Auto-GPT, although this is optional.
Virtualenv and virtualenvwrapper are tools used in Python to create isolated environments for your projects. They help keep each project’s packages and dependencies separate, avoiding conflicts between them. You can think of it like a sandbox, or VirtualBox or VMWare (if you’re familiar with them) but for Python.
Virtualenv is the basic tool that creates these environments, while virtualenvwrapper is an extension that makes managing multiple environments easier and more convenient.
For Auto-GPT, using a virtual environment is beneficial because it has specific packages it depends on. By creating a separate environment, you ensure that these packages won’t interfere with other projects, making it safer and more organized.
We’ll easily install it using pip that comes with Python. Pip is a tool used in Python for installing and managing packages, which are reusable pieces of code or libraries that add functionality to your projects.
With pip, you can easily install, update, and remove packages from your Python environment.
Install virtualenvwrapper on Linux/OS X
Open a terminal and run:
pip install virtualenvwrapper
If you encounter the command not found error after installing it, check our related post on how to fix it Fix Virtualenvwrapper workon/mkvirtualenv: command not found.
Install virtualenvwrapper on Windows
Open cmd or Powershell or your preferred terminal emulator and run:
pip install virtualenvwrapper-win
Create & Activate a Virtual Environment
Now that we’ve got virtualenvwrapper installed we can easily create a virtual environment and then we’ll install Auto-GPT.
To do this run your operating system’s terminal and navigate to the directory where you’d like to install Auto-GPT.
Then run the following command replacing name_of_virtual_environment with whatever name you want, like autogpt.
mkvirtualenv name_of_virtual_environment
mkvirtualenv autogpt
Deactivate & Reactivate a Virtual Environment
To deactivate a virtual environment simply run the following command (or close the terminal):
deactivate
To reactivate the virtual environment run:
workon name_of_virtual_environment
Install Auto-GPT
Assuming you have all the requirements, we can get to installing Auto-GPT.
Video Demo Installing Auto-GPT
This is a quick demo of me downloading Auto-GPT from Github and installing it’s dependencies.
Download Auto-GPT from Github
To install Auto-GPT on your computer you just have to download it from Github and then install some of its’ dependencies.
To do this, navigate the the directory where you want it downloaded, activate the virtual environment you want to use (if you want to use one), and run:
git clone https://github.com/Torantulino/Auto-GPT.git
Next cd into the newly created Auto-GPT directory:
cd Auto-GPT
And run the following command to install Auto-GPT’s dependencies. This will take a minute or so.
pip install -r requirements.txt

Configure Auto-GPT API Keys
Next we’ll need to use OpenAI’s API Keys so that Auto-GPT can use the GPT API.
You can generate an API key here https://platform.openai.com/account/api-keys.
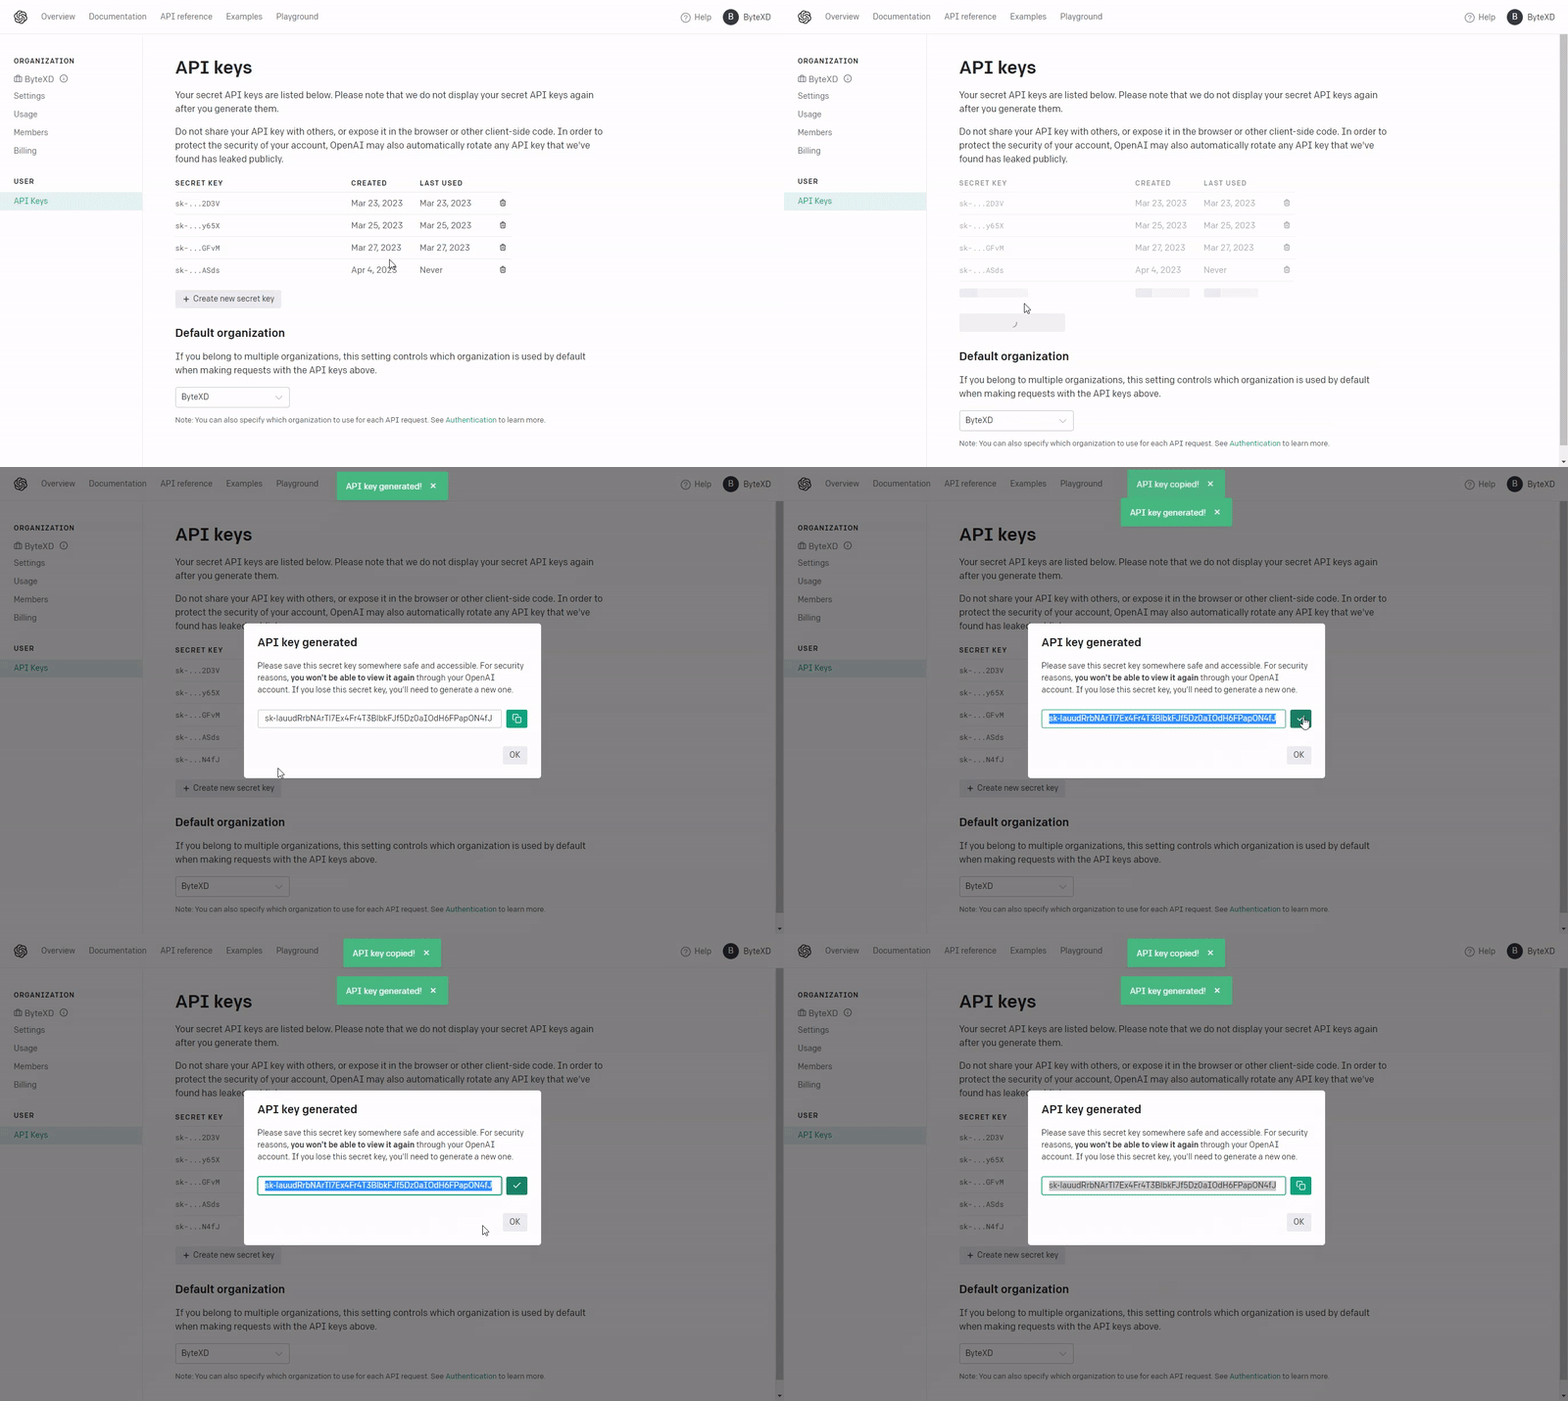
Make sure to keep that key secret because it’s like a password to using GPT from your account. If someone else has access to it, it’s all they need to use GPT and use up your funds.
Edit The .env.template File
Auto-GPT uses the ChatGPT API. We’ll want to take that API Key from OpenAI and edit the .env.template file located in the Auto-GPT directory.
If you don’t see it, depending on your operating system, it’s probably hidden. So make sure to enable viewing hidden files.

First, rename .env.template to .env (including the dot . )
After, if you open it up it will look something like the code below.
Looks intimidating at first, but don’t worry. Those are just settings in text form. The essential ones are just a few. Right now we only want to replace your-openai-api-key and that’s it.
Replace your-openai-api-key with your actual OpenAI API key.
You can ignore all the other values right now, because we just want to get this up and running.
###########################################################################
### AUTO-GPT - GENERAL SETTINGS
###########################################################################
# EXECUTE_LOCAL_COMMANDS - Allow local command execution (Example: False)
EXECUTE_LOCAL_COMMANDS=False
# BROWSE_CHUNK_MAX_LENGTH - When browsing website, define the length of chunk stored in memory
BROWSE_CHUNK_MAX_LENGTH=8192
# USER_AGENT - Define the user-agent used by the requests library to browse website (string)
# USER_AGENT="Mozilla/5.0 (Macintosh; Intel Mac OS X 10_15_4) AppleWebKit/537.36 (KHTML, like Gecko) Chrome/83.0.4103.97 Safari/537.36"
# AI_SETTINGS_FILE - Specifies which AI Settings file to use (defaults to ai_settings.yaml)
AI_SETTINGS_FILE=ai_settings.yaml
# USE_WEB_BROWSER - Sets the web-browser drivers to use with selenium (defaults to chrome).
# Note: set this to either 'chrome', 'firefox', or 'safari' depending on your current browser
# USE_WEB_BROWSER=chrome

##########################################################################
### LLM PROVIDER
##########################################################################

### OPENAI
# OPENAI_API_KEY - OpenAI API Key (Example: my-openai-api-key)
# TEMPERATURE - Sets temperature in OpenAI (Default: 0)
# USE_AZURE - Use Azure OpenAI or not (Default: False)
OPENAI_API_KEY=your-openai-api-key
TEMPERATURE=0
USE_AZURE=False

### AZURE
# cleanup azure env as already moved to azure.yaml.template

##########################################################################
### LLM MODELS
##########################################################################

# SMART_LLM_MODEL - Smart language model (Default: gpt-4)
# FAST_LLM_MODEL - Fast language model (Default: gpt-3.5-turbo)
SMART_LLM_MODEL=gpt-4
FAST_LLM_MODEL=gpt-3.5-turbo

### LLM MODEL SETTINGS
# FAST_TOKEN_LIMIT - Fast token limit for OpenAI (Default: 4000)
# SMART_TOKEN_LIMIT - Smart token limit for OpenAI (Default: 8000)
# When using --gpt3only this needs to be set to 4000.
FAST_TOKEN_LIMIT=4000
SMART_TOKEN_LIMIT=8000

##########################################################################
### MEMORY
##########################################################################

### MEMORY_BACKEND - Memory backend type
# local - Default
# pinecone - Pinecone (if configured)
# redis - Redis (if configured)
# milvus - Milvus (if configured)
MEMORY_BACKEND=local

### PINECONE
# PINECONE_API_KEY - Pinecone API Key (Example: my-pinecone-api-key)
# PINECONE_ENV - Pinecone environment (region) (Example: us-west-2)
PINECONE_API_KEY=your-pinecone-api-key
PINECONE_ENV=your-pinecone-region

...
Save and close the file when you’re done.
Run Auto-GPT
Finally we can run Auto-GPT.
To do this just run the following command in your command-line while in your Auto-GPT directory (and with your virtual environment activated if you are using one):
python -m autogpt

If everything worked you should see a text welcoming you back, and if you’d like to use the task given to Auto-GPT from the last run.

You can continue by inputting y or start a new task by inputting n.
That’s it! You can now start using Auto-GPT on your computer.
Updating Auto-GPT
Auto-GPT is continuously developed so it’s updated even a few times per day sometimes. To keep it up-to-date just cd into the Auto-GPT directory and run the following command:
git pull
git pull updates your local copy of a project with the latest changes from the Auto-GPT repository.
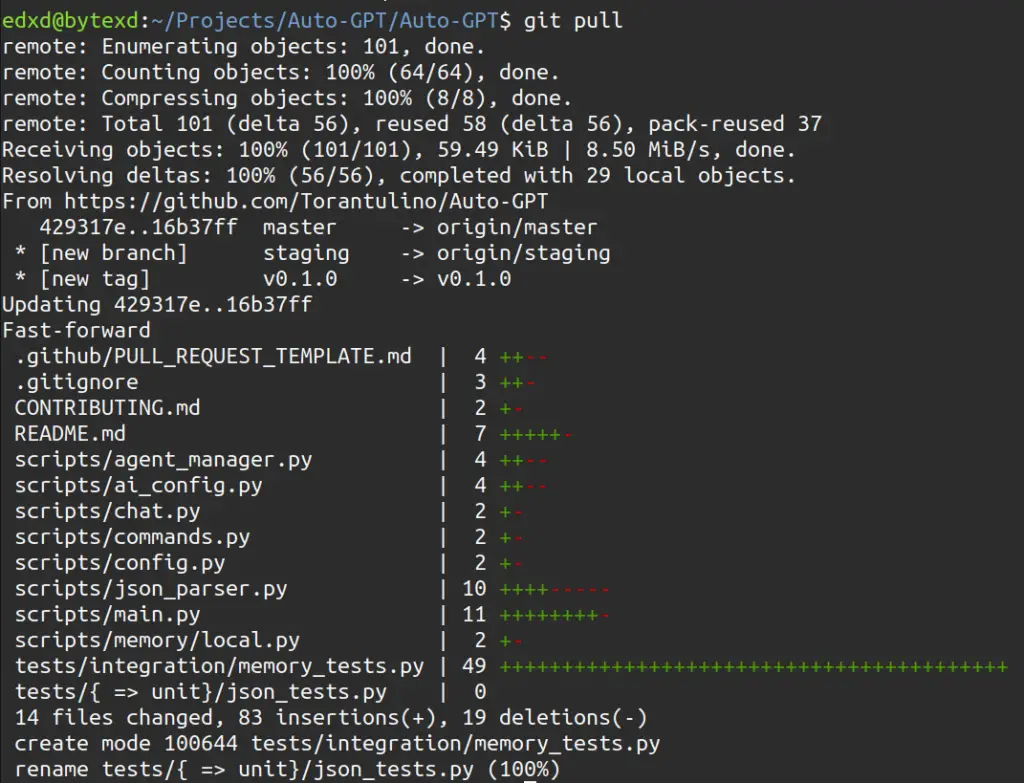

git pull again it shows that it’s up-to-date.Important Notes After Updating Auto-GPT
Install Possible New Dependencies
Sometimes updates mean that new dependencies are added.
So best run pip install -r requirements.txt as well after running git pull, to make sure there aren’t any new requirements added that you may be missing.
Check For New Environment Variables in .env.template
We initially changed the file .env.template to .env. Now that we downloaded an updated version of Auto-GPT you’ll find a new .env.template next to your .env file.
This file may have some new variables because the application has new features that need them. If that’s the case you may want to check the new .env.template file and update your .env file with the new variables if you want to use them.
For example, I just updated Auto-GPT and new variables were added in the new .env.template file.
In the image below, on the left there’s my .env file and on the right the newly downloaded .env.template that has 3 new variables.
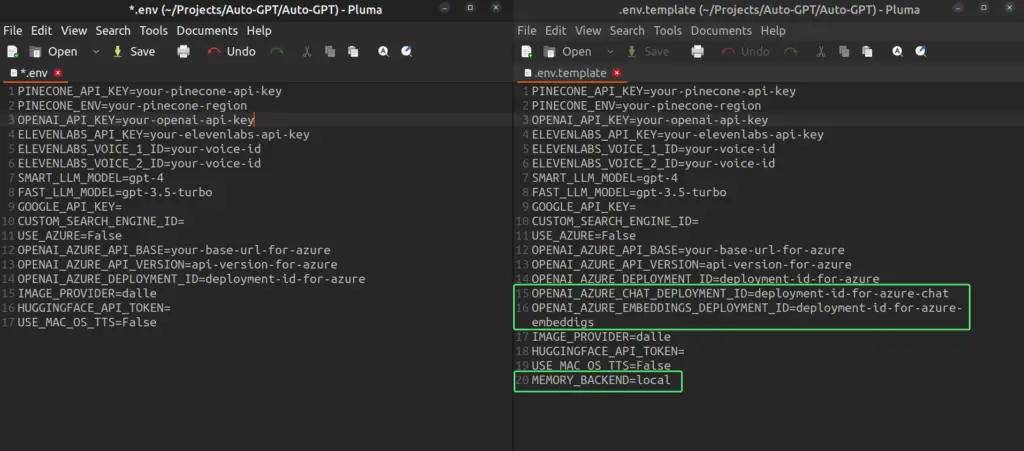
It’s important that I noticed this because I want to use the new variable MEMORY_BACKEND to use Pinecone as a memory backend and I’ll change it to MEMORY_BACKEND=pinecone.
Configuring Memory Backend (Local Cache, Pinecone, Redis, etc.)
Auto-GPT can use different memory backends. Currently the choices are Local Cache (which is a local JSON file), Redis, Pinecone, Weaviate, or Milvus.
Memory backends are used by Auto-GPT to store and manage data efficiently. They help in organizing, searching, and retrieving information that the system needs to perform various tasks, such as answering questions or making recommendations.
If you followed the tutorial so far you are currently using Local Cache for the memory backend. In the .env file it’s where it says MEMORY_BACKEND=local:
### MEMORY_BACKEND - Memory backend type
# local - Default
# pinecone - Pinecone (if configured)
# redis - Redis (if configured)
# milvus - Milvus (if configured)
MEMORY_BACKEND=local
Differences Between Memory Backends
Local Cache, Redis, Pinecone, Weaviate, or Milvus, can all be used for storing and retrieving data.
While they function differently, the memory backend you choose doesn’t directly impact the Auto-GPT’s results, as long as the system is designed to interact with them interchangeably.
However, the choice between these backends can affect the system’s performance, scalability, and efficiency, which might indirectly influence the output.
My recommendation: I use Pinecone because the setup is easy and it’s a popular choice. Initially I assumed it will affect the Auto-GPT’s results, but from what I’ve read on Auto-GPT’s Discord and Github Discussions, it doesn’t.
Using Auto-GPT with Pinecone as a Memory Backend
First sign up for a free Pinecone.io account here https://app.pinecone.io/.
Next you don’t have to do anything in Pinecone, except grab your Pinecone API Key and Pinecone Environment. Auto-GPT will take care of the rest and configure Pinecone itself.
To do this, once logged in, look in your left sidebar and click on API Keys.
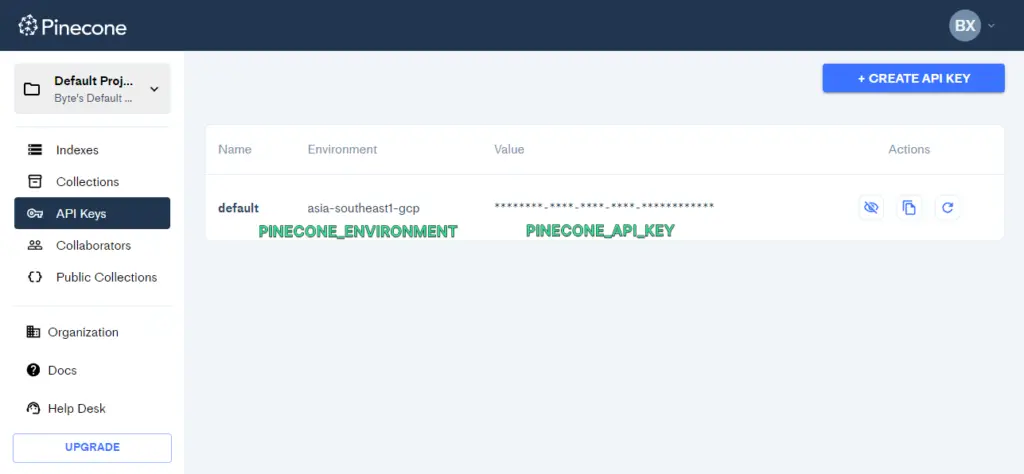
We’ll need both PINECONE_ENVIRONMENT and PINECONE_API_KEY.
Next, in your .env file set your MEMORY_BACKEND=pinecone and your PINECONE_API_KEY and PINECONE_ENV with the values you got from your dashboard.
###########################################################################
### MEMORY
###########################################################################

### MEMORY_BACKEND - Memory backend type
# local - Default
# pinecone - Pinecone (if configured)
# redis - Redis (if configured)
# milvus - Milvus (if configured)
MEMORY_BACKEND=pinecone

### PINECONE
# PINECONE_API_KEY - Pinecone API Key (Example: my-pinecone-api-key)
# PINECONE_ENV - Pinecone environment (region) (Example: us-west-2)
PINECONE_API_KEY=your-pinecone-api-key
PINECONE_ENV=your-pinecone-region
Save the file and that’s it. Now when you run Auto-GPT again you’ll see that it’s using Pinecone for it’s backend memory:

How to Use Auto-GPT
The basic usage of Auto-GPT is easy and straightforward.
Giving Auto-GPT a Name, Role, and Goals
To use Auto-GPT, upon running it, you’ll be prompted to give it some instructions on how to behave:
ai_name: This represents the name of the AI. It is used when constructing the full prompt for the user, where it is used along with the AI’s role and goals.ai_role: Theai_rolevariable is used to describe the role or purpose of the AI. In the script, it’s used to build the full prompt, which provides context and guidance for the AI model in generating its responses. Theai_roleis included in the prompt, along withai_nameandai_goalsto ensure that the AI is aware of its role while responding to user inputs.ai_goals: You can provide the bot with up to 5 goals. These are meant to help the bot better understand what to do to accomplish the task you’ve set it. You can give it just a few goals, and when a goal is left empty and you press enter, it will start working.

ai_name, ai_role and ai_goals.Where Previous Settings Are Saved
When you run Auto-GPT it saves your settings to ai_settings.yaml. Here is the one it saved just now:
ai_goals:
- Search Google for popular Linux topics
- Find the ones that are popular but don't have enough documentation
ai_name: Research-GPT
ai_role: An AI designed to research under-documented Linux topics.
Next time you run Auto-GPT it will ask you if you want to continue with these settings.
You can also just edit this file before every run, instead of writing the name, role, and goals into the prompt. And then when it asks you if you want to continue just type y.
This is how I prefer to do it, because it feels easier.
Monitoring Auto-GPT
After you’ve assigned the bot it’s name, role and goals, it will start working by itself.

Every step, it will display it’s THOUGHTS, REASONING, PLAN, CRITICISM, and NEXT_ACTION, and it will wait for you to confirm if it’s ok.
If you’d prefer for it to continue working without asking for confirmation, you can tell it how many commands it can run by itself by inputting y -N, where N means the number of commands to do by itself.
For example if I want it to run the next 10 commands without confirmation I’ll just type:
y -10
Where Auto-GPT Stores Files
Auto-GPT can only read and write files in the auto_gpt_workspace directory. That’s where you can expect to find files it has written, and that’s where it can read files from.
Frequently Asked Questions
What has Auto-GPT accomplished?
Auto-GPT hasn’t shown major achievements so far, based on my research and personal experience. Most people are still experimenting with it without obtaining significant results, such as completing tasks on their behalf.
However, some users may have gotten it to perform more complex tasks by tinkering with it more and gaining an intuition for advanced operation. Unfortunately, I haven’t seen any online demos showcasing these achievements. Remember, this is based on my own findings and time spent with the tool since its release.
From my experience, it tends to become distracted or confused, making it difficult to complete complex projects. It can handle basic tasks like searching Google and writing information to files, which is helpful, but we need it to do more than that on its own.
Why use Auto-GPT?
Auto-GPT has great potential, as it is under continuous development and improved daily.
While it may not currently demonstrate significant accomplishments in terms of completing complex tasks, its very existence is impressive.
As an open-source project with over 60,000 stars on GitHub, numerous talented people are actively working on and enhancing it.
If you don’t have the time to tinker with Auto-GPT right now due to its limited usability, it’s still worth keeping an eye on.
With its ongoing development and the dedicated community behind it, there’s a high likelihood that a breakthrough in its capabilities will happen soon. This makes Auto-GPT a promising and exciting project to watch as it evolves.
Auto-GPT vs BabyAGI
Unlike BabyAGI, Auto-GPT can access external resources like reading/writing files, running code, or browsing the internet. This feature has its pros and cons:
In my experience, this is a double edged sword:
- On one hand, it can complete complex tasks and gather up-to-date information from the internet, overcoming OpenAI GPT’s knowledge cutoff in September 2021.
- On the other hand, during brainstorming, Auto-GPT may get distracted by browsing websites. Although the right prompts might help, it can also return errors when given feedback to stay focused. In contrast, BabyAGI is simpler to use for brainstorming. Despite not accessing the internet, it can provide useful insights for handling projects with minimal effort and waiting time.
Auto-GPT vs AgentGPT
AgentGPT is another app similar to BabyAGI, that also offers a web user interface that you can use online, or run on your local computer.
At the time of writing it’s still under development and doesn’t have the capabilities of Auto-GPT, and is more like BabyAGI, which means it just thinks/brainstorms and can’t access the internet or interact with files.
However the team behind AgentGPT are working on giving it Auto-GPT capabilities, as it also states in their Github repo:

Troubleshooting
“Warning: Failed to parse AI output, attempting to fix.” Loop
If you encounter this error, at the time of writing and in my experience, if it won’t stop then it’s best to just hit Ctrl+Z to stop it and start over.
Along with newer updates, it may correct itself on it’s own, however.
Error: Invalid JSON
{'thoughts': {'text': '...'}, 'command': {'name': 'browse_website', 'args': {'url': 'https://example.com'}}}

PRODUCT FETCHER THOUGHTS:
REASONING:
CRITICISM:
Warning: Failed to parse AI output, attempting to fix.

If you see this warning frequently, it's likely that your prompt is confusing the AI. Try changing it up slightly.
Failed to fix ai output, telling the AI.
NEXT ACTION:  COMMAND = Error: ARGUMENTS = string indices must be integers, not 'str'
SYSTEM:  Command Error: returned: Unknown command Error:
Warning: Failed to parse AI output, attempting to fix.

If you see this warning frequently, it's likely that your prompt is confusing the AI. Try changing it up slightly.
Failed to fix ai output, telling the AI.
ModuleNotFoundError: No module named ‘…’
Requirements Not Installed
The likely reason you’re getting this error is because you have not installed Auto-GPT’s requirements (also called dependencies).
This can also happen if you updated Auto-GPT and the devs added new features and requirements.
To do this navigate in your terminal into the Auto-GPT folder and run:
pip install -r requirements.txt
Virtual Environment Not Activated
If you installed Auto-GPT inside a virtual environment, and also installed it’s requirements, but are still getting this error, then you may not have the virtual environment activated.
To activate it just run in your terminal:
workon name_of_your_virtual_environment
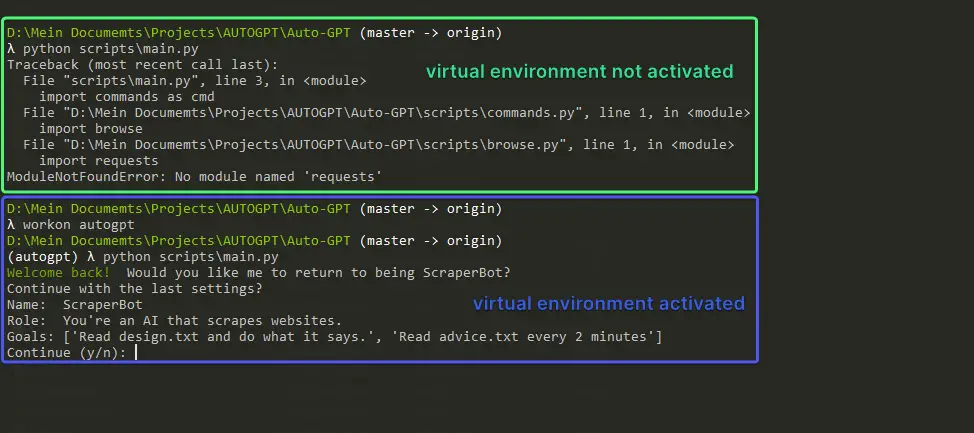
You’ll notice that when the virtual environment is activated, you’ll see it’s name before the prompt. In my case I called it autogpt and it looks like:
(autogpt) $ python -m autogptError When Running “python scripts/main.py”
The command to run Auto-GPT has changed to:
python -m autogpt
SYSTEM: Command write_to_file returned: Error: ‘PosixPath’ object has no attribute ‘is_relative_to’
This error may come up when you’re running Auto-GPT with Python 3.8. Try updating your Python interpreter to 3.10 or 3.11 and try again.
This happened to me when I tried to run Auto-GPT with a Dev Container. At the time of writing the .devcontainer/Dockerfile has python:3.8. I changed it to python:3.11 and rebuilt the container and now Auto-GPT works.
If that’s not the solution then I recommend checking this issue thread on Github (#2027) where others are discussing having the same issue.
Conclusion
Stacking AI models on top of one another in order to complete more complex tasks does not mean we’re about to see the emergence of artificial general intelligence let systems run continuously and accomplish tasks with less human intervention and oversight.
These examples don’t even show that GPT-4 is even necessarily “autonomous,” but that with plug-ins and other techniques, it has greatly improved its ability to self-reflect and self-critique, and introduces a new stage of prompt engineering that can result in more accurate responses from the language model.
Hopefully this helped you get started with Auto-GPT. We’ll update this article or post new ones with more information on how to use it.
If you have any questions or feedback please feel free to let us know in the comments and we’ll get back to you as soon as we can.
Resources & Acknowledgements
- Developers Are Connecting Multiple AI Agents to Make More ‘Autonomous’ AI – Helped me explain a few concepts about Auto-GPT
- On AutoGPT – LessWrong – A really thorough and insightful analysis of AutoGPT, discussing its fundamentals, current accomplishments, potential future developments, the risks and benefits associated with AI agents, and more.
- I think I win. – A really interesting Github discussion where a user shares a unique workflow for creating design documents and giving directives to the AI. (It’s a bit difficult to follow. I’ll try to provide clear version of it soon)
- Auto-GPT Discussions and Issues on Github – If you are new to using Github, you can browse these sections, ask questions, report issues, and discuss Auto-GPT with other users. Not everyone knows how to code, so don’t be afraid.



Looks like your search engine optimization really worked, because it led me here! Thanks for the blog post. When I tried running it though, I repeatedly get API Rate Limit Reached. Whoops.
Hi, Tony! Thanks for commenting and the feedback. Are you getting API Rate Limit Reached because you set a spending limit? If it’s something else, would you mind posting a screenshot of the error?
I fixed it to go to a payed plan with openAI
how much is the price to search the internet with the full version?.
I went to the pricing page but I didn’t understand it, could you help me, thanks
Hi, Stefano. This is the full version. Perhaps their pricing seems a bit complicated, and it makes it difficult to understand. This is the pricing page I am looking at https://openai.com/pricing
Let me know if this makes sense, or if it’s still unclear, please? Thank you!
Thanks for your reply.
Do you happen to know how much 1000 tokens correspond to in dollars for each artificial intelligence model?.
How do you choose the model to use, to configure autogpt ?
I use the models already set in the
.env.templatebecause I figure those are the best.I am not 100% clear when which model is used, but I just assume the devs who constantly test it set the optimal settings for performance and cost-efficiency.
As for pricing, GPT4’s pricing is:
GPT-3.5-turbo is:
I have tested it for a few hours and so far it used ~$5.
Yes, the spending limit seems to work. Although I think the soft limit has a slight delay in emailing you, but I’m not 100% sure about it.
I’m running with this situation now
Hi, Susan. Did you manage to figure this out? I haven’t encountered this error before.
raise self.handle_error_response(
openai.error.AuthenticationError: Incorrect API key provided: sk-rj9VP***************************************jg9y. You can find your API key at https://platform.openai.com/account/api-keys.
Hi, Lin. It looks like that OpenAI API key isn’t working. Is the key from your
.envfile ending injg9yor is it different?If it’s different then you might have a global environment variable set on your system and you need to remove it.
can you use conda for the environment instead of virtualenvwrapper?
Hi. Yes, I’m fairly certain that it should work. There isn’t anything out of the ordinary about installing Auto-GPT. You can use it without virtualenvwrapper as well if you want.
I just mentioned
virtualenvwrapperbecause I thought it would help some people avoid conflicts with other libraries, since open-source AI is on the rise and people will likely experiment with lots of other Python software.Really good tutorial, however, I’m getting an error when running main:
ModuleNotFoundError: No module named ‘requests’
Any idea how to solve?
Hi, thanks for commenting! I’m assuming you followed the tutorial with the part about installing virtualenvwrapper, and installed requirements with the following command?
If you did install virtualenvwrapper and created a virtual environment with
mkvirtualenv environment_name, then open a terminal and run:I’m assuming you got that error because you tried to run Auto-GPT without having the virtualenvironment activated.
Here a screenshot of me trying the exact same thing with the virtual environment not activated. You can tell when it’s activated because its name appears at the beginning of the prompt. In my case it’s
(autogpt)because that’s how I named it.—
Please let me know if you understand and if it works for you. I’d like to make this tutorial easy to understand, and even though virtualenvwrapper seems like a good idea, I’m afraid it confuses readers. Thanks and looking forward to hearing from you!
(autogpt) D:\Auto-GPT>python scripts/main.py –gpt3only
Redis not installed. Skipping import.
Pinecone not installed. Skipping import.
[31mPlease set your OpenAI API key in .env or as an environment variable.
You can get your key from https://beta.openai.com/account/api-keys,
what’s problem?
Hi, Lin. Based on this comment I assume you found how to get the API Keys.
hey so I updated to python 3.11 and now when I try to run auto gpt i get the following error:
Traceback (most recent call last):
File “<frozen runpy>”, line 198, in _run_module_as_main
File “<frozen runpy>”, line 88, in _run_code
File “/Users/amansinghania/Downloads/Auto-GPT-stable/autogpt/__main__.py”, line 3, in <module>
from colorama import Fore
ModuleNotFoundError: No module named ‘colorama’
Any chance you can help?
Hi Akash,
Can you run
pip install -r requirements.txtagain?I think that might be it. When you installed the requirements initially they were applied to your previous version of Python.
Let me know if that helps?
Run python –version and pip –version.
I had this, too after 3.11 and turned out my python and pip were pointing to old versions
Hello thanks for the post, i have a few questions:
-after it train the goals , how ican start to use? It have ui like chatgpt?
– after train the 5 goals can i give more goals for train withot lost the data trained for the previous goals?
Thanks you so much.
Ivan
Hi Ivan.
Regarding UI: It does not have a UI like ChatGPT. It’s usually used from the command-line. There is an UI for Auto-GPT in the works but it doesn’t seem very well documented while I am writing this – https://github.com/thecookingsenpai/autogpt-gui. I am sure that in the near future there will be an actively developed UI.
Regarding goals after it finishes the first 5 goals. I don’t know yet. Someone else was asking how to continue the job after the previous job was stopped, or after it was finished. Two options that come to mind right now:
auto_gpt_workspace/instructions.txtand to give it lots of instructions there, like what files to read such asauto_gpt_workspace/results_from_previous_job.txt, what it should already know, etc. And then when you run it again the first goal you tell it is Read auto_gpt_workspace/instructions.txt so you can continue a previous jobI’ll get back to this comment and update the article once I learn how.
I hope I understood your questions correctly. If I didn’t feel free to let me know.
Hi,
Thanks for putting this tutorial up. I’m just having an issue with the last step. everything works fine until I run python -m autogpt.
I get the following in error:
Please set your OpenAI API key in .env or as an environment variable.
You can get your key from https://platform.openai.com/account/api-keys
I’ve got a paid open AI account and have the updated the .env file with my API, I’ve also got the the virtual env setup. Any thoughts on where I’m going wrong?
I’m in Hong Kong utilizing a VPN as access is restricted here, so not sure if that’s a factor also.
Hi, thanks for commenting. I don’t think the VPN should be a factor. If it were a connectivity thing I’d assume it would throw a connectivity issue.
Can you provide a screenshot of the
.envfile with the API key obscured? Also to be sure, did you rename the.env.templateto.env?Hi thanks.
When I look in the Auto-gpt folder after the install it’s just a .env file, there is no .env.template to change (maybe that’s part of the issue)? So I just update the .env file with my API details.
The fact that there’s no
.env.templateis fine. We just care about the.envfile because that’s where the software gets the OpenAI API Key from.Can you give me a screenshot of the folder where
.envis? I’m thinking maybe it’s some Windows issue. Like.envactually named.env.txtbut you can’t see it because the.txtextension is hidden.A screenshot like this would be great, so I can see the
.envfile.So where does Auto-GPT store its results? I can’t find a directory where the information is written to.
Hi, Claude. Thanks for commenting. It should store them in the
autogpt/auto_gpt_directory.really doesn’t feel like this is for beginners, feels like there are quite a few points missing. Sent it to 4 people, none of them have experience with github and python, none of them were able to install and use based on this article. Certainly not a ‘beginner’ friendly article at all.
Hi Kevin. Thanks for commenting and for the feedback.
I apologize that the article doesn’t feel beginner-friendly enough. Setting up Auto-GPT might require some familiarity with of GitHub or Python, and I understand that this can be challenging for someone who has no prior experience with them.
I guess the term “beginner” is relative, and in this context, it was intended for users who are new to Auto-GPT but have some basic understanding of installing various tools like this one.
I tried to simplify the process as much as possible to save readers time, assuming that they might not have the time to take introductory courses on GitHub or Python.
I appreciate you commenting and I’d love to help in any way I can. This would also help me improve the article and make it more accessible.
Perhaps you could tell me where it didn’t make sense, where you got stuck, or what points you feel are missing? Thank you.