Stable Diffusion is among the best AI art generators at the time of writing. It generates fantastic art, it has relatively low hardware requirements, and it’s fast. One of the best things about it is that it’s also available as free and open-source.
Thanks to Stable Diffusion being open-source, it can be integrated it into your own projects. Whether you want to use it as a standalone AI art generator, or as part of a larger AI art project, it’s easy to set up and use.
This has lead to users finding all sorts of interesting ways to use Stable Diffusion. This is excellent news, as it means that the software is constantly evolving and improving. As more people use it, and more ideas are shared, the software just gets better and better.
One of these projects is Stable Diffusion WebUI by AUTOMATIC1111, which allows us to use Stable Diffusion, on our computer or via Google Colab1Google Colab is a cloud-based Jupyter Notebook. Jupyter Notebooks are, in simple terms, interactive coding environments. Think of them as documents that allow you to write and execute code all in one place.
Google Colab is a service that provides free Jupyter Notebooks that are run on Google’s servers. This means that you can use Google Colab to write and execute code without having to download or install anything on your own computer.
Google Colab is a great tool for data scientists and machine learning engineers as it allows you to prototype and experiment with your code in a fast and convenient way. Additionally, Colab is perfect for sharing your work with others, as you can simply share the link to your notebook and anyone can view and execute the code., using an intuitive web interface with many interesting and time saving options and features, allowing us to continuously experiment with creating AI generated images for free.
Basically you can create hundreds of images per day for free, and they’ll all be stored in our Google Drive. This is invaluable, especially considering that a prompt won’t always result in the perfect image right away, and you may have to keep on experimenting.
Fast Stable Diffusion WebUI by AUTOMATIC1111 is a modified version of Stable Diffusion WebUI by AUTOMATIC1111, which is currently the most popular implementation of Stable Diffusion that comes with the most features out of the variants that I’ve tried.
The reason we’re using the Fast variant is because it’s a lot more user friendly, very easy to set up in Google Colab, and possibly faster. You can find its Github repository here. The author also optimizes other variants of Stable Diffusion implementations, such as the hlky version.
The reasons I consider this method to be the best are:
- It’s free.
- You’re running it in Google Colab. This means you don’t need to worry about your hardware. You can even run it from your phone. For a beginner friendly intro on Google Colab check out our related tutorial.
- The setup is easy, beginner friendly, and relatively fast. Even though we’re using Google Colab to run it, it’s not complicated. You’ll just run a few initial steps, wait ~10 minutes, and then use Stable Diffusion from a very nice web interface.
- It has an easy to use and intuitive web interface, that you can access from your browser, and it has lots of features.
- It displays an accurate image generation progress bar.
- It offers a lot very cool extra features such as:
- Upscaling and face correction. It comes with two popular algorithms, to upscale images (increase their resolution), and to fix distorted faces (because Stable Diffusion may slightly distort some faces). The upscaling is done using ESRGAN and the restoration is done using GFPGAN.
- The ability to write multiple prompts separated by
|, and the system will create an image for each of them. - Downloading a fresh Stable Diffusion model or loading your own custom one. This is very useful because you can simply load an existing Stable Diffusion model from your Google Drive. And since recently we’ve been able to fine-tune Stable Diffusion, we can use the Web UI to use our fine tuned models.
- You can check out more info and features in its Github page.
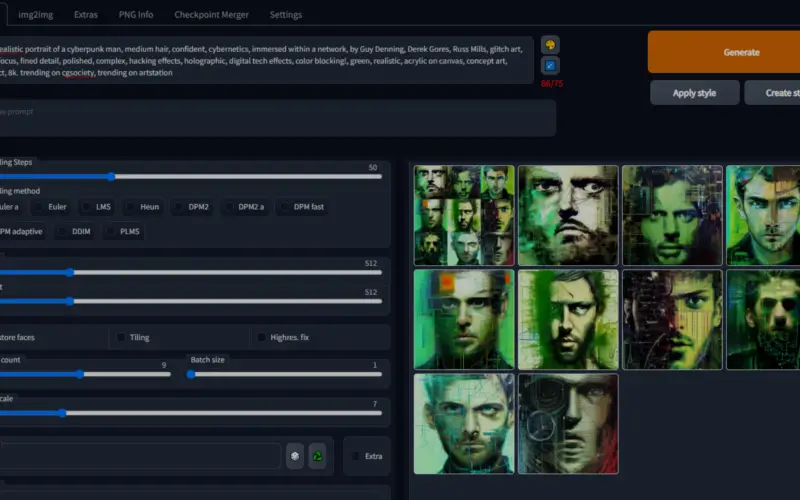
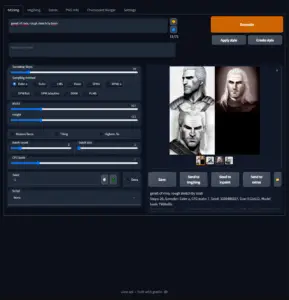
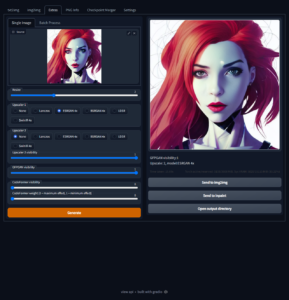
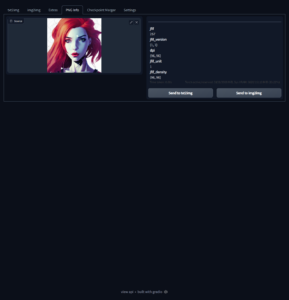
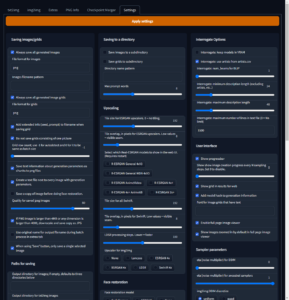
Here’s a quick preview of how it looks like:
Table of Contents
- Quick Setup & Image Generation Video Demo
- Setting Up Fast Stable Diffusion by AUTOMATIC1111 in Google Colab
- Conclusion
- Troubleshooting
- Very Useful Resources
Quick Setup & Image Generation Video Demo
This is a demo of what we’ll be doing to set it up and start using Stable Diffusion WebUI by AUTOMATIC1111. It’s not sped up so you can get an idea of how long it takes. As you can see, it’s very simple and straightforward.
[powerkit_alert type=”info” dismissible=”false” multiline=”false”]
Note: The project is continuously evolving and the interface may change in some time after posting this video and article. I’ll try to keep them updated as often as possible.
[/powerkit_alert]
Sidenote: AI art tools are developing so fast it’s hard to keep up.
We set up a newsletter called tl;dr AI News.
In this newsletter we distill the information that’s most valuable to you into a quick read to save you time. We cover the latest news and tutorials in the AI art world on a daily basis, so that you can stay up-to-date with the latest developments.
Check tl;dr AI NewsSetting Up Fast Stable Diffusion by AUTOMATIC1111 in Google Colab
Open Colab Notebook
First we’ll open the Google Colab notebook for Fast Stable Diffusion by AUTOMATIC1111. To do this click here https://colab.research.google.com/github/TheLastBen/fast-stable-diffusion/blob/main/fast_stable_diffusion_AUTOMATIC1111.ipynb to open it.
You can also copy it to your Google Drive by clicking the Copy to Drive button. This will open your new copy in a new tab and you can switch to it.

Enable GPU
Next we’ll need to enable the use of a GPU. The GPU will be allocated to us by Google.
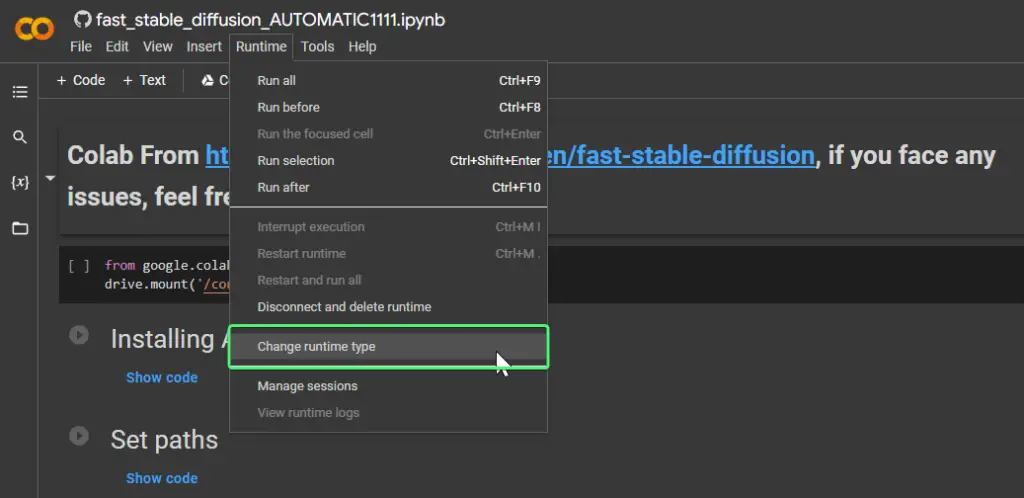
To do this go in the menu and click Runtime > Change runtime type.
A small popup will appear with the title Notebook settings. We want to make sure in the dropdown under Hardware accelerator, we have GPU selected.
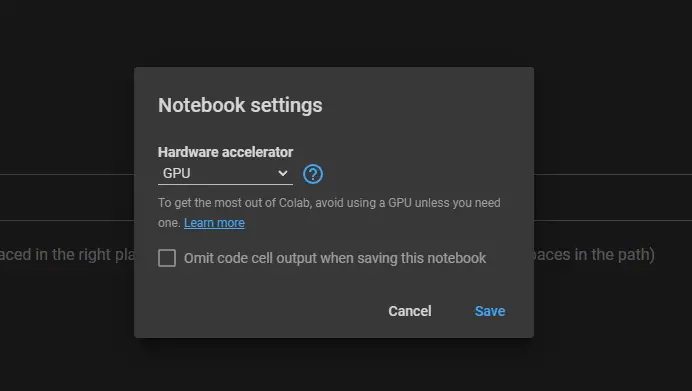
Click Save when you’re done.
Run The First Cell & Connect Google Drive
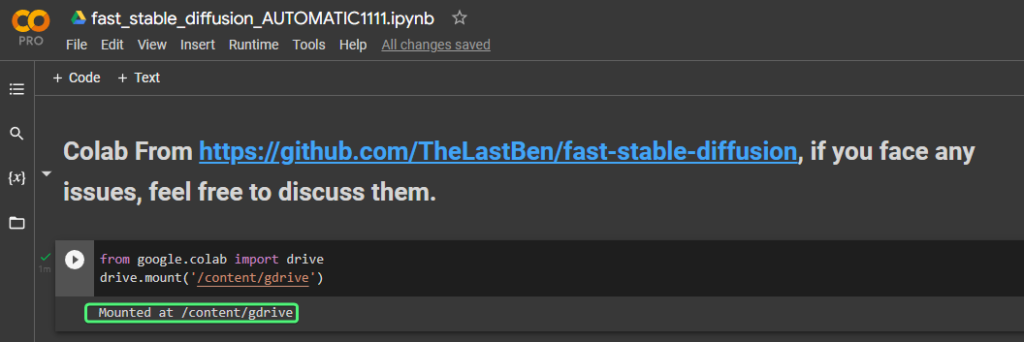
Next we’ll run the first cell which will connect Google Colab to our Google Drive, so will have access to save our generated images directly into our drive.
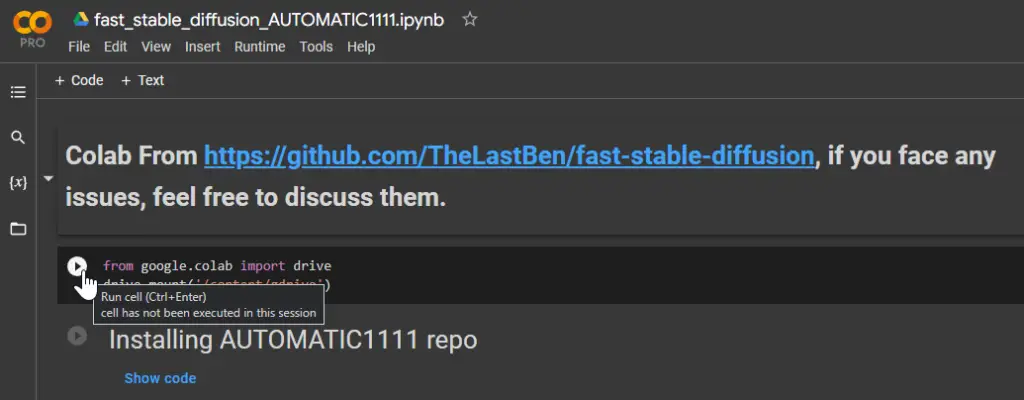
You’ll get a popup asking if you’ll permit this notebook to access Google Drive. To allow it we’ll click Connect to Google Drive.

After which you’ll get another popup to select the Google account to connect with, and then another popup showing you the permissions you’re giving the notebook to your Google Drive.
After you’re done you’ll get a small output saying Mounted at /content/drive.
Run the Next Cells
Next, at the time of writing, you’ll have Install AUTOMATIC1111 repo and Requirements. Simply run those two cells and wait for them to finish.

Input Your Hugging Face Token or Path to Pretrained Model
Before running every cell in order, we’ll first fill in the cell Model Download/Load.
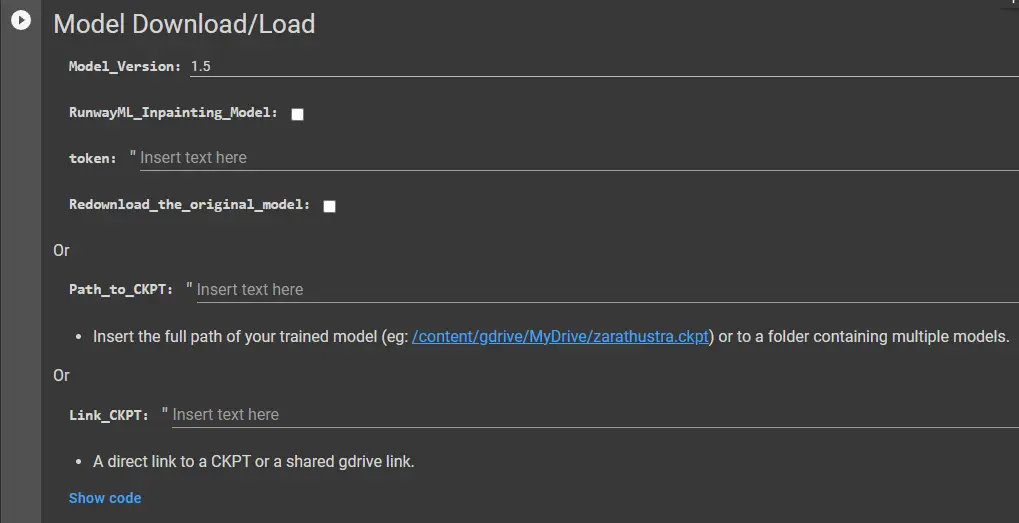
This cell offers us three main options. To either download the Stable Diffusion model, to load it from our Google Drive, if we already have it downloaded, or again from our Google Drive, but if someone shared it with us and it’s not physically in our drive.
Option 1: token (Download Stable Diffusion)

If we don’t already have the Stable Diffusion model downloaded, we can select which of the main model versions we want and input a token from Hugging Face, that will allow the notebook to download it for us. If this is the first time you’re using Stable Diffusion, or just aren’t sure if you have it downloaded in your Google Drive, then I recommend we go with this option now. The next time you run it, you won’t need to download it again since we’ll already have Stable Diffusion in our Google Drive.
Model_Version offers us 3 options at the time of writing.

- 1.5 – This is the first-ish version of Stable Diffusion. The first one was 1.4 and then came 1.5. These are the versions that made Stable Diffusion famous. They’re the most fun to play with, and they’re easier to use as than the next version. If this is your first time running Stable Diffusion go for 1.5. You’ll love it.
- V2.1-512px – This is the latest version of Stable Diffusion. It lacks a lot of the training data, like from many digital artists, celebrities, and more, which makes the original Stable Diffusion, so fun to experiment with. The developers of Stable Diffusion had to remove much of the data, because there’s a growing concern with using artist’s artworks as a component in AI models. the NSFW content is also removed. V2.1 also uses a different prompt style, making more use of negative prompts, and more difficult to learn. Stable Diffusion 2.1 may be better in some scenarios, like when generating portraits or if you train it yourself.
- V2.1-768px -Most AI image generation models natively generate 512x512px images, and then they’re usually upscaled. However V2.1 can generate 768x768px images natively, which means it can add more details to them.
[powerkit_alert type=”info” dismissible=”false” multiline=”false”]
For a comprehensive comparison between versions 1 and 2, check out this article from AssemblyAI.
[/powerkit_alert]
RunwayML_Inpainting_Model is a special model optimized for inpainting, rather than image generation from scratch. You can check the box to download it instead of the image generation models.
[powerkit_alert type=”info” dismissible=”false” multiline=”false”]
Inpainting can be used to generate new content for an image by filling in missing pixels or regions of an image. This can be useful for a variety of applications, such as creating realistic-looking images from incomplete data, or generating new images from scratch based on a given set of constraints or input.
[/powerkit_alert]

You only need to download this model once.
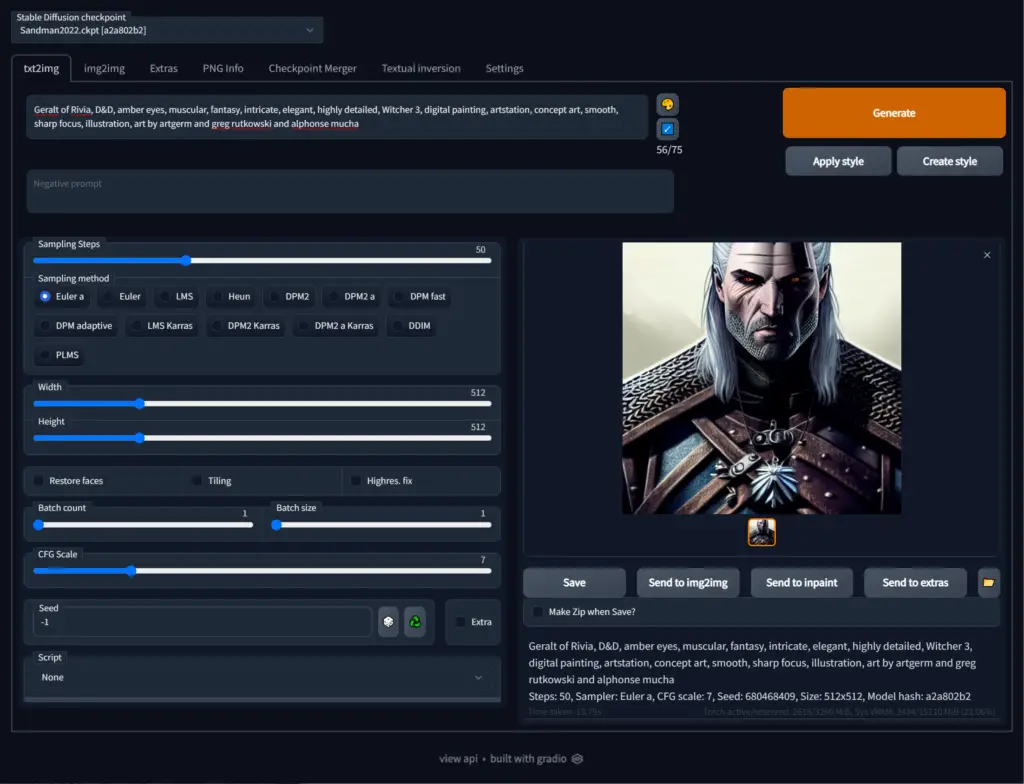
If you have downloaded the other models as well, and now you’re downloading this one, you’ll be able to switch between them in the upper left corner of the Stable Diffusion Web UI:

If you already downloaded the Stable Diffusion model, but for some reason want to redownload it, you can check the Redownload_the_original_model box.
- To get your token just sign up for Hugging Face at https://huggingface.co/join. It’s very straightforward.
- After you confirm your account just click on your profile picture in the upper right corner of the screen and go to your Settings > Tokens. Or you can just go there directly by clicking https://huggingface.co/settings/tokens.
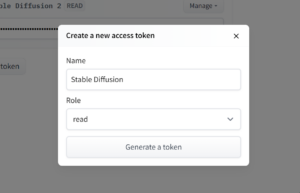
- There you can create an access token. A token is like a password. Just click on
New Tokenand then the following popup will appear. Name it anything you want (the name is just for reference purposes), and click on Generate a token.
Create New Access Token - Finally we can input our token in the notebook in the
tokenfield.
Input Token/Download Model
Option 2: Path_to_CKPT (Load Existing Stable Diffusion from Google Drive)
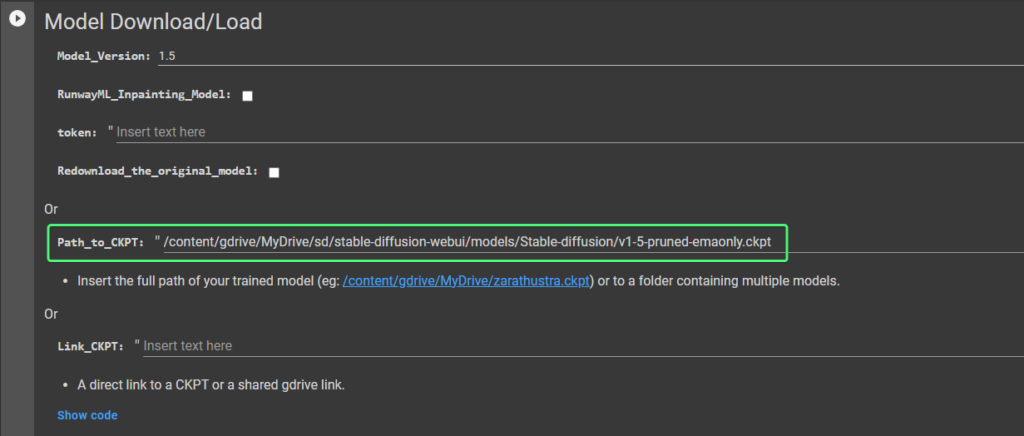
If you had already downloaded Stable Diffusion before, of have a fine-tuned version of it (in the form of .ckpt) then you can easily load it. Just input the path to it in the Path_to_trained_model field.
Option 3: Link_to_trained_model (Link to a Shared Model in Google Drive)
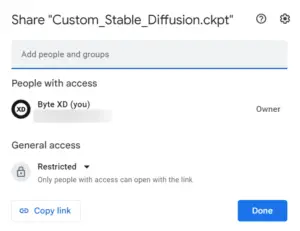
If you have a Stable Diffusion model shared via your Google Drive with your current account, then you can insert the link to it in the Link_to_trained_model. For example, say someone (or you, from a different Google account) shared a customized Stable Diffusion model with your current Google account.
Now it will show up in your Google Drive, but it won’t be physically stored there. To get the link to it, right click on it and click on Get Link.
A small popup will appear, with a button in the bottom left called Copy Link. Click on it and you’ll have your link.
Having the link, you can input it into the Link_to_CKPT field:
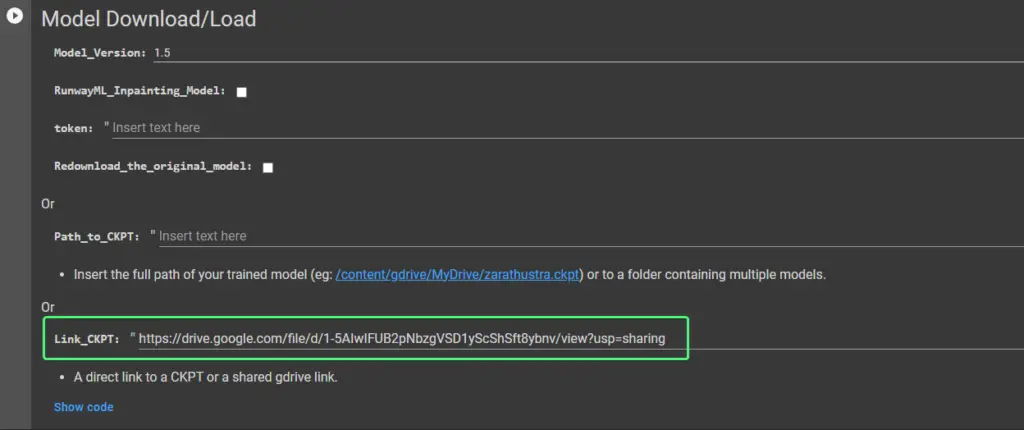
If you have already run this notebook before then you can leave both fields empty, because the notebook will automatically look for Stable Diffusion in /content/gdrive/MyDrive/sd/stable-diffusion-webui/models/Stable-diffusion/model.ckpt.
After you input either your filled in your preferred options, you can run the cell.
Access the Stable Diffusion WebUI by AUTOMATIC1111
We’re almost there. You just have 3 more options to look at and then you can run the last cell.

In this last cell, select the corresponding Model_Version. If you chose earlier to use Stable Diffusion 1.5, then select 1.5 here as well, and so on.
[powerkit_alert type=”info” dismissible=”false” multiline=”false”]
The reason it doesn’t detect your Stable Diffusion version automatically is because you may have chosen to load a model yourself using Path_to_CKPT or Link_to_CKPT.
[/powerkit_alert]
Enable_API is useful if you’d like to have API access to the WebUI. This is useful for developers. You can read about it in the AUTOMATIC1111 Wiki.
[powerkit_alert type=”info” dismissible=”false” multiline=”false”]
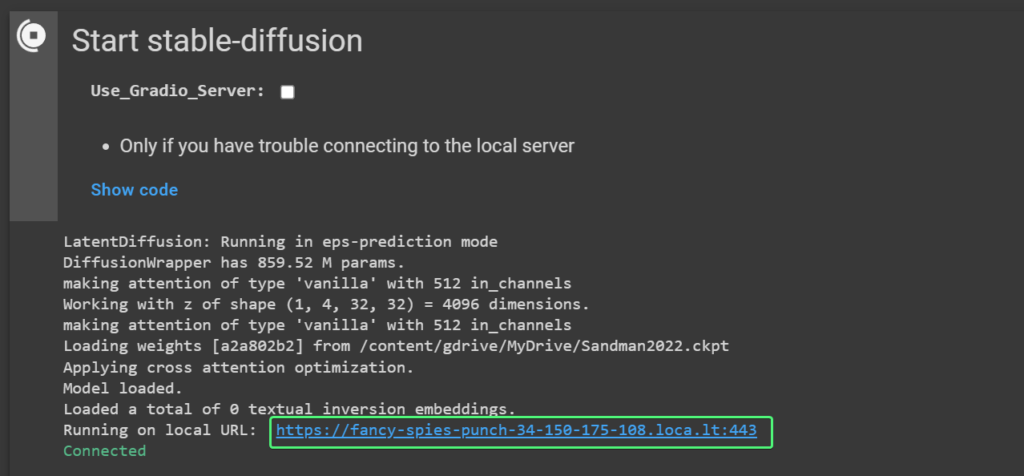
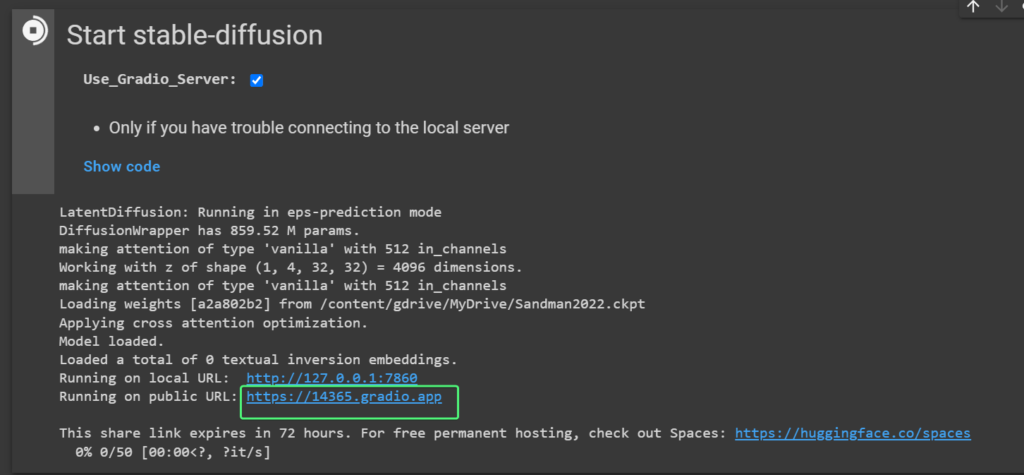
Use_Gradio_Server is a checkbox allowing you to choose the method used to access the Stable Diffusion Web UI. By default it will use a service called localtunnel, and the other will use Gradio.app‘s servers. Gradio is the software used to make the Web UI.
The reason we have this choice is because there has been feedback that Gradio’s servers may have had issues. You can leave it unchecked. Both should have a similar result.
[/powerkit_alert]
After everything has finished running, underneath the last cell we’ll see some links generated. If you left Use_Gradio_Server unchecked, the link will look like https://fancy-spies-punch-34-150-175-108.loca.lt and if you checked it, it will look like https://somenumber.gradio.app.
That is where we can access our user interface. Just click it and it will open a new tab and we can start generating images.
After clicking it a new tab will open with the WebUI where we can start generating images.
Where Are Images Stored in Google Drive
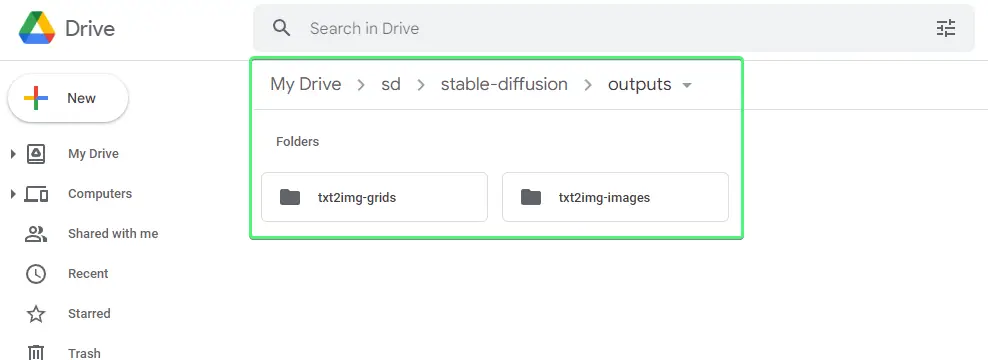
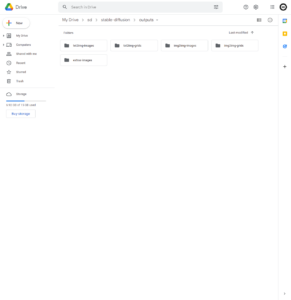
Images are stored in MyDrive > sd > stable-diffusion > outputs.
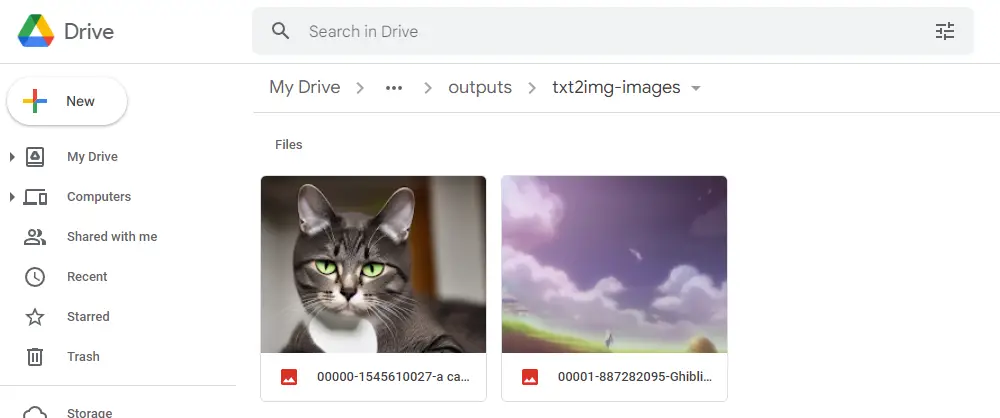
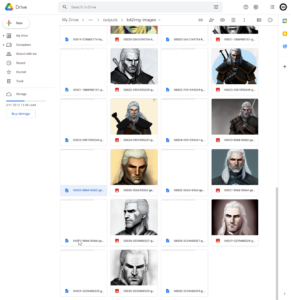
In our case, we just generated two images using the txt2img feature, and they are stored in MyDrive > sd > stable-diffusion > outputs > txt2img-images:
Conclusion
In this tutorial we covered how to set up Fast Stable Diffusion WebUI by AUTOMATIC1111 to create AI generated art using an intuitive web interface. As mentioned before, the WebUI offers you multiple useful and interesting features, and we recommend you check the original Github repository for more information on each of them.
With Stable Diffusion WebUI by AUTOMATIC1111 you’ll be able to have fun easily generating hundreds of images, to be sure you generate the right one for your prompt. You’ll conveniently have them stored in your Google Drive, and each image will have its’ settings stored in a file so you can share your settings, or tweak your settings and regenerate the image at a later date.
With ESRGAN you can upscale your images up to 4 times, and with GFPGAN you can fix distorted portraits. It also comes with with the Image-to-Image feature, where you can upload/draw an initial image to help guide Stable Diffusion to the desired result – as well as inpainting and outpainting for even more control.
And you can also load your own models during the setup, which means you can use the WebUI with your custom fine-tuned Stable Diffusion models.
If you encountered any issues or have any questions, please feel free to leave a comment and we’ll get back to you as soon as possible.
Troubleshooting
ModuleNotFoundError: No module named ‘fastapi’
The error looks something like this:
Traceback (most recent call last):
File "/content/gdrive/MyDrive/sd/stable-diffusion-webui/webui.py", line 7, in
from fastapi import FastAPI
ModuleNotFoundError: No module named 'fastapi'
This error is likely because Google Colab updated their Python version to Python 3.9. This will be fixed in a new version of Fast-DreamBooth. To fix this run the following code in any cell and run Start Stable-Diffusion again.
!pip install -r /content/gdrive/MyDrive/sd/stable-diffusion-webui/requirements_versions.txt
!pip install open_clip_torch
!pip install git+https://github.com/openai/CLIP.git
!pip install xformers
Very Useful Resources
- TheLastBen Github Repository – the repository from where we’ve used our Google Colab notebook. It’s an implementation of the AUTOMATIC1111 Stable Diffusion WebUI implementation of Stable Diffusion. In this repository there are implementations of other Stable Diffusion variants, as well. Such as Stable Diffusion WebUI by hlky, which is another very popular implementation, as well as a variant of DreamBooth (for fine-tuning Stable Diffusion), which we cover in a separate tutorial.
- AUTOMATIC1111 Github Repository – this is the repository for Stable Diffusion WebUI by AUTOMATIC1111. It’s the most popular Stable Diffusion implementation at the time of writing.
- Feature Documentation Wiki – This section is an excellent and comprehensive presentation of the WebUI’s features, along with explanations and examples.
- Lexica.art, OpenArt.ai, Krea.ai – these are some excellent search engines that allow you to search through millions of Stable Diffusion images and their prompts. They are invaluable for inspiration. I highly recommend them.






You can also run with no setup at canva, see texttoimage.app
Hi! Thanks for the heads up. I just tried it out and it’s pretty good. Right now you seem to be only able to generate square images, and one at a time. But it’s very fast and extremely convenient.
is it possible to host a persistent version of the webui on the huggingface spaces as it says?
you have forgotten to download the model file and place it in that directory
I did this but it’s not working, I created a folder called AI and a folder called models inside that folder and put the file inside that called sd-v1-4.ckpt.
the directory name doesn’t match, such as if it’s called /AI/Models instead of /ai/models
I did AI/models just as this tutorial but I still have this error.
What did I do wrong?
Hi Said. Thanks for commenting!
Could you provide a screenshot of the error you’re getting, and a screenshot of your
/AI/Modelsdirectory perhaps?Looking forward to hearing from you. Thank you!
I get the same kind of error:
FileNotFoundError: [Errno 2] No such file or directory: ‘/content/models/sd-v1-4.ckpt’
I attached the error and my drive folder.
https://ibb.co/ZfJbbmD
Hi Tomer. Thanks for commenting.
I just checked it out. I believe this happens when you the notebook is not set to use Google Drive.
Can you make sure you have that checkbox checked?
It is checked, it even asks for permission to access google drive as your instructions state. Still, it gives this error for some reason.
capitalize /Models 😀
It is checked (even asks for GDrive permission) and I still receive the error
I see. I had just tested it out myself before asking you to check the box and it worked and it’s difficult to tell what the issue could be without looking at the Google Colab Notebook.
Thank you for this fantastic guide! As someone who struggled briefly with Method 2: Step 3, I just want to mention, in case it’s helpful, that there appears to be a subtle autocorrect in the given code that causes an error when it’s copied verbatim. In the second line where it currently says “– output”, I believe it should be “–output”. I’m sure that this is merely a word-processing glitch, but hopefully a note here helps save any future head-scratching
Hi! Yes, it’s a common issue that I use some workarounds for, and I can’t believe I forgot about it this time. Thanks so much for pointing that out! It’s very much appreciated!
Thank you for commenting and for the feedback. Glad it was of use to you!
Thanks for the helpful tutorial. A couple of points/questions:
1) I think there’s a typo in the code box:
When I try to run this, it suggests that ‘– output’ is required rather than with just one dash.
2) I’m a total noob at this stuff, so probably a noob question: do I have to run the whole script each time I want to start using it, including the setup stage? It seems like it from my testing so far, but that seems counterintuitive to this noob, so maybe I’m missing something.
3) I’m running into an issue where the finished images aren’t showing up in the WebUI if I choose a batch number of higher than one. The processing finishes, which I can see on the Colab page, and the generated images show up in my Google Drive, but the image (and output) panes of the WebUI just keep on showing their ‘loading/working’ animation indefinitely. If I reload the page and turn the batch back down to 1, it works again. Any idea what I’m doing wrong?
Thanks again!
Hi! Thank you very much commenting and for pointing that out.
1) Yes it’s caused by WordPress (the software used for the website) and I usually work around it. I can’t believe I missed that.
It’s fixed now and will look into it to completely disable it because it’s clearly causing issues for readers.
2) Yes, you have to run the setup every time. This is how this specific Google Colab Notebook is set up. I think the setup can be optimized to setup faster, however. I’m assuming this will happen in the future.
3) I have also encountered this recently and I’m not sure what the cause is. I’ll update the article and leave a comment here when I find out.
Also it seems that they started a Discord Server for this. It might be useful to find answers quicker. https://discord.gg/gyXNe4NySY
Hope this helps. And thank you again for your feedback. It’s very much appreciated!
I, too, am seeing a bug where images fail to appear, but this is usually when I try upscaling. The first upscale works fine, but all subsequent upscales fail to load the resulting image, and also keep the Colab session resources marked as endlessly “Busy”.
…and now I think I know why the code I mentioned in 1) is messed up: this site software seems to be automatically converting two dashes into one, which also happened in my comment. 😛
To spell it out, then: the script seems to want two dashes in front of ‘output’, and there’s only one in front of it in the code block.
Hi EdXD,
My issue is that I wanted to upload the full ema checkpoint, after I uploaded to my google drive, I change the code in step 3 to –ckpt ‘{models_path}/sd-v1-4-full-ema.ckpt’ \
the screenshot shows that it stops running after “eps-prediction mode” leaving a ^C
and never loads the url for UI. Is it possible to use the full-ema.ckpt? If so could you help me fix the code to reflect the proper path?
Hi. Thanks for the comment!
I haven’t tried using the full-ema.ckpt model. I have only briefly checked out some articles/videos with that talked about the differences between the two models, and didn’t go any further than that. So I don’t think I can help with this.
Thanks for this tuto, it seems the part where you need to add code to mount and download models aren’t necessary anymore, there is a part in the note book where you only need to put your token.
I’m still getting familiar with it, less convenient than the set-up i used before (but at least i don’t kill my computer^^) . Main issue is, when images are finished to be generated, the ui don’t show images, and seems to still be running, even in i see in notebook that nothing is running anymore. So between each generation i need to reload the page.
Ok so it seems i can’t use it any more, i didn’t change anything, but when i tried to launch it to start a new creation session, i got this, i don’t find any way to start the notebook
No CUDA GPUs are available
Look like, notebook solution isn’t so free, google ask us to pay to be able to run it as we want i think.
I see. I’ve also noticed this lately. I’m thinking that maybe it’s because so many people have started using Google Colab because of Stable Diffusion’s growth in popularity, and are using up resources. A few months ago this hadn’t happened to me at all.
Hey, great, easy to follow instructions! I got it working, but you have a little error in the curl function block in Method 2, step 3 where you have ” – output”
when it should be “–output”
Aside from that, my results are generally slower and less accurate than what I’m getting from Huggingface’s SD demo and even the Dawn AI app for ios. maybe it’s a GPU limitation of using colab or some setting that I have yet to properly tweak. also haven’t been able to get img2img working.
Anyway, I hope my little note helps some other noobs like myself.
Thanks!
Hi! Thanks for your comment. Does it still appear as
– output? I had fixed it ~2 days ago so it’s odd that it still displays incorrectly for some.Regarding colab results vs Huggingface SD/Dawn AI – thanks for mentioning. I had no idea this was the case and will check it out.
I’m getting an error in Google collab during the final step,. I don’t really know how to address this, I’m a pleb!
This is the error it spits:
ImportError: this version of pandas is incompatible with numpy < 1.20.3
your numpy version is 1.19.2.
Please upgrade numpy to >= 1.20.3 to use this pandas version
Hi. Thanks for commenting.
I haven’t encountered this error so far.
I’m just commenting to say that I’m also running into this problem. And when I run “%pip install numpy” I get toldRequirement already satisfied: numpy in /usr/local/lib/python3.8/site-packages (1.23.3)
, while when I run “import numpyprint(numpy.version.version)” I get told 1.21.6, which only confuses me even more. I think though that the install package *is* only installing numpy 1.19.2, judging by how in the “1.1 Download repo and install” step has this in its output:Package numpy-base conflicts for:numpy-basemkl_fft -> numpy[version=’>=1.16, numpy-base==1.19.2[build=’py38hfa32c7d_0|py38h4c65ebe_1′]numpy -> numpy-base==1.19.2[build=’py38hfa32c7d_0|py38h4c65ebe_1′]torchvision -> numpy[version=’>=1.11′] -> numpy-base==1.19.2[build=’py38hfa32c7d_0|py38h4c65ebe_1′]mkl_random -> numpy[version=’>=1.16, numpy-base==1.19.2[build=’py38hfa32c7d_0|py38h4c65ebe_1′]
andPackage libgfortran-ng conflicts for:libgfortran-ngnumpy -> numpy-base==1.19.2=py38h4c65ebe_1 -> libgfortran-ngnumpy-base -> libgfortran-ng
This suggests that the error isn’t imaginary, the published version of the notebook really is only installing Numpy 1.19.2.
Same here :-/
Hi. I think that some Colab instances just have older versions installed. Can you run this command to install a new version of numpy:
When it’s done, you’ll get a warning and a button to restart runtime. Press it to restart the runtime and run all again.
Let me know if it worked out?
Thanks,just install it with the numpy fix, and it works
Did you manage to solve the problem of: Import: this version offer pandas is incompatible with numpy <1.20.3 ??? I am going crazy !!!
Your numpy version IS 1.19.2.
PLEASE UPGRESS NUMPY TO> = 1.20.3 TO US THIS PANDAS VERSION
Hi. I think that some Colab instances just have older versions installed. Can you run this command to install a new version of numpy:
When it’s done, you’ll get a warning and a button to restart runtime. Press it to restart the runtime and run all again.
Let me know if it worked out?
I’ve commented this below as well, but mentioning this here since it’s more visible.
I think that some Colab instances just have older versions installed. Can you run this command to install a new version of numpy:
When it’s done, you’ll get a warning and a button to restart runtime. Press it to restart the runtime and run all again.
Let me know if it worked out?
perfect, it worked thank you very much, you have saved my life
Joining in with some other comments with a bit of findings. It seems the upscale functionality may have a bug of some kind. It works to upscale one image after loading up the Colab, but then fails to upscale others. I can see that the Colab session shows as busy when this is happening, as though there is still an upscale process running amok on the GPU session. I haven’t yet figured out what is holding up that process or how to move beyond it, but wanted to chime in that I am experiencing it, too. What a fantastic write-up, though, thanks for helping me get this running!
Hi! Thanks so much for the kind words. They’re very much appreciated! I’m so glad it helped.
I’ll also look more into these glitches to see what’s going on
Hello, there is a way to stop batch processing once it is started (for corrections in prompt etc)?
OMG this might as well be written in Russian. I can’t even get the file to upload to drive!
All I want to do is make pretty art and not need to be some sort of code reading genius
Hi. I’m sorry the tutorial is difficult to follow. I get your point and will try to find a solution to simplify it because not everyone wants to get into all these details.
You can use apps like mage.space or https://huggingface.co/spaces/stabilityai/stable-diffusion that offer free Stable Diffusion without any hassle.
There’s a big list of similar apps also: https://www.reddit.com/r/StableDiffusion/comments/xjqy5y/list_of_stable_diffusion_systems_part_2/
And you can use lexica.art, openart.ai or krea.ai for inspiration for prompts.
Also canva.com has Stable Diffusion now as well.
Hi.I got this error when itried to start stable diffusion
Traceback (most recent call last):
File “/content/gdrive/MyDrive/sd/stable-diffusion-webui/webui.py”, line 8, in <module>
from modules.paths import script_path
File “/content/gdrive/MyDrive/sd/stable-diffusion-webui/modules/paths.py”, line 16, in <module>
assert sd_path is not None, “Couldn’t find Stable Diffusion in any of: ” + str(possible_sd_paths)
Assertion error:could’t find stable Diffusion in any of.[contentgdrivemydrivesd stable diffusion
assert sd_path is not None, "Couldn't find Stable Diffusion in any of: " + str(posI’m having this problem too
I’m stuck just after “Start stable-diffusion” and nobody else appears to have my issue.
Full Log: https://pastebin.com/0tJ5HKF2
It looks like I’m getting three errors:
1- File “/usr/lib/python3.7/zipfile.py”, line 1325, in _RealGetContents
raise BadZipFile(“File is not a zip file”)
zipfile.BadZipFile: File is not a zip file
2- File “/content/gdrive/MyDrive/sd/stable-diffusion-webui/modules/safe.py”, line 50, in find_class
raise pickle.UnpicklingError(f”global ‘{module}/{name}’ is forbidden”)
_pickle.UnpicklingError: global ‘torch._utils/_rebuild_tensor’ is forbidden
3- The file may be malicious, so the program is not going to read it.
I have no idea what any of that means.
Hi. Thanks for commenting. I’m also a bit confused by this error. I see someone is having a similar situation when running Stable Diffusion by AUTOMATIC1111 on a Mac.
From what I gather it’s because some issue with some Python library versions (torchvsion and torch). I think this is because every Google Colab instance may have different versions of some libraries.
I think the fast solution to get passed this is to end the Colab session and start a new one in hopes that you’ll get assigned a version of those packages that won’t cause you issues.
An alternative, I think, would be to reinstall those packages with different versions that won’t cause this error.
Did you manage to solve this in the meantime?
Hi, my fast_stable_diffusion_AUTOMATIC1111.ipynb page looks different from the one you have in the tutorial and in fact the process fails
Hi! Thanks for commenting. The notebook is different because the author seems to have updated it a bit in the short time since this article was posted.
The extra fields were added to accommodate more scenarios.
I’ll update the guide right away. Thanks for bringing this up.
That being said it seems like the notebook is working faster than before for me. Would you mind providing a screenshot of what error you’re getting?
I just tried it out and it worked for me.
Thanks for the reply.
This is the error I get aftee launching “Start stable-diffusion”.
Hi. By
checkpointit means that it wants a.ckptfile and it’s suggesting that you didn’t give it one. A checkpoint/.ckpt file is basically a Stable Diffusion model.I’m assuming this is the first time you’re running this. Have you inserted your Hugging Face token in the
tokenfield?Looking forward to hearing from you!
Hi. I’m facing the same problem and I’ve inserted my hugging face token
Yes, the token field was correctly compiled. Anyway, I deleted everything (from gdrive), made a new token, started the process from zero and then everything is running fine. @skye you can try the same process
Do I have to run each cell every time I close and re-open my browser?
Hi. Thanks for commenting. Yes, unless you have Google Colab Pro+, which will continue running even after you close your browser.
Hi again! Sometime when I check “Update_repo” I get this error:
There is something that I can do before reinstalling everithing? Thank you again
Hi! I suspect it doesn’t want to overwrite some files. The way I did it when I had to update the repo and got an error was to delete the
sdfolder.I backed up my previously generated images, that were stored in
My Drive > sd > stable-diffusion > outputs, so I took what was in theoutputsfolder out of there, and then I deletedsdthen ran the notebook withUpdate_repochecked.Let me know if that works? Thank you!
yep, it works when I do that. I wanted to see if there was a way to not have to reinstall everything. Thank you very much anyway!
Is there any way to get Google Colab to reconnect my Stable Diffusion connection without the need to run through all the steps of the tutorial? I can’t seem to get a reconnection after I am disconnected. I then have to connect my Google Drive and run all the steps again to get a new link to the WebUI.
Can anyone explain why I get a 502 Bad Page after a while? Is it timing out? And when i attempt to run it again from colab, there’s always a folder webui/ldm/ missing and a missing module taming.modules.vqvae?
This tutorial was amazing! If you made a video tutorial you would probably get a million views! I have one issue I can not figure out how to correct. How do I get the WebUI to work after I close my browser? I am starting the Stable Diffusion WebUI with both boxes unchecked and I can clicking the link it provides. I am taken to localtunnel and I click a box to launch the WebUI. Everything works fine. I save the URL. If I close Google Colab page or the URL with the WebUI for Stable the URL gives me an error or a 404 and I have to do all the steps again to make the WebUI work again. I tried saving a copy of the Google Colab Copy of fast_stable_diffusion_AUTOMATIC1111.ipynb on my Google Drive as well as selected SAVE from the file list in Google Colab but it doesn’t work if I close the browser and try and launch it again.
Getting 404 from .loca.lt the one day after the install
Hi Marc. That happened to me once as well. You can stop that last cell and check
Use_Gradio_Server. It worked for me just an hour ago.I had to mount again, Installing Requirements and start the SD again. Is it expected?
This is the first time this happened to me. I’m not sure what the cause is but I believe this is the reason why we also have
Use_Gradio_Server, so we can use it in case loca.lt doesn’t work.Did you also try
Use_Gradio_Serverand it didn’t work?After the reinstall the local worked again. Didn’t tried the Gradio.
I had to mount again, Installing Requirements and start the SD again. Is it expected?
I’ve got this error since this morning:
Traceback (most recent call last):
File “/content/gdrive/MyDrive/sd/stable-diffusion-webui/webui.py”, line 14, in <module>
import modules.extras
File “/content/gdrive/MyDrive/sd/stable-diffusion-webui/modules/extras.py”, line 13, in <module>
from modules.ui import plaintext_to_html
File “/content/gdrive/MyDrive/sd/stable-diffusion-webui/modules/ui.py”, line 45, in <module>
from modules.generation_parameters_copypaste import image_from_url_text
Hello. Thanks for commenting. I can’t run the notebook right now, however the first thing I’d do would be to check the
Update_repocheckbox and run theInstalling AUTOMATIC1111 repocell.Have you tried that yet?
I had the same problem, and this solved the issue, thanks.
Nice! Glad to hear it worked! Thank you for letting me know!
I seem to be getting some sort of error on the last step
Traceback (most recent call last):
File “/content/gdrive/MyDrive/sd/stable-diffusion-webui/webui.py”, line 10, in <module>
from modules.paths import script_path
ModuleNotFoundError: No module named ‘modules’
It works sometimes but most of the time I get “You cannot currently connect to a GPU due to usage limits in Colab”. How do you fix this? What is a compute unit and how many images does one generate?
Hi. Apologies for the late response.
Regarding Colab Usage Limits
This happens when you use Google Colab free too much. I think like 10h continuously or something (I am not sure because I’m also using it for free, but this only happened to me once).
Regarding Compute Units
When you pay $9.99 for 100 units of Google Colab you’re basically buying credits (except Google likes to call them units).
So you have 100 credits and when you use Google Colab with a GPU, depending on the GPU model, it will use up some amount of credits per hour. So you’re basically charged hourly.
The model you usually get is in Colab Free is Tesla T4 or Tesla P100.
The GPU premium models (that you get when you go to
Runtime > Change runtime type), are Tesla V100 and A100.I think the usage per hour looks something like this:
Also you don’t get to choose what GPU you get if you’re running non-premium (it can be either T4 or P100) or if you’re running premium (it can be either V100 or A100), which sucks. Maybe I want to just use a V100 to use up less credits per hour, but I end up with an A100.
So if I use a T4 for 2 hours, I’ve used 2 (hours) * 2 (units/h) = 4 units. I’m left with 100 – 4 = 96 units.
Later I still don’t want a premium GPU and get allocated a P100 and I use it for 4 hours. That means I’ve used 4 (hours) * 5 (units/h) = 20 units. And I’m left with 96 – 20 = 76 units.
This is worse than it was before compute units were introduced. Because now you’re basically paying to use GPUs that you’ve used for free before.
And those non-premium usages eat up your compute units, that you could’ve used for cases when you really needed more resources.
Hope that makes sense. Let me know if it doesn’t or if I’m mistaken somewhere.
thaaaaaaaaaaaaaannnnnnnnnnkkkkkkkkkkkk youuuuuuuuuuuu. i cant explain how grateful i am right now. i have a shitty pc and free alternatives are good but not automatic 1111 you know. now i can run it and its all thans to you. you are amazing
Hi! Thanks for commenting. I’m really happy to hear it works well for you! Also, thank you for the kind words!
Can anybody confirm that this tutorial still works? I’ve managed to do everything up until the last step “Access the Stable Diffusion WebUI by AUTOMATIC1111”. There, the Google UI looks a bit different from what is shown in the tutorial, but going with what I assume is as close to the tutorial as possible, I get the following error:
/usr/local/lib/python3.8/dist-packages/gradio/blocks.py: No such file or directory
Traceback (most recent call last):
File “/content/gdrive/MyDrive/sd/stable-diffusion-webui/webui.py”, line 8, in <module>
from fastapi import FastAPI
ModuleNotFoundError: No module named ‘fastapi’
That is with “Use_localtunnel” unchecked. If I check that box, I get this error instead:
FileNotFoundError: [Errno 2] No such file or directory: ‘/usr/local/lib/python3.8/dist-packages/gradio/blocks.py’ -> ‘/usr/local/lib/python3.8/dist-packages/gradio/blocks.py.bak’
And two references to specific lines of code.
Anybody know what to do?
The UI has changed a bit and I’ll have to update the tutorial and screenshots, but the Google Colab doesn’t depend on this tutorial and it’s updated constantly, so it should work, but I’m currently getting errors as well right now. Both different from yours and from one another.
First one
"cannot import name 'sd_disable_initialization' from 'modules'"and the other'ModuleNotFoundError: No module named 'k_diffusion'.I’m not sure what’s causing this.
Could you try again, and if it returns the same errors run the following in any cell and run the final cell after again? Looking forward to hearing from you.
Much needed article and one that has been helpful in my own journey!
I personally found it quite tricky to set up Automatic1111 for Stable Diffusion and the loading times of it running on my Mac Book Pro a bit slow. I’ve been working on creating a one click solution for running Automatic1111 in the browser with dedicated cloud GPUs for the instance.
It is still improving but it currently works if anyone wants to skip set up of Automatic1111 and just start creating on Stable Diffusion and other models: http://stablematic.com/ any feedback is appreciated! If anyone has any good feedback, you can also reach me via the contact or on twitter @ikigaibydesign and will send a few credits as a little thank you
Can we run deforum along with this?
is this still working? would love an updated version of this tutorial