Stable Diffusion by Stability.ai is one of the best AI text-to-image generation software, as of writing this article. A few notable things about Stable Diffusion:
- It generates high quality, coherent, and beautiful images based very fast, with much less resources than other image generation software.
- The team behind it seems to be extremely open and transparent. They seem to aim to give power to the people.
- Even if Stable Diffusion is also paid, they have made it available to the public, and we can use it via Hugging Face Spaces and we can also use Stable Diffusion from Hugging Face via Google Colab, which is free, and is the method which we’ll be using.
Other very similar software include Dall-E 2, MidJourney and Disco Diffusion (which we also covered in a separate tutorial)
You don’t have to know anything about programming to follow this tutorial. We’ll simply run some code, observe the results and try to understand what’s going on.
We recommend you also check out our newer tutorial on a variant of Stable Diffusion with a web user interface. It’s easier to use, still uses Google Colab for free, and has many more features available.
[powerkit_alert type=”info” dismissible=”false” multiline=”false”]
Google Colab is, in very simple terms, a cloud-based coding environment. The user does not have to worry about setting up any infrastructure, and the code is executed on the Google’s servers.
Google Colab might seem intimidating at first, but it’s really quite easy to use. You can run each block of code in Colab by clicking on it, and then hitting the “play” button on the left side. We don’t have to understand what it means.
For a quick and easy intro you can check our Google Colab beginner guide.
[/powerkit_alert]
Here’s a quick demo to see how fast and effortlessly you can generate images using Stable Diffusion in Google Colab:
Table of Contents
- Getting Started with Stable Diffusion (on Google Colab)
- Conclusion

Sidenote: AI art tools are developing so fast it’s hard to keep up.
We set up a newsletter called tl;dr AI News.
In this newsletter we distill the information that’s most valuable to you into a quick read to save you time. We cover the latest news and tutorials in the AI art world on a daily basis, so that you can stay up-to-date with the latest developments.
Check tl;dr AI NewsGetting Started with Stable Diffusion (on Google Colab)
We’ll start with a quick demo of running Stable Diffusion on Google Colab from start to finish, until we generate our first images.
Quick Video Demo – Start to First Image
The video also has timestamps to help you better understand the steps taken. Hopefully it gives you an overview of what we’re about to do.
Step 1: Create an Account on Hugging Face
We’ll download Stable Diffusion from Hugging Face. For this we need an account with them. Hugging Face is, in simple terms, a repository for working with different models, similar to Stable Diffusion, other than that it has many useful functionalities. A model is basically like a computer program that can learn to do things on its own.
The process is very straightforward. Just visit https://huggingface.co/join and create an account like you’d normally do, and check your email to confirm it.
Step 2: Copy the Stable Diffusion Colab Notebook into Your Google Drive
Next, just like with any Google Doc written by someone else that we need to edit, first visit the Stable Diffusion Google Colab (https://colab.research.google.com/github/huggingface/notebooks/blob/main/diffusers/stable_diffusion.ipynb) and go to File > Save a copy in Drive.
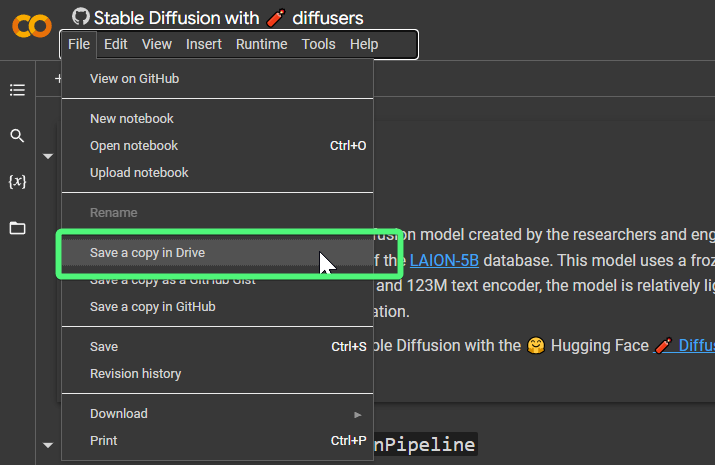
A new tab should open with the notebook saved to your drive. Only now it’s named Copy of Stable Diffusion with 🧨 diffusers. You can rename anything you want.
Step 3: Make Sure You’re Using GPU
To run Stable Diffusion we’ll need to make sure our Google Colab is using a GPU. To do this, in the menu go to Runtime > Change runtime type.
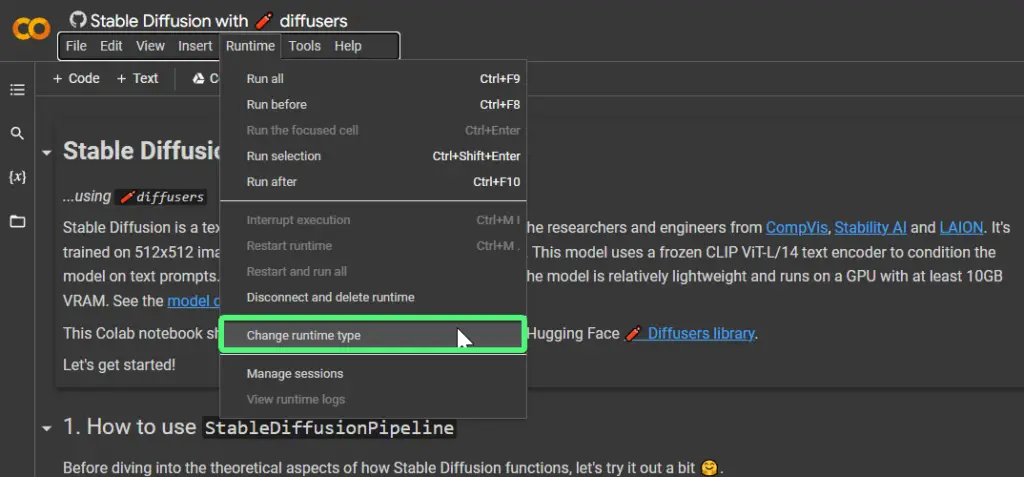
A small window will appear with a dropdown under Hardware accelerator. We want to see GPU there.
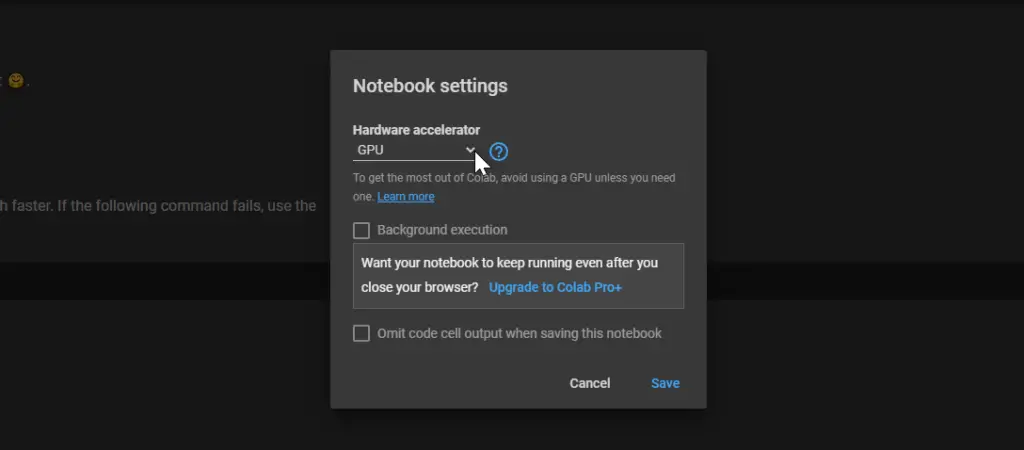
Click save, and we can move on.
Step 4: Run The First Cells
Now we can run the first cells in the Stable Diffusion colab. Just hover with your mouse on the every one of them, and a play button will appear. Just click it and wait for it to finish. It will display a green checkmark when a cell is done.
You can see that each cell has a description above it of what it does.
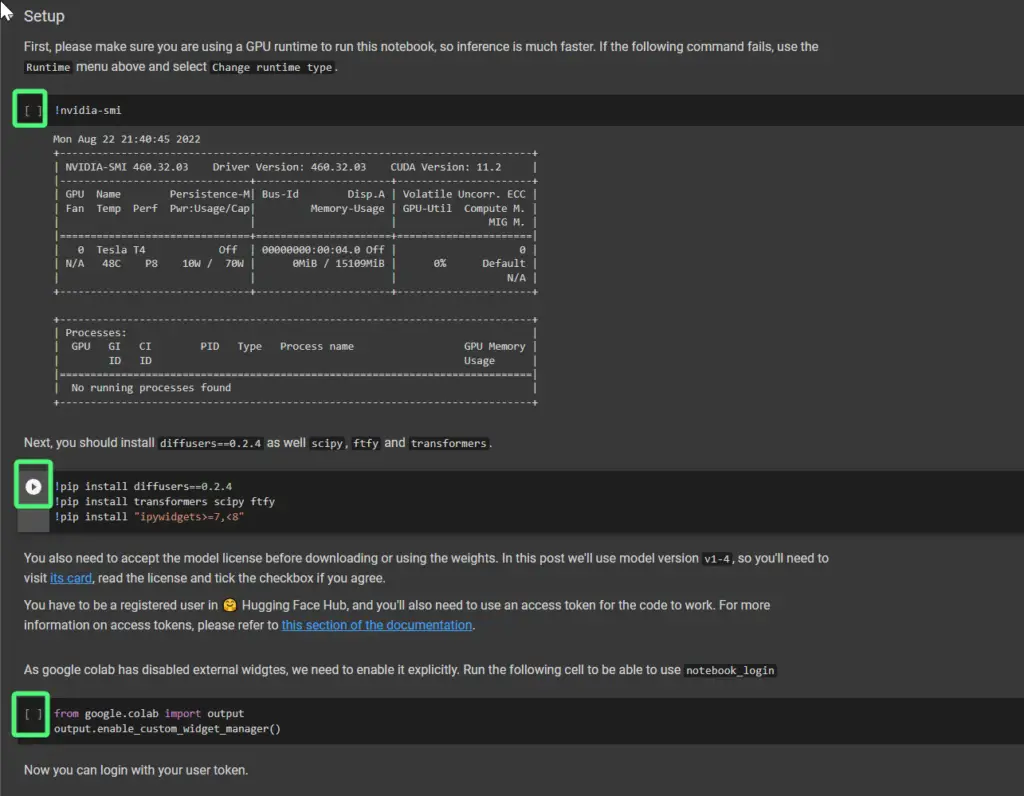
If something like “this notebook requires high ram” appears, just click ok.
Now we should be good to go.
Step 5: Run the Fifth Cell to Download Required Files
Next we’ll run the fifth cell, under Stable Diffusion Pipeline, that will download some the necessary components.
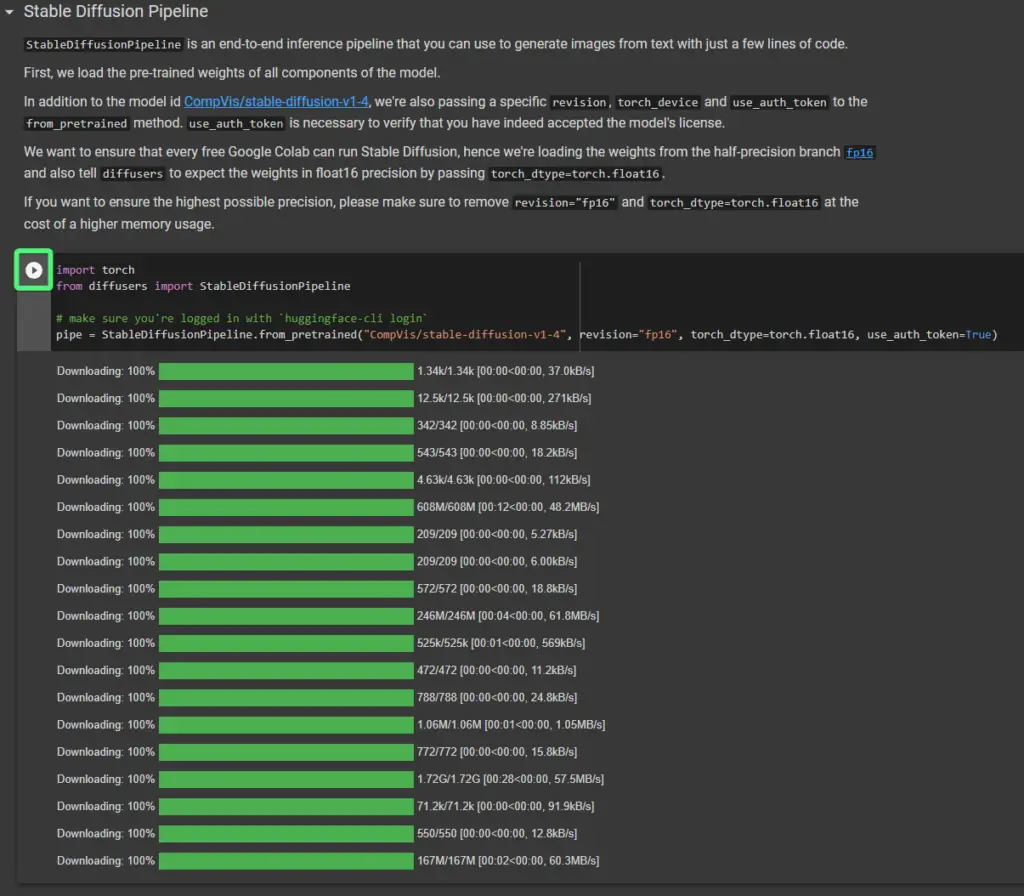
Also run the next cell, that says pipe = pipe.to("cuda"):

Step 6: Generate Our First Image
Well done. Now we can generate our first image.
In the next cell, where you’re probably already seeing an image under it, is where we generate our first image.
Just write a text in the quotes, that you want turned into an image, and run the cell.
In the following example I wrote a protoss cityscape with advanced technology, inspired by the game starcraft, making heavy use of light and shadow to create a sense of mystery and foreboding. the city sprawling below is a mix of organic and inorganic, with swirling energy currents and strange crystalline structures, illustrated in a realistic and detailed style by wei wang, artstation.
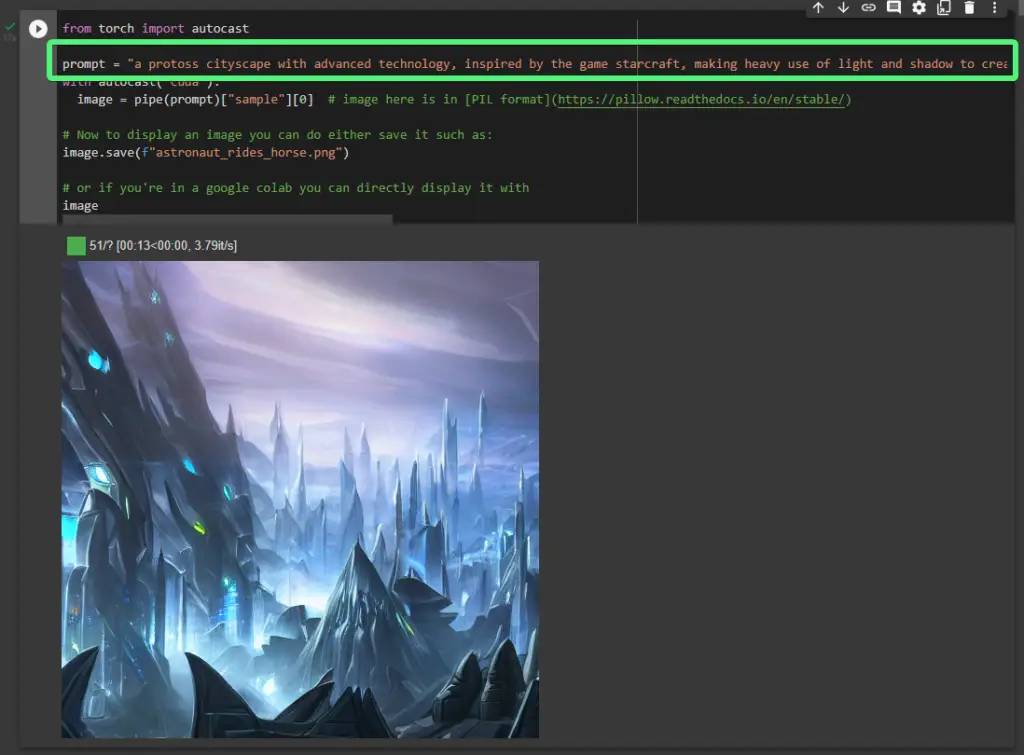
Well done! That image generation should have taken under a minute.
Generate Multiple Images at a Time
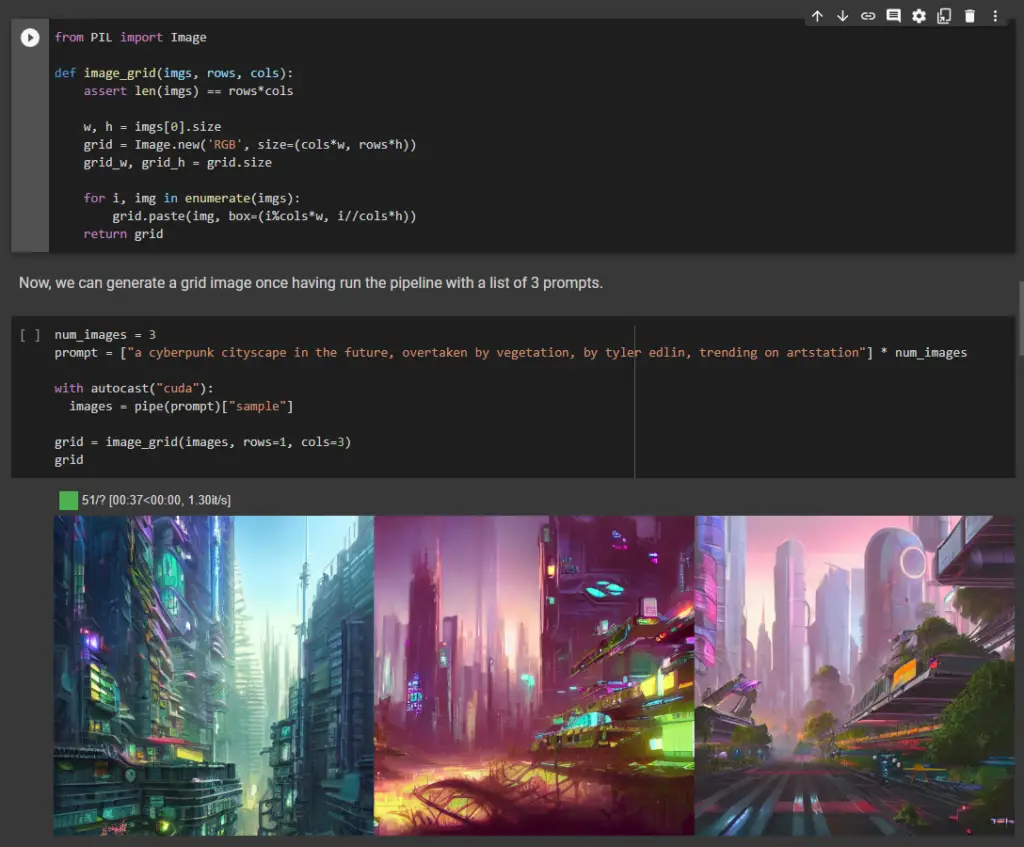
In the initial demo video you’ll see we’re also generating 3 images at a time. To do this scroll a bit further and you’ll see the following cells.
Just run the one that starts with from PIL import Image and in the following one edit the text in ["blah blah"] and run it.
Conclusion
Congratulations! Hopefully this guide got you to generate your first image using Stable Diffusion from Hugging Face on Google Colab. From here you can explore the other instructions in the Google Colab notebook. Our purpose here was to just get you up and running to get through that initial barrier.
If you encountered any issues or have any questions feel free to leave a comment and we’ll get back to you as soon as we can.




Everything worked perfectly.
Except when I wanted to generate 3 images. I’m getting this error:
“NameError Traceback (most recent call last)
<ipython-input-13-03a816915603> in <module>
5 images = pipe(prompt)[“sample”]
6
—-> 7 grid = image_grid(images, rows=1, cols=3)
8 grid
NameError: name ‘image_grid’ is not defined”
Any idea why?
Thanks!
Hi Sorin. Thanks for commenting. Did you also run the cell above it, before running the cell that generates 3 images? I’m thinking that should be the cause for the
image_griderror. You don’t have to run it every time, just the one time.Hi, thanks for this guide, it was very helpful!
I have a few follow-up questions:
– When I want to go back after I closed the tab, where do I go? Simply the same URL, that is https://colab.research.google.com/drive/ and then 33 alphanumeric signs, or is that only to set it up the first time?
– When I want to create the next image, after I had closed the tab, do I have to run all the cells again? (done in just 2 min, but I’m not sure if need to or can save myself the time)
– How do I add all those modifying things like size, stylize parameters and in particular img2img? (I understand how to upload a picture and copy its path, but not how to add it to the prompt, if possible.)
Hi! Thanks for the comment.
– The URL is the same. It’s like Google Docs. You should also find the notebook in your Google Drive (it’s an actual file). I think it should be automatically placed in
My Drive > Colab Notebooks– You don’t have to run all the cells again. Just the cell that you run when generating the image. Basically all other cells until that point are setting up the environment, and the actual generation is performed by that cell under which you see images appearing.
– I haven’t tried img2img with this notebook, and haven’t played with all the parameters.
However there is a thing I wanted to write about. Someone developed a Google Colab + an easy to use Web User Interface. You run the Google Colab, it generates an URL, and you can access it in your browser (as well as whoever you share it with). It also has settings you can play with, img2img, upscaling, portrait fixing via GFPGAN.
I highly recommend you try it out https://github.com/altryne/sd-webui-colab
I set it up just a few hours ago and it’s just too cool. Let me know if you have any issues.
Thanks again. Yes, that looks cool!
I went through the setup and it says “Download the stable diffusion model (s-d-v1-4.ckpt) file from Hugging Face Stable Diffusion”. There, there isn’t a simple file or download link, and I don’t yet know enough about models, weights and diffusers, it seems. How do I get that file, and would it include all the other files or folders (feature_extractor, safety_checker)?
Sorry for the dummy questions – that’s the sort of thing that is completely self-explanatory once you know it, and impenetrable to outsiders.
No worries! I had the same issue. You can download it from here https://huggingface.co/CompVis/stable-diffusion-v-1-4-original and then, in your Google Drive upload it in
My Drive > AI > models. It’s a bit annoying to download/upload (4GB).I couldn’t find a way fast enough to download it directly in Google Drive so gave up and just did it manually because I was in a hurry.
After you upload it in the
My Drive > AI > modelsfolder it should work.Please let me know if it works out or if you have any issues. It helps me too because I’d like to write about it, and any difficulties you encounter are like feedback for me.
Yes, seems to work so far, I’m playing with the parameters now. Thanks a lot again!
Glad to help!
I did all of this but then when I go to my URL it is asking for username and pw. I did add a PW in step 2.1 ‘share password’ but I don’t know what the username it is asking for gradio.app??
Hi thanx very much for your guide !
I tried as you recomand it the webui by altryne and it worked perfectly.
After a moment it deconnected, so i tryied to reconnect unsuccesfully.
After several attempts I finally decided to relaunch completly, and for an unknown reason when I launched the public url as i already did the first time it opens me a completly different interface much less interesting with much less choice. Impossible to choose the seed, or the size of the image for example…
It appears that i’m not anymore on the interface by Altryn, but created by CompVis and Stability AI, adapted by JPH Productions.
Have you got an idea of what happened ?
Thanx again for your very helpfull work, and excuse me for my poor english 😉
Hi! Thanks for commenting.
I don’t know what could have happened. It’s seems very odd that you’d be using the notebook by Altryne and all of a sudden you end up with a different one.
Since it came out it’s the main way I use Stable Diffusion and nothing of the kind has happened. I have also posted a tutorial on Stable Diffusion WebUI today, in case it’s useful for you somehow.
Did you figure it out what happened since posting this comment?
Hello,
In the forth cell, I don’t get the option to enter my Token and login (or the HuggingFace logo). When I press “play”, all I get is the text shown on the screenshot
Hi Jean. Thanks for commenting. Can you open another cell above that one and run:
And then run that cell again?
I’m not sure why this happens, but it happened to me once as well.
Step 7 fails to run.
How do you turn off NSFW filters for google colab with this method?
Hi! This guide is awesome and it worked perfectly for me. Thanks!
Do you know how i can upload a picture and edit it?
How can we use Stable Diffusion v2?
Hi, thanks for commenting. I’m looking into it right now.
You can run the following in Google Colab in any cell. Remember to enable GPU first.
pip install --upgrade git+https://github.com/huggingface/diffusers.git transformers accelerate scipy

from diffusers import DiffusionPipeline, EulerDiscreteScheduler
import torch

repo_id = "stabilityai/stable-diffusion-2"
device = "cuda"

scheduler = EulerDiscreteScheduler.from_pretrained(repo_id, subfolder="scheduler", prediction_type="v_prediction")
pipe = DiffusionPipeline.from_pretrained(repo_id, torch_dtype=torch.float16, revision="fp16", scheduler=scheduler)
pipe = pipe.to(device)

prompt = "High quality photo of an astronaut riding a horse in space"
image = pipe(prompt, width=768, height=768, guidance_scale=9).images[0]
image.save("astronaut.png")
The image won’t be displayed, but you can see it in the file browser on the left. Just double click it.
This is just a solution on short notice.
Hey, thanks for the tutorial!
I’m getting an error when running the 5th cell. It seems all the files are being correctly downloaded, but something is happening with “from_pretrained” method.
Do you know what could be problem? Maybe a recent bug?
Thanks again!
We need to accept something in repo but there is nothing to accept ont this page https://huggingface.co/CompVis/stable-diffusion-v-1-4-original
Hi. I’m also getting this error now. I’m looking into it. I recommend trying out this method. It’s the most popular way of using Stable Diffusion https://bytexd.com/best-way-to-run-stable-diffusion-for-free/ and very user friendly after you set it up.
Hello. Apologies for the delay. Something must have changed with some packages. I’m getting the same error recently.
I’m looking into it.
In the meantime, I recommend this variant of Stable Diffusion https://bytexd.com/best-way-to-run-stable-diffusion-for-free/
It’s absolutely worth it. You generate however many images you want, they’re saved in Google Drive, and you have a great user interface with all sorts of features.
Hello, same thing
Hi. Could you post a screenshot of what the page looks like when visiting that link, please?
Hello
Thanks! I see. It seems they no longer require us to accept any terms, at least for this version. However I’m not getting an error and it works fine.
Can you look into your Google Drive for a folder called
sdand delete it (if you haven’t used it before and don’t have any images saved in there), or just rename it to something else, and then try running the notebook again?I don’t have that folder on my Google drive.
Hello. Just to be clear.
sdfolder doesn’t exist in your Google DriveLet me know if that is correct, please?
Hi. The notebook seems to have been edited yesterday (Dec 9th) and now it works fine and doesn’t need a Hugging Face token anymore.
Perfect, now it works 🙂
Awesome! Glad to hear!
I get to the point where I can open the link to the UI but then it asks for a username and password. My google email doesn’t work. I set my password as 1234. But the username does not work.
Can I upload custom models (checkpoints, etc.)?