X2Go is a free and open source emote desktop application that uses a modified NX protocol and provides a fast, secure, and easy way to access remote desktops.
X2Go is better than VNC or RDP because it is optimized for low bandwidth connections and provides a better user experience over slow or high latency connections. It also has a number of security features that make it more secure than other remote desktop protocols.
In this article, we’ll discuss the step-by-step process of connecting to an Ubuntu 22.04 remote desktop using X2Go.
Table of Contents
What is X2Go?
X2Go is a remote desktop solution that lets you connect with another computer and control it remotely. A few keys features of X2Go are:
- It supports all operating systems including, Linux, Ubuntu, Windows, CentOS, Fedora, and Mac OS.
- It supports voice transmission to the connected systems.
- Multiple users and individual desktop sessions can connect with a single X2Go server at the same time.
- It provides a smooth experience even over low bandwidth.
When and How is X2Go Helpful?
X2Go can prove to be useful in a variety of scenarios:
- You need to access a Linux-based operating system such as Ubuntu complete with a desktop environment and can’t install it locally.
- You need more resources than your personal computer can provide. For instance, you want to compile a file that’ll take hours making your PC unavailable for long periods of time. Running it on a remote desktop will leave your PC to do whatever you want!
- You want your team to be able to access the resources and benefit from a common computer.
- You want to use the same desktop environment with the same setup, tools, file, and performance from anywhere in the world.
Prerequisites
Before setting up X2Go we recommend you have:
- A server running Ubuntu 22.04 with at least 2GB RAM. 4GB RAM is recommended. (I use a cheap VPS from Contabo using X2go on a daily basis. For more info see my review of Contabo.)
- A user with
sudo privilegesand SSH key (you can either use SSH keys or set up a password). We recommend a non-root sudo user instead of acting as root. This is because when you’re logged in as root you can do everything and the system won’t ask, so you won’t get to think twice. You could mistakenly run a command that would destroy your system and you’ll wish that the system asked you if you’re sure so you could’ve thought twice.
So, let’s begin.
Step 1 – Install X2Go on the Server
The first step is to install X2Go on the server. X2Go basically comes with two components:
- Server: start and manages the graphical session on the remote computer
- Client: installed on your local computer to view and control the remote desktop
First let’s update our package index to the latest software available:
sudo apt update
To install the X2Go server just run the following command:
sudo apt install x2goserver x2goserver-xsession
During the installation you maybe asked to select your preferred Language and Keyboard Layout. Input the number corresponding to your preference and hit ENTER when you’re prompted to do so.
Step 2 – Install Your Preferred Desktop Environment
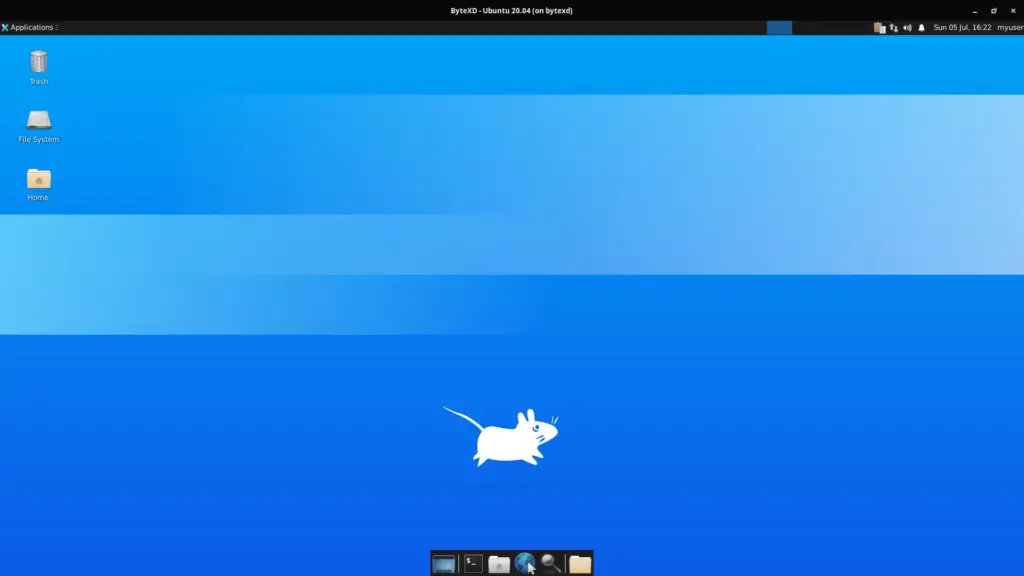
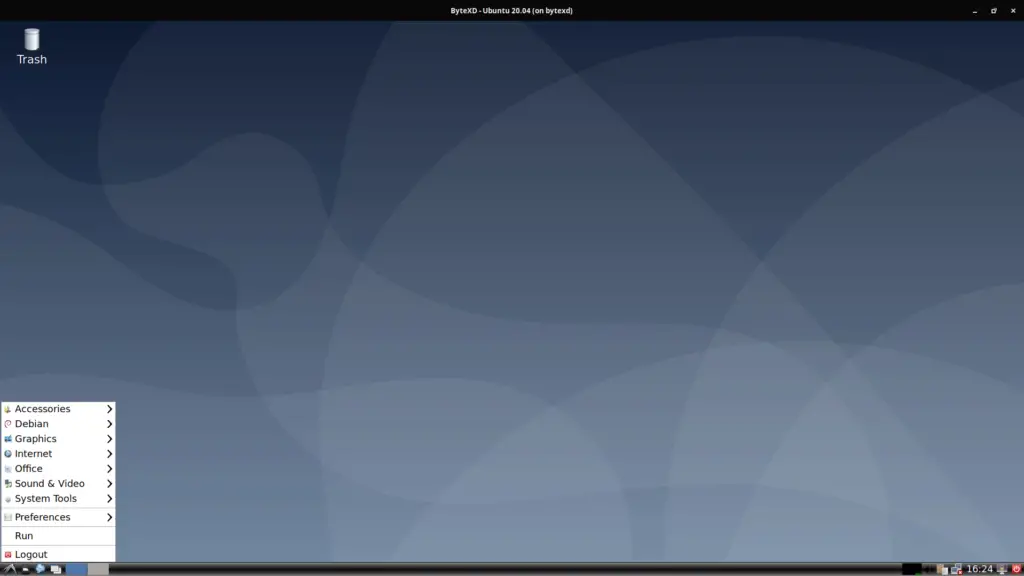
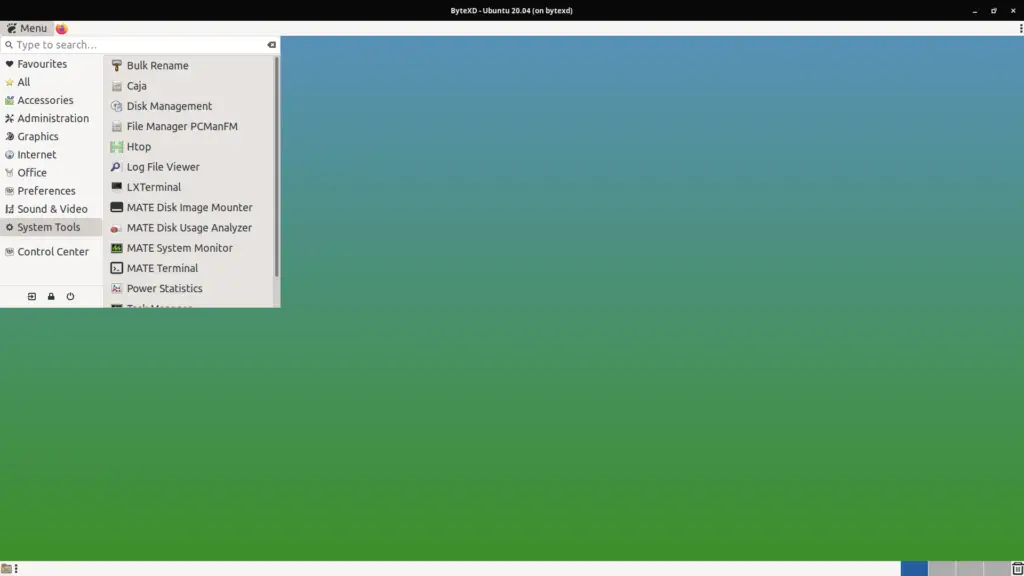
In this tutorial, we’ll be installing the XFCE, LXDE and MATE minimal desktop environments for X2Go.
XFCE doesn’t use fancy graphical effects like composting which makes it light-weight, hence more compatible with X2Go. LXDE and MATE also work well with composting disabled.
At some point during the install you may also be prompted to choose what default Graphical Display Manager you want to install. If you’re not sure which one to choose, you can go for lightdm in every case.
Minimal Desktop Environment
The minimal desktop environment is used if you want to utilize fewer resources. In minimal desktop environments, we install a small, core set of packages and add whatever is needed as we go.
Installing XFCE
To install XFCE run:
sudo apt install xfce4
Installing LXDE
To install LXDE run:
sudo apt install lxde
Installing MATE
To install MATE run:
sudo apt install mate-core mate-desktop-environment mate-notification-daemon
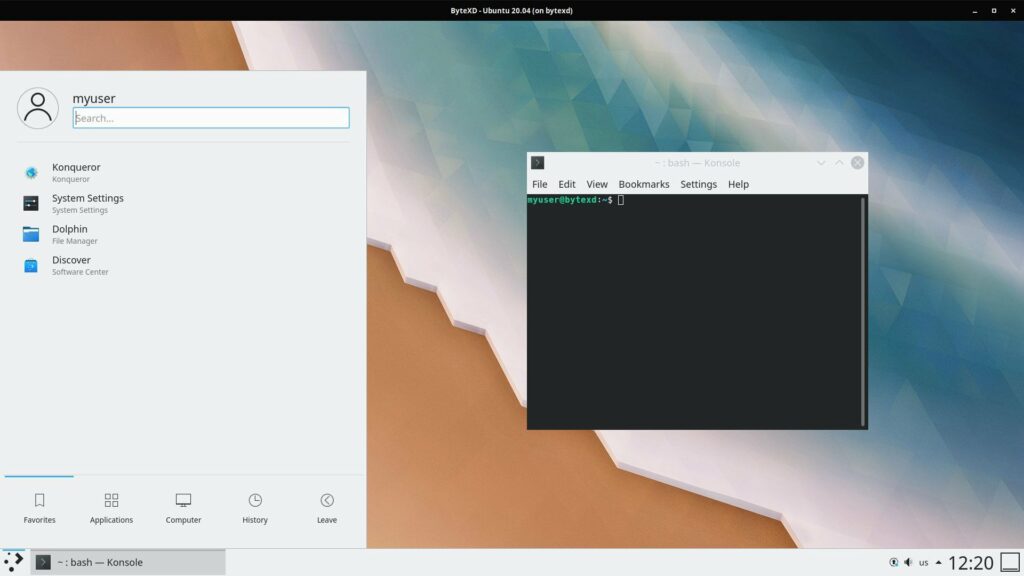
Installing KDE Plasma
To install KDE Plasma Desktop first add the Kubuntu PPA repository to your system:
sudo add-apt-repository ppa:kubuntu-ppa/backports
Press [ENTER] when prompted to continue.
To install the minimal version of KDE Plasma run:
sudo apt install kde-plasma-desktop
To install the full KDE Plasma Desktop environment run:
sudo apt install kubuntu-desktop
Press Y and Enter when prompted to proceed with the installation.
Choose the one that you prefer out of gmd3, lightdm or sddm.
Fix KDE Plasma Install Issue: error: unable to execute: startkde
After the installation is finished we have one last thing to do. At the time of writing, X2Go tries to run the /usr/bin/startkde command when launching a KDE session. But in KUbuntu 22.04 there is no startkde command, and it has been replaced by startplasma-x11, and X2Go returns error: unable to execute: startkde when we try to connect.
We can solve this in 2 ways. We’re mentioning both just in case it’s useful to someone, but you can choose whichever solution you prefer.
If you are just following along to get to the end result, and not sure what these configurations mean, then please make sure to choose just one of the following solutions.
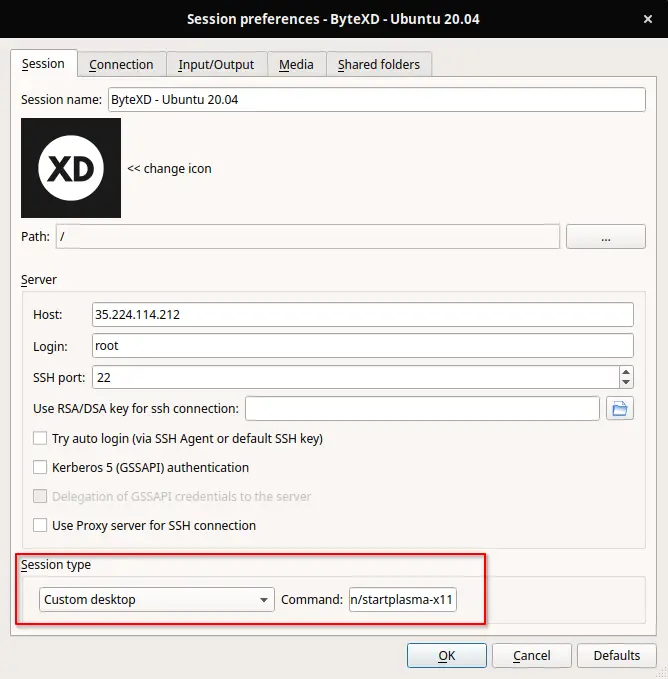
- The first solution is to configure the session in the X2Go client.Instead of selecting Session type: KDE, select Session type: Custom desktop and next to it, in the Command field, fill in
/usr/bin/startplasma-x11.
- The second solution is to is create a symbolic link from
/usr/bin/startkdeto/usr/bin/startplasma-x11. To do this run the command:sudo ln -s /usr/bin/startplasma-x11 /usr/bin/startkde
When you connect using the second solution set the session to have Session type: KDE.
This workaround allowed us to get KDE Plasma working with X2Go on Ubuntu 22.04.
I initially spent hours trying to get it to work and gave up, but he came across this guide, and then contacted us and gave us the workaround.
Thanks so much, Mike!
Installing GNOME (Doesn’t work with X2Go)
If you’d still like to install GNOME on Ubuntu 22.04, run the following command:
sudo apt install gnome-session gdm3
Step 3 – Install X2Go Client Locally
Once the desktop environments have been installed, the next step is to download the X2Go client for your chosen OS.
Install the X2Go Client on Windows
To install X2Go client on Windows, go to https://wiki.x2go.org/doku.php and download the Windows Installer.
Once you’ve installed the X2Go client on your Windows machine, open the installer and select your preferred language, agree to the terms and conditions, and the install wizard will guide you through the rest of the process. In nearly all cases, we go with the default settings.
Install the X2Go Client Debian/Ubuntu
You can install X2Go client on Ubuntu and Debian by running:
sudo apt install x2goclient
Install the X2Go Client CentOS/RHEL
To install X2Go client on the CentOS, run the following command:
sudo yum install x2go client
Install the X2Go Client Fedora 22
X2Go client is a part of Fedora 19 and the later versions. You can install it with a software installer or the following command:
sudo yum install x2go client
Install the X2Go Client on OSX
For Mac OS, find Mac OS 10.xx and higher DMG and download the X2Go client according to your Mac OS version from the X2Go website.
Now that the X2Go client has been installed, all you need to do is to configure the settings and connect the X2Go server to your remote desktop.
Step 4 – Connecting to the Remote Desktop
With the desktop environment in place and the X2Go server and client installed, you can run the X2Go client on your machine.
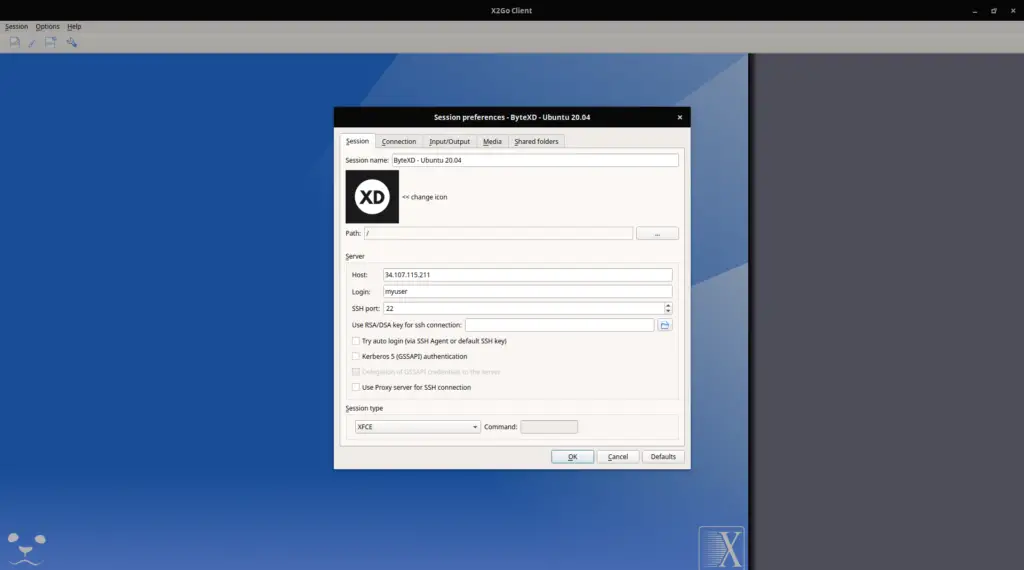
The first time you run X2Go you’ll be prompted with a dialogue to configure a new session.
If the window doesn’t open automatically, then locate the Session tab on the upper left side of the screen and click on it. Then go to Session -> New session to open the session dialogue to configure a new session.
Configuring a New Session
Sessions are basically connection configurations, and you can have one for each server you want to connect to.
In this tutorial we’ll fill in the minimal information required to connect. Also we’ll use password authentication, and not SSH-Key Based Authentication.
Session name: The name of your session should be unique so you can easily tell different servers apart.
Host: your server’s IP address or hostname goes here.
Login: enter the username you used with your SSH connection.
SSH port: The default port number is 22. You can change it as per your SSH config file settings (/etc/ssh/sshd_config).
RSA/DSA Key: It’s optional to use RSA/DSA keys. To use a private key, click on the folder next to the ‘Use RSA/DSA key for ssh connections’ and browse to your private key. You can leave it blank if you didn’t opt to use the secure SSH keys, in which case, X2Go client will ask for a password each time you log in.
Session type: select your desktop environment (for e.g. XFCE) in the dropdown.
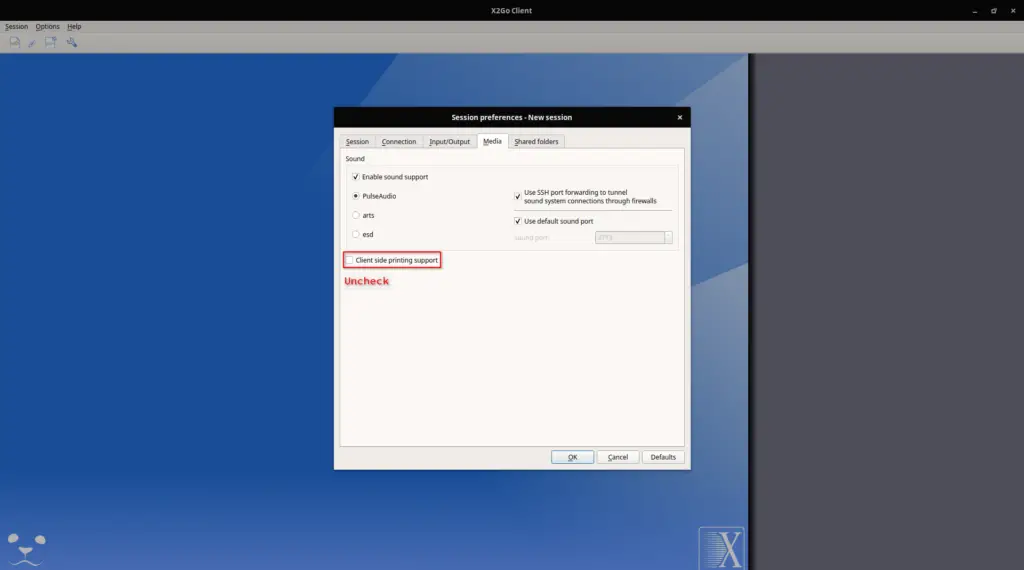
Disable Client-side printing support
By default the session is configured to enable X2Go Client-Side printing. For the purpose of this tutorial we’ll disable it, because we may get a warning if it’s left enabled. If you’d like to know more about this feature, then you can read more about it here X2Go Documentation — X2Go Client-Side Printing.
To disable client-side printing go into the Media tab, and uncheck Client-side printing support.
You can leave the rest of the settings to default until you get more familiar with the software. Click OK to save the session.
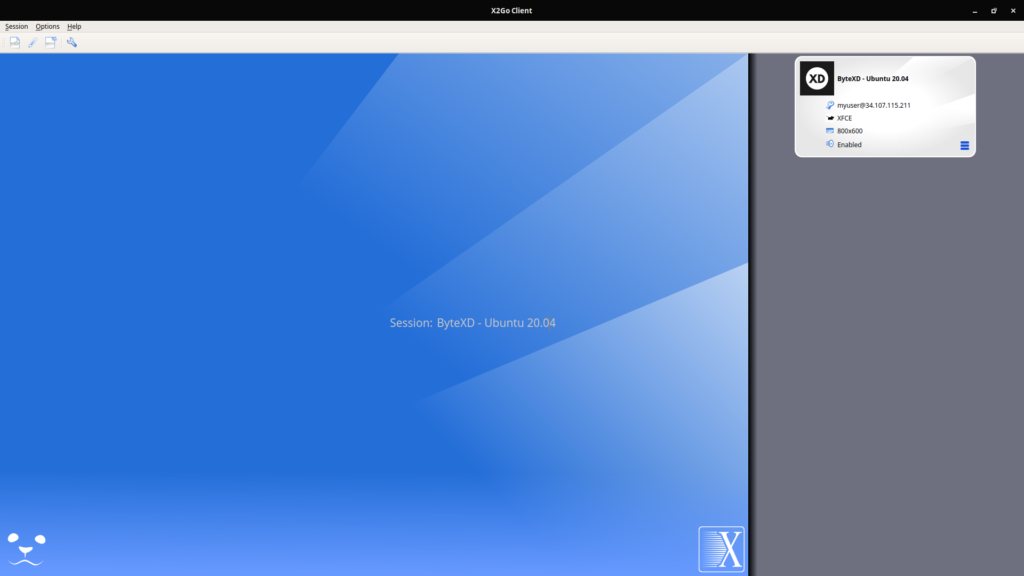
xquartz, which is required to run X11.To start the session, click on the white box that’s labeled with your session name on the top-right side of the screen.
You’ll then be prompted to fill in your username and password, with your username already filled in.
Fill them in and click Connect. Your remote desktop will show up in a few seconds and you can interact with it.
Use default settings or One empty panel. The first option will create a rectangular panel docked at the bottom of the screen with some useful applications shortcuts like file manager, and a top panel with utilities such as the application launcher.
The second option will give you an empty panel with no pre-configured start menu, toolbar, or clock. As a new user, opting for the empty [anel can prove to be quite complicated.
How to End the Remote Session?
There are two ways you can end a remote session:
- Log off
- Click the button marked with a circle and a small line (similar to the standby/power button) at the bottom-right corner of the main X2Go screen.
The first method is quick and clean but there’s a catch! It leaves applications like the session management software running. The second method closes everything (even forcefully) if it doesn’t close directly. In either case, I recommend saving everything before exiting.
Troubleshooting
How to fix “Host Key Verification Failed” Error in X2Go (Windows)
This happens when the host key changed. Such as if you’ve reinstalled your server and reinstalled X2Go and are trying to connect again.
For some reason, on Windows, instead of storing these keys in C:\Users\your_user\.ssh\known_hosts, X2Go stores them in C:\Users\your_user\ssh\known_hosts . Notice that it’s ssh and not .ssh.
You might have tried removing the old entries from the .ssh\known_hosts file and you’re still getting this error.
Try removing them from the C:\Users\your_user\ssh\known_hosts file. Just open it with a text editor and remove the lines containing the IP associated with your server and try again.
Conclusion
Congratulations! You’ve successfully connected with Ubuntu 22.04 using X2Go. Now you have a working Remote Desktop which will always be online! Let us know if it helped and your experience with X2Go!
Want to dig deeper?
Check out X2Go’s official documentation to get more details.
Running into trouble?
Leave a comment down below or contact us and we’ll get back to you as soon as possible.
Revisions & Updates of this Article
[Dec 17 2020]: Added Fix KDE Plasma Install Issue: error: unable to execute: startkde to the table of contents for users looking specifically for this fix.
[April 29 2022]: Tested on Ubuntu 22.04, confirmed it works, and made small edits to the article.





Nice article on x2go!
I use x2go for my work from home setup and it works well.
Remote x2go-server system at work is running ubuntu 18.04 LTS configured with XFCE desktop.
Local x2go-client system at home is running ubuntu 20.04 LTS with default Gnome desktop.
To access my work computer from home I need to go through an ssh login server at work, to do that I use an ssh tunnel from my home machine through the ssh server at work to my work computer.
One nice thing about using x2go is that you don’t have to terminate the session on the remote system, you can keep the remote session running and suspend the x2go connection and then resume the connection when desired. Same thing happens if you have a power outage or lose your internet connection.
You can also adjust settings in the x2go client for the session you want to launch such as DPI to improve performance depending on your internet connection.
I did not see an easy method to have more than one x2go session running at the same time which would be useful.
I believe the reason x2go has decent performance is due to the nx technology / libraries that it uses, I saw that remmina has an nx plugin available but it did not work for me.
NX (nomachine) used to have a free linux version that worked well but the new stuff is limited, for example no support for ssh unless you purchase a license.
When running X2Go with Xubuntu 20.04 (upgrade from 18.04, Windows 10 running X2Go client) the screen gets unresponsive after 5 or more minutes of inactivity, and the only thing I can do is to terminate the session. Hopefully that will be fixed in an update.
do sudo apt remove xfce4-screensaver and disable all power saving stuff from settings and reboot
Thank you. The command /usr/bin/startplasma-x11 helped me.
Hi Howard! Thanks for commenting! Glad to help!
Snap applications do not run !! Wayland issue?