What is Xpra?
Xpra (X Persistent Remote Applications) or commonly known as “Screen for X”1This is a comparison with a very popular software called GNU Screen, which is a terminal multiplexer. This means that you can run a Screen session, and in it you can run any number of virtual terminals, that will continue to run even if the window isn’t showing or if you get disconnected. For example, when you typically run a program in your terminal, then you close the window or get disconnected, then the process stops – but with GNU Screen you can leave the virtual terminal, along with the program, running., is a utility that allows users to run X11 programs on remote hosts and direct their display on the local machine. It is similar to other tools such as VNC and RDP, but has a few advantages.
In this article we’ll setup Xpra and use it to remotely access X11 applications.
That is the main difference between Xpra and X-Forwarding2X-Forwarding is another method that allows graphical interfaces for the X Window System to be displayed from a remote machine onto a local machine.. With the latter, when you disconnect from a particular program, you lose the current state.
Additionally, Xpra is rootless. That means any applications forwarded from the remote hosts to the local machine appear as normal windows managed by the window manager and not confined in a box.
In this example we’re forwarding Gnome Boxes, a terminal running the top command, GNOME Settings > About, and Geary. You can run other apps like Firefox, VLC, and such, but I wanted to forward Linux specific apps, for demo purposes. Hopefully this gives you a better idea on what you can do with Xpra.
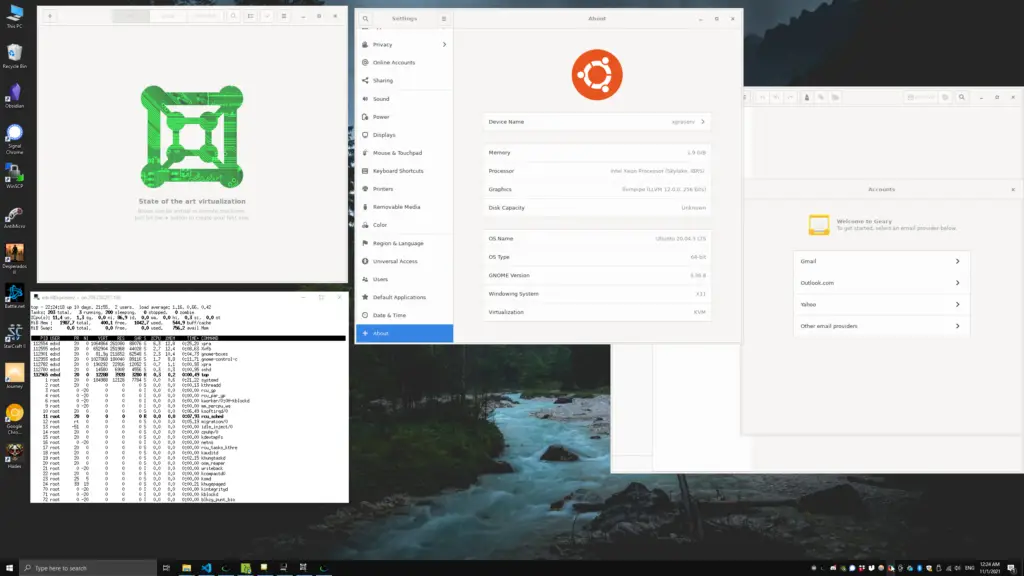
Xpra forwarding Gnome Boxes, GNOME Settings > About, Terminal running top, Geary.
To better understand the rootless feature, let’s look at how Xpra differs from other remote access/control applications.
Table of Contents
How Xpra differs from VNC / RDP and other Remote Access Applications
- Xpra is rootless (or seamless): When you use an application like VNC, you will notice that the remote Desktop is confined within the VNC application window – that’s not the case with Xpra. If I am accessing a remote app (say VLC) with Xpra, I will see the VLC window on my PC just like any other window, and it’s not confined to any other application window.
- Xpra uses a custom protocol that is usable even over a slow network connection.
- Xpra supports an HTML feature that allows you to view applications on the web browser.
Installation
In this post, we will show you how to install Xpra on Ubuntu or Debian. If you use another Linux distribution or operating system, you can check the Xpra download page on Github for detailed instructions. If you encounter any issues you can also contact us or leave a comment and we’ll get back to you as soon as we can.
Install Xpra on Ubuntu
[powerkit_alert type=”warning” dismissible=”false” multiline=”false”]
Important Note: When you run the command (sudo apt install xpra), you will install an old version available in the Ubuntu repositories.
[/powerkit_alert]
Unfortunately, this version doesn’t work well and has some bugs. Therefore, I recommend you follow the instructions below.
First, let’s upgrade the system’s packages:
sudo apt update && sudo apt upgrade
Next, execute the command below to open the sources.list file using the nano editor.
sudo nano /etc/apt/sources.list
Copy and paste the line below to add the Xpra repository.
deb https://xpra.org/ focal main

In our case, we are using Ubuntu 20.04 LTS (Focal Fossa). If you are using another release, say Ubuntu 21.04 (Hirsute Hippo), you would replace the word focal with hirsute.
Execute the command below to add the Xpra GPG key.
wget -q https://xpra.org/gpg.asc -O- | sudo apt-key add -
After adding the repository, save the file (Ctrl + S) and close it (Ctrl + X). Update the system by executing the command below.
sudo apt update
Now install Xpra by executing the command below.
sudo apt install xpra
When you run the --version command, you should see version 4.2 or newer.

Install Xpra on Debian
When you try running the sudo apt install xpra command on Debian, you will see the error E: Unable to locate package xpra. That’s because Xpra is not available in the Debian repositories. Follow the instructions below.
Execute the command below to edit the sources.list file with nano editor.
sudo nano /etc/apt/sources.list
Add the line below if you are running Debian Buster.
deb https://xpra.org/ buster main
If you are running another Debian release, say, Debian Stretch, replace the name buster with the name stretch.
Execute the command below to add the Xpra GPG key.
wget -q https://xpra.org/gpg.asc -O- | sudo apt-key add -
Save the file (Ctrl + S) and exit (Ctrl + X). Update the system with the command below.
sudo apt update
When done, proceed to install Xpra with the command below:
sudo apt install xpra

Xpra Install Issues (Ubuntu/Debian)
In some cases you may encounter the following error when updating the package index after adding the Xpra repository:
The repository 'https://xpra.org/dists focal Release' does not have a Release file.
In this case, remove the Xpra repository from the /etc/apt/sources.list file, and run
sudo apt update && sudo apt upgrade.
After it is finished you can add the Xpra repository back in the /etc/apt/sources.list file and run:
sudo apt update
Now you should be able to install the latest version of Xpra.
Install an SSH Server on the Remote System (Optional)
Xpra connects to the remote client over SSH. If one of your machies doesn’t have OpenSSH installed, then we’ll need to install it.
In our case we’ll install it on an Ubuntu 20.04 remote machine.
To do this, we’ll run:
sudo apt install openssh-server openssh-client
Xpra Usage
Xpra is a command-line tool that comes with so many options. You can view them by executing the xpra --help command. We won’t look at all the options in this post, but we will show you how to use Xpra to access remote applications and use the HTML feature.
Access Remote Applications With Xpra
As an example, we will use Xpra to access VLC on the remote system. Execute the command below on the remote system.
xpra start :100 --start=vlc
Let’s discuss the command and look at the various options present.
xpra start: This part starts the xpra server.:100: This option specifies the display number. If you don’t specify a display number, Xpra automatically uses 1.--start=vlc: Starts a program on the remote host specified after the equal sign. If no program is specified, Xpra won’t start any application.

From the image above, you can see we have started Xpra, and we can view the logs on /run/user/1000/xpra/:100.log file.
You can view all the running Xpra instances using the command below:
xpra list
Now, on your local machine, execute the command below to attach the system to the remote session started by Xpra.
xpra attach ssh:[email protected]:100
Let’s discuss the command above.
xpra attach: This command tells xpra that we want to attach to a remote session.[email protected]: This is the remote username and IP address that we are using to connect via SSH.:100: This is the display number of the remote session we want to connect and access.

The Xpra window will pop up, and you will see information about what is happening in the background.
After a few seconds, a dialog box will pop up, and you will be required to enter the user password of the remote host. If a successful connection is created, you should see the VLC window appear on your local machine, as shown below.
Video Demo – Accessing VLC Player from a remote machine
From the image above, you can see the IP address (209.250.237.169) of the remote machine at the top of the VLC window.
To stop/detach the remote applications, we will use the syntax below.
xpra detach ssh:[email protected]:[DISPLAY-NUMBER]
Example, in our case:
xpra detach ssh:[email protected]:100

That will close/detach the remote VLC application. However, that doesn’t mean the session is closed on the remote system. You may still be able to access VLC using the display number:100 on any other local machine. To stop the session, execute the command below on the remote machine.
xpra stop :100
Access Remote Apps via Web Browser
In the example above, we are viewing and accessing a remote application rootless on our local machine. These apps appear as normal system apps and even have their icons placed on the taskbar. However, you can access the applications over a browser using the --html=on feature.
Let’s try to access the remote VLC application on our web browser. We will execute the command below on our remote machine.
xpra start --bind-tcp=0.0.0.0:9876 --html=on --start=vlc
You can see we have added two arguments in the command above:
--bind-tcp=0.0.0.0:9876: We are binding port 9876 to an arbitrary address. You can specify a different port number but not more than 65535.--html=on: We are using this option to enable the web browser feature.

On the local machine, launch the web browser and use the URL syntax below to access the remote application.
[Remote-IP-Address]:[Port-Number]
In our case:
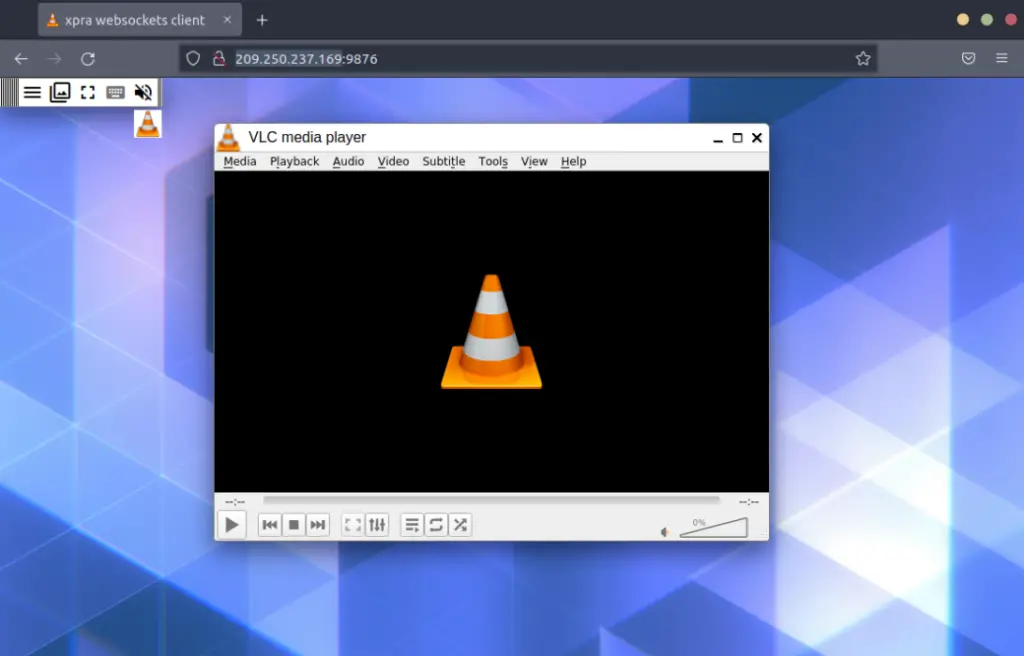
209.250.237.169:9876
Video Demo – Accessing a remote desktop in your browser
Unlike the other method, with the web browser, the remote application is not entirely rootless as it is confined within the browser window.
Conclusion
That’s it! This post has given you a detailed guide on how to use Xpra to access remote applications. Feel free to explore more options and features available by using the xpra man page or executing the xpra --help command.


Awesome nice post
Thank you! Hope it comes in handy!
Nice Explanation
Hi! Thanks for commenting and for the feedback! I’m really happy you liked it!