[powerkit_collapsibles]
[powerkit_collapsible title=”Not using Ubuntu 22.04? Choose a different version or distro.”]
Debian 10/11
CentOS 8
[/powerkit_collapsible]
xRDP is an open source implementation of the Remote Desktop Protocol (RDP), developed by Microsoft. RDP allows users to establish secure connections to other computers over the internet, and use their mouse and keyboard to interact with the remote server’s graphical user interface in the same way they would interact with a regular desktop.
xRDP allows connections using RDP to machines running non-Microsoft operating systems, such as Linux or BSD.
It accepts connections from a variety of clients, such as FreeRDP, rdesktop, NeutrinoRDP and Microsoft Remote Desktop Client (for Windows, macOS, iOS and Android).
You might also be interested in alternative remote desktop technologies for Ubuntu, such as VNC, Chrome Remote Desktop, NX (via a software called X2Go) or Xpra. They aim for similar goals of controlling remote desktops, however, the methods by which they achieve them differ.
Objectives
In this tutorial you’ll learn to install xRDP on an Ubuntu 22.04 server, install desktop environments (GUI) on it, connect to the remote machine from multiple operating systems, and adjust some settings to try and speed up slower connections.
Table of Contents
Prerequisites
- A server running Ubuntu 22.04 with a recommended minimum of 2GB RAM. (If you’d like a cheap yet powerful server, check out my review of Contabo VPS)
- Acting as a
non-root sudo user. This is best practice as you can harm your system if you’re acting as root and you’re not careful.
Step 1 – Install xRDP on Ubuntu 22.04
Start by updating the system’s package index:
sudo apt update
To install xRDP run:
sudo apt -y install xrdp
The installation may take some time.
Once it’s installed, the service should be running automatically. We can check the status of the xrdp service by running:
sudo systemctl status xrdp
The output should look something like this:
● xrdp.service - xrdp daemon
     Loaded: loaded (/lib/systemd/system/xrdp.service; enabled; vendor preset: enabled)
     Active: active (running) since Fri 2021-03-26 14:11:39 UTC; 7h ago
       Docs: man:xrdp(8)
             man:xrdp.ini(5)
   Main PID: 207349 (xrdp)
      Tasks: 1 (limit: 4714)
     Memory: 1.2M
     CGroup: /system.slice/xrdp.service
             └─207349 /usr/sbin/xrdp

Mar 26 14:11:38 bytexd xrdp[207328]: (207328)(140179238758208)[INFO ] address [0.0.0.0] port [3389] mode 1
Mar 26 14:11:38 bytexd xrdp[207328]: (207328)(140179238758208)[INFO ] listening to port 3389 on 0.0.0.0
Mar 26 14:11:38 bytexd xrdp[207328]: (207328)(140179238758208)[INFO ] xrdp_listen_pp done
Mar 26 14:11:38 bytexd xrdp[207328]: (207328)(140179238758208)[DEBUG] Closed socket 7 (AF_INET6 :: port 3389)
Mar 26 14:11:38 bytexd systemd[1]: xrdp.service: Can't open PID file /run/xrdp/xrdp.pid (yet?) after start: Operation not permitted
Mar 26 14:11:39 bytexd systemd[1]: Started xrdp daemon.
Mar 26 14:11:40 bytexd xrdp[207349]: (207349)(140179238758208)[INFO ] starting xrdp with pid 207349
Mar 26 14:11:40 bytexd xrdp[207349]: (207349)(140179238758208)[INFO ] address [0.0.0.0] port [3389] mode 1
Mar 26 14:11:40 bytexd xrdp[207349]: (207349)(140179238758208)[INFO ] listening to port 3389 on 0.0.0.0
Mar 26 14:11:40 bytexd xrdp[207349]: (207349)(140179238758208)[INFO ] xrdp_listen_pp done
[powerkit_alert type=”info” dismissible=”false” multiline=”false”]
Regarding xrdp.service: Can’t open PID file /run/xrdp/xrdp.pid (yet?) after start: Operation not permitted: I am not 100% certain of this, but I currently believe that this warning is harmless and is just a test to know if another instance isn’t already running. [source]
[/powerkit_alert]
Finally, xRDP needs to use the /etc/ssl/private/ssl-cert-snakeoil.key file, and to do so it needs to be added to the ssl-cert group.
/etc/ssl/private/ssl-cert-snakeoil.key is used in cases when no other SSL certificate is installed or configured, but encrypted communication is still enabled and desired. It still encrypts traffic, however since it lacks a root authority signature, it is still vulnerable to most man-in-the-middle attacks. That is why it’s called snakeoil.
sudo adduser xrdp ssl-cert
Output:
Adding user 'xrdp' to group 'ssl-cert' ...
Adding user xrdp to group ssl-cert
Done.
Restart xRDP to apply changes:
sudo systemctl restart xrdp
Now xRDP should be successfully installed on your system.
Configure Firewall
If your firewall is active, then you need to allow port 3389, which is the default port used by RDP.
If you’re running UFW (Uncomplicated Firewall), to allow port 3389 you can do something like the following, replacing 1.2.3.4 with the IP for which you want to allow port 3389.
- If you’d like to allow port 3389 for a specific IP address run:
sudo ufw allow from 1.2.3.4 to any port 3389
- Allow port 3389 for a specific IP block:
sudo ufw allow from 1.2.3.4/24 to any port 3389
- If you’d like to allow port 3389 for any IP:
sudo ufw allow 3389
Configuring xRDP
By default xRDP doesn’t require custom configuration, however you can customize it, if you need to, by editing the following file:
sudo nano /etc/xrdp/xrdp.ini
For a comprehensive tutorial on configuring xrdp.ini you can check xrdp.ini: Configuration file for xrdp(8) – Linux Man Pages (5)
[powerkit_alert type=”warning” dismissible=”false” multiline=”true”]Important Note
Please remember to restart the xrdp service after any edit to xrdp.ini, for the changes to take effect.[/powerkit_alert]
Step 2 – Install Your Preferred Desktop Environment on Ubuntu 22.04
In Linux, a Desktop Environment is an interface to the operating system. It is a layer of software that sits on top of the operating system and allows users to interact with the computer. The name “Desktop Environment” comes from the fact that it is meant to be a desktop, or more specifically, a graphical user interface (GUI).
The graphical user interface includes the desktop environment’s theme, window manager, icon theme, and so on. In addition, most desktop environments include a window manager, which controls the appearance of windows, and a set of other software, such as a text editor, terminal emulator, and file manager.
There are many great desktop environments available for Ubuntu 22.04 and you can very easily change your desktop environment to suit your needs.
Installing Other Desktop Environments
In this tutorial, we will focus on installing XFCE, a popular and lightweight desktop environment. However, there are many other desktop environments available for Ubuntu 22.04.
To explore and install 8 other popular desktop environments, you can follow this article: How to Install a Desktop Environment (GUI) on an Ubuntu 22.04 Server.
By installing a desktop environment of your choice, you can customize your remote desktop experience and make it more user-friendly and visually appealing.
Installing XFCE Desktop Environment
XFCE is lightweight and one of the most popular desktop environments. It is a minimal desktop environment with a focus on speed and low system resource usage, while still being visually appealing. It uses Xfwm for its window manager, and includes a settings manager for many of XFCE’s components.
It is the default desktop environment for Xubuntu, a distro based on Ubuntu (also referred to as a flavor of Ubuntu).
You can read more about it on the official website at xfce.org
To install the XFCE desktop environment, run:
sudo apt install xfce4
This is what XFCE looks like on Ubuntu 22.04 when connected via xRDP:

With xRDP installed on your machine, along with a desktop environment, we should be ready to connect to the remote machine.
Switching Between Desktop Environments
You can install multiple desktop environments at the same time and choose which one you want to use when you log in.
To switch between them you can follow our short tutorial How to Switch Desktop Environments in Ubuntu/Debian From the Command Line
Step 3 – Connect to Your Ubuntu 22.04 Remote Desktop using xRDP
To connect to the remote Ubuntu machine using xRDP we can use multiple operating systems, and we just need an RDP client installed. Windows already comes with it installed, and installing an RDP client on other operating systems is very easy.
No matter what OS or RDP client you’re using, the process is fairly similar.
If you’re familiar with how RDP works with connecting to a Windows remote desktop, you know that you run the RDP client, fill in the server’s IP or fully qualified domain name (FQDN), along with the user/password and after clicking to connect, you’d be connected to the server and controlling it.
With Linux machines it differs just slightly. We launch the client, and we can fill in just the remote machine’s IP address or its fully qualified domain name, and click to connect. After which we’re presented with a login screen in which we input our username and password, then click OK.
You can also fill in the details beforehand and you’ll automatically be logged in, however you may not always be prompted to do so. It can depend on the RDP client that you’re using.

Connecting from Windows
Windows should come with an RDP client already installed. The app is called Remote Desktop Connection.
To access it, in the search box in the Windows taskbar, type Remote Desktop Connection and you should see the Remote Desktop Connection App. Upon clicking it, if this is the first time accessing it, you should see something like this:

To connect to your Ubuntu 22.04 remote desktop, enter the remote machine’s IP or fully qualified domain name, and click connect.
If this is the first time you’re connecting, you may see a warning such as The identity of the remote computer cannot be verified. Do you want to connect anyway?

We trust this computer, so you can click Yes.
The reason you’re seeing this is because the server is unable to verify with a trusted authority that the machine you are trying to connect to matches the name you are trying to connect to. Thus it is vulnerable to man-in-the-middle attacks.
We just set up this machine, however, and are assuming that it’s safe, so you can click Yes and continue with the connection.
You should then see the login screen where you can input your username/password and click OK, and you’ll be connected to your remote desktop.
Connecting from Linux
There are multiple good RDP clients for Linux. My favorite is Remmina because it is very user friendly, very popular, and you can use it for SSH and VNC, as well. It’s sort of a one stop shop for connecting to other machines.
To install it on your distro follow the instructions from Remmina’s installation page https://remmina.org/how-to-install-remmina/
When you run it you’ll see the Remmina interface.

Click on the + Icon in the upper left corner to start creating a new connection profile.
A window will pop-up, Remote Desktop Preference, where you can configure the connection profile.
We’ll cover the minimum required to connect to your Ubuntu 22.04 remote desktop.
Name: Fill the name you want for the connection. It is just a reference and it’s for your convenience, and does not affect the connection in any way.
Protocol: Select RDP – Remote Desktop Protocol
Server: Your Ubuntu 22.04 remote desktop IP or fully qualified domain name (FQDN)
Username: Your username
Password: Your password

You can now click Connect to directly connect to the remote desktop or Save and Connect to save the configuration for future use, and also immediately connect to the remote desktop.
Connecting from OSX
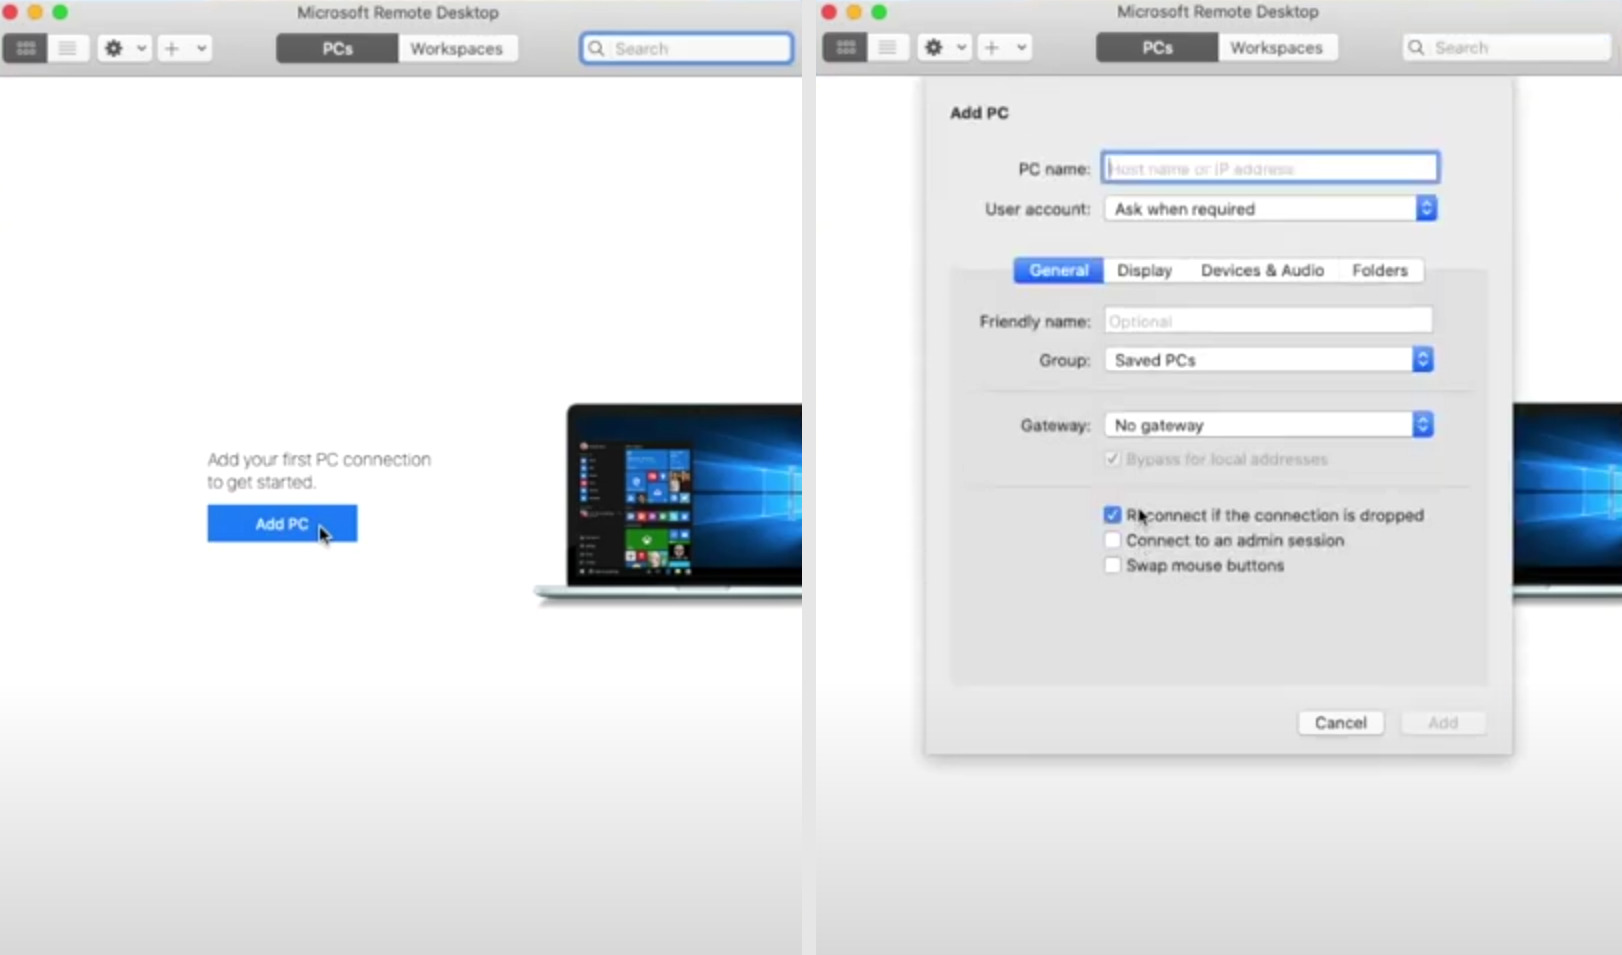
To connect from OSX first install the Microsoft Remote Desktop App form the App Store.
Once you’ve installed and launched it you should find a button to Add PC. Click it and then you should see a form where we can enter our Ubuntu 22.04 remote desktop’s connection details. Fill it as follows:
PC Name: The IP or fully qualified domain name of the remote machine
User account: You can leave it as Ask when requested
Friendly name: This is for your convenience and doesn’t affect the connection
Add the configuration and you should be able to connect to the Ubuntu 22.04 machine, after which you’ll be presented with the login screen where you can input your username and password.

Connecting from Android/iOS
Both the remote desktop clients for Android and iOS should be similar, as they’re both developed by Microsoft.
Android: The app is currently named Remote Desktop 8 by Microsoft Corporation in Google Play (at the time of writing, March 2021)
iOS: The app is currently named Remote Desktop Mobile by Microsoft Corporation in the App Store
After installing and launching it you can add and save a configuration for connecting to the remote desktop in the future.
We’ll fill in the minimum required to connect.
Tap Add desktop and fill in the following:
PC Name: the IP or fully qualified domain name of the remote desktop
User name: this is optional, as you can also fill it in when the login screen is displayed
Tap SAVE and the configuration should be saved. If you tap on it then the connection process should begin. You will end up on the login screen and you’ll move the cursor by dragging it.

Optimize xRDP Laggy/Slow Connections
There may be cases when your connection is slow due to your internet connection. In this case, a solution for this is to reduce the experience/visual styles of the remote connection, and to prioritize the remote desktop connection over other running processes on our machine. These are not guaranteed to fix speed, but they’re worth trying.
Using a More Lightweight Desktop Environment
In case you’re using heavier desktop environments, such as KDE, you might try switching to more lightweight ones like LXQt or XFCE.
If it’s still slow, you might even try switching to just using OpenBox, which isn’t really a desktop environment, but you can still have a functional remote desktop. You have a blank screen and right click for the context menu and you can select the apps to open from there. It’s a little less aesthetic, but it works and it’s lightweight.
Improving Connection from Windows
There are 2 things we can do to try and improve RDP connection on Windows:
- Lower Experience/Visual Styles
In the Remote Desktop Connection window click on the Show Options button.

You’ll see some new options available.Display: Click on the Display tab.
Here you can change the color depth. The lower you set it, the more it should help connection speed (in theory). You should try and change it until you find a combination of visual styles/speed you’re OK with.

Experience: Click on the Experience Tab.
This option has more settings that you can adjust. You can adjust these until you find a combination of speed/visual styles that you find acceptable.

- Change Remote Desktop Connection Process Priority to Realtime
To do this open Task Manager and locate Remote Desktop Connection in the Processes tab. It should be under Apps.Right click on it and click on Go to details.
 That should take you into the Details tab and highlight mstsc.exe. Right click on mstsc.exe > Set priority > Realtime.

Improving Connection from Linux (Remmina)
[powerkit_alert type=”warning” dismissible=”false” multiline=”true”]Important Note
I have not properly tested these methods, so I cannot guarantee they will make a big impact on your remote desktop connection.[/powerkit_alert]
In Remmina you can try improving the remote desktop connection by:
- Adjusting Colour Depth
This should reduce some of the resource usage. You can try adjusting the Colour depth until you find a setting that works for you.

- Adjust Remmina Process Priority
I’m using GNOME System Monitor, however I think most process monitors should have the option to change the priority of a process.In System Monitor find Remmina > (Right Click) Change Priority > Very High
Conclusion
xRDP allows you to connect to a remote desktop and control it through it’s graphical user interface.
Hopefully this article helped you set up xRDP on your Ubuntu 22.04 server, install your preferred desktop environment, connect to it from your OS, and improve connection speed.
If you have encountered any issues or have any further questions, feel free to leave us a comment or contact us.


 That should take you into the Details tab and highlight mstsc.exe. Right click on mstsc.exe > Set priority > Realtime.


wow, this is very comprehensive tutorial, everything covered, great!
Hi! Thank you very much for the kind words. They’re very much appreciated. Hope you found it useful!
I agree with Baer…this is a fantastic tutorial. Thank you.
Now…curveball time… 🙂
The one issue with xRDP is that it spawns a new session when you connect. For my use case, I want to connect to the existing, local session. Can you help with this? I have seen some tuts that stick VNC in the middle but information is kinda scattered (see here: https://linuxsheet.com/answers/235905u/).
TIA!
John
Hi John. Thanks for commenting!
I’ve also tried to find a solution for xRDP to reconnect the session and haven’t found one. I looked into the VNC option for xRDP that you mentioned and it seems you’re right that it’s scattered.
I’m currently using X2Go instead of xRDP for this kind of thing because it has the option to suspend the session. This is our tutorial in case you’re interested.
Let me know if that helps?
Very good. Thanks
But i am getting some error wiht some users. Error 0x4.