Samba is a utility present in Linux that allows sharing of folders and printers across different operating systems over a network. It means you can access the folders present in Linux in one system from another system having Windows using Samba.
In this tutorial you will learn about the Samba server in detail; how to install and configure the Samba server in Ubuntu Linux, along with different cases of its use and different issues that might arise.
Microsoft Windows and other operating systems use SMB (Server Message Block) protocol to perform client-server related operations such as printer and file sharing etc. Samba also uses the SMB protocol to share files and printers across a network connection.
This allows Windows users to access files and printers on the Linux host, and it also allows Linux users to access files and folders created (or present) in Windows systems. This means Samba acts as a bridge between Windows and Linux systems for sharing.
Table of Contents
Why use Samba?
Samba is beneficial when you have a network of computers having different operating systems installed on them (e.g., some computers have Windows, while others have Linux). In such a situation, the sharing of files and printers among different operating systems can be made possible using Samba.
However, there is no need for a Samba server if all computers on your network have Ubuntu installed. In this case, the NFS server would be used for file sharing. Similarly, if you want to share printers among Ubuntu systems only, you do not need to use Samba.
Creating shared folders using Samba
Samba can be used to create two types of shared folders: Password-protected shared folders and Public shared folders.
A public folder is used to share common documents among all the employees of an organization connected through a network. It requires no password and everyone on the same network can use the shared file or folder.
In contrast, a password-protected shared folder requires specific user credentials. It means you have to enter the required user name and password to access the contents of this folder. In large organizations, each user may have this type of password-protected personal folder, which other users cannot access.
Configuring a Samba Server
The default configuration file of Samba /etc/samba/smb.conf allows users to view their Ubuntu home directories as a Samba share. It can also be used to share any printers configured for an Ubuntu system as Samba shared printers. In other words, you can attach a printer to your Ubuntu system and print to it from Windows machines present in your network.
Following are steps that you need to follow to install and configure Samba in Linux:
Before installing the Samba server, check the distribution of Linux.
lsb_release -a

This output shows that this tutorial is performed in Ubuntu 20.04.3 LTS.
sudo apt update

1. Once the Linux system is updated, you can install Samba in Ubuntu Linux using the following command.
sudo apt install samba -y

2. Start the Samba server by using the command given below.
sudo systemctl enable --now smbd
Where smbd (SMB Daemon) is the name of the samba service.

3. Now check the status of the Samba server
sudo systemctl status smbd

In the above picture, the status of the Samba server is shown as “Active” and “Running” (highlighted in Green Color). Press CTRL+C to exit from the status screen shown above.
4. Next, you have to create a folder (that you want to share).
mkdir example_folder

5. If you want to create a password-protected shared folder, you need to set a Samba user password. You can use the following command for that.
sudo smbpasswd -a <username>

Note: You can access shared folders through Samba users only.
6. Now you have to add the information of the shared folder you just created in the Samba server configuration file.
sudo nano /etc/samba/smb.conf
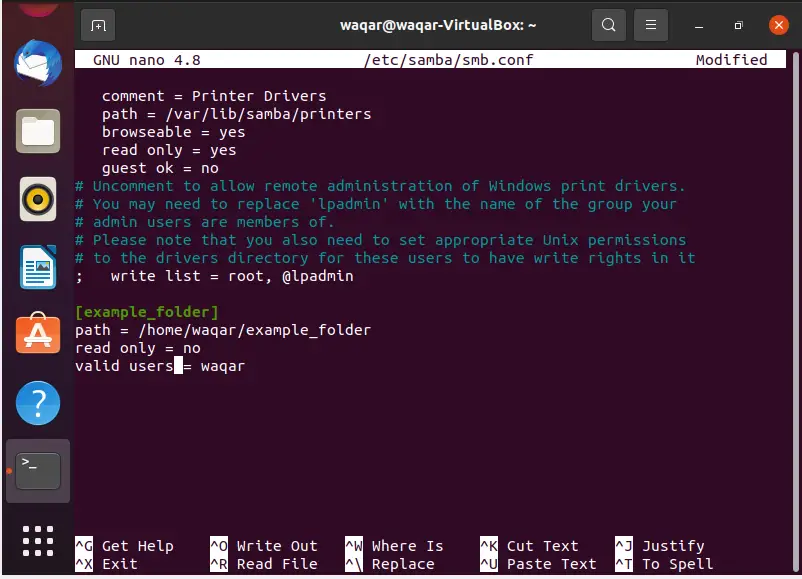
Go to the end of the file by pressing CTRL+V (hold v until you reach the end of the file), then enter the following information about the folder you created in Step 5 that you want to share.
[example_folder]                      (This is the display name of this folder in the network)
path = /home/waqar/example_folder     (This is the location of the folder)
read only = no                        (It represents that the user accessing this folder would have “write” permission)
valid users = waqar                   (Only this user can access this folder)
Save the file (CTRL+X, then press Y to confirm and press Enter).
7. Restart the Samba service
sudo systemctl restart smbd
8. Go to the Windows system, open File Explorer and type the IP address of the Ubuntu system. You will see the folder you created and shared from the Ubuntu system in Windows.
Now the files and folders created in the Ubuntu system can be seen and accessed from the Windows system and vice versa.
Creating a public shared folder
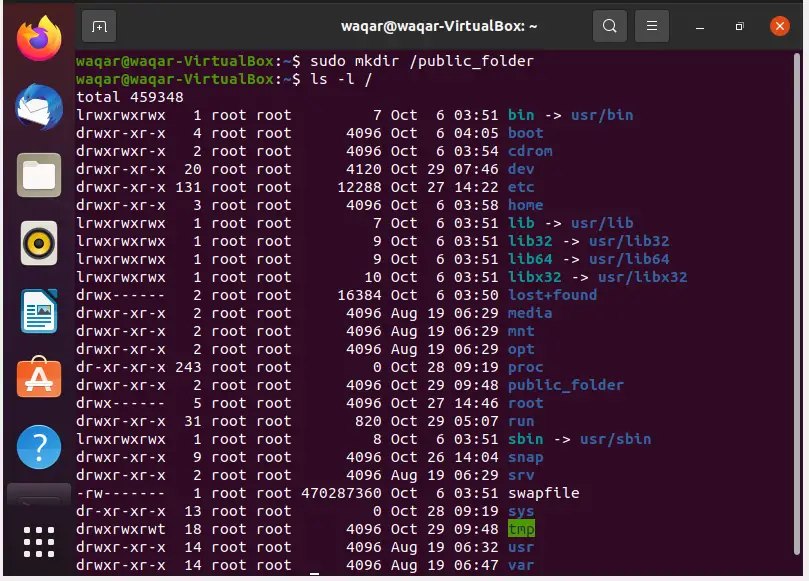
To share a public folder, it needs to be created in the root directory (/) first. The following command can be used to create a folder named public_folder in the root directory.
sudo mkdir /public_folder
However, you have to change the ownership and permission of this folder. By default, the owner of this folder will be root.
So first you have to change this ownership.
sudo chown nobody:nogroup /public_folder
Where “nobody” represents an ordinary (not privileged) user, which has minimum permissions and has no ownership of any file and folder. You cannot log in with “nobody” user in a Linux system. Similarly, “nogroup” is used to represent a group.
Then you need to change the permission on this folder. You can assign “write” permission to the group and others using the command given below.
sudo chmod g+w,o+w /public_folder/
You can check the changed permissions using the ls -l command.
Now you have to add the information of this public folder in the Samba server configuration file.
sudo nano /etc/samba/smb.conf
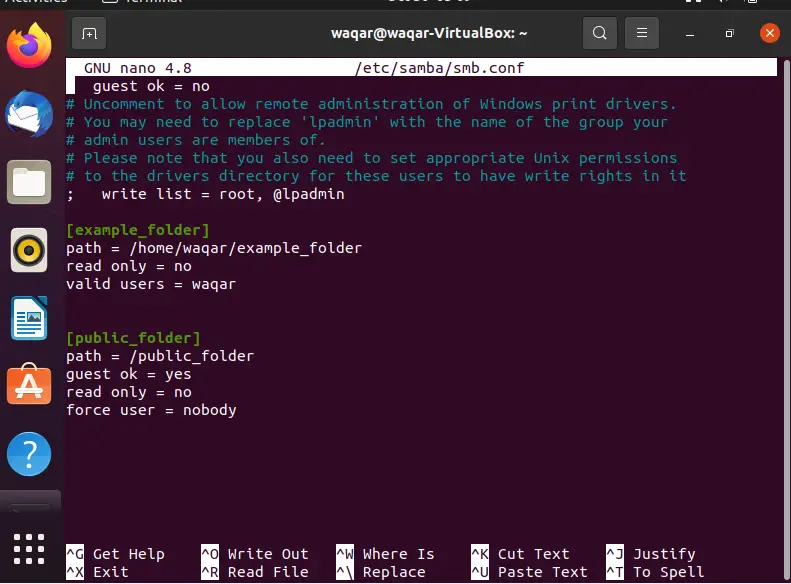
Go to the end of the file by pressing CTRL+V (hold v until you reach the end of the file), then enter the following information about the folder you created in Step 6 that you want to share.
[public_folder]             (This is the display name in the network)
path = /public_folder       (This is the location of the folder)
guest ok = yes              (Means we can access this folder in the network without any password)
read only = no              (It represents that the user accessing this folder would have “write” permission)
force user = nobody         (Anyone in the network can access this folder)
Save the file (CTRL+X, then press Y to confirm and press Enter).
Now restart the Samba service
sudo systemctl restart smbd
This folder will now be visible and accessible from the Windows system.
What if shared folders are not visible in Windows?
It is possible that after doing all the configuration in the Linux system, the shared folder still may not be visible in Windows systems. There can be many reasons, but you can perform the following if you are facing such a situation.
- Check the IP addresses of both Windows and Linux systems to make sure that they are on the same network.
- It is possible that the Ubuntu system is not visible in Windows, because in newer versions of Windows (say Windows 10) SMBv1 and NetBIOS Discovery protocols are disabled by default. It means you have to first enable them so that the shared folders become visible. There are two ways to do that:
-
-
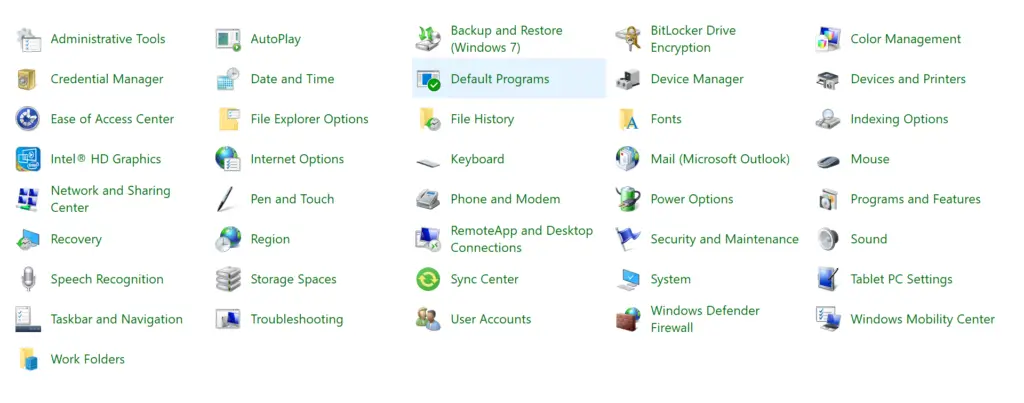
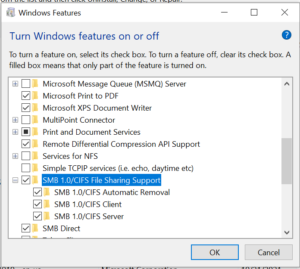
- In the Windows Operating system, go to Control Panel, select “Programs and Features” and click on “Turn Windows features on or off”. Now Check “SMB 1.0/CIFS File Sharing Support” and restart your Windows system.


- In the Windows Operating system, go to Control Panel, select “Programs and Features” and click on “Turn Windows features on or off”. Now Check “SMB 1.0/CIFS File Sharing Support” and restart your Windows system.
-
-
-
- If the problem persists you have to install the Web Services Dynamic Discovery host Daemon (WSDD) in your Linux system
-
Understanding the Samba configuration file (/etc/samba/smb.conf)
The main configuration file of Samba is smb.conf. You can create this file in the /etc directory after installing Samba, but it is highly recommended to use the default smb.conf file that comes with the Samba server and is located as /etc/samba/smb.conf.
Let’s dive in to understand the structure of this file. The smb.conf file is divided into several sections, each representing a shared resource. Each section should have a proper name enclosed in square brackets, which will be displayed in the network as the name of the shared folder.
For example, in the above examples, you can see two shared folders with the name [example_folder] and [public_folder].
Besides the sections you may create, there are some sections already present in the smb.conf file. For instance, the global setting of configuration parameters is performed in the [global] section. Similarly, users’ home directories and their paths and permissions are present in the [homes] section, and the information about shared printers and printer access can be found in the [printers] section.
Thus, the size of the smb.conf file depends on how many resources you want to share. In other words, the size can vary from tens to hundreds of lines. However, once you understand the basic structure of the smb.conf file and how to make new shares, it is easy to use this file.
Conclusion
Samba server in Linux enables file/folder sharing to other operating systems over a network. It is a server that is used to communicate between Windows and Linux operating systems. Using Samba, you can make your Ubuntu system look just like a Windows computer to other Windows systems present on your network. You do not need to install Windows on your PC. Feel free to ask any questions if you have any issues.
