MATE is a GNOME-based desktop environment that provides a modern, intuitive, and attractive desktop for users. MATE is a fork of GNOME 2 that uses the GTK+ 3 toolkit.
MATE was created as a more traditional desktop environment that would be more familiar to users of GNOME 2.
Linus Torvalds, the creator of the Linux Kernel, also criticized GNOME 3.0, saying “The developers have apparently decided that it’s ‘too complicated’ to actually do real work on your desktop, and have decided to make it really annoying to do“1Source: Linus Torvalds Ditches GNOME For Xfce. He abandoned GNOME for a while but returned to using it later on, thanks to some of the available extensions that can be used to fix its shortcomings2Source: Linus Torvalds switches back to Gnome 3.x desktop.
Some notable default applications included in MATE are Caja (file manager), Pluma (text editor), Atril (document viewer), Engrampa (archive manager), Eom (image viewer), Mate Terminal.
MATE is a good choice for a desktop environment for users who want a traditional desktop interface with a few modern features.
Some disadvantages of MATE are that it is not as up-to-date as some other desktop environments, such as GNOME 3 or KDE Plasma. Additionally, MATE is not as widely used as some other desktop environments, so it may not have as many applications or features as other environments.
As far as resource usage goes, MATE is not as lightweight as some other desktop environments, such as LXDE or Xfce. However, it is still relatively lightweight compared to GNOME 3 or KDE Plasma.
You can learn more about MATE from the official website.
In this tutorial we’ll be installing the MATE desktop environment on an Ubuntu 20.04 or 22.04 machine.
Table of Contents
Update and Upgrade Package Index
Before proceeding to install MATE on Ubuntu, first make sure you have your packages upgraded to their latest versions. There are some instances where you may get errors when trying to install it without having everything up to date.
To do this run:
sudo apt update && sudo apt upgrade
Install MATE Desktop Environment on Ubuntu
We’ll cover two easy to install MATE on Ubuntu. By installing the ubuntu-mate-desktop or by using the tasksel utility.
Install Ubuntu MATE Desktop (ubuntu-mate-desktop package)
To install Ubuntu MATE Desktop just run:
sudo apt install ubuntu-mate-desktop
The installation size, which includes packages and dependencies, has about 3.4GB on a fresh Ubuntu server install.
You may be asked to select a display manager during the install – usually between gmd3 and lightdm. I usually prefer lightdm but you can choose whichever you prefer.

After the installation process is finished, you may have to reboot.

This is what MATE looks like on an Ubuntu 22.04 machine.

Install Ubuntu MATE Minimal Desktop (ubuntu-mate-core package)
The Ubuntu MATE minimal desktop is a stripped down version of the full MATE desktop. It contains mainly the core applications required to run the Ubuntu MATE deskop environment, without some pre-installed applications that you’d typically have on a full desktop. You can check out the differences in pre-installed applications here.
To install the MATE minimal desktop just run the following command:
sudo apt install ubuntu-mate-core
The installation size, which includes core packages and dependencies, has about 2.7GB on a fresh Ubuntu server install.
This is what MATE minimal looks like after installed on a fresh Ubuntu server:

Install MATE Desktop (using tasksel)
Tasksel is a utility that allows us to install some software collections more easily.
First install tasksel by running:
sudo apt install tasksel
Next run:
sudo tasksel
You should be presented with an interactive screen from which you can select the software collections you want to install, among which there are some of the most popular desktop environments, including MATE.
I’d recommend using a different method to install MATE on Ubuntu 22.04 at this time. But on Ubuntu 20.04 it should work just fine.


This is how Ubuntu 22.04 looks like with MATE installed. Some applets seem to be missing by default, such as the clock, and the tray in the taskbar. There are probably other differences as well.

Troubleshooting
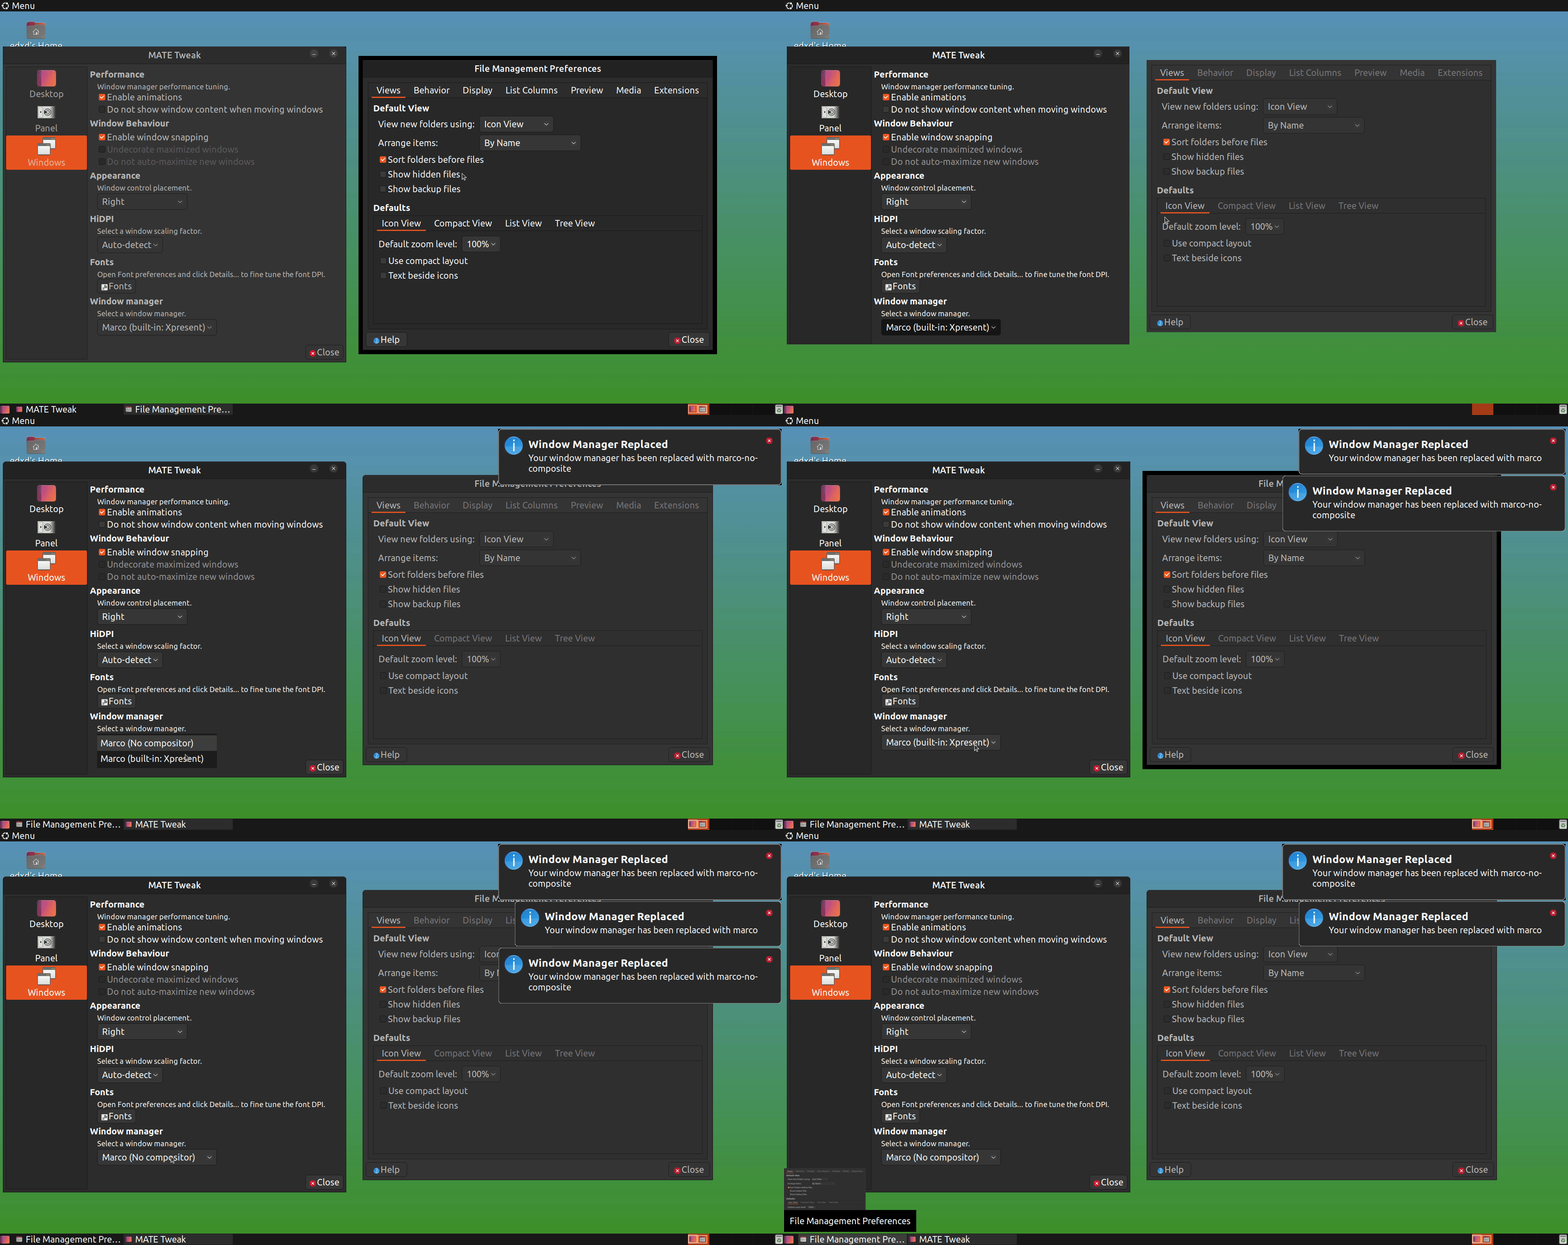
Thick black borders around windows on MATE remote desktop
This can happen when you’re using MATE over remote desktop software, like X2Go, VNC, and others.
To easily fix this you can install and use mate-tweak.
sudo apt install mate-tweak
Now you’ll find MATE Tweak in your applications.
Open it and in the left sidebar select “Windows” and under Window manager select Marco (No compositor) instead of Marco (built-in: Xpresent). That should fix it.
Conclusion
In this tutorial we covered how to install the MATE desktop environment on an Ubuntu machine, in its full and minimal versions, by installing the corresponding packages via the command like and using the tasksel utility.
If you have any questions or feedback feel free to leave us a comment and we’ll get back to you as soon as we can.


Hi, The installation size, which includes core packages and dependencies, has about 2.7GB on a fresh Ubuntu server install. You said.
But i see here around 6GB, so how is that possible?
What exactly u installed if i can ask?