GNOME is a popular desktop environment for Linux, and it is the default desktop environment for many Linux distributions. It is a desktop environment that is designed to be customizable and user-friendly for all types of users.
It is the default desktop environment for many of the popular Linux distributions, including Ubuntu, Debian, CentOS, RockyLinux, RHEL, Pop!_OS, ZorinOS, and others.
GNOME stands for GNU Network Object Modeling Environment and is a free and open-source desktop environment. It was developed by the GNOME Project, which is a community of developers and designers.
Some of GNOME’s most appealing features include:
- It supports a wide range of applications. One of the reasons for GNOME being the default desktop environment for most major Linux distros is that it provides the most functionality and compatibility with existing software.
- It has a consistent, attractive, and intuitive interface
- There is a large collection of themes and extensions available. Most of these themes and extensions are developed by the community. You can find most of them curated on gnome-look.org
- It offers better accessibility than most desktop environments for people with disabilities.
A disadvantage of GNOME is that it is not as lightweight as other desktop environments and its higher memory usage, which can be difficult to run on low-end hardware.
In this tutorial, we will install the GNOME desktop environment on a Ubuntu 20.04 or 22.04 machine. We’ll install 4 variants – Ubuntu GNOME Desktop Full/Minimal, as well as Vanilla GNOME Desktop Full/Minimal. To find out more about GNOME, you can check out the official website at gnome.org.
Table of Contents
- Update and Upgrade Package Index
- Install GNOME Desktop Environment on Ubuntu
- Conclusion
Update and Upgrade Package Index
Make sure your packages are up to date. Sometimes you may get some errors when trying to install your desktop environment, when you’re trying to install it on a fresh server, for example.
To do this run the following command to update the system’s package index and upgrade your packages.
sudo apt update && sudo apt upgrade
Install GNOME Desktop Environment on Ubuntu
There are a few ways to install GNOME and there are a few variations of it. There are minimal installs, which exclude
Install Ubuntu GNOME Desktop (ubuntu-gnome-desktop package)
Ubuntu GNOME Desktop is a full GNOME desktop environment based on Ubuntu. It is designed to be simple and easy to use for new users, while still being useful for experts.
It comes with installed applications that are the ones most often used on a desktop system, such as Firefox for web browsing, LibreOffice for office applications, Rhythmbox for music, and GIMP for image editing, etc.
On a fresh Ubuntu server install, it will take about ~2.5GB space.
To install it run the following command:
sudo apt install ubuntu-gnome-desktop
Reboot the machine after the install is finished.
This is how it looks on a fresh install:


Install Ubuntu GNOME Desktop Minimal (ubuntu-desktop-minimal package)
Ubuntu GNOME Desktop Minimal is a flavor of Ubuntu GNOME that is smaller and lighter than the full Ubuntu GNOME Desktop. It uses a slimmed-down software selection. The purpose of this flavor is to provide a smaller, lighter system to those users who have older hardware or who want a more minimal system.
On a fresh Ubuntu server install, it will take about ~800MB of space.
To install it run the following command:
sudo apt install ubuntu-desktop-minimal
Reboot the machine after the installation is finished.
This is what it looks like on a fresh install:


Install Vanilla GNOME Desktop (vanilla-gnome-desktop package)
Vanilla means that it is the original version of something without any additions or modifications. In the case of GNOME, this would refer to the official GNOME desktop environment that is released by the GNOME Project.
Vanilla GNOME Desktop is the official GNOME desktop environment that is not packaged with any additional software or modifications. It is the purest form of the GNOME desktop environment that is available.
Vanilla GNOME vs. Ubuntu GNOME
The difference between Vanilla GNOME and Ubuntu GNOME is that Ubuntu GNOME is an official flavor of Ubuntu, while Vanilla GNOME is not. Ubuntu GNOME is a fork of the GNOME project that is designed to be integrated with the Ubuntu operating system.
Some noticeable differences between them are that Vanilla GNOME doesn’t have the side dock/panel like the Ubuntu GNOME flavor, and some of the aesthetics are different, such as the Ubuntu branding, there are different fonts, icon sets, etc. There are other minor differences as well.
On a fresh Ubuntu server install, it will take about ~2.5GB of space.
sudo apt install vanilla-gnome-desktop
Reboot the machine after the installation is finished.
This is how it looks on a fresh install:


Install Vanilla GNOME Desktop Minimal (gnome-session package)
In the same manner as Ubuntu GNOME Desktop Minimal, Vanilla GNOME Desktop Minimal is a bare-minimum version of the full Vanilla GNOME Desktop that comes installed with the core applications.
It is perfect for people who want to have a lean and clean system with a small memory footprint or who want to install additional software themselves and do not want any bloat. The goal of this release is to provide a frugal, lean, and usable front end for everyday use.
On a fresh Ubuntu server install, it will take about ~2.6GB of space.
To install it run the following command, which will install GNOME as well as the GNOME terminal:
sudo apt install gnome-session gnome-terminal
Reboot the machine after the installation is finished.
This is how it looks on a fresh install:


Install Ubuntu GNOME Desktop using Tasksel
Tasksel is a Debian/Ubuntu tool that installs multiple related packages as a cohesive unit. It is useful for installing a specific desktop environment, such as GNOME, XFCE, LXDE, KDE, and so on.
It makes it easier to install various desktop environments and some other software.
Install Tasksel
To install tasksel run:
sudo apt install tasksel
Install Ubuntu GNOME Desktop
To install Ubuntu GNOME Desktop using tasksel run:
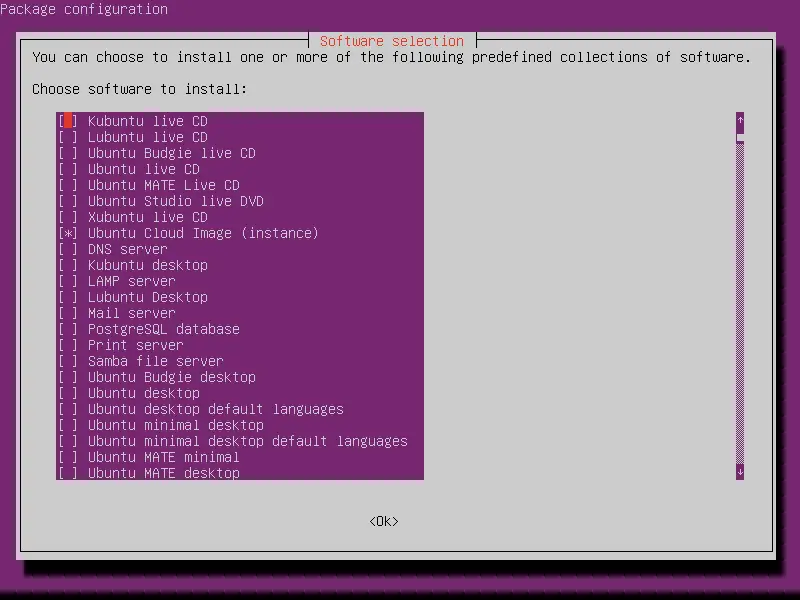
sudo tasksel
Next, you’ll be presented with an interactive screen from which you can select the software you want to install from the configurations available in tasksel. Select GNOME by navigating with your cursor into its corresponding checkbox, press SPACE, then TAB to switch to the OK/Cancel buttons, and press ENTER to OK.
tasksel on Ubuntu 22.04, as of the time of writing, it currently seems to offer packages corresponding to Debian, instead of Ubuntu. If you use it on a fresh install, you’ll notice the default wallpaper is that of Debian 11 instead of Ubuntu 22.04.
With Ubuntu 20.04 it works just fine, however.


Next, wait for the progress screen to finish. When it’s done, you’ll get back to the terminal, and you can reboot the machine.

Conclusion
In this tutorial, we covered how to install both Vanilla and Ubuntu GNOME Desktop environments, as well as their minimal versions.
If you have any questions or feedback, feel free to leave a comment, and we’ll get back to you as soon as we can.


Great !
How to install it in WSL2? A lot of failed things happens…