Knowing how to install GNOME themes empowers you to customize the appearance of your Linux graphical user interface. It entails defining GNOME, knowing how it works, and installing themes step-by-step.
By the end of this tutorial, you will not only know how to install themes but navigate the file explorer and change the shell, and icons look.
Table of Contents
What is GNOME
GNOME, short for GNU Network Object Model Environment, is a free, open-source desktop environment used in Linux distributions.
GNU is a collection of free software for operating systems, while Linux is the kernel. That means GNU is responsible for the commands you run like ls, cd, and cat, whereas Linux interprets the commands to the hardware. Therefore, combining the commands and kernel forms an operating system like Ubuntu.
However, it would help if you had a graphical user interface to work with the operating system without explicitly typing each command. That is where desktop environments like Gnome, Cinnamon, and KDE come in. Some Linux distributions specialize in one desktop environment, whereas others permit you to choose from many options.
The key takeaway is that Gnome gives you the interface to interact with applications on the screen. But how does Gnome work?
How GNOME Works
GNOME’s interface has three chief menus: Activities, Clock, and User.
The Activities menu provides a search bar to access applications and settings quickly. Below the Activities menu is a quick launch bar, a shortcut to your favorite applications, and the (bottommost) button to access your installed/frequently used apps.

The activities panel also allows you to switch workspaces.

The Clock menu shows you the date and time. It has a dropdown menu divided into notifications and calendar portions.

The User menu displaying network connectivity, volume, and battery icons is quick access to system settings, shutdown and lock shortcuts, and network settings.

The settings submenu of the User menu provides you a few options to custom your distro interfaces, like background and appearance.

That is why you may need to install Gnome themes: have more options to choose from.
How to Install Gnome Themes Step-by-Step
A theme is a preset package with functional details and a graphical look.
There are two types of Gnome themes: application and shell themes. The application theme modifies the application windows, whereas the shell theme modifies shell elements such as the top panel.
Here are the steps to Install Gnome Themes.
Install Gnome themes for a particular user
1. Create a Themes Directory
The themes you install are referenced in the themes directory.
You can install Gnome themes for the currently logged-in user only by creating a .themes folder and including new themes in the folder.
mkdir ~/.themes
Alternatively, you can install themes for all system users by including the new theme in the /usr/share/themes folder.
2. Install the Gnome Tweaks Tool
The Gnome tweaks tool helps you modify the interface of the desktop environment. Here are the steps to install the Gnome Tweaks tool on the terminal.
update and upgrade the system
It is recommended to update and update the system before installing packages.
sudo apt update
sudo apt upgrade
Install Gnome-tweak-tool
Check if the Universal repository is enabled on your system.
sudo apt-add-repository universe
# message: 'universe' distribution component is already enabled for all sources.
Then install the tool.
sudo apt install gnome-tweak-tool
Launch the Gnome tweaks tool
Run this command to launch the Gnome tweaks tool.
gnome-tweaks
The application opens up, confirming the successful installation of the Gnome Tweaks tool.

Alternatively, you can search for tweaks in the search bar.

Now let’s find and install some themes.
3. Download a Theme
Head to Gnome-look’s website and install your preferred theme.
On the sidebar menu, click on GTK3/4 Themes.

Pick your preferred theme and download it. Note: some themes may not be compatible with your system.
For example, let’s download the Midnight Theme by g-nome.

Now choose your preferred subcategory and download it.

3. Extract and Install the Downloaded Theme
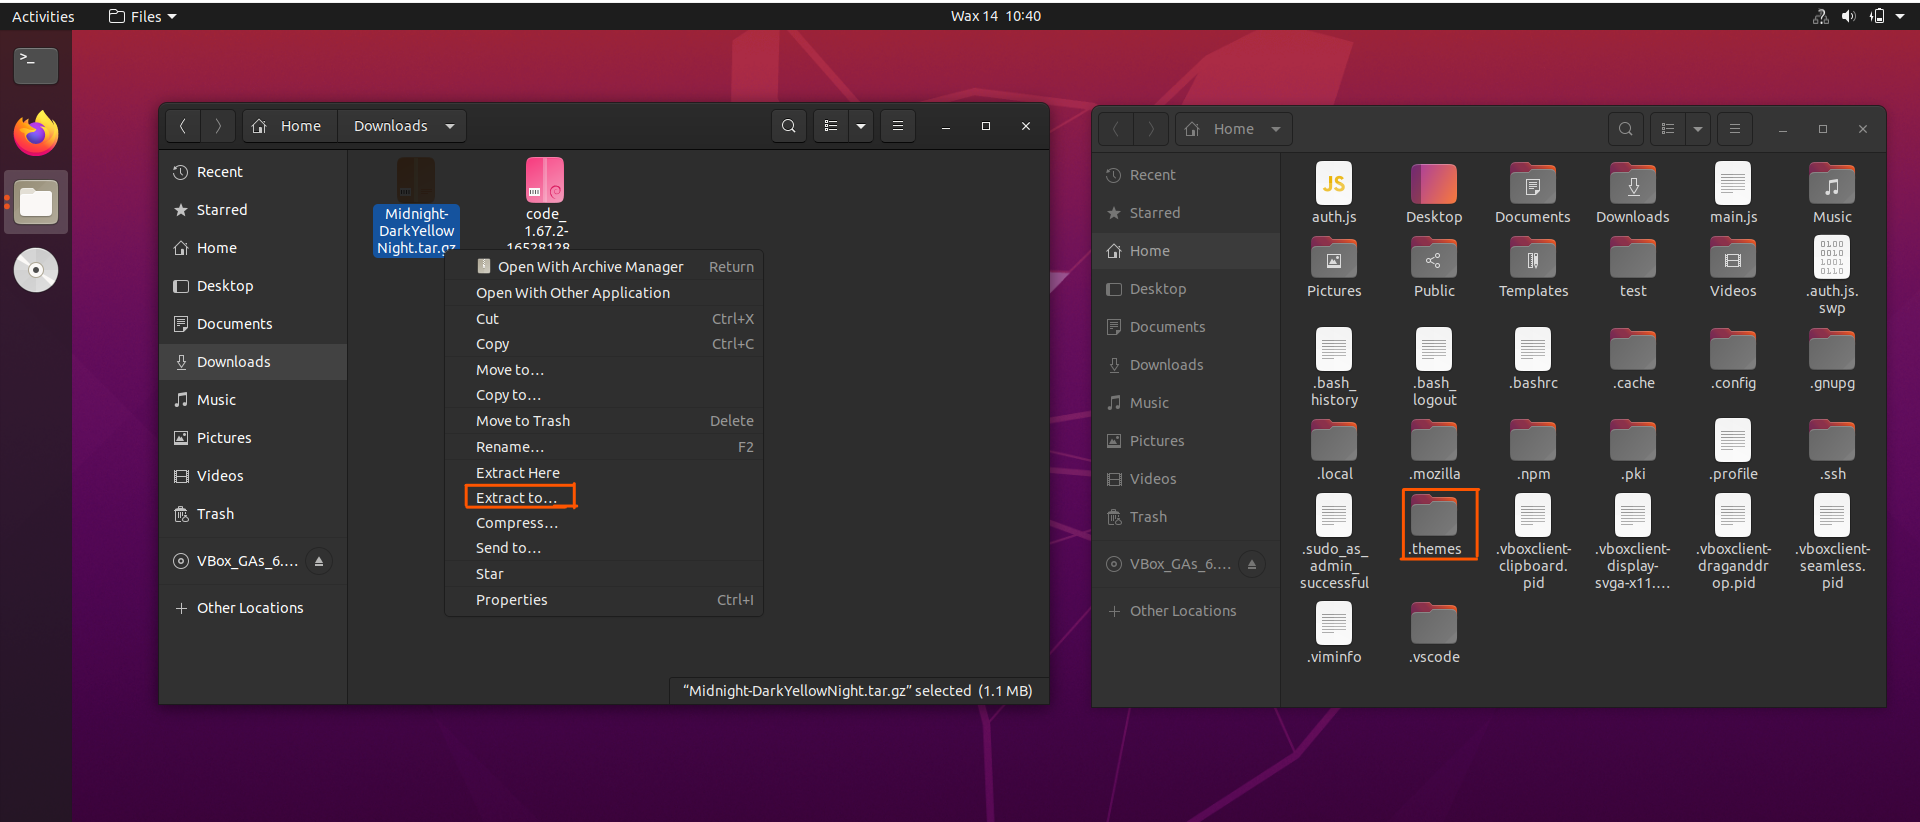
Extract the downloaded file into the .themes directory.
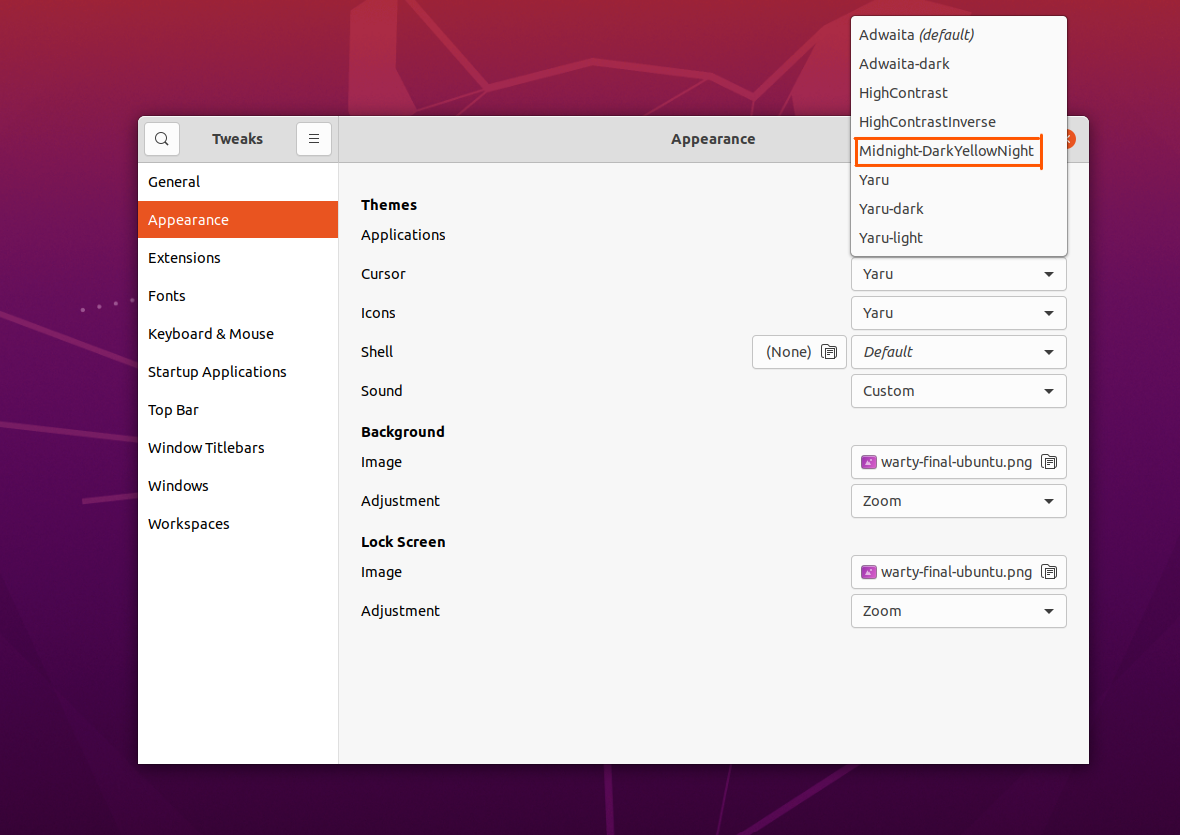
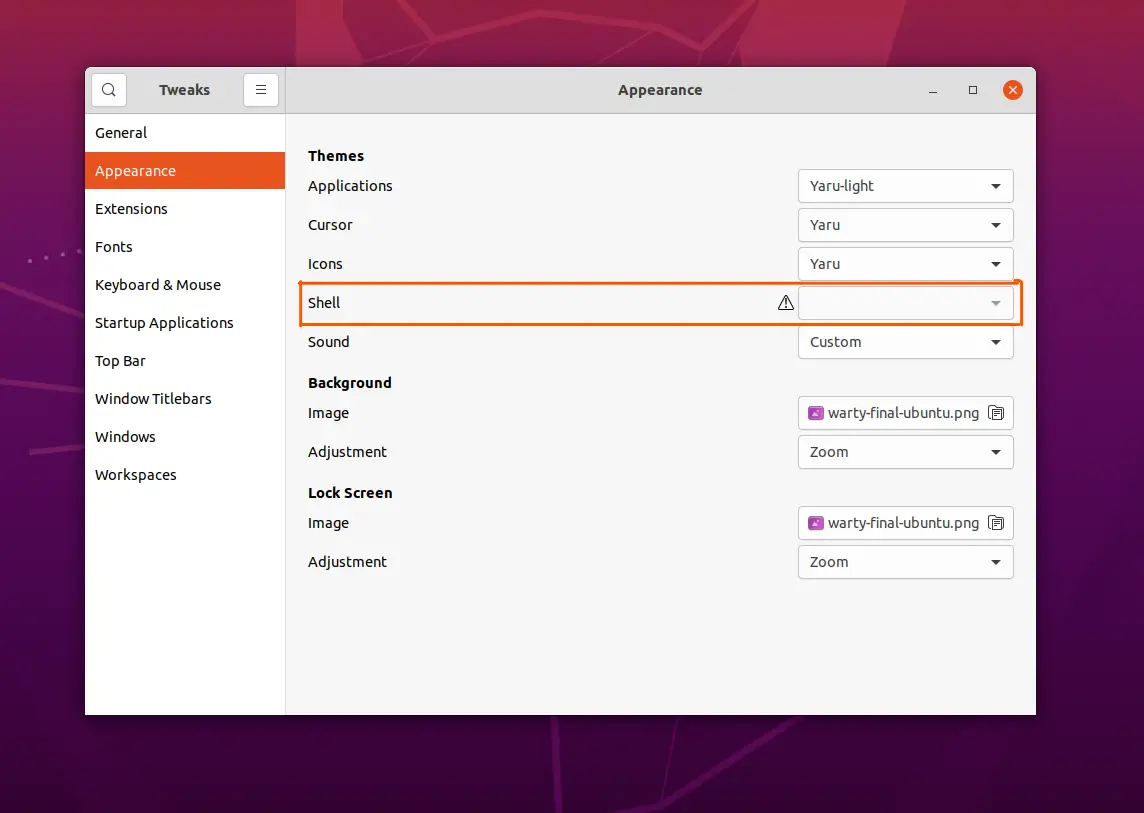
Launch the Gnome Tweaks Tool, navigate to the Appearance submenu and change the application theme by selecting the downloaded theme from the Applications link.

Likewise, you can change the shell theme by selecting one from the Shell link. However, install shell extensions if you see a warning before the selection box.
sudo apt install gnome-shell-extensions
Next, log out and power off the machine, then restart it.
Reopen the Gnome Tweaks tool and navigate to the Extensions menu, then scroll down the links till you see User themes and turn it on.

Return to the Shell link on the Appearance menu and select your preferred shell theme.
Now that you know how to install Gnome themes for a specific user let me show you how to install the themes for all system users.
Install Gnome Themes Globally
Download a theme and extract it. Next, access the /usr/share/themes folder and drag the extracted folder. Here are the steps.
Open the file explorer with root permissions.
sudo nautilus

Navigate to the themes section. Other locations -> Computer -> usr -> share -> themes
Drag and drop the downloaded file’s extracted folder into the themes directory.
Before dragging:

After dragging:

Close the windows and open the Gnome tweak tool.
You should find the new theme, as one of the options, in the Applications dropdown.

The appearance changes after selecting the installed theme.

Conclusion
You can install Gnome themes for a particular user or all system users.
To install themes for the logged-in user, create a .themes folder, download and extract the new themes folder into the .themes folder. To install themes for all users, download and extract the theme’s folder, then drag and drop the folder into the /usr/share/themes folder.
Lastly, open the Gnome tweaks tool. Move to the Appearance menu, then choose the installed theme from the Applications dropdown.

