Table of Contents
What is ProFTPD
ProFTPD is a highly enriched flavor of FTP server. It is available on Linux and Unix-like machines but can also be used in Windows via Cygwin. It is free and open-source software.
Its environment exposes a person to many configuration options and a person who has used FTP before on Unix system will learn this version very easily.
It was released and distributed under the GNU Public License. This FTP version is very versatile because it can support TLS (SSL) for a secure connection.
Pre-Requisites
Firstly, before we get started here are a few things that you should have before you start the installation process.
- Ubuntu 20.04
- Root access
System Update
Firstly, update your system so that all the repositories and dependencies are up to date so that you would get the latest stable version of the ProFTPD FTP server.
To update type the following command:
sudo apt update
sudo apt upgrade
Installation
Now we will install our ProFTPD server. Keep in mind that ProFTPD is available in default repositories of Ubuntu 20.4 and can be installed automatically by the following command:
sudo apt-get install proftpd -y
Enabling ProFTPD
Now start and enable your ProFTPD server so that it starts automatically during boot time.
To do that type the following command:
sudo systemctl start proftpd

Checking Status
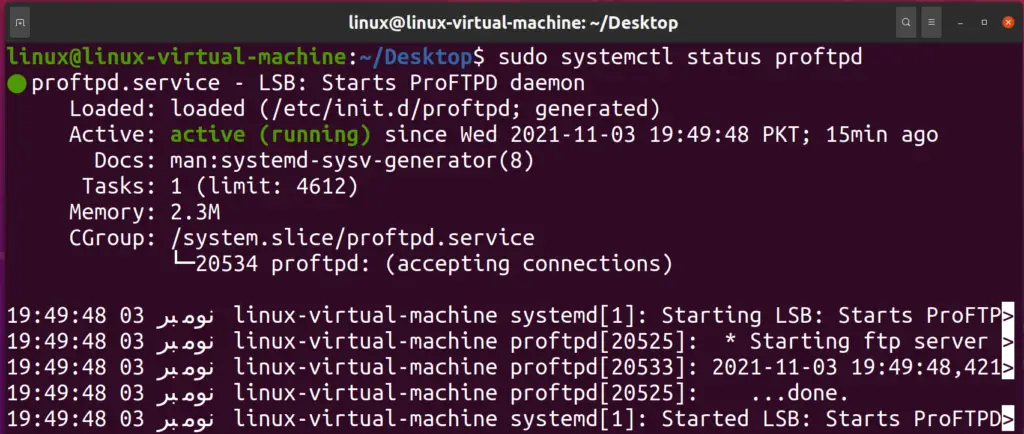
Now you can confirm that your ProFTPD server is active by the following command:
sudo systemctl status proftpd
Your output should look like this:
Configuration File
ProFTPD configuration file is located at /etc/proftpd/proftpd.conf directory. It needs to be configured to make it a fully functional and secure server before use.
It has lots of options you can configure it according to your requirements. However, in this article, I’m going to configure it according to the TLS connection.

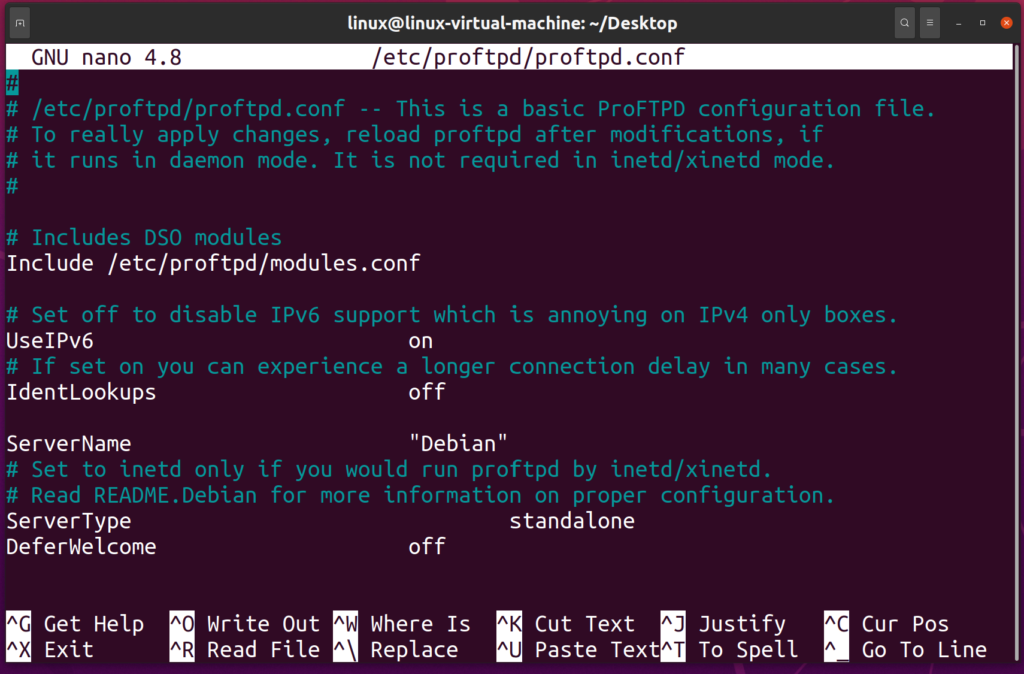
You can use nano command to check what’s inside the file. Type the following to see what’s inside the file:
sudo nano /etc/proftpd/proftpd.conf
You can remove the comments # and configure your file according to your needs. Here’s how the file looks like:
Adding FTP Users
FTP comes with two types of users which are:
- Anonymous FTP: This allows anyone to access the server without any credentials. This should not be active on public networks and should only be active on a home server or a company LAN.
- FTP User: Users that have credentials are known as FTP users. They can access the FTP with these credentials and no one else can access this server without those credentials
Adding /bin/false
Before you create a user firstly add the /bin/false to your /etc/shells file. By doing it, we enable the option to create users that cannot log into shell.
To add type the following command in terminal:
sudo echo "/bin/false" >> /etc/shells

Note: If you get an error that permission is denied then you need to log in as root and then enter the command without the keyword sudo
Creating User
Now we will create a user with a specific home directory and disable its shell access by adding /bin/false. Also, we will grant it to the FTP server.
To do that type the following command:
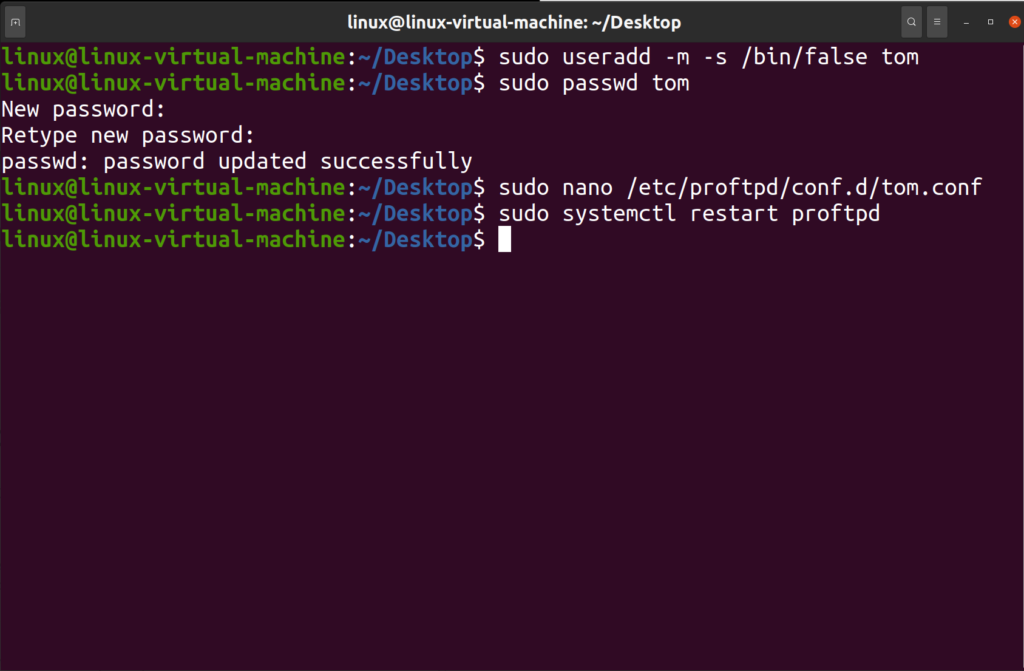
sudo useradd -m -s /bin/false tom
passwd tom

Configuring .conf file
Now your user tom has been created without shell access located in the directory /home/tom/
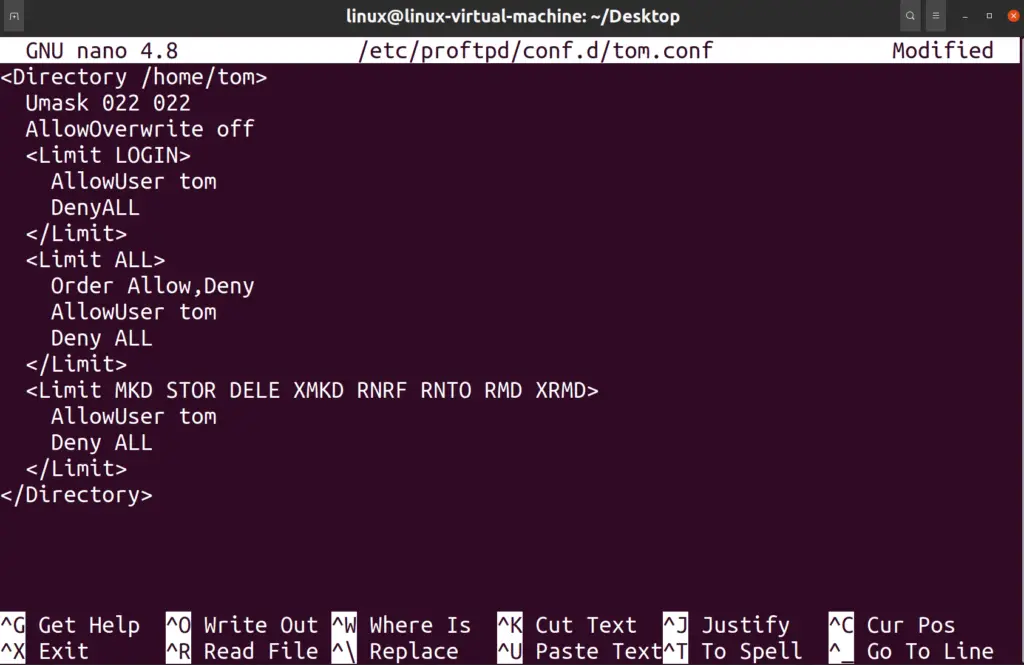
Now we will give access to tom by updating the ProFTPD configuration file so that we can give tom permissions in the FTP serve.
Type the following command in terminal:
sudo nano /etc/proftpd/conf.d/tom.conf
Now restart your ProFTPD server with the following command:
Your output file should look like this:
sudo systemctl restart proftpd
Configuring TLS in ProFTPD
Firstly, to use TLS we need to add SSL certificate which can be downloaded with the following command:
sudo openssl req -x509 -newkey rsa:2048 -keyout /etc/ssl/private/proftpd.key -out /etc/ssl/certs/proftpd.crt -nodes -days 365
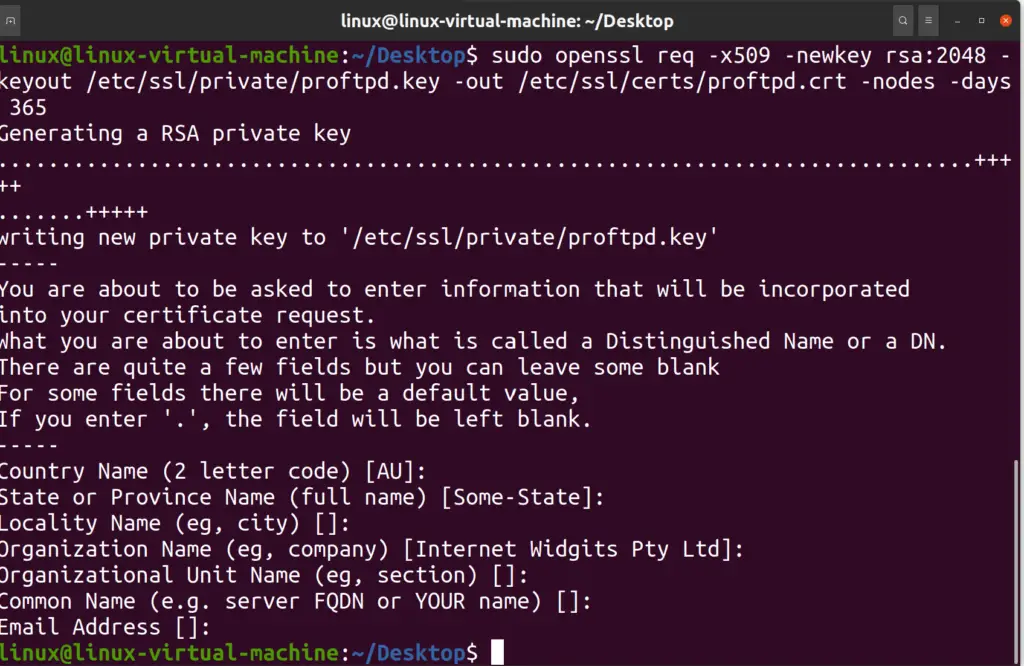
sudo chmod 600 /etc/ssl/certs/proftpd.crt
sudo chmod 600 /etc/ssl/private/proftpd.key

Now configure your configuration file to make use of the SSL certificate that we just generated.
Now change the permission of the certificate by these commands:
sudo nano /etc/proftpd/proftpd.conf
Now uncomment the TLS file:
Include /etc/proftpd/tls.conf
If you can’t find the comment, then you can add it to the file. Now uncomment the TLS file:
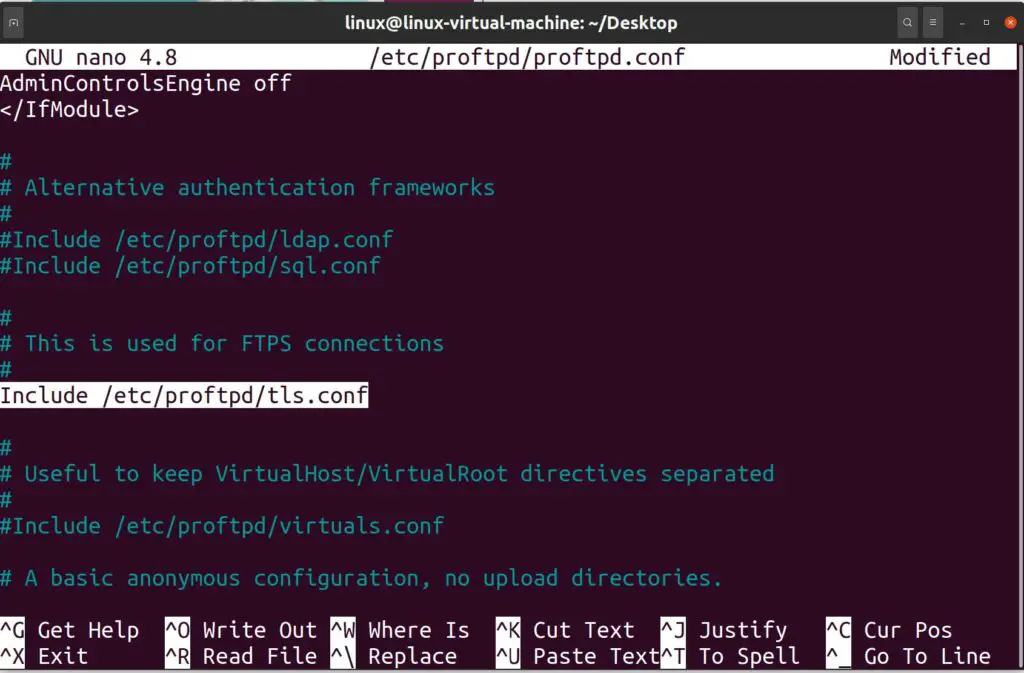
Save and exit the file.
Now go to the TLS configuration file to enable source authentication and uncomment the following files:
sudo nano /etc/proftpd/tls.conf
Uncomment the following files:
- TLSEngine
- TLSLog
- TLSProtocol
- TLSRSACertificateFile
- TLSRSACertificateKeyFile
- TLSOptions
- NoSessionReuseRequired
- TLSVerifyClient
- TLSRequired
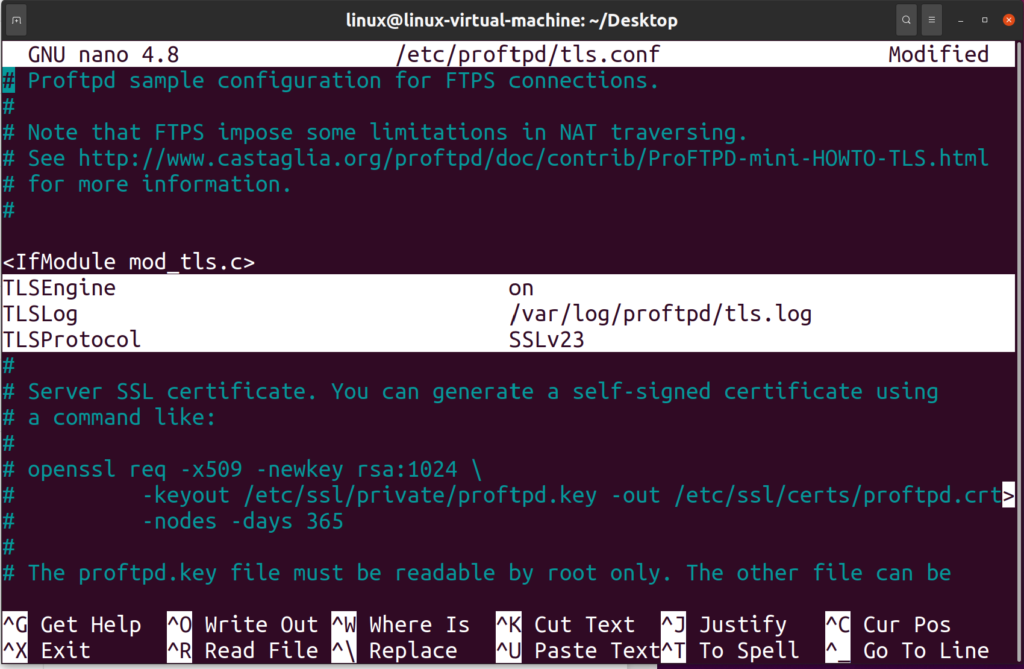
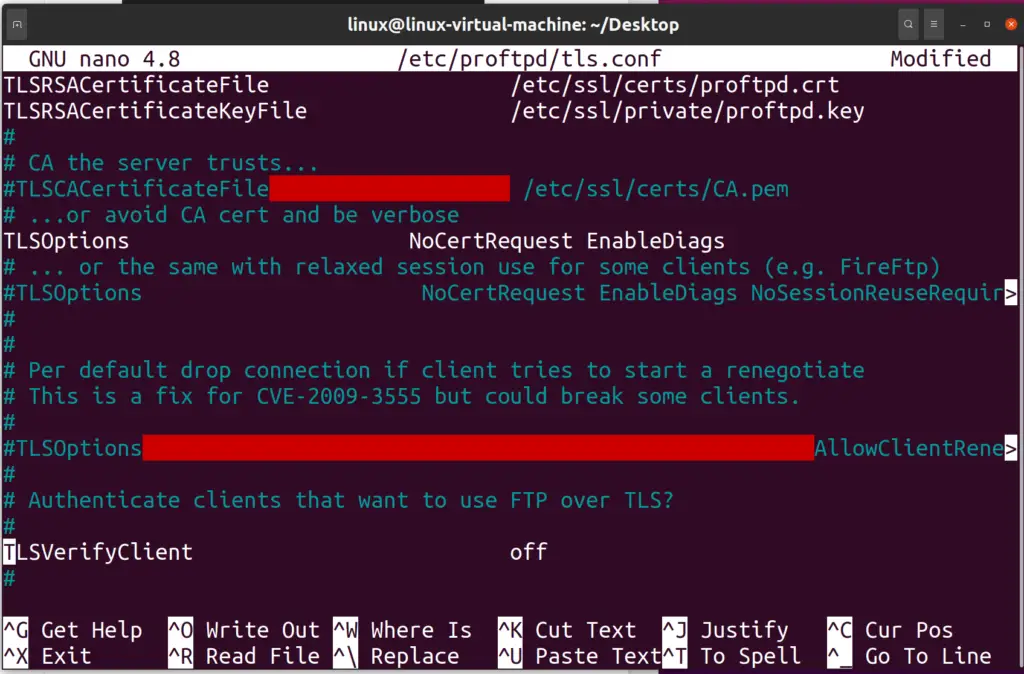
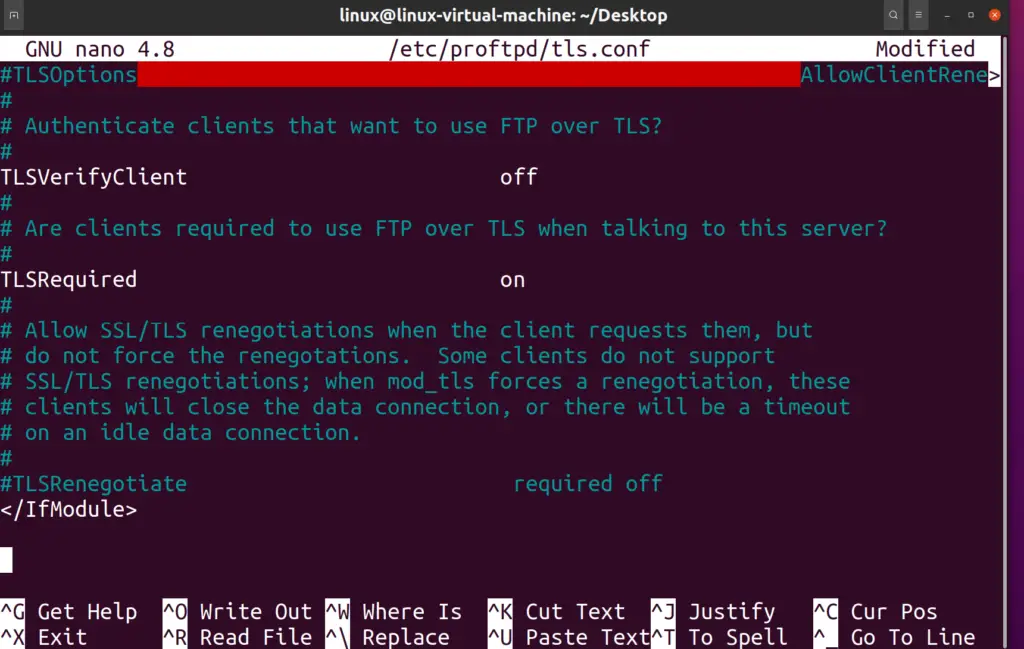
Save and exit the file
Now the only step left is to restart the FTP server. To do that type the following command:
sudo systemctl restart proftpd
Note: You can test this server by connecting to it with software like FileZilla. To connect you only need to fill in the server IP, username, password, and port.


![How to Install and Use Telnet on Linux 42 telnet [options] host [port] on light blue background](https://bytexd.com/wp-content/uploads/2022/06/How-to-Install-and-Use-Telnet-on-Linux-380x220.png)


