Cron is the task scheduler for Linux, and it’s one of the most useful tools for system administrators.
It helps you automate the repeating tasks at ease.
These tasks or commands that are pre-scheduled are called Cron Jobs.
A few examples of common uses for Cron Jobs:
- Backing up some files periodically.
- Periodic scanning or monitoring – you can use cron jobs to run various scripts that may perform a security scan regularly, or monitor performance.
- Run a script regularly that performs some kind of audit and then sends a report to your email.
Those are just a few basic examples, but there are many use cases.
In this tutorial, we will be learning how to use the Crontab command to schedule tasks and edit already existing schedules.
Table of Contents
Basic Ideas
Before we begin let’s familiarize ourselves with some basic ideas and terms related to cron:
What is a Cron Job
In Unix-like operating systems, a Cron Job is a task that runs on a schedule, on a server. This can be a command that you run every 5 minutes, every hour, every day, every week, every month, and even at more precise times such as every 2 hours and 15 minutes, on every January 3rd, but only if January 3rd falls on a Wednesday.
Crond
Crond stands for Cron Daemon. In computing, a daemon is just a background process that runs to handle periodic requests by the system. It is analogous to services in the Windows operating system.
Crond is the daemon that runs in the background and checks if there are any scheduled jobs to run. If there is nothing to run, it stays idle.
Crontab
Crontab stands for Cron Table.
A crontab file holds all the information about what the scheduled tasks are and when they should be run by Crond. The crontab command allows us to interact with the contents of the Cron Table.
Each user has their own Cron table that they can edit. The root user can see all the cron tables and interact with them.
Crontab Commands
With the crontab command you can do three things, in general:
- List the cron table
- Edit the cron table
- Removing a cron table
Let’s see how to run each of those.
1. List the cron table
To see what’s in the cron table existing on our system, run:
crontab -l
You will see your cron table with this command.
Other user’s cron table can be listed by the command:
crontab -u username -l
This will only work when you are root. Remember to use sudo if you have access.
2. Edit the cron table
You can edit your cron table by simply typing in:
crontab -e
And you can edit the cron table of another user:
crontab -u username -e
3. Removing a cron table
To remove a cron table run:
crontab -r
Use the -u flag to remove the cron table from other users:
crontab -u username -r
Now that you know the basic commands you can perform with crontab, let’s see how to schedule a job.
Schedule Jobs by Creating Crontab Entries
You can add jobs to be run at a specific time by editing crontab.
When you run the crontab -e command, you will see some comments starting with # written in the crontab file.
You can add jobs after the commented out lines end:
crontab -e
# Edit this file to introduce tasks to be run by cron.
#
# Each task to run has to be defined through a single line
# indicating with different fields when the task will be run
# and what command to run for the task
#
# To define the time you can provide concrete values for
# minute (m), hour (h), day of month (dom), month (mon),
# and day of week (dow) or use '*' in these fields (for 'any').#
# Notice that tasks will be started based on the cron's system
# daemon's notion of time and timezones.
#
# Output of the crontab jobs (including errors) is sent through
# email to the user the crontab file belongs to (unless redirected).
#
# For example, you can run a backup of all your user accounts
# at 5 a.m every week with:
# 0 5 * * 1 tar -zcf /var/backups/home.tgz /home/
#
# For more information see the manual pages of crontab(5) and cron(8)
#
# m h  dom mon dow   command
Start adding your entries here
Note: I’ve have added the line Start adding your entries here to indicate where you’d start editing. You’d just replace that line with your first job.
But before we schedule a job here, you have to understand how to specify the time when the job will run.
As such, next we’ll cover the syntax of crontab.
Crontab Syntax Scheduling Jobs With Crontab
In this section, we’ll learn how to specify the time in crontab. The following is the general syntax:
* * * * * [path to the script/command to execute]
There are 5 asterisks here, and each of them represents different time parameters to be specified.
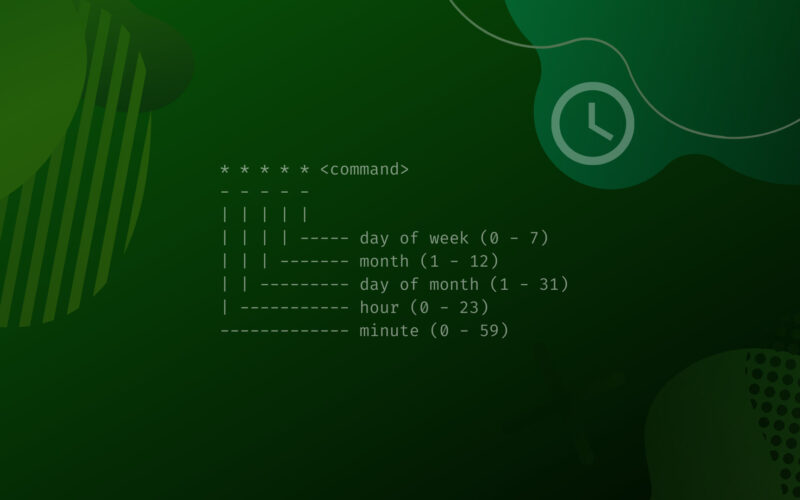
Let’s see what they mean with a simple diagram:
* * * * * [path to the script/command to execute]
- - - - -
| | | | |
| | | | ----- day of week (0 - 7)
| | | ------- month (1 - 12)
| | --------- day of month (1 - 31)
| ----------- hour (0 - 23)
------------- minute (0 - 59)
Here’s another representation, in hopes that it may be easier to follow and remember for some. The asterisks have been replaced with the what each field represents:
<minute> <hour> <day-of-month> <month> <day-of-week> [command]
Now let’s break them down one by one:
- Minute (m): Specifies the minute of the hour. It can be any value between 0 to 59.
- Hour (h): This indicates the hour of the day. It can be a value between 0 to 23 (0 being 12am, and 23 is 11 pm)
- Day of Month (dom): It’s the number of the day in a month. The value is between 1 to 31.
- Month (mon): This parameter marks the month in a year. Values can be between 1 to 12.
- Day of Week (dow): It can take value in between 0 to 7. 0 or 7 both means Sunday and 6 is Saturday.
Replacing the asterisks with a value isn’t required.
If you leave an asterisk instead of setting a value, it will take on every possible value that it’s position allows.
For example, in the first position if you leave an asterisk, which is the minute position, then the job will execute every minute. If you leave the asterisk in the second position (hour), then the job will execute every hour. It will do this, while also taking into account the other parameters.
We’ll try to demonstrate this through examples to give you a better idea:
35 13 * * * [imaginary command]
Adding this entry to the crontab will run the [imaginary command] at the 35th minute of the 13th hour (01:35 pm), each day of every month.
As such, keeping the asterisk in the position of (dom), (mon), and (dow) meant this command will run every day of the month (dom), every month (mon), and every day of the week (dow), throughout the year.
10 0 * * 5 [command to execute]
The command will be run on the 10th minute of 0th hour (12:10 am), each Friday of every month.
Here, the last value, 5 (dow) means the code will only run on the 5th day of the week (Friday).
0 18 8 5 * echo "Guess the output" >> output.txt
This piece of code will create a text file containing Guess the output on 6 pm, 8th May.
* * 20 1 * /root/bin/example_command.sh
This will make the /root/bin/example_command.sh run every minute on 20th January.
* * * * * [some annoying command]
It will run [some annoying command] every minute, of every hour, of every day, of every month, and every day of the week.
In other words, the command will run every minute as long as the machine is running.
Now we’ll learn some ways to input multiple values by modifying the syntax with operators.
Operators To Use in the Crontab
You have already seen an operator. It’s the asterisk that takes all the values of the position it’s in.
Let’s look at some other operators that can be used in cron tables:
- The comma (,) – Allows the user to specify multiple values, each followed by a comma.
- The hyphen (-) – A range of values can be entered with a hyphen.
- Slash (/) – Are used to specify stepvalues (or incremental values). For example you can use
*/5in the minutes field to specify that you want the job to run every 5 minutes, or*/2in the hour field means that it will run every 2 hours.
Here are some examples with these operators:
0 0 10,11 * * /root/Desktop/myscript.sh
This line will make “myscript.sh” to be run at midnight on the 10th and 11th day of every month.
17 6-10 * 8 * [path to the script]
The hyphen operator is used to specify a range of values. Here we set the hour value to 6-10, so the script will run 5 times a day in August.
Each day the script will run at 6:17 am, 7:17 am, 8:17 am, 9:17 am, and 10:17 am.
*/2 * * * 2 [something]
In this example, [something] will run for every 2 minutes on every Tuesday.
Here is another example with the slash (/) operator:
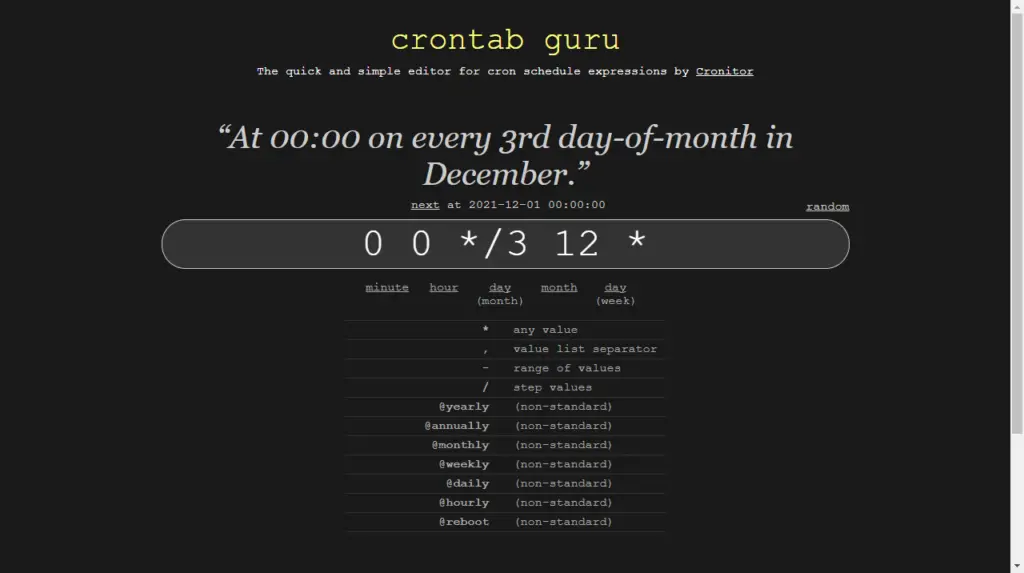
0 0 */3 12 * /root/bin/sh/ScriptA.sh
It will make the /root/bin/sh/ScriptA.sh run at midnight on every 3rd day of December.

A Little Experiment for You To Try
In this section, we’ll show you an experiment you can try on your device to see the cron working.
Follow the steps below:
Type in crontab -l to see if there are any entries on your crontab. If you don’t have any entries you will see the following results:
crontab -l
no crontab for [username]
If there is some entry in the crontab you will see them at the bottom. Let’s look at my crontab:
crontab -l
# Edit this file to introduce tasks to be run by cron.
#
# Each task to run has to be defined through a single line
# indicating with different fields when the task will be run
# and what command to run for the task
#
# To define the time you can provide concrete values for
# minute (m), hour (h), day of month (dom), month (mon),
# and day of week (dow) or use '*' in these fields (for 'any').#
# Notice that tasks will be started based on the cron's system
# daemon's notion of time and timezones.
#
# Output of the crontab jobs (including errors) is sent through
# email to the user the crontab file belongs to (unless redirected).
#
# For example, you can run a backup of all your user accounts
# at 5 a.m every week with:
# 0 5 * * 1 tar -zcf /var/backups/home.tgz /home/
#
# For more information see the manual pages of crontab(5) and cron(8)
#
# m h dom mon dow command
0 0 1 1 * echo 'Happy New Year' >> /root/Desktop/Happy.txt
Sidenote: I have one entry in my crontab. See the last line there? Can you decode when will this command run? You might have figured it out just by glancing at it.
Getting back to our little experiment, next we have to add a line to the crontab. For that, we’ll need to edit the crontab. Run:
crontab -e
Now add the following line at the bottom:
* * * * * echo "Experiment" >> path/Output.txt
Replace path with wherever you want the output file to be saved. I will change the path to my desktop:
* * * * * echo "Experiment" >> /root/Desktop/Output.txt
Can you tell what this job will do? This line will create a file named Output.txt on my desktop and add the word “Experiment” every minute.
Now press CTRL+X and then type Y and hit Enter to save the cron table.
Next, when you open the Output.txt file after some minutes you will see something like this:

Now you should be able to create your own scheduled tasks and run commands or scripts automatically whenever you want.
Also, while we’re at it, you might want to delete this experimental crontab entry we created, unless you want to keep the cron job spamming in the text file.
Crontab entries survive reboots. So, some days later you might find the file eating up some of your storage space and reappearing every time you delete it.
If you had nothing in your crontab before this experiment, you can just remove all the crontab entries by typing in:
crontab -r
You can confirm that you have no crontab by the list command:
crontab -l
Some Special Strings for Crontab
You can also use some strings instead of the time parameters to save time. Using them is much easier. Let’s look at the strings and their equivalent time parameters:
- @reboot – Runs scripts/commands every time the system boots up.
- @hourly – It means run every hour. Equivalent to
0 * * * * - @midnight – Run every midnight. Same as
0 0 * * * - @daily – Same as @midnight
- @weekly – This will run a command once every week. Equivalent to
0 0 * * 0 - @monthly – Run some commands monthly. Same as
0 0 1 * * - @yearly – This will run commands yearly. Equivalent to
0 0 1 1 *(Remember happy new year?) - @annually – Same as @yearly
Now let’s see some examples with these strings –
@hourly [path to command]
@weekly [path to command]
Remember to enter these lines in your crontab.
More on Crontab
If you want to learn more about the crontab then this is the section for it. There are some directories for crontab in /etc/ parent folder. We can learn more information about the cron jobs from those directories.
Also, there is a permission file for crontab that keeps the track of which users are allowed to use the crontab. We can only access the file as root. Let’s get to about these concepts more.
Permissions for Cron
The permission for using cron can be granted or revoked by root.
Two files determine the user permissions. They are the /etc/cron.allow and /etc/cron.deny file. There can be 3 scenarios:
- If only the
cron.allowfile is found in the/etc/directory then the users on this file gets the permission to use cron. - If only the
cron.denyfile is found then the users on this file are DENIED from using cron. - If both files are present then the
cron.allowfile takes precedence.
Where Are Cron Jobs Stored
In the /etc/ directory we can find hourly, daily, monthly, etc. subdirectories that reveal the cron jobs that are done accordingly.
For example, if you want to see the cron jobs that run daily, list the contents of /etc/cron.daily:
ls -la /etc/cron.daily
You will see all the cron jobs that are done daily. Hourly, monthly, etc. jobs can also be found in the same way.
Anacron – an Interesting Tool
When a device shuts down or goes to sleep without performing the scheduled tasks, those tasks might not be performed again.
This is why some devices for personal use will have the anacron program. It mostly works like the cron with the additional capability to run some of those skipped scheduled tasks once the system has started.
The missed tasks will get executed only once however many times they got missed.
Common Cron Jobs
In case you’re here in a hurry, don’t have time to read through the tutorial and just want a quick solution then this section might be useful.
Run a Cron Job Every X Minutes
To run a cron job every X minutes, then all you have to do is set the first field as */X where X is a number between 2 and 59 (every 2 minutes is */2, every 17 minutes is */17, every 59 minutes is */59 etc).
*/X * * * * command
Run a Cron Job Every 5 Minutes
*/5 * * * * command
Run a Cron Job Every 10 Minutes
*/10 * * * * command
Run a Cron Job Every 15 Minutes
*/15 * * * * command
Run a Cron Job Every X Hours
This differs a bit from every X minutes.
Run a Cron Job Every Hour
The most basic example for this is using the special @hourly string and ditch the asterisks:
@hourly command
To run a cron job once per hour using the asterisk syntax we’ll first have to set the Minutes asterisk to something between 0 and 59, so it runs only once per hour.
0 * * * * command
You can also run the job hourly, but at a different minute.
*/5 * * * * command
Run a Cron Job Every 2 Hours
If we want to run every 2 hours or more, we first do the same as above, where we set the minute at which the job to run, and we’re looking at the second asterisk *, as that is the one that represents hours. We’ll just replace the simple asterisk with */X where X is a number between 2 and 23 (every 2 hours is */2, every 17 hours is */17, every 23 hours is */23 etc).
0 */2 * * * command
0 */17 * * * command
25 */10 * * * command
Hopefully you see the pattern.
Run a Cron Job Every Day
The easiest way to do this is using the @daily string so you don’t need to know how to use the syntax involving asterisks.
@daily command
If you want to run the cron job daily at a certain hour, we’ll just need to set the minute and hour fields, so the cron runs at a certain minute and certain hour every day.
15 2 * * * command
In the following example, just replace X (minutes) with a value between 0-59 and Y with a value between 0-23.
X Y * * * command
Conclusion
In this tutorial we covered the basics of cron and we hope that it helped you learn how to schedule jobs in Linux with the crontab command.
If you face any problems, take a look at the manuals page for the crontab command. You may also check out some of the websites that generate crontab according to your needs, such as crontab.guru and others like it.
If you encounter any issues or have any kind of feedback, feel free to leave a comment below contact page and we’ll get back to you as soon as we can.


![How to Use the fd Command in Linux ('find' Alternative) 21 $ fd [options]](https://bytexd.com/wp-content/uploads/2022/06/How-to-Use-the-fd-Command-in-Linux-‘find-Alternative-380x220.png)

