cURL (client URL) is a command line tool that can be used to transfer data from a server. It is often used by developers to test web applications. cURL can be used to download files, submit form data, and even to log in to websites.
The curl command is one of the most used commands to automate the process of sending and receiving data to or from a server, and it provides a simple, easy-to-use command-line interface that can be used to do this.
The curl command supports many protocols such as – HTTP, HTTPS, FTP, SFTP, TELNET, etc. It is a cross-platform tool available in Windows, Unix, and macOS.
cURL has a very broad usage – a quick way to see how broad of a usage is, you can run curl -h in your command line and see all of the options it offers.
Objectives
This tutorial will explain the basics of the cURL command and how to use it to transfer data to or from a server, along with some of its most frequently used options.
We’ll also explain the basics of HTTP requests and how to perform them with the cURL command, along with some useful things you can do.
Table of Contents
- Objectives
- Installing cURL on Your System
- Basics of the cURL command
- Basics of HTTP Requests & Responses
- HTTP Requests with The cURL Command
- Conclusion
Installing cURL on Your System
If you’re using Linux, Mac OS X, or Windows 10 version 1803 or later, chances are cURL is already installed in your machine. You can check if you have cURL simply by typing the following in your command line:
curl -V
This will output the version of cURL, if it is installed:
curl 7.68.0 (x86_64-pc-linux-gnu) libcurl/7.68.0 OpenSSL/1.1.1f zlib/1.2.11 brotli/1.0.7 libidn2/2.2.0 libpsl/0.21.0 (+libidn2/2.2.0) libssh/0.9.3/openssl/zlib nghttp2/1.40.0 librtmp/2.3

Release-Date: 2020-01-08

Protocols: dict file ftp ftps gopher http https imap imaps ldap ldaps pop3 pop3s rtmp rtsp scp sftp smb smbs smtp smtps telnet tftp

Features: AsynchDNS brotli GSS-API HTTP2 HTTPS-proxy IDN IPv6 Kerberos Largefile libz NTLM NTLM_WB PSL SPNEGO SSL TLS-SRP UnixSockets
You can also see the list of the supported protocols and the features. If you did not have cURL installed, you would’ve got something like this:
Command 'curl' not found, but can be installed with:

sudo snap install curl  # version 7.76.1, or
sudo apt  install curl  # version 7.68.0-1ubuntu2.5

See 'snap info curl' for additional versions.
'curl' is not recognized as an internal or external command, operable program or batch file.
If you don’t have cURL installed, next, we’ll cover how to install it on your system.
Installing cURL on Debian-based Distros
To install cURL on Debian-based distros (Debian, Ubuntu, etc.) run:
sudo apt-get update
sudo apt-get install curl
Installing cURL on RPM-based Distros
To install cURL on RPM-based distros (CentOS, Fedora, etc.) run:
sudo yum update
sudo yum install curl
Installing cURL on Windows
There are multiple ways you can install cURL on Windows. We’ll focus on just one quick and clean way (in my opinion), which I hope works for most using Windows. If you encounter any issues please leave a comment, and we’ll get back to you as soon as we can.
- Go to the download page: Go to the curl Windows (https://curl.se/windows/)
- Download the zip file: Click on curl for 64-bit or curl for 32-bit to download the package, depending on which version you have. (Here is an article on Microsoft.com with a FAQ on 32-bit and 64-bit Windows, in case you need to check which one you have, along with a bit more info on the topic)

- Extract necessary files: It’s a .zip archive. Double-click to see the contents and go inside the
binfolder. We wantcurl.exeandcurl-ca-bundle.crt. We’ll need to place them in some folder on our computer. You can create the folder anywhere and name it anything you want – I prefer to createC:\Program Files\curland extract the two files in there. - Add cURL to
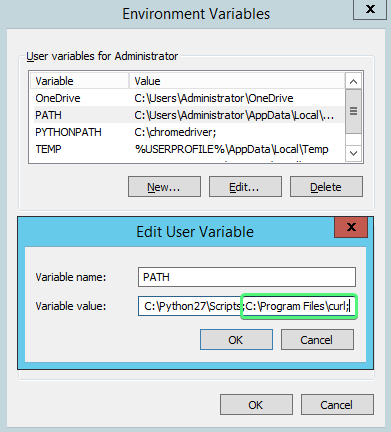
PATH: We need to do this to be able to run the cURL command from anywhere in the command line. If we don’t do this, we’ll have to always navigate to wherecurl.exeis located when we try to run it in the command line. What is thisPATH? It’s an environment variable that specifies directories in which executables are located on the machine without knowing and typing the whole path to the file on the command line. To do this, we need to find the Environment Variables section.
Installing cURL on Mac OS X
Mac OS X should come with the cURL command, but if it isn’t, we recommend installing it via Homebrew, a very popular package manager for Mac.
To install Homebrew open up the command line and run:
/bin/bash -c "$(curl -fsSL https://raw.githubusercontent.com/Homebrew/install/HEAD/install.sh)"
The script should explain what it’s doing in the output.
When it’s finished, just run the following command to install cURL:
brew install curl
Basics of the cURL command
Now, let’s move on to some basic usages of the cURL command.
The general structure of the curl command looks like:
curl [options...] <url>
Let’s try the curl command without any options:
curl https://example.com
This command will display the source code of example.com on your command line.
Let’s try another:
curl bytexd.com
You may be surprised that there is no output. We’ll discuss this in the next section.
Redirects with the cURL Command
The curl command without any options will use HTTP protocol by default. So, it will not perform any HTTPS redirects. As our website bytexd.com uses HTTPS redirect, cURL cannot fetch the data over the HTTP protocol.
Now let’s try running the command again, but this time, we add https://:
curl https://bytexd.com
Now, you should get the expected result.
Use the -L Flag to Follow Redirects
This is a good time to learn about the redirect option with the curl command:
curl -L bytexd.com
Notice how we didn’t have to specify https:// like we did previously.
The -L flag or --location option follows the redirects. Use this to display the contents of any website you want. By default, the curl command with the -L flag will follow up to 50 redirects.
Save Outputs to A File with the cURL Command
Now that you know how to display website content in your terminal, you may be wondering why anybody would want to do this. A bunch of HTML is indeed difficult to read when you’re looking at it in the command line.
But that’s where outputting them to a file becomes super helpful. You can save the file in different formats that’ll make them easier to read.
What can be even more useful is some cURL script pulling up content from the website and performing some tasks with the content automatically.
For now, let’s see how to save the output of the curl command into a file:
curl -L -o file bytexd.com
The flag -o or --output will save the content of bytexd.com to the file.
You can open this file with your browser, and you’ll see the homepage of bytexd.com.
Now, if the URL you used has some page with a name or some file, you can use the -O or --remote-name flag to save the page/file with its original name. Let’s see this in action –
curl -O https://github.com/pbatard/rufus/releases/download/v3.14/rufus-3.14p.exe
  % Total    % Received % Xferd  Average Speed   Time    Time     Time  Current
                                 Dload  Upload   Total   Spent    Left  Speed
100   619  100   619    0     0   3942      0 --:--:-- --:--:-- --:--:--  3917
Here, I downloaded an executable file which is the Rufus tool. The file name will be rufus-3.14p.exe.
-o and -O flag is that the -o (lowercase) lets you save the file with a custom name.Let’s understand this a bit more:
curl -L -O bytexd.com
curl: Remote file name has no length!
curl: try 'curl --help' or 'curl --manual' for more information
Now it’s clear that the -O flag cannot be used where there is no page/filename. Whereas:
curl -L -O php.net/manual/en/tutorial.firstpage.php
This will generate the file tutorial.firstpage.php, which you can read.
Downloading Multiple files
You can download multiple files together using multiple -O flags. Here’s an example where we download both of the files we used as examples previously:
curl -L -O https://github.com/pbatard/rufus/releases/download/v3.14/rufus-3.14p.exe -O php.net/manual/en/tutorial.firstpage.php
Resuming Downloads
If you cancel some downloads midway, you can resume them by using the -C - option:
curl -C - -O example.com/somefile.ext
With this, we’ve covered the basic cURL commands. Now, we’ll move on to HTTP requests with cURL.
Basics of HTTP Requests & Responses
We need to learn some basics of the HTTP Requests & Responses before we can perform them with the cURL command efficiently.
curl command in previous sections. You’ll understand better to perform more commands after this section. Whenever your browser is loading a page from any website, it performs HTTP requests. It is a client-server model.
- Your browser is the client here, and it requests the server to send back its content.
- The server provides the requested resources with the response.
The request your browser sent is called an HTTP request.
The response from the server is the HTTP response.
HTTP Requests
In the HTTP request-response model, the request is sent first.
These requests can be of different types, which are called HTTP request methods.
The HTTP protocol establishes a group of methods that signals what action is required for the specific resources.
Let’s look at some of the HTTP request methods:
- GET Method: This request method does exactly as its name implies. It fetches the requested resources from the server. When a webpage is shown, the browser requests the server with this method.
- HEAD Method: This method is used when the client requests only for the HTTP Header. It does not retrieve other resources along with the header.
- POST Method: This method sends data and requests the server to accept it. The server might store it and use the data. Some common examples of this request method would be when you fill out a form and submit the data. This method would also be used when you’re uploading a photo, possibly a profile picture.
- PUT Method: This method is similar to the POST method, but it only affects the URI specified. It requests the server to create or replace the existing data. One key difference between this method and the post is that the PUT method always produces the same result when performed multiple times. The user decides the URI of the resource.
- DELETE Method: This method requests the server to delete the specified resources.
Now that you know some of the HTTP request methods, can you tell which request you performed with the curl command in the previous sections? The GET requests. We only requested the server to send the specified data and retrieve it.
We’ll shortly go through the ways to perform other requests with the cURL command. Let’s quickly go over the HTTP responses before that.
HTTP Responses
The server responds to the HTTP requests by sending back some responses.
The status code indicates different types of messages, including success or error messages.
The structure of the HTTP response is as follows:
- Status code: This is the first line of an HTTP response. See all the codes here. (Another way to remember status codes is by seeing each code associated with a picture of silly cats – https://http.cat)
- Response Header: The response will have a header section revealing some more information about the request and the server.
- Message Body: The response might have an additional message-body attached to it. It is optional. The message body is just below the Response Header, separated by an empty line.
Let’s take a look at an example HTTP response. We’ll use the cURL command to generate a GET request and see what response the server sends back:
curl -i example.com
Don’t worry about the -i flag. It just tells the cURL command to show the response, including the header.
Here is the response:
HTTP/1.1 200 OK
Age: 525920
Cache-Control: max-age=604800
Content-Type: text/html; charset=UTF-8
Date: Sun, 16 May 2021 17:07:42 GMT
Etag: "3147526947+ident"
Expires: Sun, 23 May 2021 17:07:42 GMT
Last-Modified: Thu, 17 Oct 2019 07:18:26 GMT
Server: ECS (dcb/7F81)
Vary: Accept-Encoding
X-Cache: HIT
Content-Length: 1256

<!doctype html>
<html>
<head>
    <title>Example Domain</title>

    <meta charset="utf-8" />
    <meta http-equiv="Content-type" content="text/html; charset=utf-8" />
    <meta name="viewport" content="width=device-width, initial-scale=1" />
    <style type="text/css">
    body {
        background-color: #f0f0f2;
        margin: 0;
        padding: 0;
        font-family: -apple-system, system-ui, BlinkMacSystemFont, "Segoe UI", "Open Sans", "Helvetica Neue", Helvetica, Arial, sans-serif;

    }
    div {
        width: 600px;
        margin: 5em auto;
        padding: 2em;
        background-color: #fdfdff;
        border-radius: 0.5em;
        box-shadow: 2px 3px 7px 2px rgba(0,0,0,0.02);
    }
    a:link, a:visited {
        color: #38488f;
        text-decoration: none;
    }
    @media (max-width: 700px) {
        div {
            margin: 0 auto;
            width: auto;
        }
    }
    </style>
</head>

<body>
<div>
    <h1>Example Domain</h1>
    <p>This domain is for use in illustrative examples in documents. You may use this
    domain in literature without prior coordination or asking for permission.</p>
    <p><a href="https://www.iana.org/domains/example">More information...</a></p>
</div>
</body>
</html>
Can you break down the response?
The first line, which is highlighted, is the Status code. It means the request was successful, and we got a standard response.
Lines 2 to 12 represent the HTTP header. You can see some information like content type, date, etc.
The header ends before the empty line. Below the empty line, the message body is received.
Now you know extensive details about how the HTTP request and response work.
Let’s move on to learning how to perform some requests with the curl command.
HTTP Requests with The cURL Command
From this section, you’ll see different HTTP requests made by the cURL command. We’ll show you some example commands and explain them along the way.
GET Request With the cURL Command
By default, the cURL command performs the GET requests when no other methods are specified.
We saw some basic commands with cURL at the beginning of the article. All of those commands sent GET requests to the server, retrieved the data, and showed them in your terminal.
Here are some examples in the context of the GET requests:
curl example.com
As we mentioned before, the -L flag enables the cURL command to follow redirects.
curl -L bytexd.com
Both will send GET requests to the servers specified.
HEAD Request With the cURL Command
We can extract the HTTP headers from the response of the server.
Extract the HTTP Header
The header is not shown when you perform GET requests with the cURL command.
For example, this command will only output the message body without the HTTP header.
curl example.com
To see only the header, we use the -I flag or the --head option.
curl -I example.com
It will output only the header section of the HTTP response.
HTTP/1.1 200 OK
Content-Encoding: gzip
Accept-Ranges: bytes
Age: 390829
Cache-Control: max-age=604800
Content-Type: text/html; charset=UTF-8
Date: Mon, 17 May 2021 19:33:52 GMT
Etag: "3147526947"
Expires: Mon, 24 May 2021 19:33:52 GMT
Last-Modified: Thu, 17 Oct 2019 07:18:26 GMT
Server: ECS (dcb/7EEB)
X-Cache: HIT
Content-Length: 648
If you wanted to see the whole HTTP response, you’d use the -i flag or --include option as we mentioned earlier:
curl -i example.com
Debugging with the HTTP Headers
Now let’s find out why you might want to look at the headers. We’ll run the following command:
curl -I bytexd.com
Remember we couldn’t redirect to bytexd.com without the -L flag? If you didn’t include the -I flag, there would’ve been no outputs.
With the -I flag you’ll get the header of the response, which offers us some information:
HTTP/1.1 301 Moved Permanently
Date: Thu, 13 May 2021 07:06:05 GMT
Connection: keep-alive
Cache-Control: max-age=3600
Expires: Thu, 13 May 2021 08:06:05 GMT
Location: https://bytexd.com/
cf-request-id: 0a062512d2000001c88dbb2000000001
Report-To: {"endpoints":[{"url":"https:\/\/a.nel.cloudflare.com\/report?s=U8B0HJ%2BLZ9xb%2FodQtDu1E0YCDElQ9%2FHpFJ0kuLX6tJRdY%2F4t9rAr9e2sdeEpTtnz%2FuBnOpyJj%2BjIm74ffdfhDExFFVkAKHoJDgu3"}],"group":"cf-nel","max_age":604800}
NEL: {"report_to":"cf-nel","max_age":604800}
Server: cloudflare
CF-RAY: 64ea0acaeed601c8-SIN
alt-svc: h3-27=":443"; ma=86400, h3-28=":443"; ma=86400, h3-29=":443"; ma=86400
Look at the first line, and you’ll see something interesting. It is the status code of your response. The code is 301, which indicates a redirect is necessary. As we mentioned before, you can check HTTP status codes and their meanings here (Wikipedia) or here (status codes associated with silly cat pictures)
If you want to see the communication between cURL and the server, then turn on the verbose option with the -v flag:
curl -v bytexd.com
*   Trying 104.21.37.46:80...
* TCP_NODELAY set
* Connected to bytexd.com (104.21.37.46) port 80 (#0)
> GET / HTTP/1.1
> Host: bytexd.com
> User-Agent: curl/7.68.0
> Accept: */*
>
* Mark bundle as not supporting multiuse
< HTTP/1.1 301 Moved Permanently
< Date: Mon, 17 May 2021 19:40:57 GMT
< Transfer-Encoding: chunked
< Connection: keep-alive
< Cache-Control: max-age=3600
< Expires: Mon, 17 May 2021 20:40:57 GMT
< Location: https://bytexd.com/
< cf-request-id: 0a1d71998f00004108c090c000000001
< Report-To: {"endpoints":[{"url":"https:\/\/a.nel.cloudflare.com\/report?s=y8EgEvrQ5VQuErysespUqCcmICva4jHOAap0Z1UKkT450FC4jcBLmAGOkyMcm2BhBnK7rRezgRwOOqffOIcCEJFH3zNQnO5vxy%2FO"}],"group":"cf-nel","max_age":604800}
< NEL: {"report_to":"cf-nel","max_age":604800}
< Server: cloudflare
< CF-RAY: 650f5208ee5e4108-PRG
< alt-svc: h3-27=":443"; ma=86400, h3-28=":443"; ma=86400, h3-29=":443"; ma=86400
<
* Connection #0 to host bytexd.com left intact
You can trace the whole request and response and save it to a file with the --trace option:
curl --trace-ascii file.log bytexd.com
This is important for debugging and looking under the hood.
HTTP Header With the Redirect Option
Now you might wonder what will happen if we use the redirect option -L with the Header only -I option. Let’s try it out:
curl -L -I bytexd.com
This will show the headers for all the HTTP responses for all the redirects. Previously, we saw that without the -L flag, the response only had one header. Now, you’ll see two response headers.
The second one will have the status code of 200 OK, which means Standard Response.
HTTP/1.1 301 Moved Permanently
Date: Thu, 13 May 2021 07:26:16 GMT
Connection: keep-alive
Cache-Control: max-age=3600
Expires: Thu, 13 May 2021 08:26:16 GMT
Location: https://bytexd.com/
cf-request-id: 0a06378cf60000ddbbac1c5000000001
Report-To: {"endpoints":[{"url":"https:\/\/a.nel.cloudflare.com\/report?s=sBhAuyICvY79ULS0CZk3tMjz1y%2F%2BUiegyUCtTD7bojs1SXcXlGf26py8vLGXg%2Ba%2F%2FJAWgY2997sTMk4VS1qguJ3I%2F9IvKMe2TW7y"}],"group":"cf-nel","max_age":604800}
NEL: {"report_to":"cf-nel","max_age":604800}
Server: cloudflare
CF-RAY: 64ea285b28c7ddbb-SIN
alt-svc: h3-27=":443"; ma=86400, h3-28=":443"; ma=86400, h3-29=":443"; ma=86400

HTTP/1.1 200 OK
Date: Thu, 13 May 2021 07:26:19 GMT
Content-Type: text/html; charset=UTF-8
Connection: keep-alive
Vary: Accept-Encoding
cf-edge-cache: cache,platform=wordpress
Link: <https://bytexd.com/wp-json/>; rel="https://api.w.org/"
X-Powered-By: WordOps
X-Frame-Options: SAMEORIGIN
X-Xss-Protection: 1; mode=block
X-Content-Type-Options: nosniff
Referrer-Policy: no-referrer, strict-origin-when-cross-origin
X-Download-Options: noopen
Strict-Transport-Security: max-age=31536000; includeSubDomains; preload
X-fastcgi-cache: HIT
CF-Cache-Status: DYNAMIC
cf-request-id: 0a063793f1000001f6efa4e000000001
Expect-CT: max-age=604800, report-uri="https://report-uri.cloudflare.com/cdn-cgi/beacon/expect-ct"
Report-To: {"endpoints":[{"url":"https:\/\/a.nel.cloudflare.com\/report?s=vQ1vk%2BhP027gW2my981tBWMOTbmfpXYDwiJS%2BZExFsjw95qlyzHkFI2I1i3SdhuloGfDglCZRevbkdR8YdSNaD9C46KTz92qHqNd"}],"group":"cf-nel","max_age":604800}
NEL: {"report_to":"cf-nel","max_age":604800}
Server: cloudflare
CF-RAY: 64ea28664e4b01f6-SIN
alt-svc: h3-27=":443"; ma=86400, h3-28=":443"; ma=86400, h3-29=":443"; ma=86400
Now, let’s move on to the POST requests.
POST Requests With the cURL Command
We already mentioned that the cURL command performs the GET request method by default. For using other request methods need to use the -X or --request flag followed by the request method.
Let’s see an example:
curl -X [method] [more options] [URI]
For using the POST method, we’ll use:
curl -X POST [more options] [URI]
Sending Data Using POST Method
You can use the -d or --data option with the curl command to specify the data you want to send to the server.
This flag sends data with the content type of application/x-www-form-urlencoded.
httpbin.org/post to send POST requests to. httpbin.org is a free service HTTP request & response service, and httpbin.org/post accepts POST requests and will help us better understand how requests are made.Here’s an example with the -d flag:
curl -X POST -d "p1=value1" https://httpbin.org/post
This command will request the server to post the data p1=value1. The p1 could be any parameter having any value. The URI is used just as an example here.
Multiple data can be sent like below:
curl -X POST -d 'p1=value1' -d 'p2=value1' https://httpbin.org/post
..or..
curl -X POST -d 'p1=value1&p2=value2' https://httpbin.org/post
Uploading Files with cURL
Multipart data can be sent with the -F or --form flag, which uses the multipart/form-data or form content type.
You can also send files using this flag, and you’ll also need to attach the @ prefix to attach a whole file.
/root/Desktop/file with the path to any file on your computer that you want to test this command with.curl -X POST -F 'file=@/root/Desktop/file' https://httpbin.org/post
Upload multiple files by joining the strings representing the files to upload, joined by ;:
curl -X POST -F 'file1=@/root/Desktop/file1;file2=@/root/Desktop/file2' https://httpbin.org/post
..or by using multiple -F flags:
curl -X POST -F 'file1=@/root/Desktop/file1' -F 'file2=@/root/Desktop/file2' https://httpbin.org/post
Modify the HTTP Header
You can use the -H or --header flag to change the header content when sending data to a server. This will allow us to send custom-made requests to the server.
Specify the content type in the Header
We can specify the content type using this header.
Let’s send a JSON object with the application/json content type:
curl -H 'Content-Type: application/json' -X POST -d '{"date": "18-May-2021", "name": "Ed"}' https://httpbin.org/post
PUT Requests With the cURL Command
The PUT request will update or replace the specified content.
httpbin.org/put for testing.Perform the PUT request by using the -X flag:
curl -X PUT -d 'arg1=val1' -d 'arg2=val2' https://httpbin.org/put
We’ll show another example with the PUT method sending raw JSON data:
curl -X PUT -H "Content-Type: application/json" -d '{"name":"bytexd"}' https://httpbin.org/put
DELETE Requests With the cURL Command
You can request the server to delete some content with the DELETE request method.
httpbin.org/delete for testing.Here is the syntax for this request:
curl -X DELETE https://httpbin.org/delete
Let’s see what actually happens when we send a request like this. We can look at the status code by extracting the header:
curl -I -X DELETE https://httpbin.org/delete
HTTP/2 200
date: Mon, 17 May 2021 21:40:03 GMT
content-type: application/json
content-length: 319
server: gunicorn/19.9.0
access-control-allow-origin: *
access-control-allow-credentials: true
Here, we can see the status code is 200, which means the request was successful.
Conclusion
In this tutorial, we covered how to perform HTTP requests with the cURL command from the basics. You can learn more about the cURL command by typing man curl in the terminal.
If you have any issues, questions, or feedback, then feel free to contact us or leave a comment below, and we’ll get back to you as soon as possible.

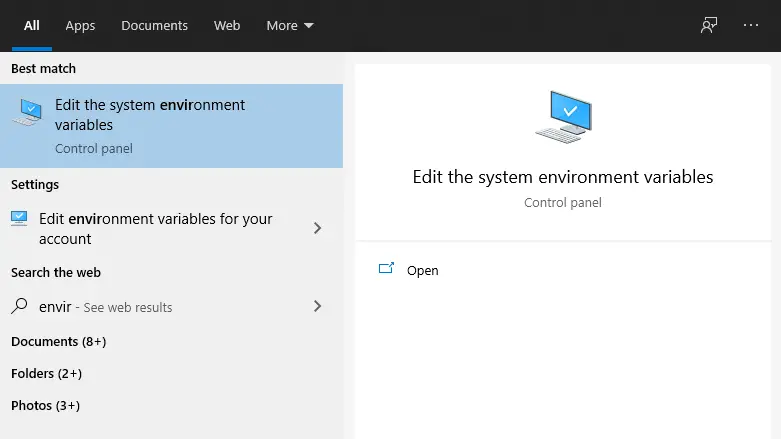
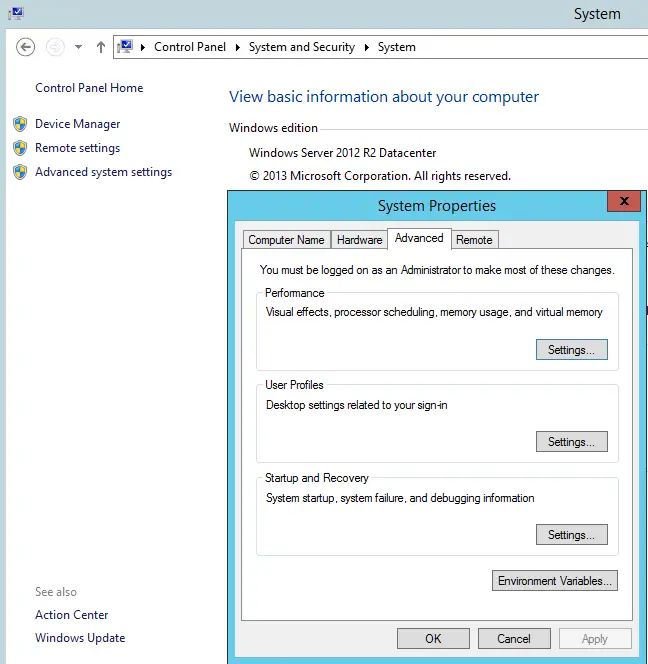 Near the bottom of the window you’ll see Environment Variables. Click it.Now we can add the path to the directory where we placed
 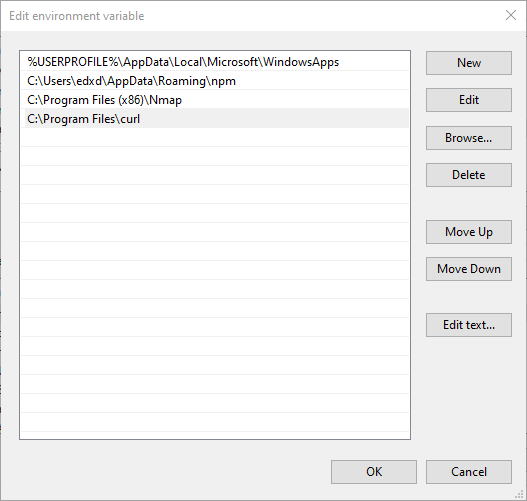 Other Windows Versions: In other Windows versions, in the Variable Value field, you’ll have to add the path to cURL at the end of the line, separated by




It is so helpful thamks
Great post, very usefull!
Thanks a lot!
Thank you for the kind words! Glad you liked it!