When working with some files or folders on Linux you might have seen an error saying Permission Denied.
This is a common error that is associated with the permissions for the specific file/folder.
In this tutorial, you will learn different ways to change the file and folder permissions for any users or groups on Linux.
Linux is an operating system that supports multiple users working on the same system. Thus, it is essential to manage the permissions such as who can see or modify the files and folders for every one of them.
In some GUI versions of Linux such as Ubuntu, you can change the permissions from file managers. Here, we will be focusing on a more general way to do it using any Linux terminal or command line.
Table of Contents
Basic Ideas
Before we move on to the methods to change the permissions, you need to have some basic ideas of how the file/folder permissions work on Linux.
There are 3 separate user classes on Linux, who could use a file in different ways. The user classes are:
- Owner: This is the user who created the file/folder.
- Group: The users who are in a group.
- Others: Any user outside the Group and the Owner. This user class is often called World.
Any files or folders can have three different kinds of permissions associated with them –
- Read permission: A user can read files with this permission.
- Write permission: This permission allows a user to modify the file.
- Execution permission: It allows a user to execute the file.
Now that you know the user and permission types, an example will help you understand the whole picture. Let’s see how we can view the permissions of a file or a folder.
Use the ls -l command to list the files, directories, and their permissions:
ls -l
You can also see the permissions of a specific file using:
ls -l filename.extension
After running the ls -l command, you will see something like this:
root@bytexd: ~/Desktop# ls -l
total 20
drwxr-xr-x 2 root root   4096 Sep 21  2017  BUET_INFO
-rw-r--r-- 1 root root     18 Sep 28  2016  Default_MAC.txt
-rwxr-x--x 1 root root    252 Mar  7  2020  pycharm.desktop
-rw-r--r-- 1 root root    263 Sep 16  2016  users.csv
drwxr-xr-x 2 root root   4096 Nov 17  2016  Words
Right now we’ll focus on the text on the left, drwxr-xr-x or -rw-r--r-- in lines 3 and 4 respectively. These are the permissions for each of the directories and files that are listed to the right.
Don’t worry, they are pretty easy to understand even though they might look intimidating at first. Now let’s analyze these two examples to understand what they mean.
drwxr-xr-x
-rw-r--r--
If you count the characters here, you will find every one of these codes has 10 characters.
d in the first example indicates a directory. The first character - in the second example indicates a file.That leaves us to decode the next 9 characters for both examples. If you simply divide these characters into groups of 3s, decoding them becomes much simpler. Take a look:
d rwx r-x r-x
- rw- r-- r--
For both of the examples, we have just divided the last 9 characters into three groups, each consisting of 3 characters.
Let’s analyze the first example:
d rwx r-x r-x
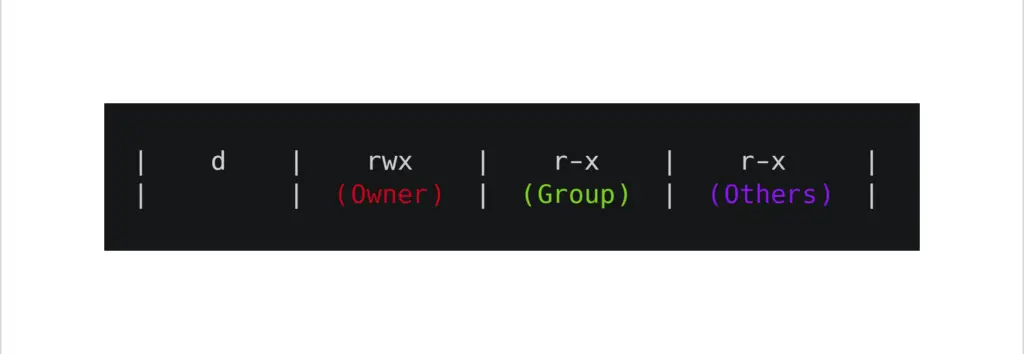
d: indicates that this is a directory
rwx: are the permissions for the Owner.
r-x: are the permissions for the Group user class.
r-x: are the permissions for the Other users.
These characters stand for:
r = Enables permission for reading
w = Enables permission for writing
x = Enables permission for execution
When a class of user has all the permissions, there will be rwx written in the position of that user class.
So, in the above example, the Owner of the directory has all the permissions. The Group users and Other users have the same permission to read & execute, denoted by r-x.
Notice that these classes of users do not have permission to write. Thus, a - is used in the place of w.
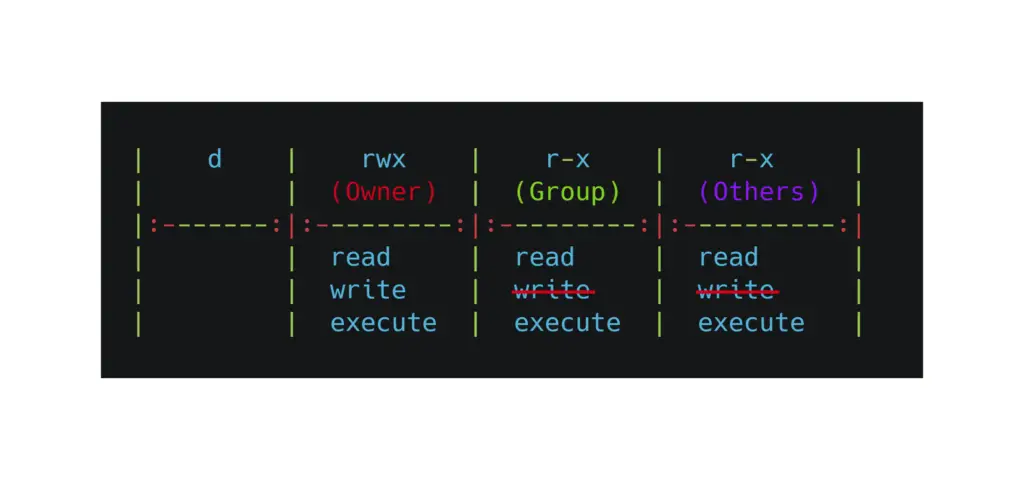
Likewise, having a --- means the user class does not have any permission for the file/directory whatsoever.
Let’s also take a look at our second example of permissions from earlier:
-rw-r--r--
Here, the Owner has permission to read & write the file, while the Group and Other user classes have only the permission to read.
The Chmod Command
Now we’re ready to learn the commands to change the permissions of files and folders.
The chmod command changes the file permissions. There are two methods for changing permissions with chmod. By using:
- Symbolic chmod commands. (The notation we’ve used in the examples above,
drwxr-xr-x,-rw-r--r--) - Numeric chmod commands. (We’ll cover this a bit further down. Examples 777,
644)
Symbolic Chmod Commands
In Linux systems “mode” refers to permissions. The command chmod stands for “change mode”.
The easiest way of using the chmod command is the symbolic or text commands. The command usually takes at least three inputs and the file/directory name. The syntax can be written in a simple format as:
chmod [user class][operation][permissions] [filename/directory name]
The first input [user class] can be:
- u – The owner of the file/directory.
- g – Users who are members of the same group.
- o – Other users.
- a – All users, same as ugo
The second input is the [operation] having the values of:
- + For adding specified permissions.
- – For removing specified permissions.
- = Sets the current permissions to the specified ones. If nothing is specified after
=sign, all the current permissions of the specified user class get removed.
The general values for the third input [permissions] is:
- r – Sets the permissions to read.
- w – Sets the write permissions.
- x – Sets the permission for execution.
Let’s look at some examples.
I’ll run the following command on a file on my computer, Default_MAC.txt. This command will add write permissions to the Other user class.
chmod o+w filename.extension
Here’s how the permissions look for Default_MAC.txt initially.
root@bytexd: ~/Desktop# ls -l
total 20
drwxr-xr-x 2 root root   4096 Sep 21  2017  BUET_INFO
-rw-r--r-- 1 root root     18 Sep 28  2016  Default_MAC.txt
-rwxr-x--x 1 root root    252 Mar  7  2020  pycharm.desktop
-rw-r--r-- 1 root root    263 Sep 16  2016  users.csv
drwxr-xr-x 2 root root   4096 Nov 17  2016  Words
Now I’ll run the command on Default_MAC.txt:
sudo chmod o+w Default_MAC.txt
Here’s the resulting output when listing files with their permissions. Keep in mind that you might have to use the sudo command to run it successfully.
root@bytexd: ~/Desktop# ls -l
total 20
drwxr-xr-x 2 root root   4096 Sep 21  2017  BUET_INFO
-rw-r--rw- 1 root root     18 Sep 28  2016  Default_MAC.txt
-rwxr-x--x 1 root root    252 Mar  7  2020  pycharm.desktop
-rw-r--r-- 1 root root    263 Sep 16  2016  users.csv
drwxr-xr-x 2 root root   4096 Nov 17  2016  Words
Some more examples with the chmod command:
chmod u-x filename.extension
This command will remove execution permission from the Owner.
chmod g=r filename.extension
It will set the permission to read-only for the Group user class.
chmod o= filename.extension
This command will remove all the permissions from the Other user class.
Multiple inputs can be used together for [user class] and [permissions] flags. Take a look at some more examples:
chmod ug+rwx filename.extension
Using this command will add read, write, and execution permissions to the Owner and Group user class.
chmod ugo-rwx filename.extension
chmod a-rwx filename.extension
chmod ugo= filename.extension
These three commands are equivalent. Running any of them will remove all the permissions from all the user classes.
If you want to change the permissions for a directory, just replace the file name with the directory name. This concludes the symbolic method for changing the permissions of a file or a folder.
Numeric Chmod Commands
This is an elegant technique that will allow you to change file or directory permissions while typing less than using the symbolic approach.
The Basics
We’ll start with the basics. Each permission has a digit or value associated with it. The digits are:
- r = 4, Read permission has a value of 4.
- w = 2, Write permission has a value of 2.
- x = 1, Execution permission has a value of 1.
- – = 0, no permission has a value of 0.
We add different values together to get different sets of permissions we want to have.
Here are the combinations:
- 4 + 2 = 6, means that 6 is rw
- 4 + 1 = 5, means that 5 is rx
- 2 + 1 = 3, means that 3 is x
- 4 + 2 + 1 = 7, means that 7 is rwx
Let’s say we want a user to have all the permissions.
We will add the values of these permissions (rwx) together, 4+2+1, which gives us 7.
If we want permissions to only be read & write (rw), we will have 4+2+0 = 6.
Likewise, the digit 5 means read & execution (rx) permissions, 3 means write & execution (wx), and so on.
This is how you can represent permissions with the help of a single digit.
Assigning Permissions
Now we’ll see how to assign these digits to different user classes.
We’ll take the digits representing the permissions and form a 3-digit number with them.
The position of those digits in the number will represent three different user classes.
As an example, we’ll use the number 643:
- The first number, 6, represents the permissions for the Owner
- The second digit, 4 is the permissions for the Group user class
- The third digit, 3 designates the permissions for the Others user class
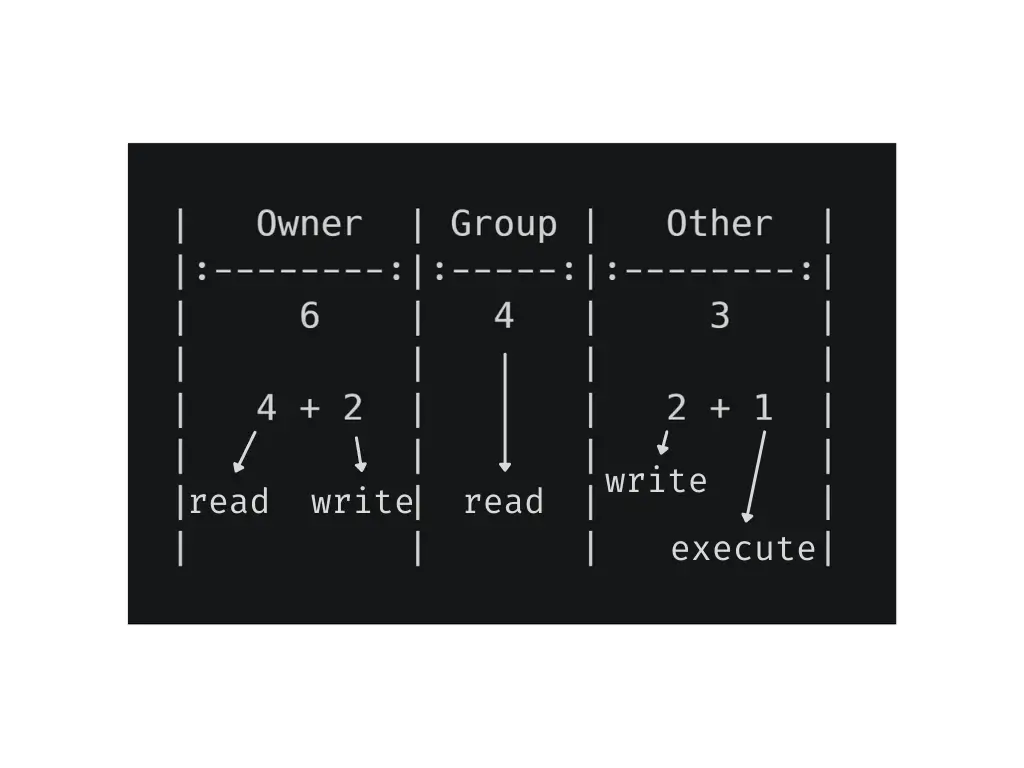
In other words, 643 means that the Owner will have the read & write (6) permissions. Likewise, the Group user class will have reading (4) permission, and the Other user class will have write & execution (3) permissions.
Here is a little image trying to explain this visually.
Let’s take another example, for practice reasons:
This time we take the number 751:
- 7 means that the Owner has all the permissions (read, write, & execution)
- 5 designates that the Group user class has read & execution permissions
- 1 marks the Others user class only has execution permission.
The syntax of chmod command with the numeric method is:
chmod [number] [filename/directory name]
Doesn’t that look cleaner than when using the symbolic notation? I believe you’ll encounter numeric notation more often, however you are free to use whichever notation feels more natural.
Finally, let’s look at some of the examples with the command:
chmod 777 filename.extension
This command will give full permissions ( -rwxrwxrwx ) to all the user classes. I’ll use the files on my desktop again, and will run the command on Default_MAC.txt:
chmod 777 Default_MAC.txt
Now Default_MAC.txt has read/write/execute ( -rwxrwxrwx ) permissions for all user classes.
root@bytexd: ~/Desktop# ls -l
total 20
drwxr-xr-x 2 root root   4096 Sep 21  2017  BUET_INFO
-rwxrwxrwx 1 root root     18 Sep 28  2016  Default_MAC.txt
-rwxr-x--x 1 root root    252 Mar  7  2020  pycharm.desktop
-rw-r--r-- 1 root root    263 Sep 16  2016  users.csv
drwxr-xr-x 2 root root   4096 Nov 17  2016  Words
Now let’s take away all of its permissions. To do this we set the permissions to 000:
chmod 000 filename.extension
The result:
root@bytexd: ~/Desktop# ls -l
total 20
drwxr-xr-x 2 root root   4096 Sep 21  2017  BUET_INFO
---------- 1 root root     18 Sep 28  2016  Default_MAC.txt
-rwxr-x--x 1 root root    252 Mar  7  2020  pycharm.desktop
-rw-r--r-- 1 root root    263 Sep 16  2016  users.csv
drwxr-xr-x 2 root root   4096 Nov 17  2016  Words
Now the file has no permissions for any of the user classes.
Here are a few more random examples, in hopes that it helps better understand the numeric notation:
This command will give read-only permission to the Owner and no permission for Group and Other user classes.
chmod 400 filename.extension
This will allow full permission to the Owner and Other user classes, read-only permission to the Group user class.
chmod 747 filename.extension
This command will remove all the permissions for the Owner and Group user classes, and allow the execution permission to Other users.
chmod 001 filename.extension
Recursively change permissions of all files within a directory
A frequent situation you’ll encounter is having to recursively change permissions of files within a directory.
You can use the recursive option with the chmod command for doing it. The -R option enables the chmod command to change permissions recursively.
chmod -R 644 [directory name]
This command will change all the file and subdirectory permissions recursively within the directory you specified.
Conclusion
In this tutorial we hope you’ve understood how to change permissions of files and directories in Linux using the chmod command.
If you face any problems, take a look at the manuals page for the chmod command. The manual is also available in the terminal, when you type man chmod.
If you encounter any issues or have any feedback for us, then feel free to leave a comment or contact us, and we’ll get back to you as soon as we can.


dude thank you so much this is the best explanation in the entire web!!
Hi Ema! We’re overjoyed you feel that way! Thanks so much for the kind words, they’re greatly appreciated!