Despite having a relatively steep learning curve, Linux distributions are one of the best operating systems you can use compared to their main alternatives, Windows and macOS. Linux is free and open-source.
It is rated as one of the most secure OS today and has thousands of software packages available for installation. It’s also possible to run Windows applications on Linux with the help of apps like Bottles and Wine.
However, like with any piece of software, anything can go wrong with Linux.
With one sudo command, you can permanently delete critical settings and packages on your system or make your OS un-bootable. Sometimes, normal system operations can cause these challenges. Maybe you are trying to install another Desktop environment that re-configures your entire system.
That leaves you wondering if it is possible to reinstate your system to a previous state. Well, that is possible with Timeshift.
In this tutorial we’ll learn how to use Timeshift to restore our system to a previous state.
Table of Contents
What’s Timeshift?
Timeshift is a system backup and restores tool designed to restore your system into a usable state after something goes wrong. Maybe you were tinkering with some commands on the Terminal, or you installed an application that messed up your settings.
Unfortunately, Timeshift is not designed to backup user files and personal data such as documents, media, and music.
For that, you can use applications like Deja Dup, Rsnapshot, Restic, and Rsync.
Timeshift is designed to only backup system files and settings. It does that by grabbing a copy of your system’s files as a snapshot and later restoring that snapshot over any system files you might have.
Timeshift Features
Some of the features you will find with timeshift include:
- Supports both command-line and Graphical (GUI) mode
- Includes support for the BTRFS file system
- Presents several creating backups – On boot, Monthly, Weekly, daily, and hourly.
- You can use Cron jobs to schedule backups
- Timeshift supports both online and offline system restoration.
- Supports cross-distribution system restore.
How to Install Timeshift on Linux
Timeshift is available for several Linux distributions and can be easily installed from the command line. Execute the command below to check whether Timeshift is already installed.
which timeshift
In our case, we got the output /usr/bin/timeshift as we have already installed Timeshift on Ubuntu.

If you don’t have Timeshift installed, follow the steps below depending on your Linux distribution.
Ubuntu and Linux Mint
If you are running Ubuntu 18.04 LTS or earlier or Linux Mint 19 series, you will need to add a PPA to install Timeshift on your system. Execute the commands below.
sudo apt-add-repository -y ppa:teejee2008/ppa
sudo apt update
sudo apt install timeshift
| sudo apt-add-repository -y ppa:teejee2008/ppa sudo apt update sudo apt install timeshift |
|---|
If you are running Ubuntu 20.04/22.04 or Linux Mint 20, use the command below to install Timeshift.
sudo apt install timeshift

RHEL, CentOS, Fedora, Rocky Linux, AlmaLinux
Use the command below to install Timeshift on RHEL-based systems.
sudo dnf install timeshift
Arch Linux, Antergos, Apricity, and Manjaro
For Arch Linux-based distributions, you can easily install Timeshift from the Aur User Repository. Execute the command below.
yaourt timeshift
Alternatively, you can install it using Paru and Yay utilities as shown below.
paru -S timeshift
Or,
yay -S timeshift
Getting Started with Timeshift
Up to this point, I hope you have successfully installed Timeshift on your system. There are two ways in which you can use Timeshift.
- The Graphical User interface
- The Command-line interface
For this post, we will walk you through how to use the Timeshift GUI which is much easier to use. Launch Timeshift from the applications menu as shown below.

Step 1. Set the Snapshot Type
When you first launch Timeshift, you will see a window where you need to select what type of snapshots you want to use for your backups.
[powerkit_alert type=”info” dismissible=”false” multiline=”false”]
Tip: Don’t panic if you don’t see this window, you can still set these options from the Settings tab.
[/powerkit_alert]
They include:
- Rsync
- BTRFS
The Rsync mode allows you to perform incremental backups. That means, when a snapshot is made, only the modified files will be snapshot-ed, the unchanged files will be hard linked to previous snapshots.

Use the BTRFS mode if your system is running on the BTRFS file system. That means you are not using the common Linux file systems like EXT or XFS. Click Next to continue.
Step 2. Set the Snapshot Location
The next step is selecting a location where you want to save your snapshots. By default, it’s best if you save your backup and snapshots in an external drive, which enables you to still recover your system even if all the partitions fail. Unfortunately, for this post, I only have one hard drive and I will save my snapshots in the same partition (not recommended though).

[powerkit_alert type=”info” dismissible=”false” multiline=”false”]
Tip: If you opt for an external drive, ensure it is formatted with one of the supported Linux file systems like EXT or other.
[/powerkit_alert]
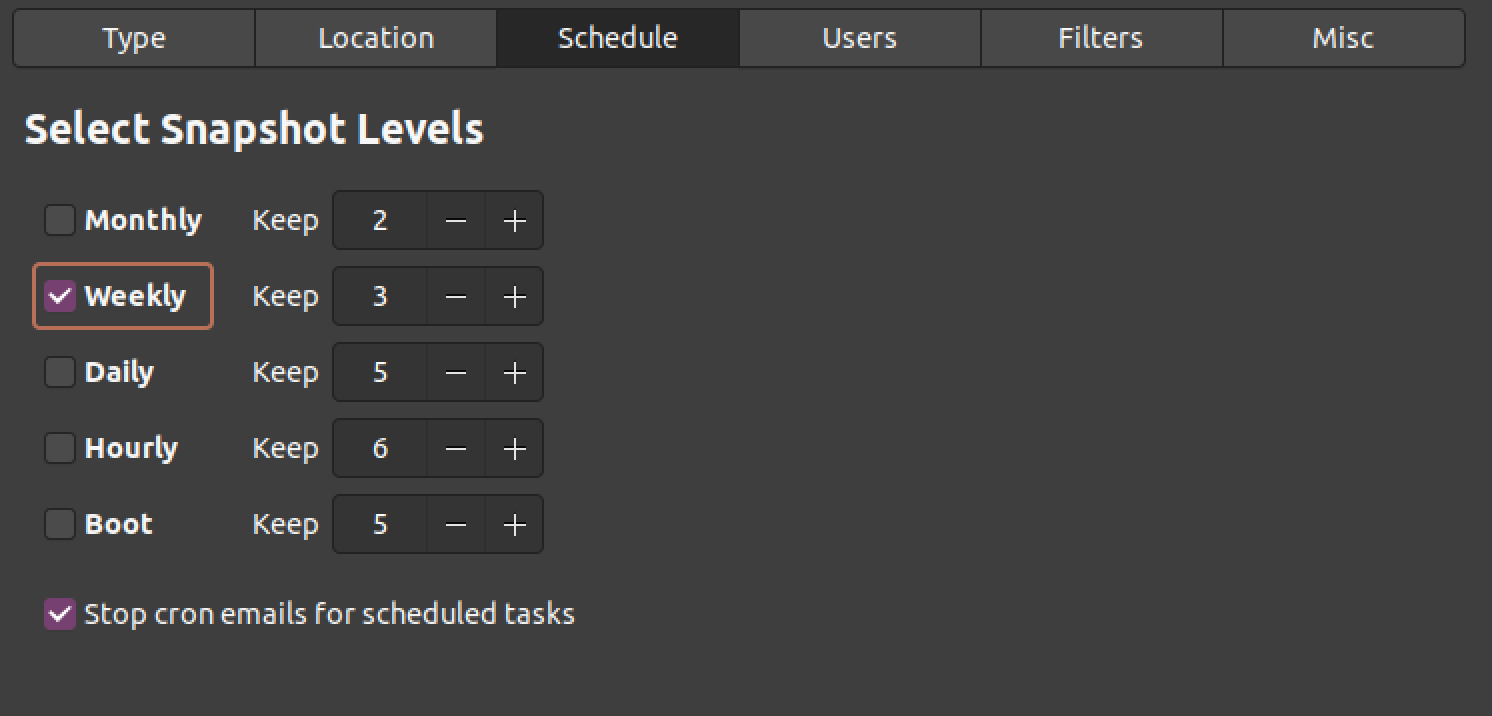
Step 3. Set Snapshot Schedules
One of the best features you will find in Timeshift is the automated backup support. You can decide the snapshots to be taken either hourly, daily, weekly, monthly, or on boot. Other than these scheduled system backups, you can still create a snapshot manually anytime you wish.
Step 4. Select Target Directories
As we discussed above, Timeshift is designed to carry our system-level backups and is not recommended for personal data and files. Even though you still have an option to include your home directory, we do not recommend that. There are many tools available that you can use to backup your personal files.
When selecting a directory, you have three main options that you can use.
- Exclude all files,
- Include only hidden files
- Include all files
For this post, we want to include all files in the root directory and exclude the home directory. See the image below.

Step 5. Set Filters
In the previous Step, we discussed how you can select User directories that you want to backup. To ensure a smooth and detailed backup, Timeshift includes one more option called Filters that allows you to include or exclude specific files and folders.
If you have written Bash regular expressions before, this should just be a walk in the park.
But don’t panic if you haven’t written regular expressions before because there are several buttons at the bottom that you can use. Let’s look at these buttons.
- Add: This option opens an input box where you can exclude files with patterns. For example, *.mp3 to exclude all mp3 files from the snapshot.
- Add files: Add a file to exclude from the backup.
- Add folders: Add a directory to exclude from the backup.
- Remove: Use this option to remove any files or folders you added before.

Click OK or Finish to save your configurations.
Restore your System with Timeshift
The Timeshift GUI is quite intuitive and easy to use. Even if you are just getting started with Linux systems, you can easily understand how to navigate your way through this application. If you face any errors, you can easily restore your systems to a particular state depending on the snapshots you have.
Creating a Snapshot
As we discussed above on how to get started with Timeshift, we looked at how you can automate snapshot schedules to hourly, daily, weekly, or monthly. Therefore, you will find all these snapshots which Timeshift has been taking listed on the main window.
Alternatively, you can create a snapshot any time manually using the ‘Create’ button as shown below. You will also see a comment section, where you can add a comment for your snapshots. This option can be quite useful as it can help you easily distinguish your backups from the latest to the oldest.

View Backups
Although you can view the backups from the Timeshift main window, you can use the ‘Browse’ button to have an indepth look. This option will open the /timeshift directory where all the snapshots are stored.
Alternatively, you can use the command below to list the backups on the Terminal.
ls -l /timeshift

From the image above, you will notice that Timeshift creates separate directories depending on how the backup was made.
- Snapshots: These are snapshots taken manually by pressing the
Createbutton. - Snapshots-boot: These are automated snapshots taken on boot.
- Snapshots-daily: These are automated snapshots taken daily.
- Snapshots-hourly: These are automated snapshots taken hourly.
- Snapshots-monthly: These are automated snapshots taken monthly.
- Snapshots-on demand: Similar to the snapshots directory, the ondemand directory holds snapshots taken manually using the
Createbutton. - Snapshots-weekly: These are automated snapshots taken weekly.
You may face two main issues when you want to restore your system with Timeshift.
- Restoring a system which is up and running.
- Restoring a system that cannot boot
Restore Your System While it’s Up and Running
As an example, I have installed VLC after taking a snapshot of my system. Now, I want to restore my system to the state it was before I installed VLC. On the Timeshift main window, I will select the backup that I want to restore and click the Restore button at the top.

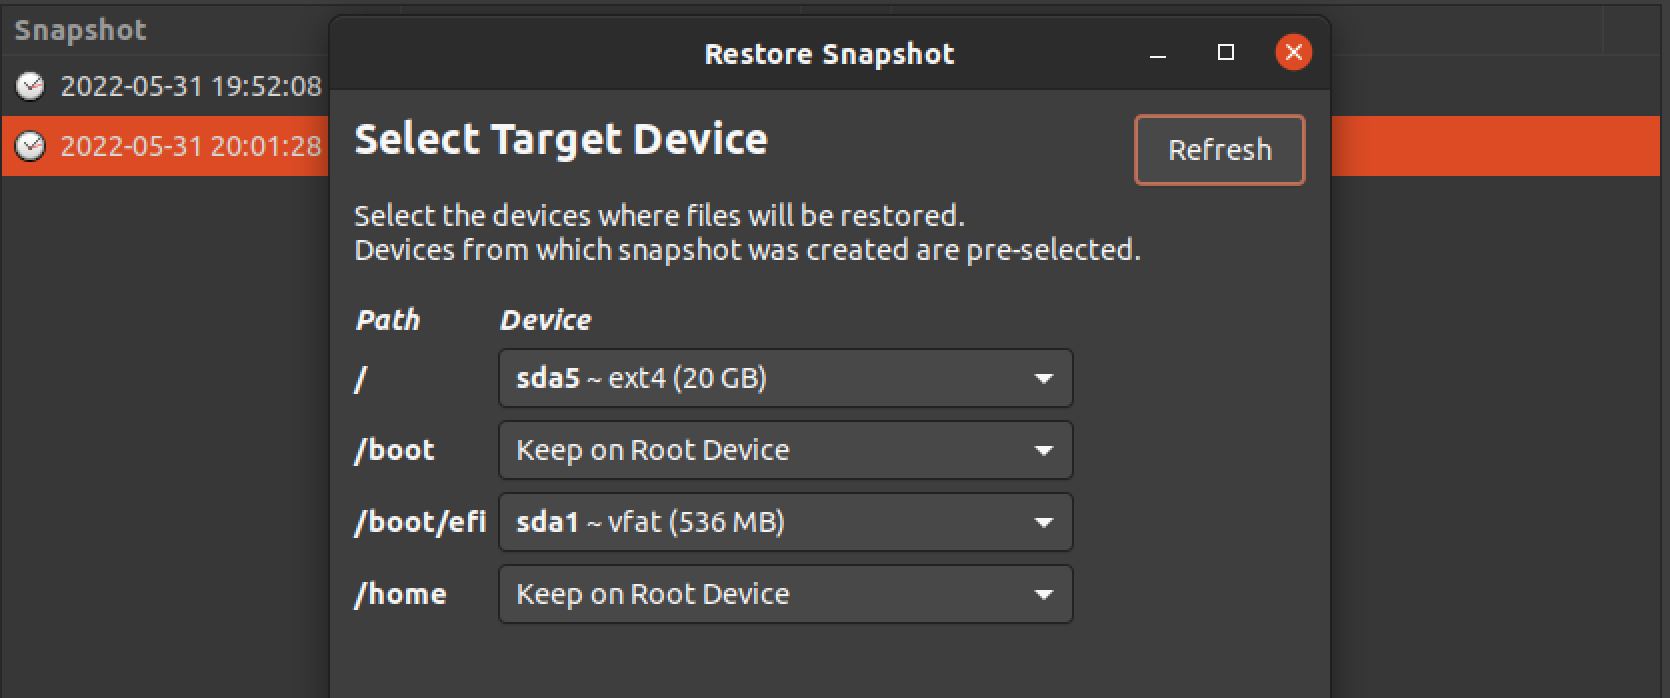
A window will open where you can select the location where the files will be restored. Luckily, Timeshift makes the whole process much easier by pre-selecting the locations from which the files were created. When done, click ‘Next.’
On the next screen, Timeshift will run a dry run to compare the files on the selected backup to those on the current system state. In our case, we expect Timeshift to list VLC packages for deletion as it was not installed before we made the backup. See the image below.
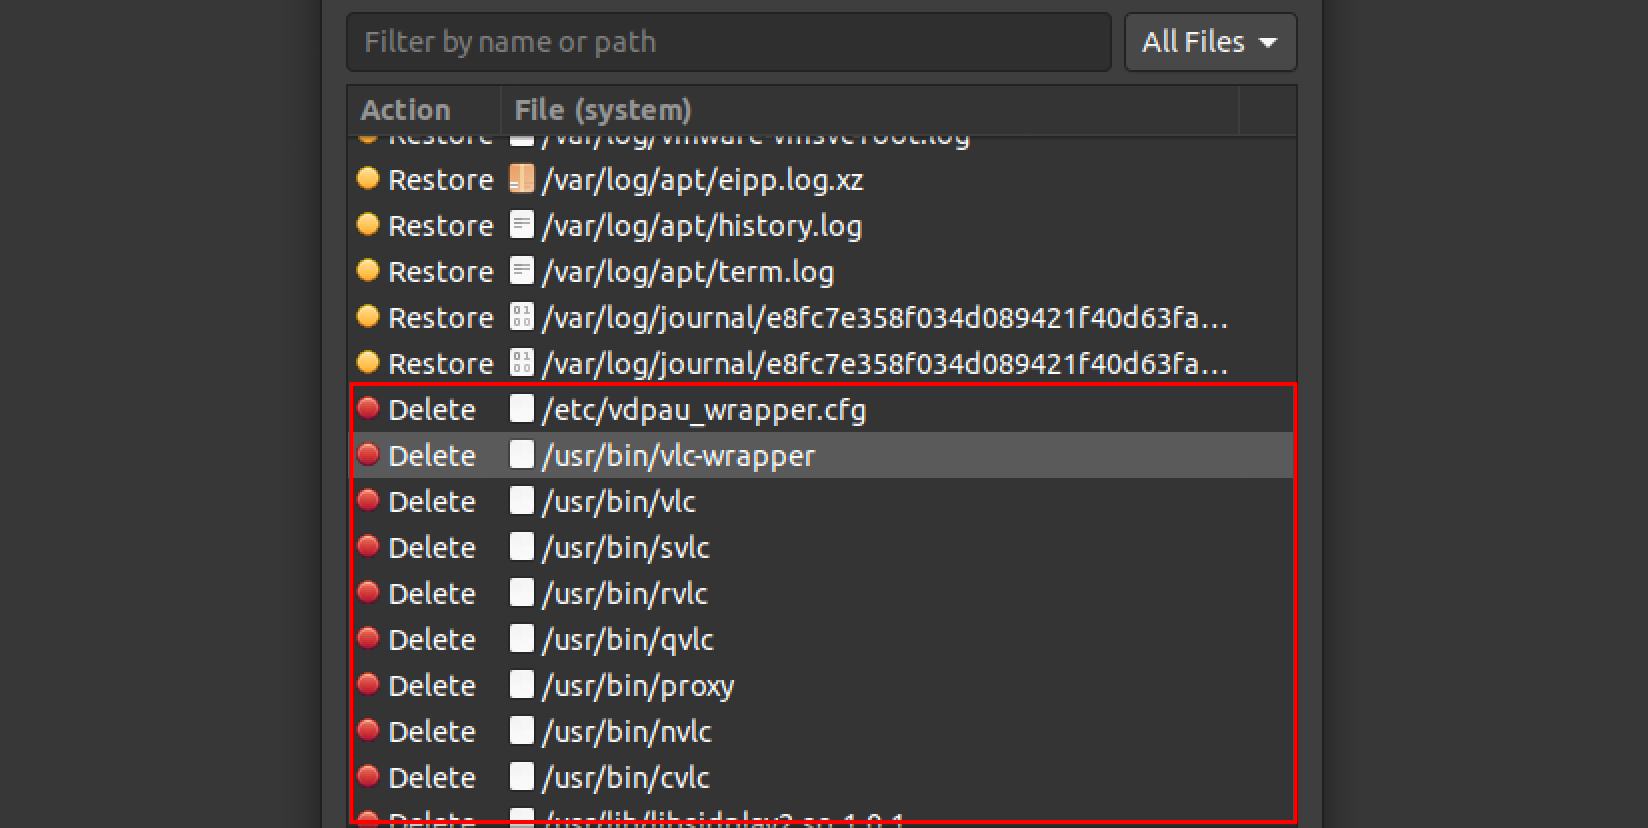
After confirming all the packages that will be restored and which will be deleted, click ‘Next.’ You will see a warning message showing which partitions will be modified. Click ‘Next’ to restore your system.
Restore a System that Cannot Boot
When working with Linux systems, it’s not a surprise to face an issue where your system cannot boot. Luckily you can still use Timeshift to a previous working state.
To do so, you will need a bootable USB with an operating system that allows you to use the live mode. Some good examples include Ubuntu, Fedora, Parrot OS etc. After a successful boot, install Timeshift on the live operating system and proceed to restore your system.
Deleting Snapshots
At times, these snapshots can take quite some space on your system. Luckily, you can easily delete them from the Timeshift main window using the ‘Delete’ button. First, select the snapshot that you want to delete then click the ‘Delete’ button.

Conclusion
That’s it! This post has given you a detailed guide on using Timeshift to restore your system to a previous state. As stated above, it is not recommended to use Timeshift to backup your personal files. For that, you can use a tool like Rsync. We hope you enjoyed this post. If you came across any issues please let us know in the comments below.



It’s an awesome tool, however, i couldn’t use it as it needs a linux partition for incremental backups but all my external HDDs are ntfs formatted which makes it useless for me.