xRDP is a free and open-source implementation of the Microsoft RDP (Remote Desktop Protocol) server. It enables the non-Windows operations systems like Linux and BSD to provide an RDP-compatible remote desktop experience. xRDP works with rdesktop, FreeRDP, NeutrinoRDP and Windows RDP.
With RDP you can connect to a remote computer over the Internet, to access the computer’s files and programs as if you were using its own keyboard, display screen and mouse. It is a proprietary protocol developed by Microsoft, and the standard remote desktop protocol used in Windows operating systems.
Using xRDP you can remotely control your Linux (in our case CentOS 8) machine, through its graphical user interface, from devices using different operating systems, such as Windows, Linux, Mac, iOS or Android.
You might also be interested in alternative remote desktop technologies for CentOS, such as VNC or NX (via a software called X2Go). They aim for similar goals of controlling remote desktops, however, the methods by which they achieve them differ.
Objective
In this tutorial, we’ll install xRDP on a remote machine running CentOS 8, install multiple desktop environments and see how to switch between them, connect from multiple operating systems, and learn a few ways to optimize the remote connection for speed.
Table of Contents
Prerequisites
- A server running CentOS 8 and I recommend at least 2GB RAM, however, 4GB would be better. (If you’re interested in a cheap server with high resources, the one I use is from Contabo.com and you can check my review of them here.)
- Being logged in as a
non-root sudo user. This is because when you’re acting as root you can do everything and the system won’t ask. If you’re not careful you can run a command that may harm or even destroy your system.
Frist we’ll update the package index:
sudo dnf -y update
Step 1 – Install xRDP on CentOS 8
Enable EPEL repository, if not already enabled on your system:
sudo dnf install epel-release
Install xRDP:
sudo dnf install xrdp
Enable xRDP so it starts on boot:
sudo systemctl enable xrdp --now
Check the status of xRDP:
sudo systemctl status xrdp
It should look something like this:
● xrdp.service - xrdp daemon
   Loaded: loaded (/usr/lib/systemd/system/xrdp.service; enabled; vendor preset: disabled)
   Active: active (running) since Tue 2021-03-09 00:45:00 UTC; 5s ago
     Docs: man:xrdp(8)
           man:xrdp.ini(5)
 Main PID: 66228 (xrdp)
    Tasks: 1 (limit: 25004)
   Memory: 1.2M
   CGroup: /system.slice/xrdp.service
           └─66228 /usr/sbin/xrdp --nodaemon

Mar 09 00:45:00 xrdp systemd[1]: Started xrdp daemon.
Mar 09 00:45:00 xrdp xrdp[66228]: [INFO ] starting xrdp with pid 66228
Mar 09 00:45:00 xrdp xrdp[66228]: [INFO ] address [0.0.0.0] port [3389] mode 1
Mar 09 00:45:00 xrdp xrdp[66228]: [INFO ] listening to port 3389 on 0.0.0.0
Mar 09 00:45:00 xrdp xrdp[66228]: [INFO ] xrdp_listen_pp done
Configuring Firewall for xRDP
The default port for a remote desktop connection is 3389. If you’ve got a firewall enabled on your CentOS 8 remote machine you’ll want to make sure to allow the remote desktop connection port.
To do this run the following commands to add the port and reload the firewall.
sudo firewall-cmd --add-port=3389/tcp --permanent
sudo firewall-cmd --reload
Allow Specific IP Range
If you want to allow the remote desktop connection port only for specific network or a range of IPs, for security reasons, then you can do something like the following instead:
sudo firewall-cmd --new-zone=xrdp --permanent
sudo firewall-cmd --zone=xrdp --add-port=3389/tcp --permanent
sudo firewall-cmd --zone=xrdp --add-source=1.2.3.4/32 --permanent
sudo firewall-cmd --reload
Replace 1.2.3.4/32, in the above example, with the IP range you want to whitelist.
Configuring xRDP
To configure xRDP, such as changing the default port, adding compression, and others, you can edit the following file with your preferred text editor:
sudo nano /etc/xrdp/xrdp.ini
Remember to restart the service for new changes to apply.
Step 2 – Install Your Preferred Desktop Environment
Desktop environments are one of the most profound advantages of Linux over Mac OS and Windows. In each Linux distribution, there are multiple desktop environments also known as flavors. For example, Ubuntu offers eight distinct flavors, each of which behaves differently.
A desktop environment is a bunch of components (file manager, login screen, mouse pointer, etc) that come together to provide a graphical interface (GUI). The GUI in Linux distributions consists of four layers:
- X-server
- X-client
- Windows Manager
- Desktop environment
In Linux, not only can you customize the look and feel of your desktop, but you can also install multiple desktop environments instead of just one, and you can switch between them whenever you want.
Switching Between Desktop Environments
To switch between desktop environments you need to create a file: .Xclients in your home directory, in which you specify the desktop environment you want to launch and make it an executable.
Install GNOME Desktop Environment
GNOME is one of the most popular desktop environments for Linux distributions. Originally, GNOME stood for GNU Network Object Model Environment. The acronym was dropped when it no longer reflected the vision of the GNOME project. It’s an excellent and free alternative to the proprietary options such as KDE.
GNOME 3 was released in 2011 and is the default desktop environment on multiple major Linux distributions including Fedora, Debian, and CentOS.
To install GNOME run the following command:
sudo dnf groupinstall "Server with GUI"
Run the following commands to create the .Xclients file containing the line gnome-session, make it an executable an restart xRDP:
echo "gnome-session" > ~/.Xclients
chmod a+x ~/.Xclients
sudo systemctl restart xrdp.service
This is how GNOME looks like:

Install XFCE Desktop Environment
If you want a fast and light-weight desktop environment, then XFCE is the way to go. XFCE is visually appealing along with being fast and light-weight.
Install XFCE running the following commands:
sudo dnf install -y epel-release
sudo dnf groupinstall -y "Xfce"
Run the following command to create the .Xclients file containing xfce4-session:
echo "xfce4-session" > ~/.Xclients
chmod a+x ~/.Xclients
sudo systemctl restart xrdp.service
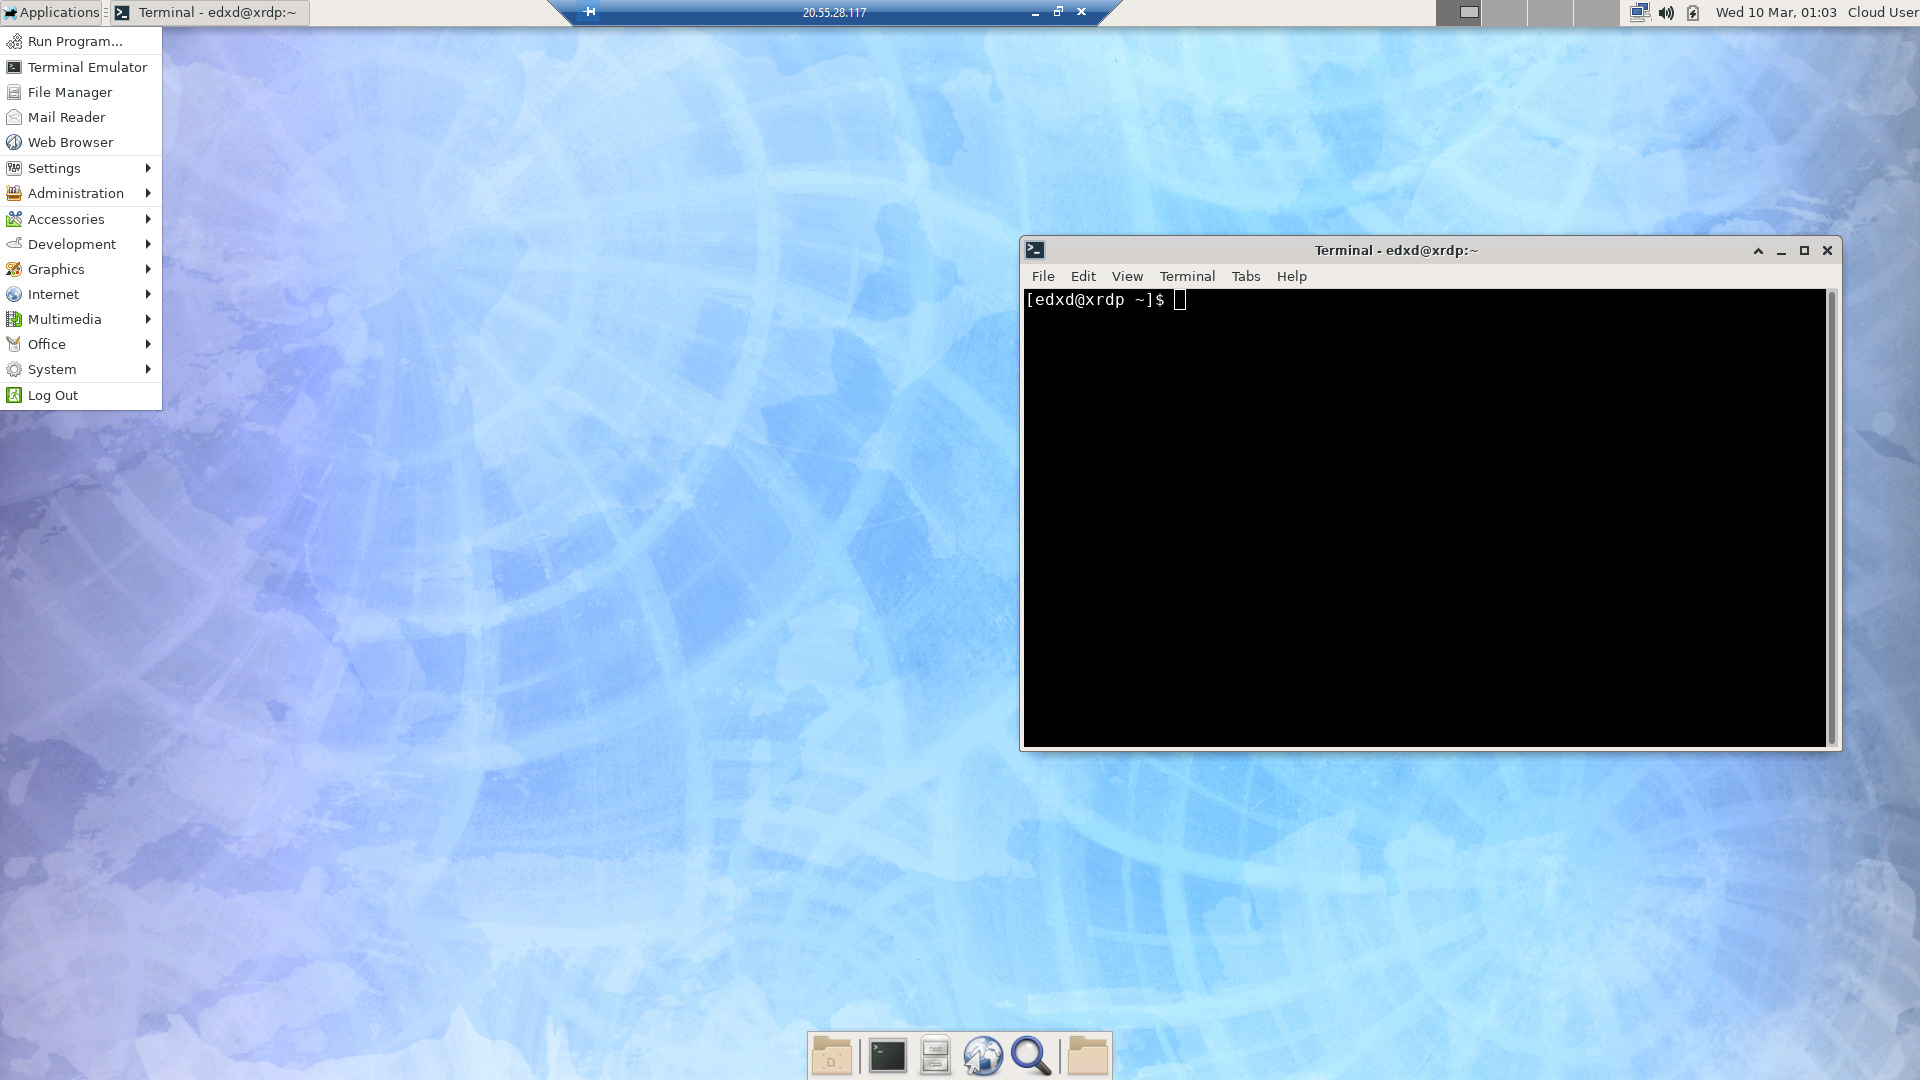
Now, when you log in, the desktop environment should be XFCE.
This is how XFCE looks like:
Install MATE Desktop Environment
GNOME 3 faced a lot of backlash from users after it replaced the classic menu and taskbar. The controversy resulted in the continuation of GNOME 2 as MATE (to avoid confusion). MATE is supported in nearly all Linux distributions including Ubuntu and Debian.
To my knowledge, the current maintainer of MATE for CentOS/Fedora isn’t maintaining it for CentOS 8. Thankfully, someone going by /u/stensorp set up their own repository with a build of MATE that works for CentOS 8, so they’re now the unofficial maintainer. It can be found at coprs/stensorp/MATE.
To install MATE we’ll first enable the stensorp/MATE repository on our machine:
sudo dnf copr enable stenstorp/MATE
Next enable the PowerTools repository, because some EPEL packages might depend on some PowerTools packages:
sudo dnf config-manager --set-enabled powertools
Now run the following command to install MATE:
sudo dnf install NetworkManager-adsl NetworkManager-bluetooth NetworkManager-libreswan-gnome NetworkManager-openvpn-gnome NetworkManager-ovs NetworkManager-ppp NetworkManager-team NetworkManager-wifi NetworkManager-wwan abrt-desktop abrt-java-connector adwaita-gtk2-theme alsa-plugins-pulseaudio atril atril-caja atril-thumbnailer caja caja-actions caja-image-converter caja-open-terminal caja-sendto caja-wallpaper caja-xattr-tags dconf-editor engrampa eom firewall-config gnome-disk-utility gnome-epub-thumbnailer gstreamer1-plugins-ugly-free gtk2-engines gucharmap gvfs-afc gvfs-afp gvfs-archive gvfs-fuse gvfs-gphoto2 gvfs-mtp gvfs-smb initial-setup-gui libmatekbd libmatemixer libmateweather libsecret lm_sensors marco mate-applets mate-backgrounds mate-calc mate-control-center mate-desktop mate-dictionary mate-disk-usage-analyzer mate-icon-theme mate-media mate-menus mate-menus-preferences-category-menu mate-notification-daemon mate-panel mate-polkit mate-power-manager mate-screensaver mate-screenshot mate-search-tool mate-session-manager mate-settings-daemon mate-system-log mate-system-monitor mate-terminal mate-themes mate-user-admin mate-user-guide mozo network-manager-applet nm-connection-editor p7zip p7zip-plugins pluma seahorse seahorse-caja xdg-user-dirs-gtk
Run the following commands to write to the .Xclients file, and make it an executable if you haven’t already, so next time you log in MATE is launched as the desktop environment:
echo "mate-session" > ~/.Xclients
chmod a+x ~/.Xclients
sudo systemctl restart xrdp.service
This is how MATE Desktop looks like:

Install KDE Plasma Desktop Environment
KDE Plasma is the new face of Linux and is the fifth and current version of desktop environments created by KDE. It’s not light-weight like XFCE, but rather fully-featured with an interface similar to that of Windows operating system.
Install KDE Plasma Desktop by running the following command:
sudo dnf groupinstall -y "KDE Plasma Workspaces"
Run the following command to edit the .Xclients file and enable KDE Plasma Desktop as the desktop environment:
echo "startkde" > ~/.Xclients
chmod a+x ~/.Xclients
sudo systemctl restart xrdp.service
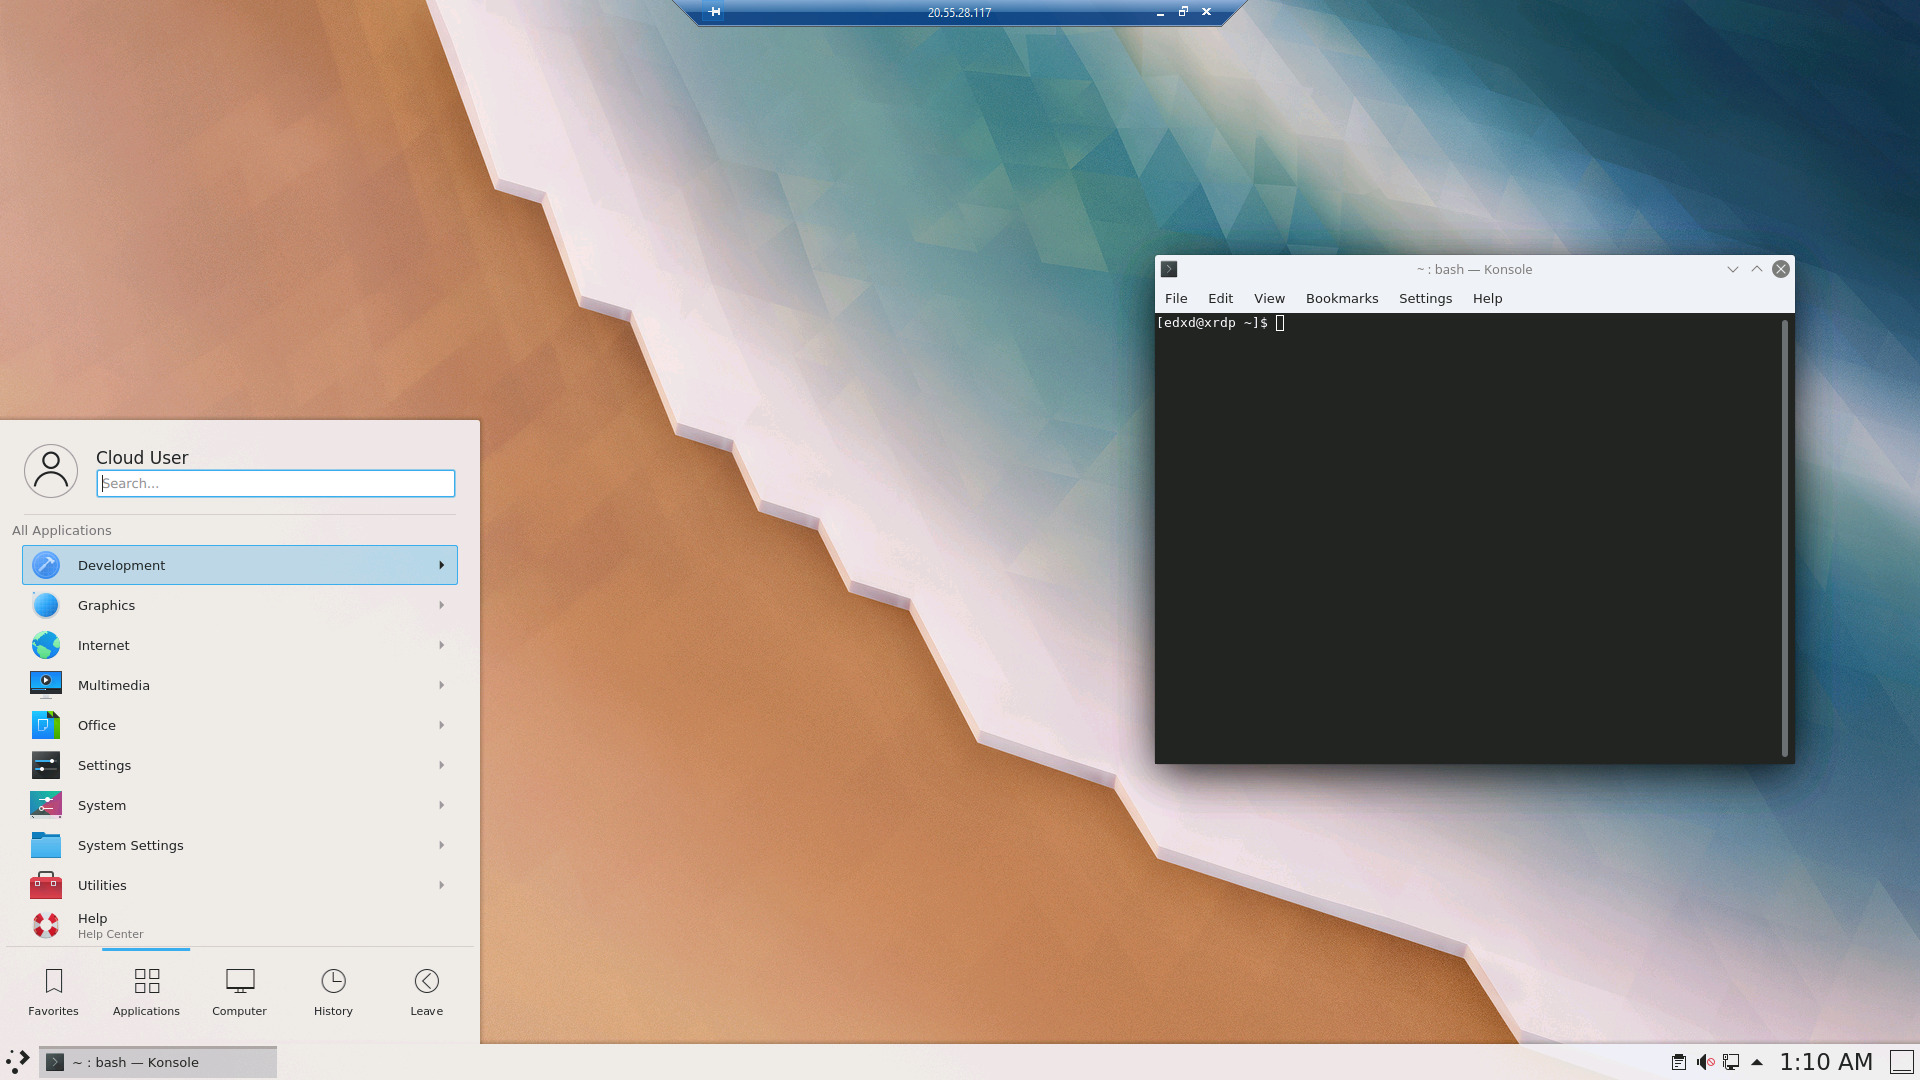
This is how KDE Plasma Desktop looks like:
Fix: System policy prevents control of network connections
It’s likely that when you logged in as a non-root sudo user while using KDE you’re getting nagged by a prompt requiring you to authenticate with a warning System policy prevents control of network connections.
This tends to happen with KDE and is not limited to CentOS 8.
An option is to dismiss any such prompt and go on with your work, and it shouldn’t bother you the rest of the session.
If you want to prevent it we have a simple fix. I’m not sure if it’s the best fix, but it’s quick and gets the job done.
CentOS 8 uses a component called Polkit (formerly PolicyKit), which is a framework for application authorization. Polkit captures actions and checks if the user is authorized to perform those actions on the system. To do this it reads some policy files to check whether the user is authorized or needs authentication to perform those actions.
The Solution
We’ll create a file for Polkit so we override some policies, and we’ll name the file /etc/polkit-1/localauthority.conf.d/03-allow-network-manager.conf
You can use it with your preferred text editor. I’ll use nano:
sudo nano /etc/polkit-1/localauthority.conf.d/03-allow-network-manager.conf
And add the following content:
polkit.addRule(function(action, subject) {
if (action.id =="org.freedesktop.NetworkManager.settings.modify.system" &&

        subject.isInGroup ("users")) {
        return polkit.Result.YES;    }
});
Save and close the file.
Reboot the machine.
Now when you log in with xRDP you shouldn’t receive the prompt anymore.
Install Cinnamon Desktop Environment
Cinnamon is another GNOME 3 derivative that follows the traditional desktop metaphor convention. It’s available in nearly all Linux distributions and Unix-like operating systems and is the principal desktop environment for Linux Mint. Cinnamon offers both speed and an excellent GUI.
Thanks to /u/stenstorp we can easily install Cinnamon on CentOS 8.
To do this enable the stenstorp/cinnamon repository:
sudo dnf copr enable stenstorp/cinnamon
Install Cinnamon:
sudo dnf install cinnamon
Install recommended packages that go with Cinnamon:
sudo dnf install gnome-terminal gnome-system-monitor
You can also install mint icon themes from stenstorp/icon-themes. To enable the repository and install the icon themes run the following commands:
sudo dnf copr enable stenstorp/icon-themes
sudo dnf install mint-themes mint-*-icons
Create the .Xclients file, make it an executable and restart xRDP:
echo "cinnamon" > ~/.Xclients
chmod a+x ~/.Xclients
sudo systemctl restart xrdp.service
This is how Cinnamon looks like (in my case):

Install Budgie Desktop Environment
Budgie is among the latest desktop environments released in 2014. It uses GNOME technologies like GTK (>3.x) and emphasizes on minimalism and simplicity. The interface of Budgie takes inspiration from GNOME (obviously), KDE, and Cinnamon. Budge desktop is available on many Linux distributions including Debian, Manjaro, and Ubuntu Budgie.
Again, thanks to /u/stenstorp we can easily install Budgie on CentOS 8.
First enable the stenstorp/budgie repository:
sudo dnf copr enable stenstorp/budgie
Enable the PowerTools repository, if you haven’t already, in order to install some Budgie development packages:
sudo dnf config-manager --set-enabled powertools
Enable some dependencies for Budgie desktop:
sudo dnf copr enable stenstorp/budgie-dependencies
Install Budgie desktop by running:
sudo dnf install budgie-desktop
Install recommended packages:
sudo dnf install nautilus gnome-terminal gnome-system-monitor arc-theme arc-icon-theme gedit
Lastly create the .Xclients file with the line for Budgie Desktop, make it an executable, and restart the xRDP service, so that Budgie is launched as the desktop environment:
echo "budgie-desktop" > ~/.Xclients
chmod a+x ~/.Xclients
sudo systemctl restart xrdp.service
This is how Budgie looks like:

Step 3 – Connecting via xRDP from Different Operating Systems
Connecting to a CentOS 8 machine with a remote desktop is slightly different than connecting to Windows.
When connecting to Windows you have a small prompt popping up asking you for the username/password, but in our case you’ll be presented with a login screen on the server, where you can fill in the username/password.
It should look something like this:

Connecting from Windows
Windows comes with the Remote Desktop Connection app by default.
To connect from Windows, run the Remote Desktop Connection app. You can find it by clicking in the Search Bar and searching for Remote Desktop Connection:

You’ll be presented with the Remote Desktop Connection window, which features a small form.
Just fill in the Computer field with the IP or hostname of the machine you’re trying to connect to (in my case it’s my server’s IP), and then click Connect.

You should reach the login screen when you can enter your login credentials, after which you’ll be logged into your CentOS 8 machine via xRDP.
Connecting from Linux
For connecting via Remote Desktop Connection from Linux I use Remmina.
There are multiple other solutions, among which are rdesktop, FreeRDP, or Vinagre, but Remmina is one of the most popular and also my personal favorite.
You can find instructions on how to install Remmina on your distro in their How to install Remmina article.
Once Remmina is installed you can run it.

In this example I’ll describe in short how to create a remote desktop connection profile.
- New Connection Profile: Click on the + icon in the upper left corner. You’ll be presented with a new window where you can fill in the connection details. We’ll fill in the minimum in this example.
- Name: Fill in a Name you want to give this connection profile. It can be anything, as it doesn’t influence the connection, and it’s only for your convenience.
- Protocol: Select RDP – Remote Desktop Protocol
- Server: Fill in the IP or hostname of the machine you want to connect to.
- Connect: Click Save and Connect if you want to save the profile and connect, or just Connect if you don’t intend on saving it and just want to connect.\
If all went well you should now see the logon screen where you can fill in your username/password.
Connecting from OSX
To connect via RDP from OSX first download the Microsoft Remote Desktop app from the Mac App Store.
After launching it click on Add PC and you’ll be presented with a form to fill in the details for the remote connection. The minimum you need it to add the IP or hostname in the PC name field, and then connect to it.
Then you’ll be brought to the login screen where you can fill in your username/password.

Connecting from Android/iOS
To connect from Android or iOS you’ll need to install the Remote Desktop Client app. You should be able to find the app in the Google Play or App Store.
In Google Play it’s Remote Desktop 8 by Microsoft Corporation and in the App Store it’s Remote Desktop Mobile by Microsoft Corporation.
After you install and launch the app you should see a dashboard with an option to Add Desktop, which is the equivalent of adding/saving a connection profile.
It looks something like this. You can add just the PC Name and tap save and the remote desktop will be saved. Then you can just tap it to connect to the remote desktop, and after that you’ll see the login screen where you can fill in your username/password.

Connection Slow/Laggy Using xRDP
Typically, if your connection is slow, the first thing you’ll want to try is lower video quality as much as you can.
Optimizing xRDP Speed when connecting from Windows
- Adjust Remote Desktop Connection Display > ExperienceYou can improve speed by giving up on visual styles in exchange for performance. You can do this by adjusting color depth and experience (visual styles).The settings that work well for me are Display->Colors->High Color (16 bit) and Experience->Performance->Low-speed broadband (256 kbps – 2 Mbps)

- Set Realtime Priority in Task Manager
Another hopefully low effort/high impact adjustment is setting Realtime Priority for the mstsc.exe process. To do this open Task Manager and located Remote Desktop Connection-> Right click on it and click on Go to details-> Right click on mstsc.exe-> Set priority -> Realtime.
Optimizing xRDP Speed when connecting from Linux (via Remmina)
- Adjust Color Depth & Visual StylesIn Remmina you can also adjust color depth and increase performance by reducing visual styles.In the Basic tab when creating a connection profile you can adjust Colour Depth. I’ve found that High Colour (15 bpp) works well for me while keeping visual styles acceptable.In the Advanced tab you can also set the Quality to Poor (fastest), if it isn’t set already.

- Adjust Remmina Process PriorityI haven’t tested this thoroughly, but it’s worth trying. You can change the process priority to Very High for Remmina in System Monitor.

Conclusion
Hopefully you’ve managed to set up xRDP on a remote CentOS 8 machine, with your preferred remote desktop, and it’s working smoothly.
I’ll try to keep this article updated and improve it with other useful info.
If you’ve encountered any issues or have any questions, then feel free to leave a comment or contact us and we’ll get back to you as soon as possible.
Revisions & Updates of this Article
[Mar 24 2021]: Added short description on what you can do with RDP (Remote Desktop Connection).




This is a very detailed and good article. Thank you for it. It helped me to get KDE Desktop via XRDP on Rocky Linux.