Virtual Network Computing, commonly known as VNC, is a platform-independent protocol that uses the client-server architecture to access a remote computer over a network.
It enables users to access the remote computer’s graphical desktop and send mouse clicks and keyboard strokes to the remote system.
Alternatives to VNC for CentOS that we have covered are xRDP and X2Go. All these technologies have similar goals, but their methods for achieving them differ.
In this article, we’ll cover step-by-step how to install and configure a VNC server on a remote machine running CentOS 8, Rocky Linux 8, or AlmaLinux 8, along with how to install and use multiple popular desktop environments.
Also, the screenshots provided in this tutorial are mostly from CentOS 8. I have provided a few from Rocky Linux 8 and AlmaLinux 8, to prove that I have also tested this tutorial on them.
Table of Contents
- Prerequisites
- Step 1. Install GUI packages
- Step 2. Install VNC server
- Step 3. VNC Initial Configuration – Setup Password
- Step 4. Configure TigerVNC
- Step 5. Map Ports to Users
- Step 6. Start VNC Server
- Step 7. Connecting to the VNC Server
- Configuring VNC to Use Other Desktop Environments (And Switching Between Them)
- Conclusion
Prerequisites
- A machine running CentOS 8, Rocky Linux 8, AlmaLinux 8, or similar. You may be interested in affordable high-RAM VPS hosting for this.
- Acting as a non-root sudo user. If you don’t have one already, you can quickly create one by using our tutorial How to Create a Sudo User in CentOS. You can also act as root, however it’s not recommended, especially if you’re working on a “sensitive” system, since you can harm it if you’re not careful.
- A VNC Client (also called VNC Viewer) installed on your local computer. The VNC Client is the software you will use to connect to the remote computer. There are some popular VNC viewers that you can choose from. The one I’m using in this tutorial is Real VNC Viewer.It’s available for Windows, macOS, Linux, Android, and others. You can choose your OS and download Real VNC Viewer here. If you’re on Linux then I prefer Remmina, although there are other great and popular choices such as Vinagre.
Before we start let’s also update our package index and upgrade our existing packages to the latest version:
sudo dnf update && sudo dnf upgrade
Step 1. Install GUI packages
If you are running a headless (without graphical Desktop interface) CentOS system, you will first need to install the GUI.
When you connect to your remote CentOS system using VNC, what you access is the Desktop Interface.
If you already have GUI installed, you can skip this step. Else, execute the command below on your Terminal to install the necessary GUI packages.
sudo dnf groupinstall "server with GUI"
If you’d like a different desktop environment then feel free to install another one from the section covering desktop environments below, and then you can return here and continue the tutorial.
This command will install the GNOME Desktop Environment. GNOME is quite a large package, and the process might take a while to complete. However, that will also depend on your internet speed.

Once the installation completes, we will install our VNC server.
Step 2. Install VNC server
There are several VNC applications available for Linux. They include RealVNC, X11VNC, TigerVNC, TurboVNC, etc. For this particular tutorial, we will install TigerVNC. Execute the command below on your Terminal.
sudo dnf install tigervnc-server
After successfully installing TigerVNC, we will need to perform several configurations to have the VNC server running.
Step 3. VNC Initial Configuration – Setup Password
Execute the command below to set up the password for the currently logged-in user. In my case, it’s edxd.
Execute the command below without sudo privileges.
vncpasswd
You will see a prompt, Would you like to enter a view-only password (Y/N). That means that users who access the VNC connection using that password will not send any mouse clicks or keyboard strokes to the remote system. They will just view the remote desktop.
That is a reliable feature if you want to present something to a group of people. For this tutorial, I don’t need a view-only password. I will enter N.

Step 4. Configure TigerVNC
After setting up a password, we now need to configure the Desktop Environment that TigerVNC will use when launched.
In our case, it’s GNOME. We will do this by editing the configuration file present in the ~/.vnc/config directory. Execute the command below to open and edit the file using the nano editor.
nano ~/.vnc/config
Paste the contents below.

Here, the session arguments show the Desktop Environment that TigerVNC will use, and geometry sets the resolution of the Desktop Environment as viewed on the user local PC.
Step 5. Map Ports to Users
When you launch a VNC instance on your server, you will see an argument like :1. What this means is that VNC is running on port 5901. If running on port 5902, you would see :2, port 5903 would be represented as :3, and so on. Now, if you have multiple users on your system, you can map each one of them to a particular port. To do so, we will edit the vncserver.users file present in /etc/tigervnc directory.
Execute the command below to edit the file with nano editor.
sudo nano /etc/tigervnc/vncserver.users

If you have more users, map them to ports :2, :3, :4, and so on.
Step 6. Start VNC Server
We have done all the necessary configurations up to this point, and we can now start the VNC server. First, let’s add the service to our startup menu to launch automatically even after a reboot.
sudo systemctl enable vncserver@:1.service
Created symlink /etc/systemd/system/multi-user.target.wants/vncserver@:1.service → /usr/lib/systemd/system/vncserver@.service.
The command below launches a VNC instance with display port :1, which refers to port 5901 as discussed above.
sudo systemctl restart vncserver@:1.service
You can check the status of the running vnc service with the command below.
sudo systemctl status vncserver@:1.service

sudo nano /etc/gdm/custom.conf
Uncomment WaylandEnable=false
sudo systemctl restart gdm.service

Step 7. Connecting to the VNC Server
Now we have successfully configured our VNC server, and it’s ready to accept incoming connections from clients.
However, there is one more crucial thing we need to do.
VNC by itself doesn’t use secure protocols. Therefore, it can easily suffer from attacks like sniffing. To avoid this, we will use an SSH tunnel to connect to our VNC server.
Set up an SSH Tunnel with Your Terminal
If you are on Linux or macOS, execute the command below on your Terminal.
Remember to replace and with the username and IP address of your CentOS system.
ssh -L 59000:127.0.0.1:5901 -C -N -l <username> <remote_server_ip>
In my case, I’ll run:
ssh -L 59000:127.0.0.1:5901 -C -N -l edxd 192.168.122.1
Let’s see what the above command means:
-L 59000:localhost:5901: The -L argument specifies the post on your local computer (ours is 59000) to the given host (127.0.0.1) and port (5901) on the destination server (server_ip_address).
Note: The local port, 59000, can be any number but not more than 65535 and not running another service. We just used 5901 for convenience
-C: This argument speeds up processes and minimizes resource usage.
-N: This argument prevents execution of remote commands and tells SSH to only forward ports.
-l <username> <remote_server_ip>: This line specifies the user you will use to login to the server
Set up an SSH Tunnel with Putty
You can also easily set up an SSH tunnel if you’re using Putty. To do this launch Putty and enter your Host Name (or IP address) in the Session > Host Name (or IP address) field.
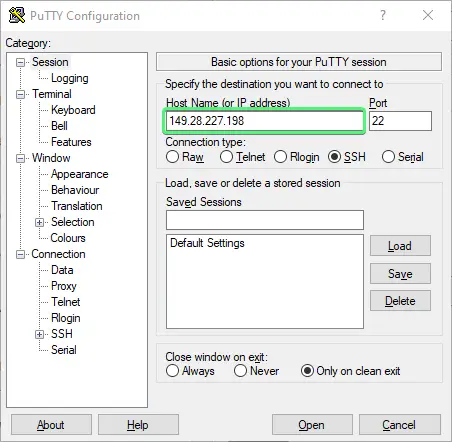
Next, in the left sidebar, click the + next to the SSH option, to expand it. We’re looking for the Tunnels option.
Once you’ve found it, click on it, and fill in the details as shown in the image below:
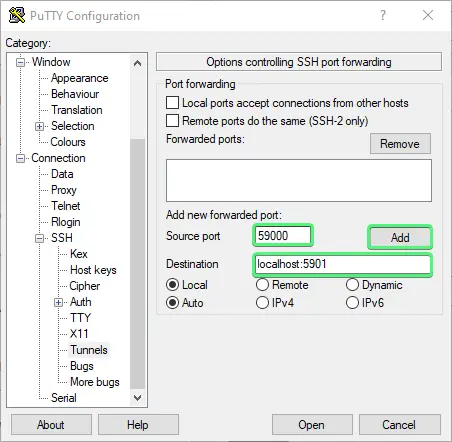
In my case it will be Source port: 59000 and Destination: localhost:5901.
When done just click on the Add button and then Open to start the session. You will have to just log in via the Putty terminal and the SSH tunnel will be created and now you should be able to connect to the VNC server using your client to 127.0.0.1:59000 (or localhost:59000).
Once you have established an SSH tunnel, we can now connect securely to our server. There are various VNC client applications that you can use to connect to your VNC server. They include TigerVNC, TightVNC, RealVNC, UltraVNC, Vinagre, and VNC Viewer for Google Chrome.
Example Connecting from Ubuntu
In this example, we will use Vinagre. Since I am running Ubuntu, I can easily install Vinagre with the command below.
sudo apt install vinagre -y
You can also easily install and use Remmina, instead of Vinagre.
If you are using an SSH tunnel, connect to the VNC server using the localhost address and bind it to port 5901, as shown below. If you used a different display port other than :1, then use the required port number.

Once done, click Connect. You will see a prompt to enter the password you set when you once execute the vncpasswd command. After a successful connection, you should see the CentOS graphical desktop, as shown in the image below.

Example Connecting from Windows
From Windows I typically use Real VNC Viewer. You can download it for multiple operating systems as well, such as Mac, Linux, iOS, Android, and more.
If the SSH tunnel is created, you can easily go to File > New Connection and input 127.0.0.1:59000, and then click OK.

Next you’ll see the connection created like in the image below – it will show like a little screenshot of the remote desktop.
Then just double click it and you’ll be prompted to input the password for your user and after you should be connected to your remote desktop.
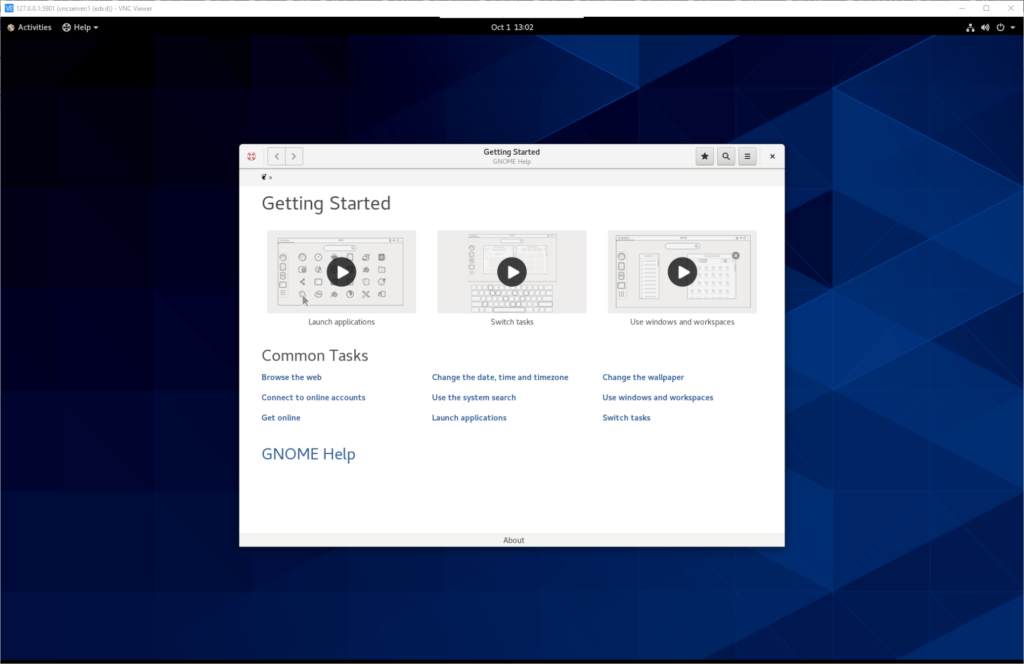
After a successful connection this is what I’m seeing:
Configuring VNC to Use Other Desktop Environments (And Switching Between Them)
In this section we’ll cover how to install several popular desktop environments on CentOS 8, as well as switching between them to use with VNC.
Setting the Desktop Environment in the ~/.vnc/config File
To switch between desktop environments all we have to do is edit our ~/.vnc/config file, and define the type of session we want in the line containing session=desktop_environment.
We just have to replace desktop_environment with the desktop environment we wish to run.
If you’ve followed the tutorial from the beginning, we edited the ~/.vnc/config file earlier and set our desktop environment to GNOME by inserting the line session=gnome, and our file currently looks like this:
session=gnome
geometry=1920x1200
localhost
alwaysshared
To find what desktop environments we have installed, as well as the name we should use in the ~/.vnc/config file, we can check the .desktop files in the /usr/share/xsessions/ directory.
To do this you can run:
ls /usr/share/xsessions/
Here is my output (I have installed multiple desktop environments for this tutorial):
budgie-desktop.desktop
cinnamon.desktop
cinnamon2d.desktop
gnome.desktop
gnome-classic.desktop
gnome-custom-session.desktop
gnome-xorg.desktop
mate.desktop
openbox.desktop
plasma.desktop
xfce.desktop
xinit-compat.desktop
In the above example I have installed are:
GNOME – gnome.desktop
XFCE – xfce.desktop
MATE – mate.desktop
Budgie – budgie-desktop.desktop
KDE Plasma – plasma.desktop
Cinnamon – cinnamon.desktop
When installing some of the desktop environments, additional variants were installed. For example Cinnamon 2D was installed alongside Cinnamon, GNOME Classic was installed alongside GNOME, and Openbox was installed alongside KDE Plasma. This can happen with other desktop environments that you may install, and that aren’t covered in this article.
When we want to change the desktop environment, we simply edit the ~/.vnc/config file, and we define the session with the name of the .desktop file (without the extension) corresponding to our desired desktop environment.
For example, in our ~/.vnc/config file, instead of session=gnome, we’ll have:
GNOME – session=gnome
XFCE – session=xfce
MATE – session=mate
Budgie – session=budgie-desktop
KDE Plasma – session=plasma
Cinnamon – session=cinnamon
Configure VNC to Use GNOME
The GNOME desktop is a very popular desktop environment for Linux and Unix systems. It is designed to be easy to use, and to be consistent across different platforms. It is also designed to be very customizable, so that users can change the look and feel of their desktop to suit their own tastes. In addition, GNOME is designed to integrate well with other open source software, such as the GIMP and Inkscape.
This is the desktop environment we installed at the beginning of the tutorial. To install it run:
sudo dnf groupinstall "server with GUI"
Then edit the ~/.vnc/config file, and set session=gnome, then save and close it.
Here’s how mine looks:
session=gnome
geometry=1920x1200
localhost
alwaysshared
And restart the VNC server:
sudo systemctl restart vncserver@:1.service
When you connect via VNC you should have GNOME as your desktop environment.
This is what GNOME looks like using VNC, on CentOS 8:

This is what GNOME looks like using VNC, on Rocky Linux 8:

This is what GNOME looks like using VNC, on AlmaLinux 8:

Configure VNC to Use GNOME Classic
GNOME Classic is a desktop environment that is designed to be familiar to users of GNOME 2. It provides a user experience that is similar to GNOME 2, but with the added benefit of the new technologies that have been introduced in GNOME 3.
GNOME Classic should have been installed alongside GNOME.
Then edit the ~/.vnc/config file, and set session=gnome-classic, then save and close it.
session=gnome-classic
geometry=1920x1200
localhost
alwaysshared
And restart the VNC server:
sudo systemctl restart vncserver@:1.service
When you connect via VNC you should have GNOME Classic as your desktop environment.
This is what GNOME Classic looks like using VNC, on CentOS 8:
Configure VNC to Use XFCE
XFCE is a lightweight desktop environment for Unix-like operating systems. It aims to be fast and low on system resources, while still being visually appealing and user friendly. It is designed with productivity and ease of use in mind. Thanks to all of this it is a very popular desktop environment.
To install XFCE first we need to enable the EPEL repository:
sudo dnf install -y epel-release
Next we install XFCE:
sudo dnf groupinstall -y "Xfce"
Then edit the ~/.vnc/config file, and set session=xfce, then save and close it.
session=xfce
geometry=1920x1200
localhost
alwaysshared
And restart the VNC server:
sudo systemctl restart vncserver@:1.service
When you connect via VNC you should have XFCE as your desktop environment.
This is what XFCE looks like using VNC, on CentOS 8:
Configure VNC to Use MATE Desktop
MATE is a fork of GNOME 2.x. It’s designed to be very familiar to people who used GNOME 2.x and it has a lot of the same features. GNOME 2 was forked because users and developers were not happy with the direction GNOME was taking.
MATE is primarily designed to run on older hardware, although it will run well on newer hardware too. MATE is also the desktop environment of choice for users who prefer a traditional desktop metaphor.
To install MATE we’ll need an unofficial repository, stensorp/MATE:
sudo dnf copr enable stenstorp/MATE
We will also need to enable the EPEL repository if you don’t already have it:
sudo dnf install -y epel-release
And we’ll also need the PowerTools repository, because some EPEL packages might depend on PowerTools packages:
sudo dnf config-manager --set-enabled powertools
Finally, to install MATE run the following command:
sudo dnf install NetworkManager-adsl NetworkManager-bluetooth NetworkManager-libreswan-gnome NetworkManager-openvpn-gnome NetworkManager-ovs NetworkManager-ppp NetworkManager-team NetworkManager-wifi NetworkManager-wwan abrt-desktop abrt-java-connector adwaita-gtk2-theme alsa-plugins-pulseaudio atril atril-caja atril-thumbnailer caja caja-actions caja-image-converter caja-open-terminal caja-sendto caja-wallpaper caja-xattr-tags dconf-editor engrampa eom firewall-config gnome-disk-utility gnome-epub-thumbnailer gstreamer1-plugins-ugly-free gtk2-engines gucharmap gvfs-afc gvfs-afp gvfs-archive gvfs-fuse gvfs-gphoto2 gvfs-mtp gvfs-smb initial-setup-gui libmatekbd libmatemixer libmateweather libsecret lm_sensors marco mate-applets mate-backgrounds mate-calc mate-control-center mate-desktop mate-dictionary mate-disk-usage-analyzer mate-icon-theme mate-media mate-menus mate-menus-preferences-category-menu mate-notification-daemon mate-panel mate-polkit mate-power-manager mate-screensaver mate-screenshot mate-search-tool mate-session-manager mate-settings-daemon mate-system-log mate-system-monitor mate-terminal mate-themes mate-user-admin mate-user-guide mozo network-manager-applet nm-connection-editor p7zip p7zip-plugins pluma seahorse seahorse-caja xdg-user-dirs-gtk
Then edit the ~/.vnc/config file, and set session=mate, then save and close it.
session=mate
geometry=1920x1200
localhost
alwaysshared
And restart the VNC server:
sudo systemctl restart vncserver@:1.service
When you connect via VNC you should have MATE Desktop as your desktop environment.
This is what MATE Desktop looks like using VNC, on CentOS 8:
Configure VNC to Use Budgie
Budgie is a desktop environment designed with the modern user in mind. It is simple, clean, and elegant. It is built with the GTK3 toolkit, and is fully compatible with GNOME applications. Budgie is an intuitive, easy to use, modern desktop environment that is built for the modern user.
First we’ll have to enable an unofficial repository for Budgie:
sudo dnf copr enable stenstorp/budgie
Enable some dependencies for Budgie:
sudo dnf copr enable stenstorp/budgie-dependencies
Enable the PowerTools repository, in order to install some Budgie development packages:
sudo dnf config-manager --set-enabled powertools
Now we can install Budgie:
sudo dnf install budgie-desktop
Install some recommended packages:
sudo dnf install nautilus gnome-terminal gnome-system-monitor arc-theme arc-icon-theme gedit
Then edit the ~/.vnc/config file, and set session=budgie-desktop, then save and close it.
session=budgie-desktop
geometry=1920x1200
localhost
alwaysshared
And restart the VNC server:
sudo systemctl restart vncserver@:1.service
When you connect via VNC you should have Budgie as your desktop environment.
This is what Budgielooks like using VNC, on CentOS 8:

Configure VNC to Use KDE Plasma
KDE Plasma is a lean, fast, modern desktop for GNU/Linux and other Unix-like systems. It combines a traditional desktop metaphor with certain aspects of the modern desktop. The desktop is highly configurable and supports many different methods of interacting with the user, ranging from traditional keyboard-and-mouse input to touch screen input.
To install KDE Plasma we’ll first need to enable the EPEL and PowerTools repositories:
sudo dnf install -y epel-release
sudo dnf config-manager --set-enabled powertools
Now we can install KDE Plasma:
sudo dnf groupinstall -y "KDE Plasma Workspaces"
Then edit the ~/.vnc/config file, and set session=plasma, then save and close it.
session=plasma
geometry=1920x1200
localhost
alwaysshared
And restart the VNC server:
sudo systemctl restart vncserver@:1.service
When you connect via VNC you should have KDE Plasma as your desktop environment.
This is what KDE Plasma looks like using VNC, on CentOS 8:

Configure VNC to Use Cinnamon
The Cinnamon desktop environment is a fork of GNOME 3. It’s main defining features are a traditional layout of application menus and desktop controls, a traditional layout of windows with a single title bar, and an emphasis on simplicity and ease of use. It is designed around the desktop metaphor, and is built to be familiar, easy to use, and beautiful. Cinnamon is the default desktop environment used by Linux Mint.
To install Cinnamon we’ll first need to enable an unofficial repository, stenstorp/cinnamon:
sudo dnf copr enable stenstorp/cinnamon
Install Cinnamon:
sudo dnf install cinnamon
Install some recommended packages for Cinnamon:
sudo dnf install gnome-terminal gnome-system-monitor
You can also install mint icon themes from stenstorp/icon-themes. To enable the repository and install the icon themes run the following commands:
sudo dnf copr enable stenstorp/icon-themes
sudo dnf install mint-themes mint-*-icons
Then edit the ~/.vnc/config file, and set session=cinnamon, then save and close it.
session=cinnamon
geometry=1920x1200
localhost
alwaysshared
And restart the VNC server:
sudo systemctl restart vncserver@:1.service
When you connect via VNC you should have Cinnamon as your desktop environment.
This is what Cinnamon looks like using VNC, on CentOS 8:

Cinnamon 2D is a variant Cinnamon that doesn’t require the graphics hardware and drivers to run Cinnamon, and you’ll likely find it installed alongside Cinnamon.
To use Cinnamon 2D just set session=cinnamon2d.
This is how Cinnamon 2D looks like:

Configure VNC to Use Openbox
Openbox is a lightweight compositing window manager that is fast, small, and extensible. While it is not a desktop environment, and usually serves as an “engine” for some popular desktop environments, it can still offer a fast and pleasant desktop experience by itself.
It has a very basic set of features, but its simplicity makes it very easy to learn and use. It is used in a variety of desktop environments and window managers, and is one of the most popular window managers used in Linux.
To install Openbox just run:
sudo dnf install openbox obconf
Then edit the ~/.vnc/config file, and set session=openbox, then save and close it.
session=openbox
geometry=1920x1200
localhost
alwaysshared
And restart the VNC server:
sudo systemctl restart vncserver@:1.service
When you connect via VNC you should have Cinnamon as your desktop environment.
This is what Openbox looks like using VNC, on CentOS 8:

Conclusion
Well done! Hopefully you managed to install and configure a VNC server on your CentOS 8, Rocky Linux 8 or AlmaLinux 8 remote machine. Feel free to ask anything or share any additional information in the comments section.




The basic install instructions don’t even result in a working vncserver.