As a system administrator or a regular Linux user, there are times when you need to transfer files between two servers or two Linux desktop systems. The most common methods to use are FTP or SCP.
But what if you don’t want to use those two tools?
Then Rsync is the way to go. This tool is way more powerful than you might think. This post will give you a detailed guide on how to transfer files and directories between two servers using Rsync.
What is Rsync?
Rsync is a command line utility that you can use to synchronize files between two Linux systems or directories. You can use this command locally or remotely.
In short, you can use Rsync to move files across two systems without FTP. This tool makes use of the default SSH port. However, you can specify a port using the various available options, as you will learn in this post.
Up to this point, you might have one main question.
What’s the difference between cp / scp and rsync?
This question might be a whole topic on its own. But to keep everything brief and straightforward – the CP command duplicates files, and by default, it ensures that files and directories have unique full path names. That is the same case with the SCP command that securely copies files across two systems.
SCP is a more advanced version of the CP command.
On the other hand, the Rsync command synchronizes files and directories.
file_A on Server-One, you can use Rsync to create a copy of this file on Server_Two. If the file_A on Server-One is updated, the next time you run the Rsync command, it will only update the changes to Server-Two.That’s unlike the CP command, which would copy the entire file again.
The Rsync command is good when performing incremental transfers or duplicates – for example, doing a system backup. It also saves bandwidth and time.
The SCP command is best for transferring small files between systems.
Prerequisites
- Two Linux servers are up and running. You can install them as virtual machines using virtualization software like VMware, VirtualBox, or Quickemu.
- The server sending the files should have access to the other servers’ SSH ports.
- Root access.
Basic Rsync Syntax.
This post will use the terms push and pull to keep things straightforward and help you understand Rsync much quicker.
- A Push is where you send a file from Server-A to Server-B.
- A Pull is when you are getting a file from a Remote server.
You will use the syntax below when doing a Push with Rsync (transferring a file to a remote server).
rsync [-options] SOURCE [email protected]:DESTINATION
Use the syntax below when doing a pull with Rsync (getting a file from a remote server to your local server).
rsync [-options] [email protected]:SOURCE DESTINATION.
SOURCE: This refers to the path to the file or directory you want to transfer.[-options]: This refers to all the arguments you can use with the Rsync command.DESTINATION: This refers to the location on the receiving server where the file will be stored.[email protected]: This is the username and IP address of the receiving server.
Using Rsync to Synchronize Directories on the Same System.
Launch the Terminal and use the mkdir command to create two directories – Dir_One and Dir_Two.
mkdir Dir_One Dir_Two
Create several dummy files inside Dir_One using the touch command, as shown below.
touch Dir_One/file{1..10}

When you run the ls command on Dir_One you will see all the files that were created. However, Dir_Two is still empty. To sync the contents of Dir_One to Dir_Two, you will use the Rsync command syntax below.
rsync -r Dir_One/ Dir_Two
Here we are using the -r option, which means we are copying the files recursively. Alternatively, you can also use the -a option which stands for “archive.” This option syncs the files recursively and preserves other features like symbolic links, modification times, groups, owners, and user permissions.
/ after Dir_One in the command above. This slash is important as it specifies we are copying the files inside the directory and not the whole directory itself.
When you run the ls command on Dir_Two as shown in the image above, you will notice it has the same files as Dir_One.
Transfer (Push) a File from One Server to Another
This post has two servers setup – Johndoe server and Alexdoe server. We will use the syntax below to send a file from Johndoe server to Alexserver.
rsync [-options] SOURCE [email protected]:DESTINATION
First, create a dummy file that you want to send using the command below.
touch file_One
Next, use the command below to transfer this file to the second server.
rsync file_One [email protected]:/home/alexdoe

Now when you run the ls command on the second server (Alexdoe) you will see the file you transferred on their home directory.

That was quite simple and easy since we are dealing with only one file. You will need to use the -a option when transferring multiple files inside a directory. Let’s look at a simple example.
Create a directory called Dir_One and create several dummy files inside this folder. You can run the commands below.
mkdir Dir_One
touch Dir_One/file{1..100}
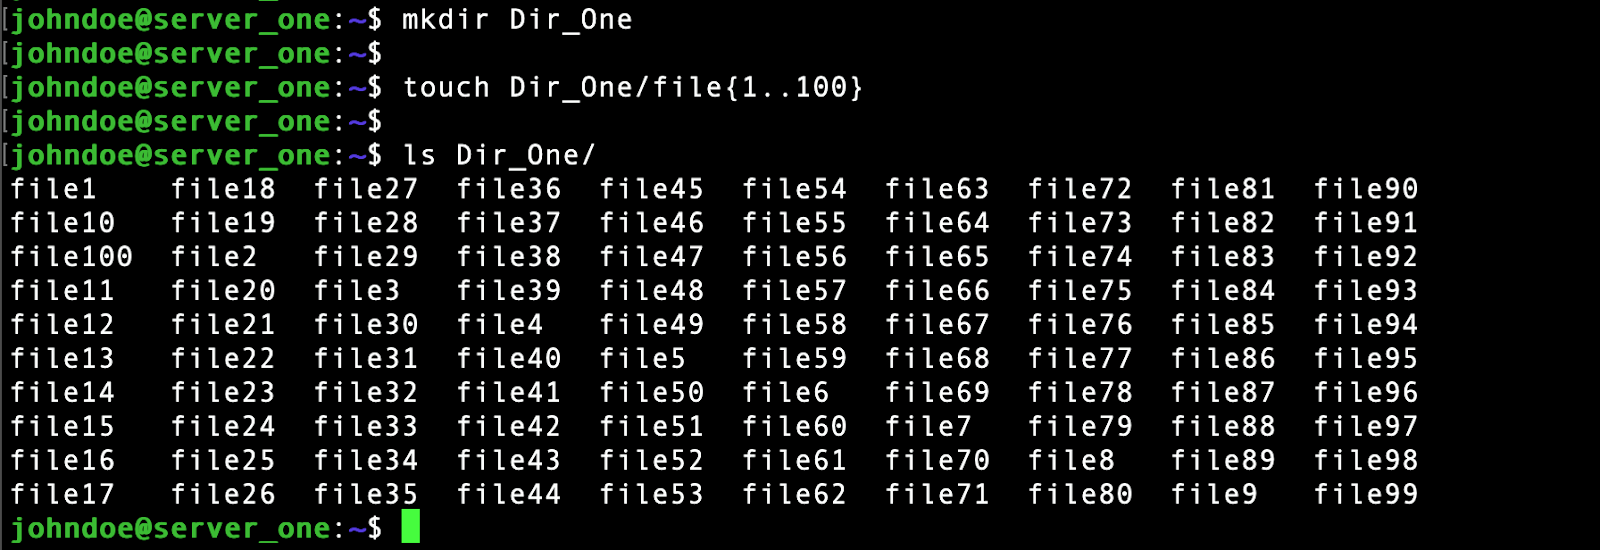
To copy these files to the other server (Alexdoe) you will use the command below. Take note of the -a option.
rsync -a Dir_One/ [email protected]:/home/alexdoe
When you run the ls command on the receiving server you should see an output similar to the image below. The file was copied successfully.

When working with a large number of files, it’s always good to take precautions and avoid copying the wrong items or the wrong destination location. One way of doing that is performing a dry run using the -n option. Another option that you can include is the -v or “verbose” which shows you what is happening on the terminal.
To do a dry-run of the files that we copied above, we will use the command below.
rsync -anv Dir_One/ [email protected]:/home/alexdoe
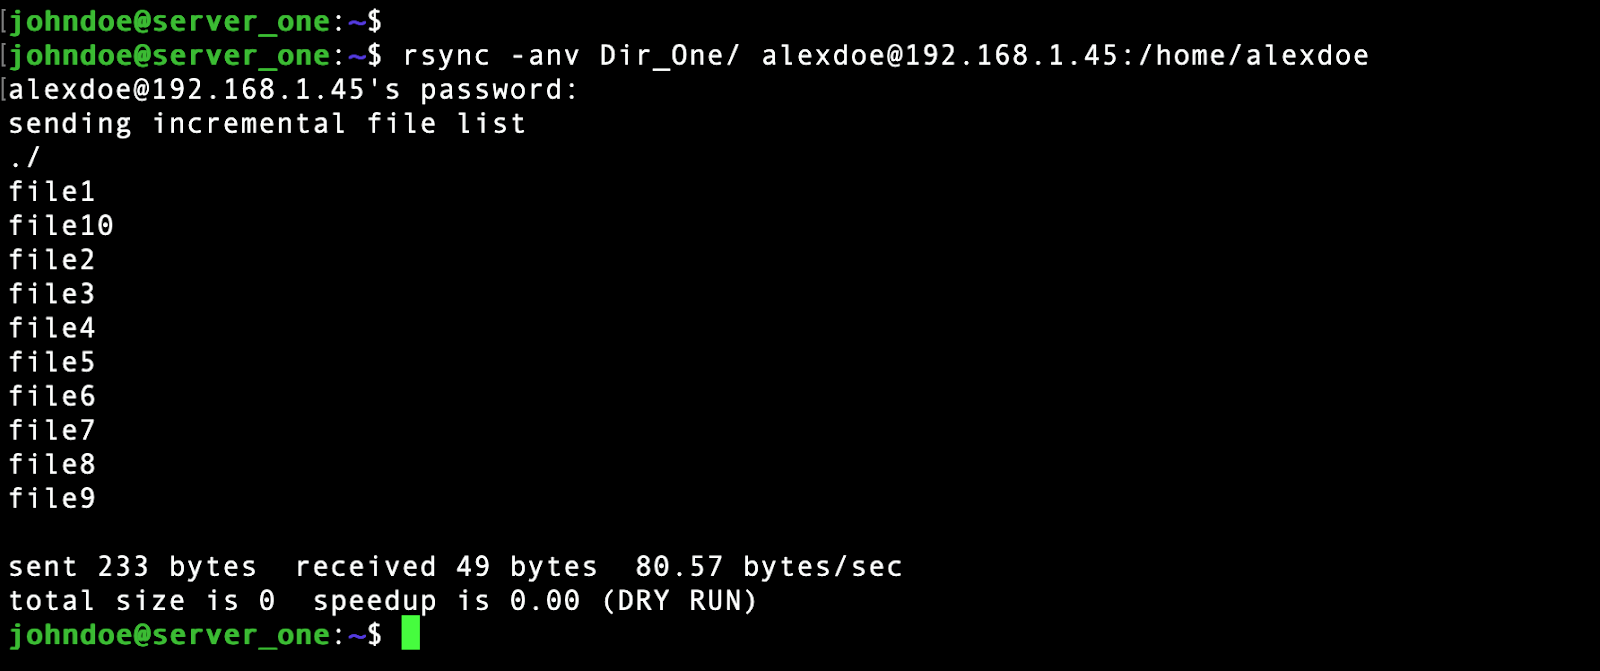
From the image above, you can see all the files that will be transferred including the total number of bytes. This method (dry-run) enables you to verify and confirm what will be transferred.
In one of the above paragraphs, you learned about the importance of the trailing slash (/). Let’s do a dry-run without adding this slash (/).
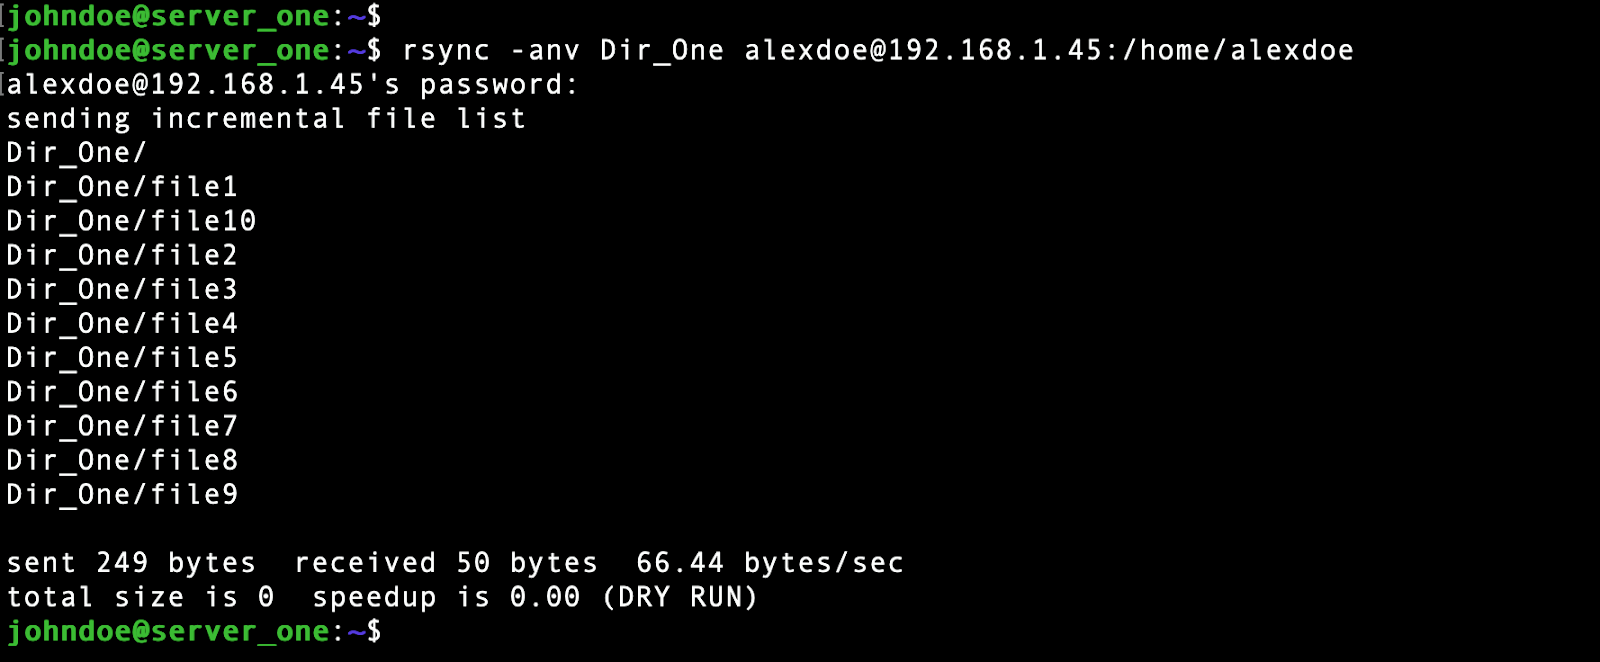
Without adding the slash (/) you can see in the image above that you will transfer the whole directory to your other server.
Get (Pull) a File From a Remote Server
Up to this point, you have learned how to send files to a remote server. What if you wanted to get (pull) a file from a remote server? Well, that’s pretty simple and straightforward as you only need to tweak the Rsync syntax as shown below.
rsync [email protected]:SOURCE DESTINATION
Let’s assume there is a file called TextFile_One on Alexdoe server that we want to transfer to our Johndoe server. You will use the syntax below.
rsync -av [email protected]:/home/alexdoe/TextFile_One /home/johndoe/
You can see there are two options added to the command including the -v option which allows us to see what is happening behind the scenes.

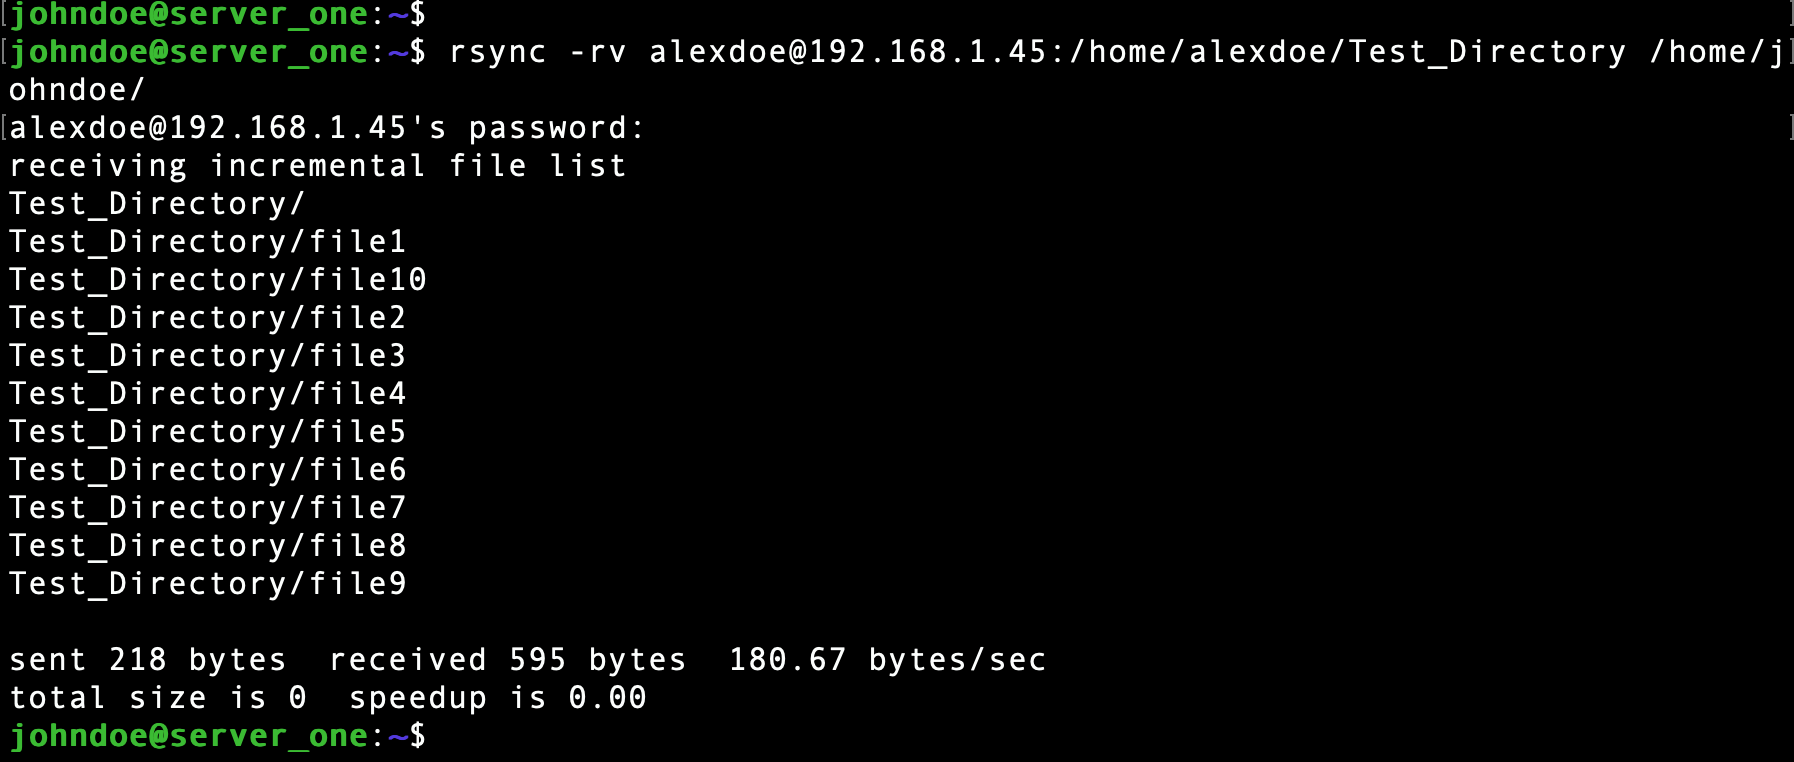
Assume you had a directory called Test_Directory on the other server with multiple files inside. To get this directory you will use the command below. Note that we added the -r option and removed the trailing slash after the directory name.
Rsync Command Tips and Tricks
Now that you have a good understanding of how to transfer files between two servers using the Rsync command, let’s look at some tips and tricks that will come in handy.
Rsync -d Option
To transfer only the directory without its contents using the Rsync utility you will need to use the -d option. Also, don’t add the trailing slash after the directory name. For example, to pull a directory called Test_Directory from the other services you would use the command below.
rsync -d [email protected]:/home/alexdoe/Test_Directory /home/johndoe
Rsync -t Option
The Rsync -t option enables you to copy the date and time the file was last modified. This option would be pretty useful when working with files that are audited regularly.
Use a Specific Port with Rsync
By default, Rsync uses the dedicated SSH port (port 22). However, if you have changed this port or you have set up an Rsync daemon running on a specific port, you will need to specify the port in your command using the -e option.
To perform a push action, use the syntax below.
rsync [options] -e 'ssh -p PORT' SOURCE [email protected]:DESTINATION
E.g.,
rsync [options] -e ‘ssh -p 22’ SOURCE [email protected]:DESTINATION
To perform a pull action, use the syntax below.
rsync [options] -e 'ssh -p PORT' [email protected]:SOURCE DESTINATION
E.g.,
rsync [options] -e 'ssh -p 22 [email protected]:SOURCE DESTINATION
Conclusion
This post has given you a comprehensive guide on using the Rsync command on your system. It is important to note that Rsync is used to transfer files and directories only. You cannot use it to move services and packages. For that, you will need to install them manually.
Do you have any comments or queries regarding this post? Please don’t hesitate to let us know in the comments.

