If you have used an Android phone for some time, you will notice that there are certain features and capabilities that you cannot access or perform. These include sideloading apps, taking screenshots in applications that forbid that (e.g. Telegram has such a feature), installing custom ROMs, removing unnecessary Google or manufacturer apps, creating frequent backups, etc.
Fortunately, there is a way that you can bypass all that and do anything you wish to do with your phone using the Android Debug Bridge (ADB). This post will guide you on Installing ADB and Fastboot Android Drivers on Linux.
Table of Contents
What are ADB and Fastboot?
To understand ADB, let’s have a quick look at what happens on an Android phone under the hood.
Android mobile phones run a customised version of the Linux kernel to perform the core system services (It must be a surprise to know Linux has a massive market in the phone industry, right?). Even though Android is regarded as open-source, phone manufacturers add certain restrictions which prevent the average user from tweaking the software.
The Android Debug Bridge (ADB) is a command-line tool that you can install on your PC and execute commands directly on your Android phone. This tool enables you to have more privileged access over your phone. To use ADB, you will first need to enable USB debugging on your phone – We will discuss this below.
With ADB, you can efficiently perform tasks like accessing your phone UI from your laptop, taking screenshots from your PC, and more. A more exciting bit is you can use ADB to remove malware and other malicious apps from your phone.
Fastboot, on the other hand, is a command-line tool that allows you to modify the flash system on your Android phone from your computer. That is made possible because this utility is built-in with the Android SDK. It enables you to install custom ROMs, root your mobile phone, or perform a custom recovery.
Install ADB on Linux Systems
To install ADB tools on Linux systems is pretty straightforward. Execute any of the commands below depending on your Linux distro.
Debian/ Ubuntu-based distributions
sudo apt-get install android-tools-adb
Or
sudo apt install adb

RHEL/ CentOS/ Fedora
To install ADB on any RHEL-based distribution, execute the command below.
sudo dnf install adb
To use ADB tools on your Android phone, we first need to enable USB debugging. Follow the steps below.
How to Enable USB Debugging
The procedure might differ from one phone to another. However, they all use simple logic. Find the build number on your Settings app and tap it continuously seven times until you see the notification “you are already a developer.”
For this post, we will use a Tecno phone. First, open the Settings application and click on “About Phone.” Scroll down until you see the “build number” option. Continuously tap this option seven times to enable USB debugging.

When done, navigate to the System option (still on the Settings app). Here, you should see a new option listed as “Developer Options.”

Open the Developer Options and scroll down till you see the USB Debugging option. Tap on it to enable USB debugging on your phone. See the image below.

Starting ADB Server on Linux
To start using USB debugging, we need to start the ADB server on our PC. Execute the command below.
adb start-server

Once done, connect your Android phone to your PC via the USB cable. If you are doing this for the first time, you will see a pop-up notification on your phone prompting you to whether to allow USB debugging. Select the option “Always allow from this computer.”
Optional: Connecting to USB Debugging Wirelessly.
You might need to use USB debugging, but you don’t want to use a USB cable to create a physical connection. In such a situation, you cannot connect to your phone wirelessly. Follow the steps below.
- Connect your phone to the same network your PC is connected to.
- Get the IP address assigned to your phone. You can do this from the Settings app on your phone or the router connection page. If you have a little background in computer security, you can also use a tool like Nmap. In our case, we easily accessed it from the Settings app.

- After retrieving the IP, execute the command on your PC.
adb tcpip [port_number]
e.g.
adb tcpip 5555
That will allow us to connect to our phone via port 5555. You can use any other port but not greater than 65535. We highly recommend using a port over 1000.
- To connect to your phone device wirelessly, execute the command below on your PC.
adb connect [phone_ip_address:port_number]
e.g.
adb connect 192.168.1.44:5555

From this point, you can now proceed to execute commands on your system.
adb kill-server
sudo adb start-server
sudo adb devices
To keep things simple, use one ADB connection. For example, if you connect wirelessly, don’t connect again via the USB cable. If you do that, you will encounter the error, “adb: error: failed to get feature set: more than one device/emulator.”
Using ADB on Linux
If you have used Linux systems for a while, you know that most utilities will change the Terminal prompt when running them. That’s not the case with ADB. The Terminal prompt will stay the same (probably pointing to your current working directory). And that’ is where you will execute your ADB commands. However, there is still the adb shell option, but we will look at that at end of this post.
Let’s look at some activities that you can carry out with ADB.
Transferring Files with ADB
Before we dive deeper, there are a few things you need to understand. The files you see on your phone are all located in the /storage/sdcard0 directory. If you insert an external SD card, it will be registered as /storage/sdcard1.
To copy a file from your computer to the Downloads folder on your phone, use the syntax below.
adb push [path_to_file] /storage/sdcard0/Downloads
E.g.
adb push test_dir /storage/sdcard0/Downloads

If the transfer was successful, you should see an output like file pushed.
To copy a file from the phone to our PC, we will use the pull command. For example, inside the test_dir directory that we copied to our phone, there was a file called image.jpg. Let’s copy this file from our phone to our PC. We will use the syntax below.
adb pull [path_to_file_on_the_phone]
E.g.
adb pull /storage/sdcard0/Downloads/test_dir/image.jpg

Installing and Uninstalling Applications
This is one of the most interesting features that fascinates me when using ADB. You have the power to remove applications that you cannot remove when using your normal phone UI.
To install an application, you first need to download that .apk file on your PC. Use the syntax below.
adb install [path_to_apk_file]
E.g.
adb install ProtonVPN_Android_App.apk

If the installation was successful, you will see the message Success on the Terminal.
To uninstall any application, we first need to list all installed applications. Execute the command below.
adb shell pm list packages
You will see a long list of all apps installed on your phone. The names might be quite complicated but you should still be able to spot your target app with ease.

To uninstall any app, use the syntax below.
adb uninstall --user 0 [application_name]
E.g.
adb uninstall --user 0 ch.protonvpn.android

package: prefix.View Logs
To view the logs on your android phone, execute the command below.
adb logcat
The output might be a little complex for the average user. However, if you are a developer or a security analyst, these logs are quite useful.

Access the Phone Screen on the PC
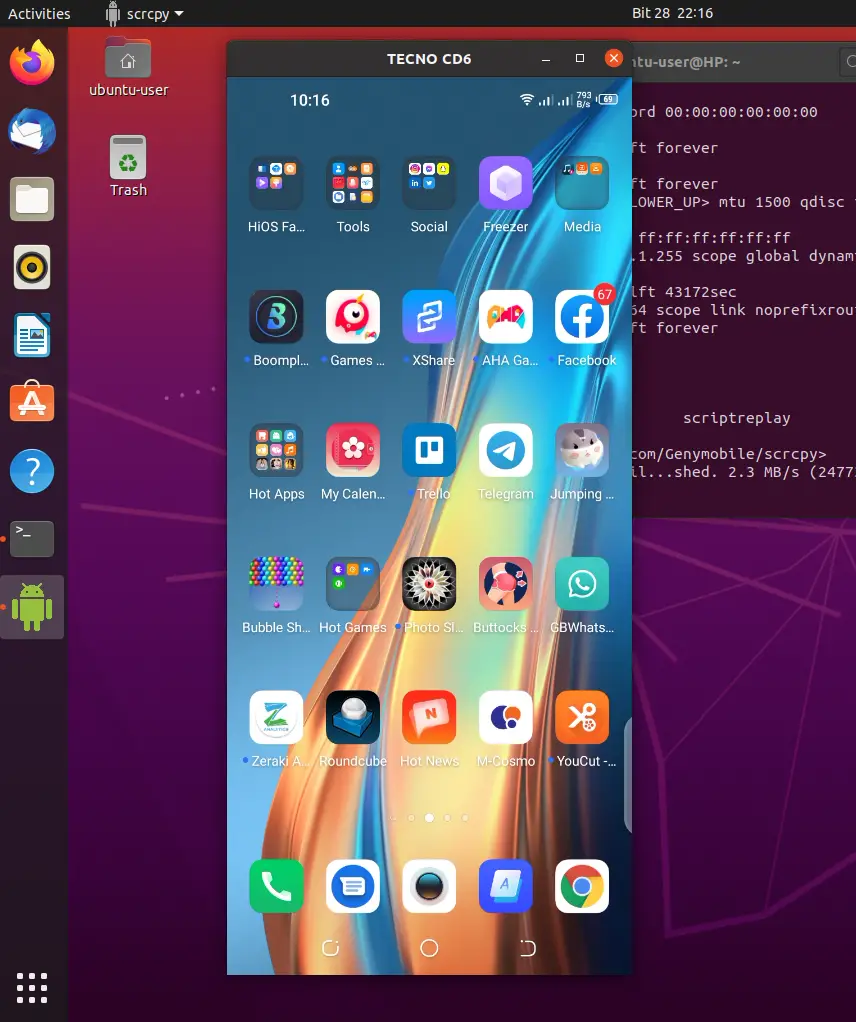
Another interesting feature you can use with ADB is accessing your phone’s screen on your PC. However, for this one, we need to install a package called scrcpy. If you are running any Debian/ Ubuntu-based distribution, execute the command below to install scrcpy.
sudo apt install scrcpy

To access your phones’ screen on the PC, run the scrcpy command on the Terminal.
scrcpy

Using the ADB Shell
In the previous section, we have looked at various practical situations where you can use ADB. However, you will notice that we were executing all these commands in our working directory. That might not give you full access to the phone as you might want. And that’s where the adb shell command comes in. As the name states, these commands opens a direct shell to your phone.
adb shell

Here, you can run any Linux commands just like you would on the Terminal. What you can do with this simple shell is unimaginable.
Conclusion
Up to this point, we hope you now have a good understanding of the Android Debug Bridge (ADB) and how to install ADB tools on your Linux system. ADB gives you more privilege over your phone, allowing you to access more resources and features. Did you encounter any errors when installing or working with ADB? If so, please don’t hesitate to leave a comment below.


Connecting wirelessly as described here does not work with Android 5.1 and a Debian based OS.# adb tcpip 5555
error: no devices/emulators found
# adb connect 192.168.1.2:5555
failed to connect to ‘192.168.1.2:5555’: Connection refused
Good tutorial