[powerkit_collapsible title=”Not using Debian 10/11? Choose a different version or distro.”]
Ubuntu 22.04 or 20.04
CentOS 8
[/powerkit_collapsible]
xRDP is a free and open-source implementation of Windows Remote Desktop Protocol (RDP) that started in 2004.
With RDP, you can connect to another computer over a network and control it through its graphical user interface, and use it almost as if you were sitting right in front of it. You also control the remote machine from operating systems that support RDP, which includes Windows, Mac, Linux, Android, and iOS.
xRDP allows non-Microsoft operating systems such as Linux and BSD to provide a fully functional RDP-compliant remote desktop environment.
The xRDP server is full-screen and doesn’t require any special client-side software to be installed. xRDP allows RDP clients to present an X Windows desktop to the user. It works by bridging graphics from an X Windows system (Unix-like OS) to the client (the one receiving commands) and relaying controls back from the client to X.
This tutorial explains how to install xRDP on a remote machine running Debian 10 or Debian 11, how to install multiple desktop environments on the remote machine, how to connect to it from different operating systems, how to fix a few common issues, and a few optimizations you can make to possibly improve a laggy connection.
[powerkit_alert type=”info” dismissible=”false” multiline=”false”]
For an alternative remote desktop technology for Debian, you can use Chrome Remote Desktop. You can see our guide here – the tutorial was written with Ubuntu 20.04 in mind. However, it is the exact same setup procedure for Debian.
[/powerkit_alert]
Table of Contents
- Prerequisites
- Step 1 – Install xRDP on Debian 10/11
- Step 2 – Install Your Preferred Desktop Environment
- Install GNOME Desktop Environment
- Install XFCE Desktop Environment
- Install MATE Desktop Environment
- Install KDE Plasma Desktop Environment
- Install LXQt Desktop Environment
- Install LXDE Desktop Environment
- Install Cinnamon Desktop Environment
- Installing Budgie Desktop Environment
- Installing Openbox
- Switching Between Desktop Environments
- Step 3 – Connecting to Your Debian 10/11 Machine using Remote Desktop Environment
- Fix: Authentication Required Prompt
- xRDP Connection Slow/Laggy
- Frequent Errors
- Conclusion
Prerequisites
- Debian 10 or Debian 11 server with a minimum of 2GB, but 4GB is better. (You can check out my review of Contabo.com’s cheap and high-resource VPS if you’re interested, or other high-ram VPS providers)
- A
non-root sudo user. Being a sudo user gives you to have administrative privileges without having to log in as a root user. We do not recommend logging in as a root user because when you’re logged in as a root user, all your applications are running with root privileges. That makes your system vulnerable to outside and inside threats.
Update package index:
sudo apt update
Step 1 – Install xRDP on Debian 10/11
To install xRDP on Debian 10/11 run the following command:
sudo apt -y install xrdp
Once installed, you can check the status of xRDP by running:
sudo systemctl status xrdp
The output should look something like this:
● xrdp.service - xrdp daemon
   Loaded: loaded (/lib/systemd/system/xrdp.service; enabled; vendor preset: enabled)
   Active: active (running) since Thu 2021-03-11 13:47:22 UTC; 59s ago
     Docs: man:xrdp(8)
           man:xrdp.ini(5)
 Main PID: 3488 (xrdp)
    Tasks: 1 (limit: 4717)
   Memory: 1.1M
   CGroup: /system.slice/xrdp.service
           └─3488 /usr/sbin/xrdp

Mar 11 13:47:21 xrdp xrdp[3487]: (3487)(140439008667456)[DEBUG] Testing if xrdp can listen on 0.0.0.0 port 3389.
Mar 11 13:47:21 xrdp xrdp[3487]: (3487)(140439008667456)[DEBUG] Closed socket 7 (AF_INET6 :: port 3389)
Mar 11 13:47:21 xrdp systemd[1]: xrdp.service: Can't open PID file /run/xrdp/xrdp.pid (yet?) after start: No such file or directory
Mar 11 13:47:22 xrdp systemd[1]: Started xrdp daemon.
Mar 11 13:47:22 xrdp systemd[1]: /lib/systemd/system/xrdp.service:8: PIDFile= references path below legacy directory /var/run/, updating /var/run/xrdp/xrdp.pid → /run/xrdp/xrdp.pid; please update the unit file accordingly.
Mar 11 13:47:22 xrdp systemd[1]: /lib/systemd/system/xrdp.service:8: PIDFile= references path below legacy directory /var/run/, updating /var/run/xrdp/xrdp.pid → /run/xrdp/xrdp.pid; please update the unit file accordingly.
Mar 11 13:47:22 xrdp systemd[1]: /lib/systemd/system/xrdp.service:8: PIDFile= references path below legacy directory /var/run/, updating /var/run/xrdp/xrdp.pid → /run/xrdp/xrdp.pid; please update the unit file accordingly.
Mar 11 13:47:23 xrdp xrdp[3488]: (3488)(140439008667456)[INFO ] starting xrdp with pid 3488
Mar 11 13:47:23 xrdp xrdp[3488]: (3488)(140439008667456)[INFO ] listening to port 3389 on 0.0.0.0
Mar 11 13:47:25 xrdp systemd[1]: /lib/systemd/system/xrdp.service:8: PIDFile= references path below legacy directory /var/run/, updating /var/run/xrdp/xrdp.pid → /run/xrdp/xrdp.pid; please update the unit file accordingly.
xRDP uses the /etc/ssl/private/ssl-cert-snakeoil.key file, which belongs to the ssl-cert group. As such, we need to add the xRDP user to that group:
sudo adduser xrdp ssl-cert
Configure Firewall for xRDP
The Remote Desktop Protocol uses port 3389 by default.
If you’re using a firewall, then you’ll need to allow that port. We’ll assume you’re using UFW.
If you want to allow access via RDP from anywhere, then run the following command:
sudo ufw allow 3389
Allow Specific IP Range
If you want to allow access from a specific IP address or IP range, run the following command, replacing the example range 1.2.3.4/32 with the one you want:
sudo ufw allow from 1.2.3.4/32 to any port 3389
Configuring xRDP
Configuration files for xRDP are located in /etc/xrdp. The main configuration file is /etc/xrdp/xrdp.ini.
By default, you don’t need to configure anything, but it’s there if you need to customize xRDP. You can read about how to configure it on the Linux man page for xrdp.ini
Keep in mind to restart xRDP after making any changes so they get applied:
sudo systemctl restart xrdp
Step 2 – Install Your Preferred Desktop Environment
To control the remote machine like a desktop, you’ll need to install a desktop environment.
Desktop environments set Linux apart from Windows and macOS, where you’re stuck with the same GUI. However, in each Linux distribution, you can take advantage of more than one desktop environment.
A desktop environment combines various graphical components like the file manager and mouse pointer to make up a GUI. Users can not only choose and install their favorite desktop environment. They can even install more than one desktop environment and choose a different one each time they log in.
If you’ve installed xRDP but haven’t installed a desktop environment, you can still connect, but after logging in, you’ll see just the console:

Install GNOME Desktop Environment
GNOME is one of the most popular, free, and open-source desktop environments. It mainly targets Linux systems but can also run on BSD. GNOME is an excellent alternative to proprietary options like KDE.
What makes GNOME popular is that it’s built on the idea of using multiple workspaces and managing them dynamically. GNOME allows users a lot of flexibility in terms of the desktop interface. They can even make it look like macOS or Windows.
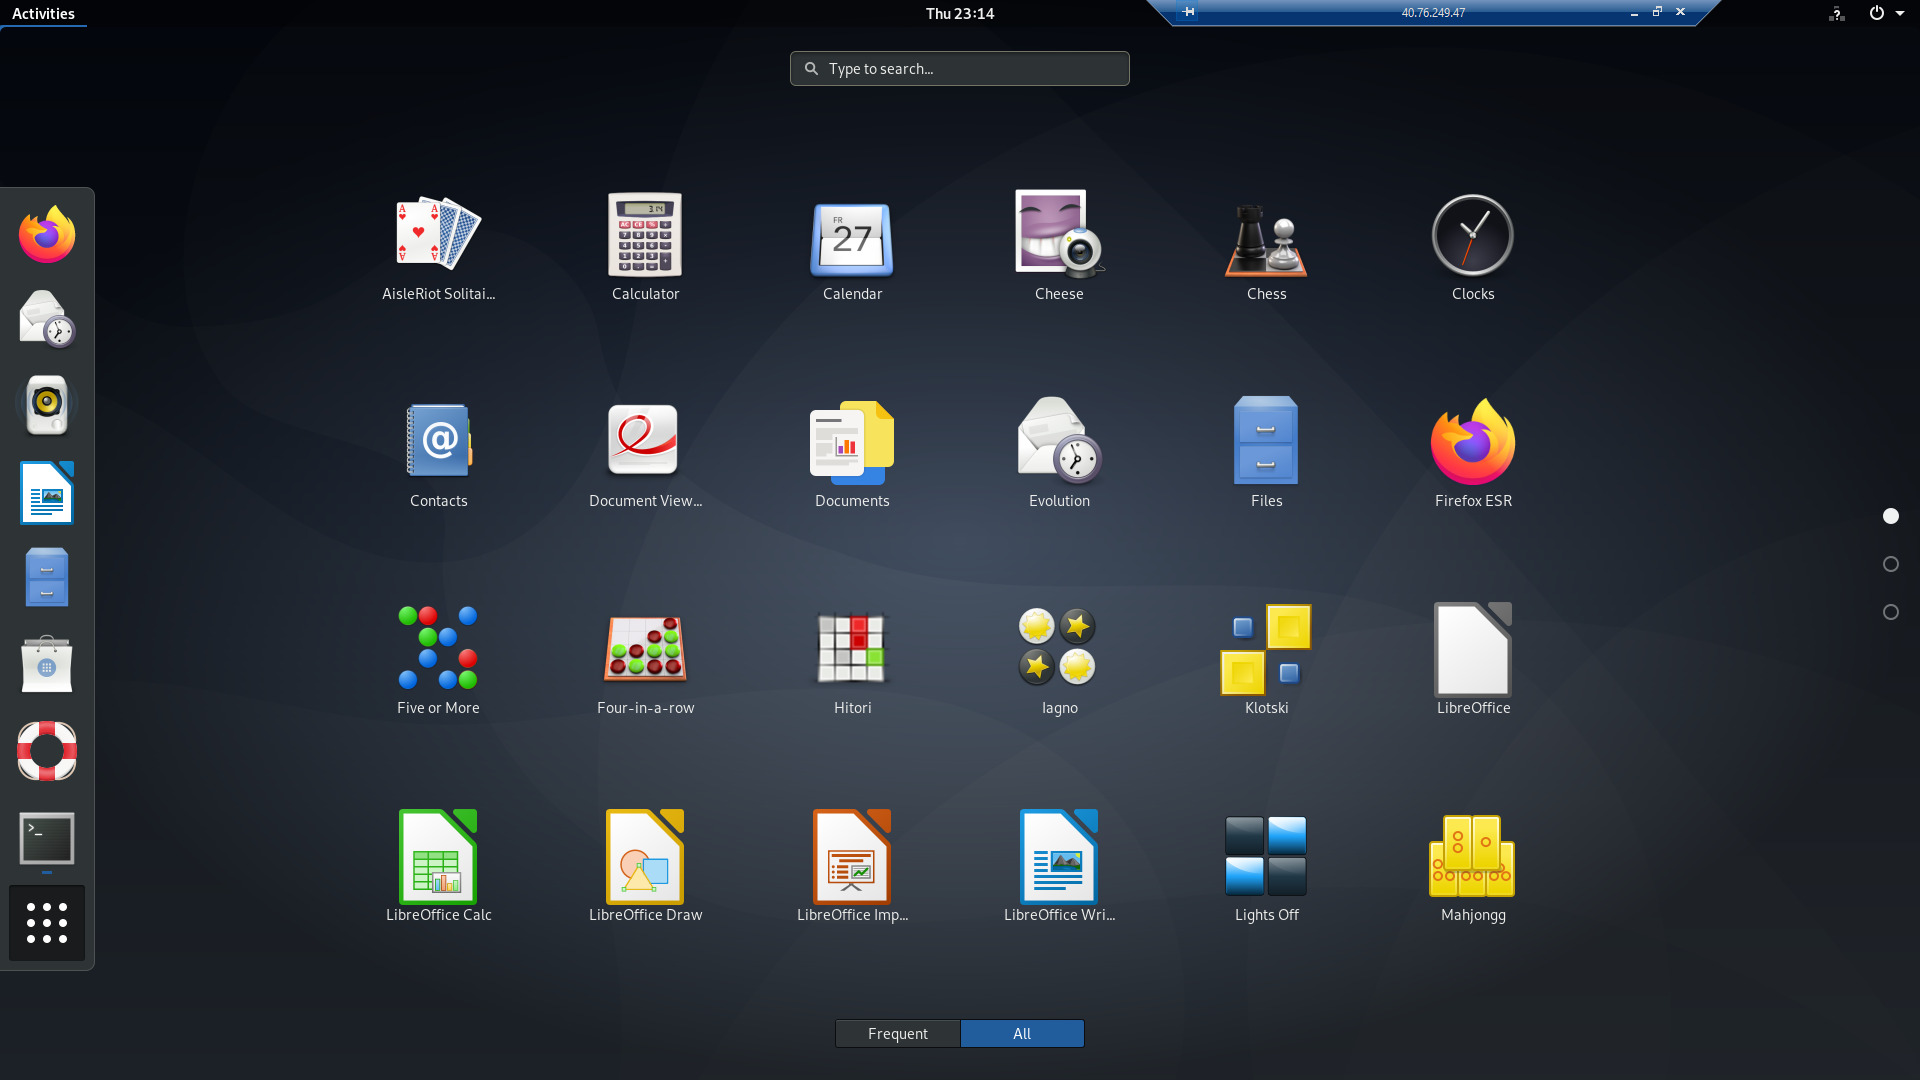
To install GNOME, run the following command:
sudo apt-get install task-gnome-desktop
You can read more about GNOME for Debian here: https://wiki.debian.org/Gnome
Install XFCE Desktop Environment
Xfce is one of the most lightweight desktop environments for Unix-like operating systems. It’s built to be fast, lightweight, user-friendly, and visually attractive.
Since Xfce embodies the Unix philosophy of reusability and modularity, it consists of separate packages that come together as a desktop environment. Users can select packages according to their needs and preferences.
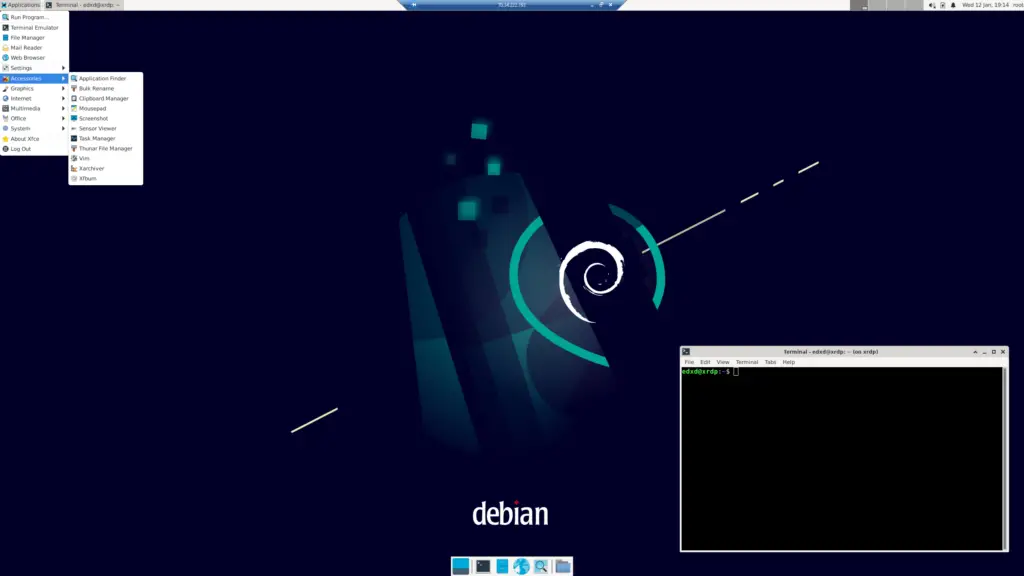
To install XFCE, run the following command:
sudo apt install task-xfce-desktop
You can read more about XFCE for Debian here: https://wiki.debian.org/Xfce
Install MATE Desktop Environment
MATE is the continuation of GNOME 2, which was renamed MATE to avoid confusion with GNOME. The idea of MATE was born after the classic menu and taskbar were replaced in GNOME 3, which prompted unrest amongst the GNOME patriots. Several Linux distributions, including Debian, Fedora, and Linux Mint, have MATE available via the official repositories.

To install MATE Desktop run the following command:
sudo apt install task-mate-desktop
You can read more about MATE for Debian here: https://wiki.debian.org/MATE
Install KDE Plasma Desktop Environment
KDE Plasma is the fifth and current version of KDE’s graphical workspace environments, primarily for Linux systems. It’s a user interface technology that can run on numerous devices including desktops, notebooks, tablets, smartphones, and even embedded devices.
KDE Plasma also introduced a new theme called Breeze. KDE’s graphical interface has migrated completely to QML (which uses OpenGL for hardware acceleration). That’s why KDE Plasma offers better performance alongside less power consumption.

To install KDE Plasma Desktop, run the following command:
sudo apt install task-kde-desktop
You can read more about KDE Plasma for Debian here: https://wiki.debian.org/KDE
Install LXQt Desktop Environment
LXQt is among the minimalistic and lightweight desktop environments in Linux. It’s an excellent alternative to LXDE and provides the same lightweight, minimalistic environment. The only difference between the two is that LXQt uses Qt (standard toolkit for KDE) while LXDE uses GTK (standard toolkit for GNOME).
LXQt is the default desktop environment in many Linux distributions and can be installed as an alternative desktop in Debian and OpenSUSE.

To install LXQt run the following command:
sudo apt install task-lxqt-desktop
While installing LXQt, you’ll be asked to select your preferred window manager. Here, I selected Openbox. You can read more about Window Managers here: https://wiki.debian.org/WindowManager
You can read more about LXQt for Debian here: https://wiki.debian.org/LXQt
Install LXDE Desktop Environment
LXDE (Lightweight X11 Desktop Environment) is another free desktop environment that requires low resources. LXDE uses less RAM and CPU, and it’s designed especially Phoronix for cloud computers with low hardware specifications.
According to some tests conducted by Phoronix in 2010, LXDE 0.5 has the lowest memory consumption. Phoronix tested the five most popular desktop environments, including GNOME 2.29, KDE Plasma desktop 4.4, and XFCE 4.6.

To install LXDE, run the following command:
sudo apt install task-lxde-desktop
You can read more about LXDE for Debian here: https://wiki.debian.org/LXDE
Install Cinnamon Desktop Environment
The release of GNOME 3 brought about major unrest among GNOME loyalists because it replaced the traditional desktop metaphor or GNOME 2. That gave rise to two different desktop environments that maintained the convention, MATE (GNOME 2 continuation) and Cinnamon (GNOME 3 with traditional desktop metaphor). It’s the primary desktop environment for Linux Mint and comes as an optional desktop in other Linux distributions and Unix-like OS.

To install Cinnamon Desktop, run the following command:\
sudo apt install task-cinnamon-desktop
There doesn’t seem to be an article for Cinnamon Desktop on https://wiki.debian.org
Installing Budgie Desktop Environment
Budgie is another desktop environment that’s developed using GNOME technologies like GTK (3.x and further). Budgie’s design is focused on simplicity and minimalism. Amongst other desktop environments like KDE and GNOME, Budgie tends to be lightweight and takes less storage space.
To install Budgie, run the following command:
sudo apt install budgie-desktop
Installing Openbox
Unlike GNOME, LXDE, and MATE, Openbox is not exactly a desktop environment. It’s a free and stacking windows manager for X Windows systems. A windows manager is the program that divides your screen into the boxes where the program runs.
Other popular desktop environments like LXDE and LXQt (the two most light-weight desktop environments) also use Openbox. It’s designed to be fast, small, and fully compliant with ICCCM (Inte-Client Communication Conventions Manual) and EWMH (Extended Window Manager Hints).
If not already installed along with other desktop environments, such as LXQt, then you can install it by itself. It can be useful since you can use it as a stripped-down desktop environment if you’re trying to reduce resource usage as much as possible.

To install Openbox, run the following command:
sudo apt install openbox
You can read more about LXQt for Debian here: https://wiki.debian.org/Openbox
Switching Between Desktop Environments
You can install multiple desktop environments and switch between them.
The screenshots I’ve provided above are from all the desktop environments listed above, all installed on the same server.
To switch between desktop environments, run the following command:
sudo update-alternatives --config x-session-manager
You’ll be presented with a list of all the available desktop environments installed on the system, and you can select which one you want to be enabled:
There are 10 choices for the alternative x-session-manager (providing /usr/bin/x-session-manager).

  Selection    Path                       Priority   Status
------------------------------------------------------------
  0            /usr/bin/startlxqt          50        auto mode
  1            /usr/bin/cinnamon-session   50        manual mode
  2            /usr/bin/gnome-session      50        manual mode
  3            /usr/bin/lxsession          49        manual mode
  4            /usr/bin/mate-session       50        manual mode
  5            /usr/bin/openbox-session    40        manual mode
  6            /usr/bin/startkde           40        manual mode
  7            /usr/bin/startlxde          50        manual mode
* 8            /usr/bin/startlxqt          50        manual mode
  9            /usr/bin/startxfce4         50        manual mode
  10           /usr/bin/xfce4-session      40        manual mode

Press <enter> to keep the current choice[*], or type selection number: 4
The option marked by the * (asterisk) is the active desktop environment.
You can enter the number corresponding to the desktop environment you want to enable and press Enter.
You don’t need to restart xRDP for the changes to take effect.
Step 3 – Connecting to Your Debian 10/11 Machine using Remote Desktop Environment
If you’ve ever used RDP to connect to a Windows machine, you’ll know you usually provide the IP/hostname, username, and password to the remote desktop client, after which you’re logged into the remote machine.
In this case, you’ll fill in the IP/hostname in the remote desktop client app, and then you’ll be taken to a login screen on the remote machine, where you can fill in your username/password.
The login screen will look something like this:

Connect from Windows
Windows comes with the Remote Desktop Connection app already installed.
To connect to your remote desktop, search for the Remote Desktop Connection app and run it.
In the app window, under Computer, fill in the IP or hostname of your remote machine and click Connect. You should then be presented with the login screen from the remote desktop, where you can fill in your username and password.

Connect from OSX
First, download the Microsoft Remote Desktop App from the Mac App Store.
After you run it, you’ll see a button to Add PC – which means to add a configuration for connecting to a new remote desktop.
Click on it, and you’ll see a prompt where you can fill in some details. The minimum needed is the PC name, which is the IP or hostname of the remote machine.
After you’ve added it and connected to it, you’ll be presented with the login screen where you can enter your username/password.

Connect from Linux
Multiple well-known remote desktop clients are connecting from Linux, but we’ll discuss Remmina. It’s very popular, and it’s the one I use.
Other popular solutions are rdesktop, FreeRDP, or Vinagre.
You can check the following article to see how to install Remmina on your distro https://remmina.org/how-to-install-remmina/
When you launch it, you can create a new desktop connection profile by clicking the + (plus) icon in the top left corner:

After which, just give it a name (for easy reference), and select RDP – Remote Desktop Protocol in the Protocol dropdown.
In the Server section, fill in the IP or hostname of your remote machine and click Connect (to connect) or Save and Connect (to save the connection profile and immediately connect to the server).
Then, you’ll be taken to the login screen, where you can fill in the username and password.
Connect from iOS/Android
To connect to your remote machine via RDP, you’ll need to download the Microsoft Remote Desktop App.
- For Android, the app is Remote Desktop 8
- For iOS, the app is Remote Desktop Mobile
After it’s installed and you run it, you’ll see a button to Add Desktop. Tap this to fill in the connection details for your remote machine.
The minimum you need to add is the IP or hostname for your remote machine, and tap SAVE. After which, you can tap on the newly created desktop, and the connection should start, and the login screen displayed.

Fix: Authentication Required Prompt
On some desktop environments, some nagging prompts require additional authentication.
You can dismiss them and continue the session without it popping up again, but that is a temporary fix, as it will pop up later.
Debian uses a framework called Polkit, which handles application authorization. It captures actions that the user is attempting to perform and checks if they are authorized or if they aren’t and need to authenticate for them to be authorized. Polkit reads some policy files to determine this.
What we’ll do is create such a policy file ourselves.
Create and edit the file with your preferred text editor.
sudo nano /etc/polkit-1/localauthority.conf.d/02-allow-colord.conf
Paste the following:
polkit.addRule(function(action, subject) {
 if ((action.id == "org.freedesktop.color-manager.create-device" ||
 action.id == "org.freedesktop.color-manager.create-profile" ||
 action.id == "org.freedesktop.color-manager.delete-device" ||
 action.id == "org.freedesktop.color-manager.delete-profile" ||
 action.id == "org.freedesktop.color-manager.modify-device" ||
 action.id == "org.freedesktop.color-manager.modify-profile" ||
 action.id == "org.freedesktop.packagekit.system-sources-refresh" || action.id == "org.freedesktop.packagekit.system-network-proxy-configure") &&
 subject.isInGroup("{users}")) {
 return polkit.Result.YES;
 }
});
The above should handle any of the following authentication warnings for users that belong to the user’s group (you can replace users with any other group you prefer).
The following are some common authentication warnings:
1. Authentication is required to refresh the system repositories
I’ve encountered this issue on Cinnamon Desktop.

2. Authentication is required to create a color-managed device
I encountered this issue on GNOME.
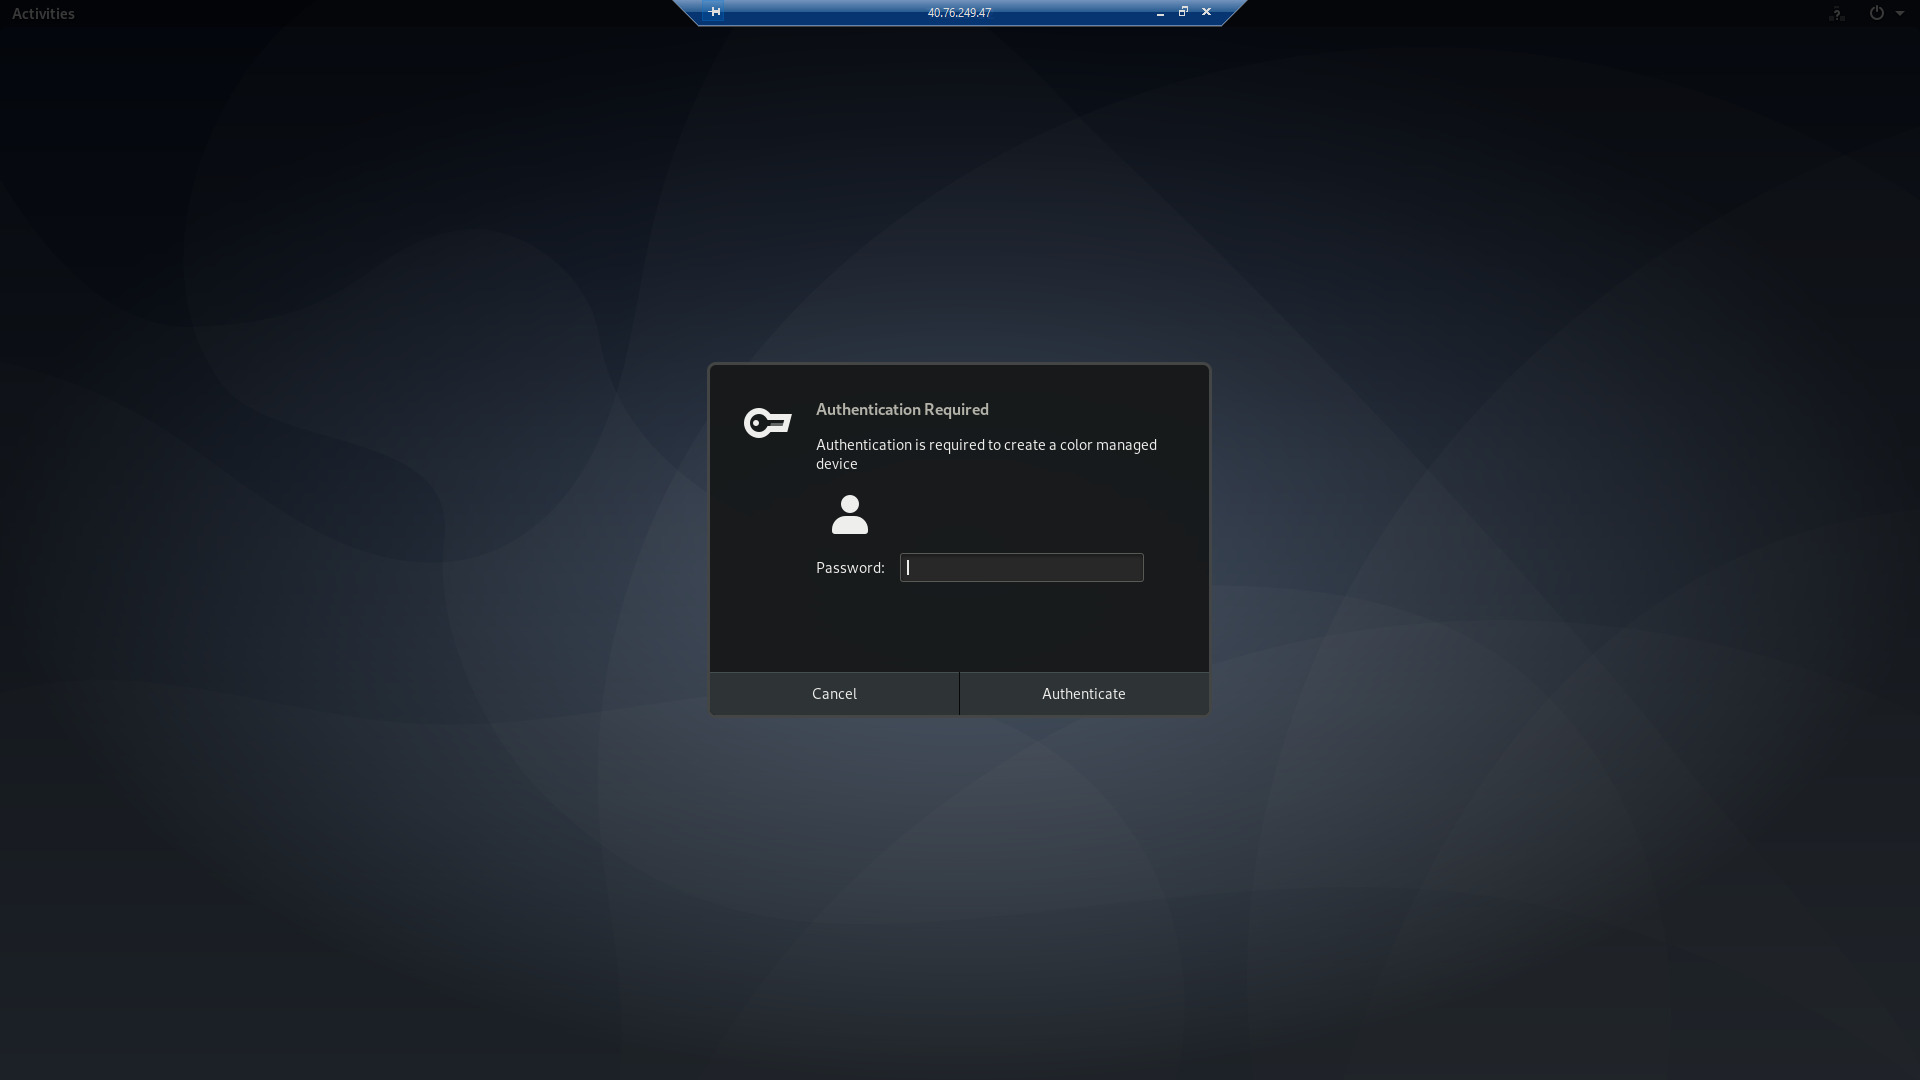
3. Authentication is required to set the network proxy used for downloading software
I encountered this issue on the KDE Plasma Desktop.

xRDP Connection Slow/Laggy
If you’re experiencing a slow/laggy connection, then some of the best options to improve performance include:
Using a lightweight desktop environment
The most lightweight desktop environment among the ones listed above is Openbox. Other lightweight environments are LXQt, LXDE, and XFCE.
Improving Performance when connecting from Windows
Improve performance by reducing color depth & visual styles
You can do this right before connecting to the server.
In the Display tab, you can choose color depth. The lower it is, the faster the connection should be. You should test this yourself until you find what works for you.
In the Experience tab, you can select an option from the Performance dropdown. The higher in the list, the more performance you get, and the more visual styles are removed.
Also, you’ll want to check the Persistent bitmap caching in the Experience tab.

Set Remote Desktop Connection Process Priority to Realtime
The next option is setting the RDC process priority to Realtime in Task Manager.
To do this, open Task Manager, locate Remote Desktop Connection->(Right-click on it), right-click, and click Go to details. This will take you to the Details tab and highlight mstsc.exe. Right-click on it and hover over Set priority->Realtime.

Improving Performance when connecting from Linux
Improve performance by reducing color depth & visual styles
When creating a remote desktop connection profile, in the Basic tab, in the Color depth dropdown, reduce the color depth to a level you find acceptable.
In the Advanced tab, under Quality, select poorer quality to improve speed.

Set Remote Desktop Connection Process Priority to Realtime
Launch the System Monitor, right-click on Remmina (or the process for the software you’re using for remote desktop connection), and go to Change Priority->Very High.

Frequent Errors
Black Screen / Oh No! Something has gone wrong…
There seems to be an issue with the current versions of xrdp and xorgxrdp available in Debian 11. Instead of a black screen, I was now getting an error along the lines of “Oh No! Something has gone wrong….”
The solution that worked for me is from this comment on the Github issue:
Download the following versions of xorgxrdp and xrdp from https://snapshot.debian.org/:
wget https://snapshot.debian.org/archive/debian/20210302T032219Z/pool/main/x/xorgxrdp/xorgxrdp_0.2.15-1_amd64.deb
wget https://snapshot.debian.org/archive/debian/20210302T032219Z/pool/main/x/xrdp/xrdp_0.9.15-1_amd64.deb
And install them:
sudo apt install ./xorgxrdp_0.2.15-1_amd64.deb
sudo apt install ./xrdp_0.9.15-1_amd64.deb
This should upgrade your existing xordxrdp and xrdp.
Now, when you connect via xRDP, the login screen will probably have Session: LoggingPerLogger selected in the dropdown.
Just select Xorg, click ok, and fill in your username and password.
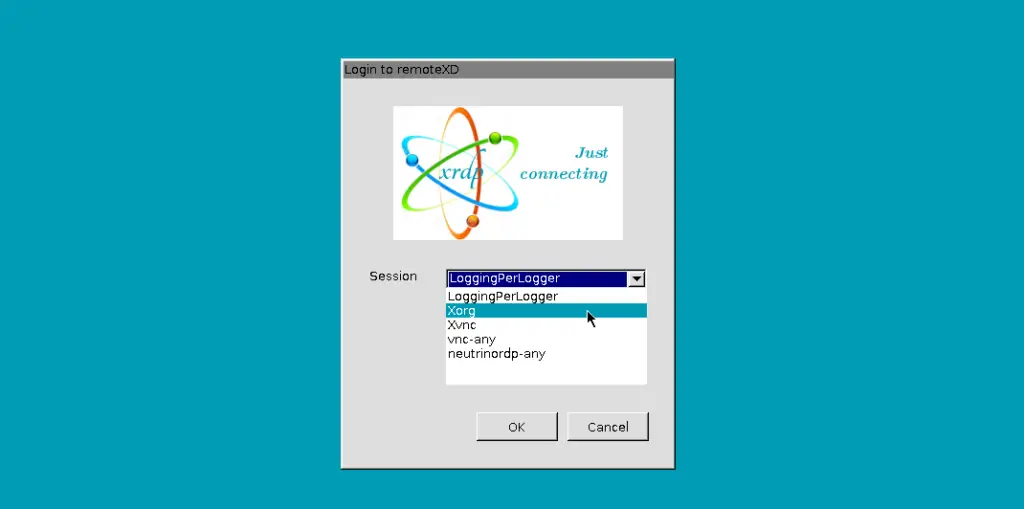
Now, xRDP should work properly. In this case, the issues were with GNOME. After upgrading xorgxrdp and xrdp it works.
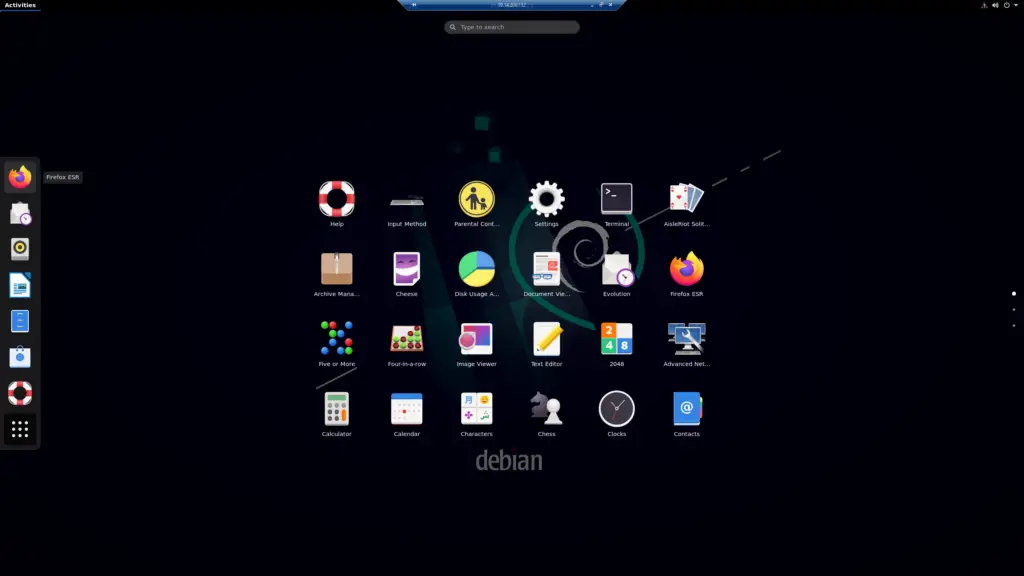
[powerkit_alert type=”info” dismissible=”false” multiline=”false”]
Thanks to Jibun no Kage commenting about this issue.
[/powerkit_alert]
Conclusion
Hopefully, you’ve managed to install xRDP on your Debian 10/11 remote machine, connected to it using your preferred desktop environment, and optimized the connection for speed.
If you encounter any issues, then feel free to leave a comment or contact us, and we’ll get back to you as soon as possible.





Got this workiing when I used Xfce, but when I changed to Gnome, i get only a black screen. And now, worse, when I login to Gnome on the actual server, I get nothing but a black screen as well. HELP
Hi! Thanks for letting us know about the issue.
I tried a few things and I think I found a working solution and updated the tutorial by adding this section https://bytexd.com/xrdp-debian/#black-screen-oh-no-something-has-gone-wrong
Let me know if it works for you?
This looks awesome. But just as I got the article, said machine’s power supply got busted. Local pc shop does not have stock. Just came back from them. This project does not seem to get traction. I bought an entry level ryzen 5 gaming rig to do aggregation of big data, then pumping it into a mongo cluster
Hi Ben,
Thanks for replying. I’m really sorry to hear about your power supply failure. It must be one annoying setback.
I hope you hang in there and it works out!
Should you try this again and still encounter issues please don’t hesitate to leave a comment/send an email/social media, and I’ll try to assist as soon as I can.
Wget can’t find the first file at this time..1/9/2023. tried earlier one and it complained about libc6:amd64. I too get the black screen. Note: this one is on Bullseye on Raspberry Pi4.
Solution did work on Bullseye I loaded on a Wyse thin client machine.
So close. It feels like I’m on the right track with this article.
ben@Lab02:~$ sudo apt install ./xorgxrdp_0.2.15-1_amd64.deb
[sudo] password for ben:
Reading package lists… Done
Building dependency tree… Done
Reading state information… Done
Note, selecting ‘xorgxrdp’ instead of ‘./xorgxrdp_0.2.15-1_amd64.deb’
Some packages could not be installed. This may mean that you have
requested an impossible situation or if you are using the unstable
distribution that some required packages have not yet been created
or been moved out of Incoming.
The following information may help to resolve the situation:
The following packages have unmet dependencies:
This is on a fresh install of Ubuntu Budgie 22.04. Out of the box. I’ve enabled ssh, then moved to xrdp and ran into this issue.
[duplicate comment]
Hi. I got this to work using this https://bytexd.com/switch-desktop-environments-ubuntu-debian-commandline/#switching-between-desktop-environments
(Also on a fresh Ubuntu 22.04 just with Budgie and xRDP)
You just have to edit a file. Let me know if it works?
I appreciate the work of this author. I believe I have encountered this issue with GNOME and Bullseye.
I am just going to reinstall Debian with Xfce because, on principle, it shouldn’t be necessary to install with such a specific URL to get remote access.
I am primarily a Win user and have been flummoxed for decades whenever I try to work in linux. This kind of bug stinks and if Microsoft had the same problem there would be endless ridicule.
Hi Pete! I’m glad the article was useful to you! Thank you very much for the kind words. Your comment is very much appreciated!
This is amazing. Thank you!
Hi! Thanks for commenting! Glad to help!
**canceled** sorry
Many thanks, i spent the day because “Oh no somethings gone wrong” with gnome desktop.
An Update of xrdp was usefull.
https://snapshot.debian.org/archive/debian/20210302T032219Z/pool/main/x/xorgxrdp/xorgxrdp_0.2.15-1_amd64.deb
https://snapshot.debian.org/archive/debian/20210302T032219Z/pool/main/x/xrdp/xrdp_0.9.15-1_amd64.deb
Just for info, i’m on arm core, rename “amd64” with “arm64” is ok, the files exist and it works !.
Thanks again, great article and very complete. There is to the command to switch desktops !!!
There is a little error on “install budgie”.
i think it’s : budgie-deskop
Hi! Thanks for commenting. I can’t believe I missed that! Thanks so much for pointing that out! It’s fixed now.
Thanks for this man, I was struggling with this for a long time. I took an ovh server with Debian 11 and I only administrate it with CLI, now I can play with a GUI 🙂
Hi! Thank you for commenting. Glad to help! I can relate – the first time I managed to get a remote desktop to work on Linux was also with an OVH server.
Hello,
Thanks for the article.
I am on Debian 11 (XFCE, lightdm) and followed your steps. I got the black screen.
I tried all your suggested solutions before upgrading xrdp and xorgxrdp.
I did not follow this last solution because I just detected that xorgxrdp was not installed in my system. In fact, have checked actual and previous xrdp packages and all of them recommend xorgxrdp but do not install it.
So my piece of advice is that you should add xorgrdp installation in step 1 (if X.org is being used, of course):
sudo apt install xrdp xorgxrdp
How is that you did not say anything about xorgxrdp at first? ;-D
Regards,
Josep
Hi Josep,
Thank you for commenting and adding your solution. I apologize for not mentioning that in step 1.
I don’t recall the reason I didn’t add that solution in step 1. I think it seemed like something optional, and that doesn’t always happen at the time.
I’ll run through the steps again to refresh my memory and I’ll add this at step 1.
Thanks again for your feedback. It’s very much appreciated!
I installed xrpd and Xfce on a debian remote server. I can access the server via windows remote desktop. However, after installation, I cannot access the server via the console (ssh from terminal). When I attempt to do so, I receive the following response: ” ssh: Could not resolve hostname do: No address associated with hostname”
Note:
I am using the terminal via WSL.
I cannot ping the remote server either.
Prior to installing xrpd and Xfce, I was able to access remote server via console.
Thank you! Updating xorgxrdp and xrdp worked for me on Deb 11
I went through all the steps including the ‘Oh no / Black screen’ but as soon as I open an RDP connection and login the RDP connection drops. No message, just closes instantly.
After having spent countless hours trying many, if not all, procedures found around the net … this actually WORKS on Debian with Gnome. THANKS, HUGE THANKS EdXD for sharing …
Oh, wow. Thanks so much for the kind words. I’m so happy to hear that! Much appreciated!
First Great article; thanks.
My problem is that I can start applications on the remote desktop window, but the applications start on the physical hardware attached monitor; not on the RDP window. I hope it is something simple that I missed.
Debian 12, lxsession, Windows 11
Also, the local desktop and the rdp desktop don’t look the same–?