You probably want to launch your own website but you’re stuck at the part where you have to choose the type of web hosting, and you’ve come across non-intuitive terms like shared hosting, VPS (Virtual Private Server), dedicated server and others.
On top of that, each type of web hosting has various technical specs, and you don’t know how they apply to your specific use case.
Web hosting terms are confusing when you’re just starting out, but I’m hoping this article will help you understand them. You just need some foundational info on web hosting, to give you the basic intuition, and then it’ll all make sense.
In this article, we’ll discuss the different types of web hosting and their key features so that you can make an informed decision when choosing a web host for your website.
There are several types of web hosting available, each with its own unique features and advantages.
Choosing the right web hosting is important for a website, as it can impact its performance, security, and overall success. Or if you’re looking to host something else other than a website, like some other application, you need to know what type of web hosting you need and what specs it should have.
You also don’t want to choose a web hosting package with more resources than you need, that’s likely more expensive. You’ll just be wasting money then.
Key Takeaways on Different Types of Web Hosting
In short, there are several types of web hosting available, each with its own unique features and advantages.
- Shared hosting is a budget-friendly web hosting option that allows multiple websites to share the same server and its resources. Ideal for beginners or small websites, it’s a convenient way to establish an online presence without much technical knowledge or a high investment.
- VPS hosting (Virtual Private Server) is a step above shared hosting where your website resides in its own partitioned server space. It offers more control, flexibility, and improved performance, making it a suitable choice for growing businesses or websites with higher traffic.
- Cloud hosting is a modern hosting solution that distributes your website across multiple connected servers in the cloud. This type of hosting is highly scalable and reliable, making it perfect for websites that need to handle heavy traffic or sudden spikes in visitors.
- Dedicated hosting provides your website with its own exclusive server. Offering the highest level of performance, control, and security, it’s an excellent choice for large businesses and high-traffic websites where resources and privacy are paramount.
- Managed hosting is a hands-off type of web hosting where the hosting provider takes care of all server-related tasks. From system updates to security patches, this service is ideal for businesses that prefer to focus on their core operations and leave the server management to experts.
- Colocation hosting is a unique hosting solution where you provide your own server and rent physical space in a data center. The provider ensures your server’s security, power, cooling, and internet connection. This option is suitable for organizations that own their servers but require the advanced infrastructure of a data center.
- Reseller hosting is a form of web hosting that allows you to purchase hosting services in bulk and then resell them to your own clients. It’s an option for web designers, developers, or business owners who want to offer hosting as part of their services. This method provides an additional revenue stream, and it also allows you to control the hosting environment for your clients’ websites.
How Web Hosting Works – Summary
Web hosting refers to the process of storing and maintaining a website’s data and files on a server, allowing it to be accessible to the public through the internet.
- When a user wants to view a website, they enter the website’s domain name (such as www.example.com) into their web browser.
- The browser then sends a request to the server where the website is stored, and the server sends the website back to the user’s browser, which displays it on their screen.
Web hosting companies provide the servers and technology that enable this process to happen.
When a business or individual buys web hosting, they are essentially renting space on one of the web host’s servers, where they can store their website’s data and files. This allows the website to be accessible to anyone who wants to visit it.
1. Shared Web Hosting
Shared hosting is an excellent starting point for small websites, personal blogs, or businesses that are just beginning to establish their online presence.
Shared hosting means that it allows multiple websites to use the same server and its resources. That’s why it’s called “shared”, because you share resources.
Your website is still safe and isolated from other users sharing the server, so you don’t need to worry about them.
It’s like living in an apartment building where everyone shares the common utilities.
The hosting provider is responsible for managing the server, which includes running the server software, installing security updates, and providing technical support.
How Do You Use Shared Hosting
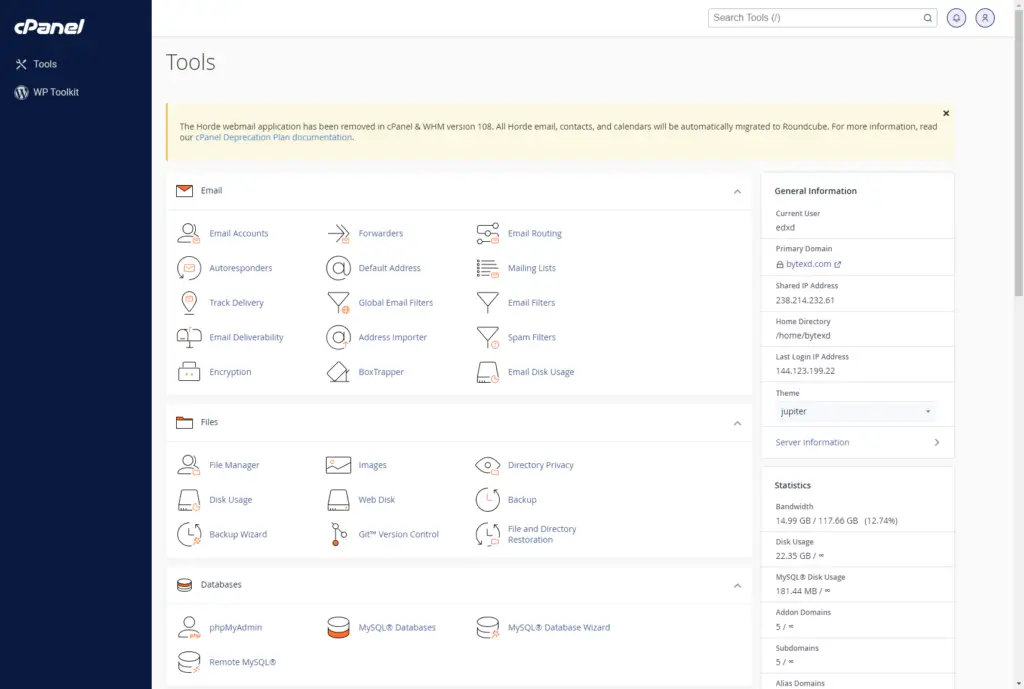
A significant benefit of shared hosting is the use of the widely recognized control panel, cPanel.
This powerful tool provides an intuitive interface for managing numerous aspects of your website. It makes web hosting accessible to users of all technical skill levels by handling complicated server tasks behind the scenes.
Most shared hosting providers use cPanel. There are other good alternatives, but most use cPanel. So if you’re using one shared hosting provider, and want to move, you can rest assured that the next shared hosting provider has almost the same setup.
With cPanel, even complete beginners can easily manage websites, set up email accounts, install software, create databases, secure their site, and monitor their website’s performance, all through a user-friendly interface.
The Shared Hosting Website Setup Process
We won’t go into all the technical details here, and will provide an overview which hopefully will give you a framework on how setting up a website with shared hosting works.
Setting up a website on shared hosting is a simple process, even for beginners. It may still be a little intimidating when you’re first starting out, since there’s a lot of new information coming at you.
Here’s a general step-by-step guide to get you started:
- Choose a Shared Hosting Provider: Your first step is to choose a reliable shared hosting provider. Consider factors such as cost, uptime guarantee, customer service, and the inclusion of a user-friendly control panel like cPanel.
- Select a Hosting Plan: Shared hosting providers typically offer a range of plans. These can vary in terms of storage space, bandwidth, number of websites you can host, and other features. Choose a plan that best fits your website’s needs and your budget.
- Register a Domain Name: A domain name is essential for your website. Many shared hosting providers offer domain registration services, but I prefer to buy them from a domain registrar. You’ll also need to point your domain name to your web host, which is a simple process, but probably confusing at first.
- Recommended Domain Registrars: My main places to register domain names are Namecheap.com and Porkbun.com, known for their competitive prices and reliable service. All my domain names are from them.
- Set Up Your Account: After purchasing a hosting plan, the provider will guide you through setting up your account. This usually involves creating a username and password and setting up any included email accounts.
- Access cPanel: Once your account is set up, you can log in to cPanel. This control panel allows you to manage all aspects of your website. Here you can create email accounts, manage files, install software, set up databases, and more.
- Install a Content Management System (CMS): With cPanel, you can easily install a CMS like WordPress, Magento, Joomla, Drupal, and others. These platforms make it easy to design your website and add content without needing to know how to code. As soon as you’ve installed a CMS, your website is live and accessible online.
- What is a Content Management System (CMS)? A CMS is just the name of the software used to manage your content on your website. It also helps you build and manage your website without needing to write code. The most popular CMS is WordPress. It’s not the most intuitive name, since when starting out you think of it as a tool to build/design your website, instead of managing content.
- Design Your Website: You can now start designing your website using your selected CMS. Choose a theme, customize it to fit your style, add pages, create a menu, and start adding content.
- Configure Additional Features: With your website live, you can leverage cPanel to configure additional features like setting up professional email accounts associated with your domain, managing and monitoring your website’s performance, handling security settings, creating backups, and even setting up databases if necessary.
When Do I Need Shared Hosting?
Shared hosting is a perfect starting point for many individuals and small businesses venturing into the online world for the first time. Here are some scenarios where shared hosting could be the right choice for you:
- Starting Small: If you’re launching a new website, especially if it’s your first, shared hosting can provide the resources you need at an affordable price. It’s ideal for personal blogs, small business websites, portfolios, or any site that doesn’t expect a high amount of traffic initially.
- Limited Technical Knowledge: Shared hosting is managed by the hosting provider. They handle server maintenance, software updates, security patches, and other technical tasks. This means you don’t need to be a tech expert to run your website; you can focus on creating great content and growing your online presence.
- Budget Constraints: Shared hosting is the most cost-effective type of hosting, making it a great choice if you’re on a tight budget. It allows you to get your site online without a large upfront investment.
- Less Resource-Intensive Needs: If your website doesn’t require a large amount of server resources or bandwidth, shared hosting may suffice. It’s suitable for websites that don’t have high-resolution media, complex functionalities, or a high volume of traffic.
- Experimentation: Shared hosting is a good option if you’re creating a website for learning, testing, or experimenting. It provides a live environment to learn web design, experiment with different plugins and tools, or test your coding skills.
Unmanaged vs Managed Shared Hosting
When choosing a shared hosting plan, you’ll often encounter the terms “unmanaged” and “managed“.
These refer to the level of service and support the hosting provider offers.
- Unmanaged Shared Hosting: In an unmanaged shared hosting environment, you are primarily responsible for maintaining your website. While the hosting provider takes care of the server hardware, network infrastructure, and basic server software, you’ll handle tasks such as installing and configuring web applications, setting up email accounts, managing security measures, creating backups, and troubleshooting issues.
This requires a certain level of technical proficiency and can be a good fit if you’re comfortable with these tasks or willing to learn. Unmanaged shared hosting is the cheaper of the two. - Managed Shared Hosting: On the other hand, managed shared hosting is a more hands-off approach. Here, the hosting provider takes care of many of the tasks associated with running a website. This can include installing and updating software, handling security patches, monitoring the server for issues, performing regular backups, and providing more comprehensive support.
Managed shared hosting is an excellent option for those who prefer to focus on their content or business operations rather than the technical aspects of running a website. Managed shared hosting is more expensive than unmanaged.
In short, unmanaged hosting gives you more control but requires more time and technical skill. Managed hosting requires less technical know-how and can free up your time, but it often comes at a higher cost. The best choice depends on your skills, time availability, and budget.
Shared Web Hosting Pros/Cons
PROS
- Cost and Time Effective: Shared hosting is an affordable and time-saving solution, especially for beginners. While a VPS with more resources might be cheaper, it often doesn’t come with user-friendly features like cPanel, requires more technical knowledge to set up (including your own email server), and needs regular maintenance. Shared hosting frees you from these time-consuming tasks, making it a valuable choice if you’d rather focus on your content or business.
- User-Friendly: For those new to web hosting, shared hosting is a significant advantage due to the use of control panels like cPanel. It simplifies the management of your website by handling many technical aspects under the hood, which could be quite daunting if you lack the time or interest to tackle them.
- One-Click Installations: Many shared hosts include tools like Softaculous that allow for easy installation of popular web applications like WordPress, Joomla, or Drupal.
- Emails and Other Features: Shared hosting usually includes the ability to set up multiple professional email accounts under your domain. Additionally, you may have access to other features like database management, file manager, visitor statistics, SEO tools, and even e-commerce capabilities depending on your hosting package. These extra features can significantly enhance your website’s functionality and help manage your online presence more effectively.
- Package Variety and Scalability: Shared hosting comes in a variety of packages, allowing you to choose a plan that suits your website’s traffic and resource usage. Even larger shared hosting packages can handle significant traffic when the website is properly configured.
For example, there are shared hosting packages around $10 per month that can easily accommodate over 3000 visitors per day for WordPress websites. Remember, shared hosting can be a very viable solution for many websites, given the right package and configuration.
CONS
Disclaimer: The “cons” are relative and depend largely on your specific needs and level of expertise. If you’re a beginner or have a website with moderate traffic (around 1000 visitors per day or more), many shared hosting options will serve you well. The limitations of shared hosting in terms of resources, customization, or scalability may not impact your website significantly or at all.
- Limited Customization and Control: One of the primary limitations of shared hosting is the lack of full control over your hosting environment. It can be likened to not having administrative access to your own computer. If you’re planning to run unique scripts, special software, or various types of applications, shared hosting might pose some challenges. It may not support all scripts or software, and you generally don’t have the freedom to tweak the server settings to your specific needs.
- Limited Resources (compared to VPS or Dedicated Servers): In terms of resources, shared hosting often falls short compared to larger VPS or Dedicated servers. For instance, while a shared hosting plan might provide you with a part of the server’s resources (like 1-2 GB of RAM), a larger VPS or a dedicated server could offer significantly more (ranging from 4 GB to hundreds of GB of RAM).
To give you an idea, for a basic WordPress website you don’t need that much RAM to begin with anyway. A simple blog should be just fine with 1GB RAM. This site was on a 1GB RAM VPS (not shared hosting), for 2 years. - The number of websites, email addresses, databases, or monthly visitors is often limited in shared hosting.
- Security Concerns: While the shared nature of shared hosting can theoretically pose a security risk, it’s worth noting that these risks are often well-managed by reputable hosting providers. I have used shared hosting for over a decade without encountering such issues. Therefore, if you choose a trusted shared hosting provider, security concerns should not be a big issue. However, always have backups!
Shared Hosting Recommendations
I haven’t used shared hosting in a while, except own shared hosting on our own server.
However, if I had to choose a shared web host right now for my website, I’d go with:
- https://knownhost.com for WordPress Managed Hosting. The reason for recommending them is:
- They’re a very respected web host. I’ve heard positive things about them for 10+ years. This has been usually on Reddit or WebHostingTalk.com, and other forums.
- Their offer looks good value. They offer Managed WordPress hosting at good price (the ENTRY plan is $11.95/mo). I know they say $5.98 on their sales page, but it says below “* Based on 3 year commitment“. The price is still great for the features they’re offering, and the fact that it’s managed, in my opinion.
- https://nixihost.com for Unmanaged Hosting. The reasoning is:
- They’re recommended in the sidebar on https://reddit.com/r/webhosting. That, along with the fact they’re not a big company, suggests that they will be accountable and make sure the services works well with no downtime.
- I like their offer: https://www.nixihost.com/hosting/shared. The price looks great, and they don’t seem to limit things like number of databases, number of email addresses, or number of visitors you can have per month. For unmanaged hosting I’d 100% go with them.
2. VPS (Virtual Private Server) Hosting
VPS hosting is well-suited for those who need more control and resources than what shared hosting can provide, such as medium-sized businesses, high-traffic websites, or developers needing a testing environment.
It’s ideal for users who have some technical knowledge or are willing to learn, as it requires a bit of server management.
Whether you’re scaling up from shared hosting due to increased traffic or need a more customizable hosting solution, VPS hosting can be an efficient and flexible choice.
VPS stands for Virtual Private Server. It gets its name from the fact that it provides you with your own private server resources, even though these resources are on a server that’s virtualized, or divided among multiple users.
What is Virtualization?
Virtualization is a technology that allows for the creation of multiple simulated environments or dedicated resources from a single, physical hardware system.
Two popular forms of virtualization you’ll often come across are KVM (Kernel-based Virtual Machine) and OpenVZ (Open Virtuozzo).
- KVM is a full virtualization solution for Linux. It provides each VPS with its own dedicated resources and a separate operating system, similar to having a dedicated server. This means better performance and stability, as what you do on your VPS won’t affect others, and vice versa. You can also install any operating system, enhancing your flexibility.
- In contrast, OpenVZ is an operating system-level virtualization solution where each VPS shares the host’s kernel1An operating system’s kernel is the core part of an operating system that directly interacts with the hardware of the computer. It manages system resources like memory, CPU usage, and input/output requests from software, effectively serving as a bridge between the software and hardware of a computer.. Unlike full virtualization solutions like KVM, it doesn’t provide each instance with its own separate operating system. This makes it more efficient in terms of resource usage, but at the cost of lower isolation.
- For example, a high load on one VPS could affect the performance of others on the same host. It also limits you to the Linux distributions compatible with the host’s kernel.
Most well-known VPS providers offer KVM by default, and it’s typically the preferred choice due to its robust isolation and flexibility.
How Do You Use VPS Hosting
Using a VPS is somewhat like using a personal computer that’s located somewhere else.
After you sign up for a VPS hosting plan, you’ll receive the necessary credentials to access your virtual server. These credentials will allow you to connect remotely to your VPS, usually through a Secure Shell (SSH) for Linux servers or Remote Desktop Protocol (RDP) for Windows servers.
Once connected, you’ll find yourself in a server environment with full control.
You’re now free to configure the server to your liking, install any software you need, or even host a website. You could set up a web server to serve your website, install a content management system (CMS) of your choice, like WordPress or Drupal, to run your website, or any other software you like.
One thing to remember, though, is that you’re responsible for managing and maintaining your VPS (unless you bought a managed VPS). This includes taking care of security, updates, and any troubleshooting. It’s not as managed as shared hosting, so some technical knowledge is beneficial, but it does give you significantly more control and resources.
If this sounds like a lot, don’t worry. Many VPS hosting providers offer extensive knowledge bases, tutorials, and customer support to help you along the way. Plus, there are numerous free resources available online to learn about VPS management.
The VPS Hosting Setup Process
We won’t go into the finer details of how to connect to your VPS. But, to give you an idea, the process of getting a VPS is:
- Choosing a Provider and Plan: Start by selecting a VPS hosting provider that fits your needs. Each provider will offer different plans based on resources like CPU, RAM, storage, and bandwidth. Some might even offer the choice between Linux and Windows-based servers.
- Sign-Up Process: Once you’ve chosen a plan, you’ll go through the sign-up process. This usually involves creating an account, selecting your plan, and making the payment.
- Getting Access: After successful payment, the hosting provider will set up your VPS and send you the login details, typically via email. These will include the IP address of your VPS, along with the username (often “root” for Linux VPS and “Administrator” for Windows VPS) and password.
- Connecting to Your VPS: With these credentials, you can connect to your VPS using an SSH client if it’s a Linux-based server, or Remote Desktop Protocol (RDP) if it’s a Windows-based server.
- For Linux GUI: you can also connect via SSH first, then install and configure graphical desktop services like XFCE, GNOME or KDE, along with remote desktop software, to enable GUI access.
- Configuring Your Server: Now, you’ll have full control over your VPS. You can start setting it up to match your needs, such as installing a web server, database server, or any software you need.
The process might seem complicated at first, especially if you’re new to VPS hosting. But over time, with a bit of experience and learning, you’ll find it quite straightforward.
How You Manage Your VPS Hosting
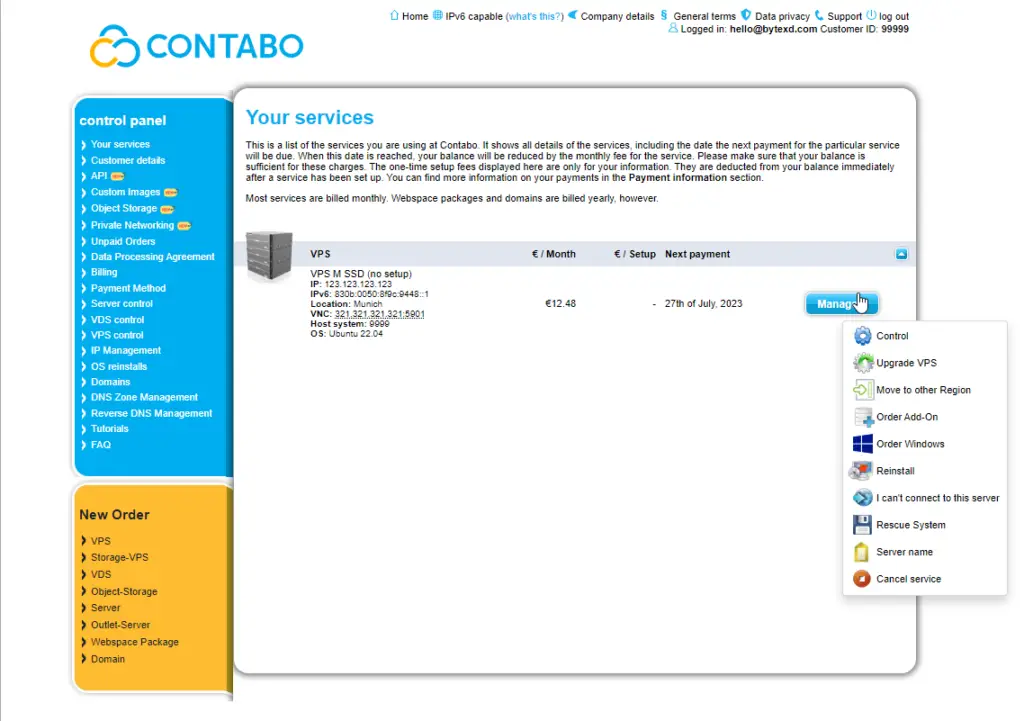
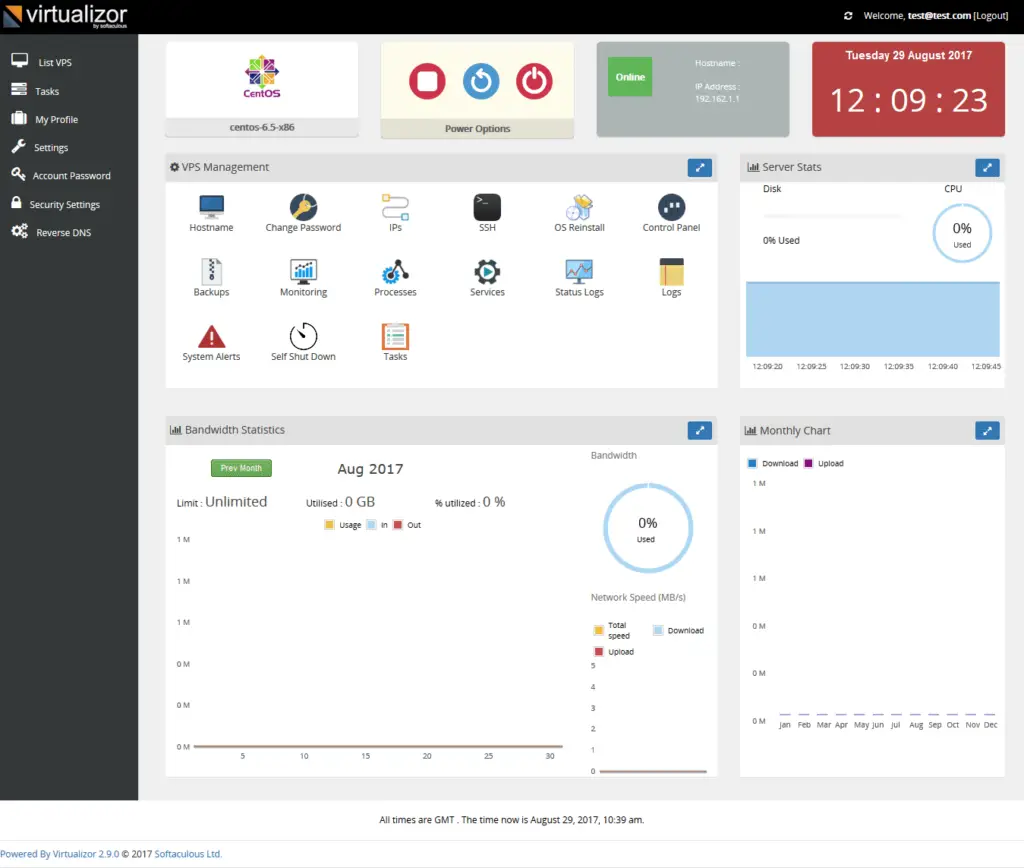
Some VPS hosting providers offer user-friendly control panels to manage your servers.
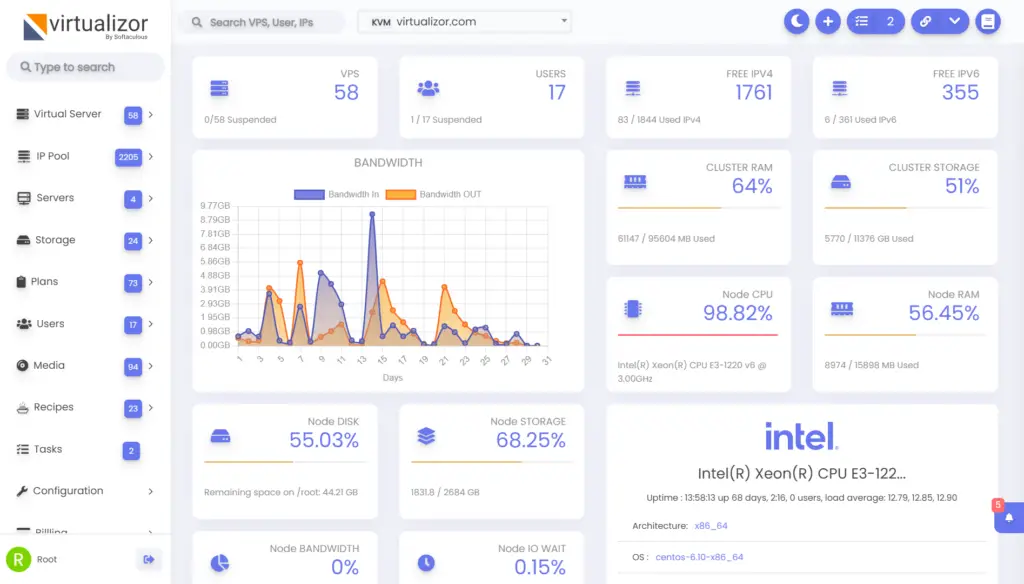
These can be custom panels, or they could use popular third-party panels like Virtualizor, developed by the same people behind Softaculous.
From these panels, you can typically manage various aspects of your VPS, including installing an operating system, rebooting your server, backing up data, viewing server resource usage, and more.
The following are only 2 examples of control panels. The one from Contabo.com is their custom panel, and the one on the right is Virtualizor, which is used by many other VPS providers.
Linux vs. Windows VPS
A VPS can run on Linux or Windows operating systems, each serving different use cases.
- Linux VPS: This is the most common choice, and it’s mainly used to run websites and web applications. Linux is preferred due to its efficiency, security, and the vast array of open-source software available.
- Windows VPS: This is generally used when you need to run applications that specifically require a Windows environment, like certain business or enterprise software.
How to Host a Website on a VPS
Hosting a website on a VPS is like having your own computer for your website.
A basic overview of it would be:
- After signing up for a VPS, you install necessary software like a web server2A web server, like Apache or Nginx, is a special computer program that distributes web pages to users. When you type a website address into your browser, your computer sends a request to the web server. The web server then finds the page you asked for, and sends it back to your browser so you can see it. This happens every time you click a link or type a new address. Web servers are important because they store and send the information that makes up the internet. (Apache or Nginx) and a database system (MySQL or PostgreSQL).
- You then connect your domain name to your VPS.
- Next, you install a content management system (CMS) such as WordPress, which makes it easy to manage your website’s content.
- With these steps completed, your website is live and accessible to anyone on the internet.
This is a basic overview, but there are plenty of online resources available to guide you.
Many, but not all, VPS providers offer one-click installation features for popular web applications including WordPress, Discourse, Ghost, and others. This allows you to easily install your chosen CMS without having to manually configure the server software and databases.
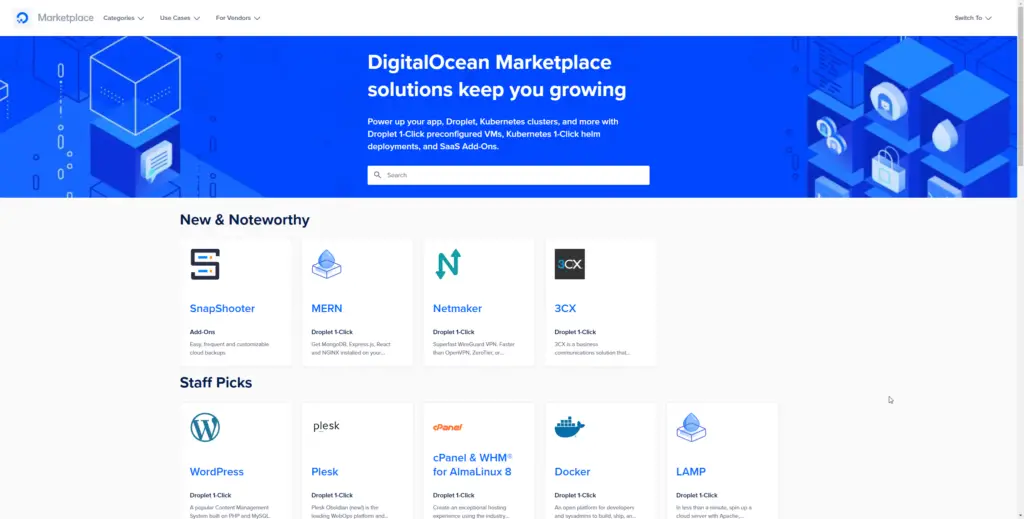
The available software installs depends on the provider.
Host Websites on VPS Using a Web Hosting Control Panel
While manual configuration of a VPS provides more control control, and VPS providers may offer 1-click installs for popular software, there are also more automated methods for setting up websites on a VPS.
Paid Web Hosting Control Panels
If you still want a user friendly way to host websites, you could even install cPanel or other paid web hosting panels on your VPS, such as Plesk or DirectAdmin.
This would streamline many configurations for you, and you could host websites much like on a shared hosting platform.
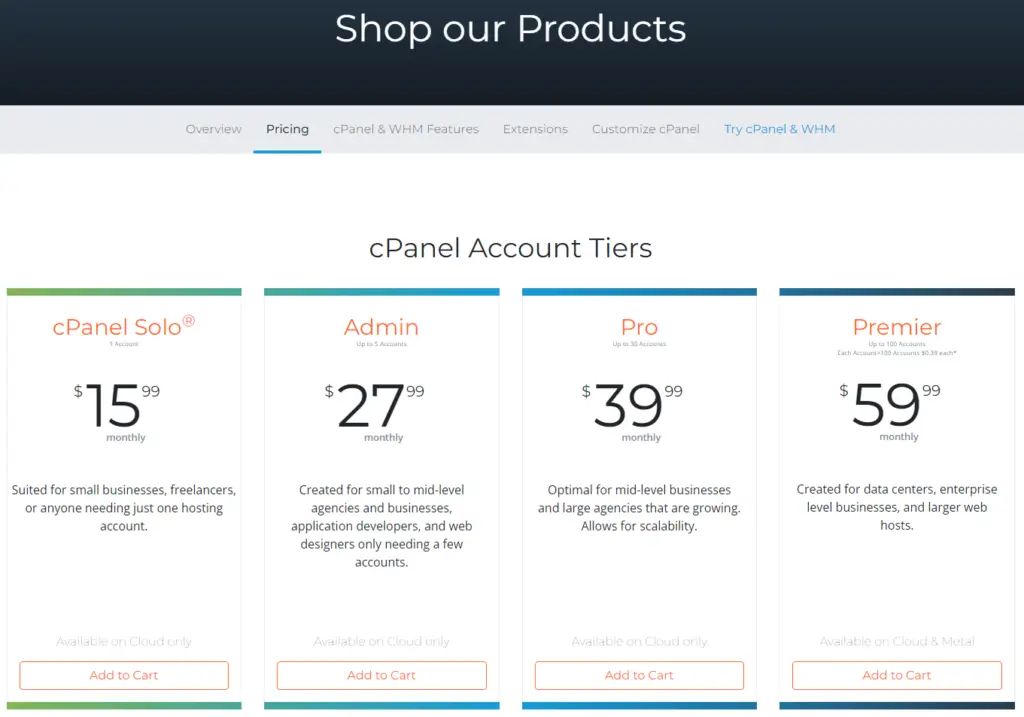
With cPanel, this can get pricey, as you’d be paying for both the VPS and cPanel, which starts at $15.99 per month.
Free & Open-Source Web Hosting Control Panels
Alternatively, there are free and open-source web hosting control panels that can handle most of the configurations for you and also provide one-click installations for popular web applications such as WordPress.
This feature is highly advantageous for those who want a quick and easy setup process.
Some of these include ISPConfig, Hestia, CyberPanel, and Virtualmin. If you’re a beginner, looking for a cost-effective hosting solution and willing to learn, these options might be perfect for you.
Automated Install Scripts
There are also specialized scripts and tools available that can automatically set up WordPress or other popular CMSs on your VPS without needing a web hosting control panel at all.
These scripts handle the process of downloading and installing the software, setting up the database, and configuring the web server, essentially automating the entire setup process. For WordPress, tools such as SlickStack, WordOps or EasyEngine are examples of this.
This website is set up using WordOps. WordOps, SlickStack, and EasyEngine are my preferred ways of setting up WordPress websites for myself, and when mail servers aren’t involved.
When mail servers are involved I 100% go for VPS with cPanel.
VPS Hosting Pros/Cons
PROS
- Improved performance, as the website has its own dedicated resources.
- Can be much more cost-effective than shared hosting in terms of resources – you can get more resources at a lower price. The cost is that you need technical expertise to set up and manage your server.
- Greater control and flexibility, if you have the technical expertise, as the website has its own operating system and can install and run custom software.
- Improved security, as the website has its own dedicated portion of the server and is not sharing resources with other websites. On the other hand, it can be a lot less secure if you don’t have the required technical expertise.
- Depending on the web host, you may be provided a user-friendly control panel, allowing for easy installation of software such as WordPress, and others.
- Can install your own web hosting control panel, such as cPanel or free open-source options like ISPConfig, Hestia, CyberPanel, and Virtualmin.
- Can handle a large amount of traffic, depending on the VPS resources. For example, with a $5 VPS with 1GB RAM, and the appropriate configurations, you can handle 1 million visitors/month. Maybe more. Shared hosting often limits the allowed amount of monthly traffic.
CONS
- Requires more work and technical expertise than shared hosting, and may not be as user-friendly for beginners.
- Can be a security risk if not properly managed, compared to shared hosting where the web host typically handles security-related tasks.
VPS Hosting Recommendations
The following are VPS providers we currently use for various projects, or that we have used in the past and will likely return to in the future.
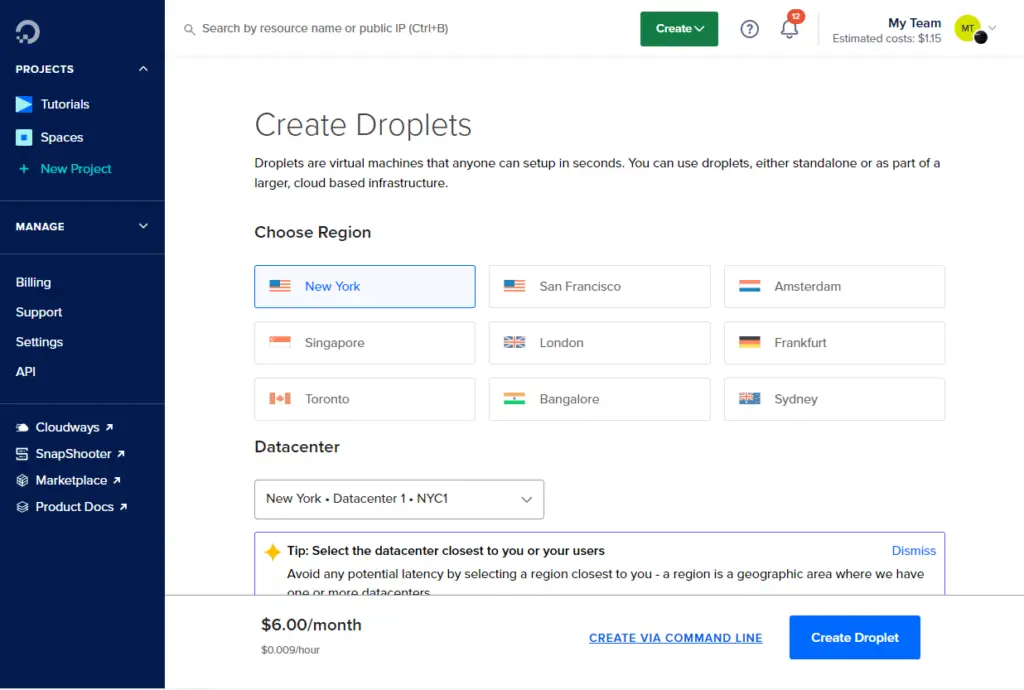
- DigitalOcean: This cloud server provider (more on the subtle differences between VPS and cloud servers later) is renowned and reasonably priced, with a 1GB VPS at $6/mo. Their marketplace allows quick installations, including a one-minute WordPress setup.
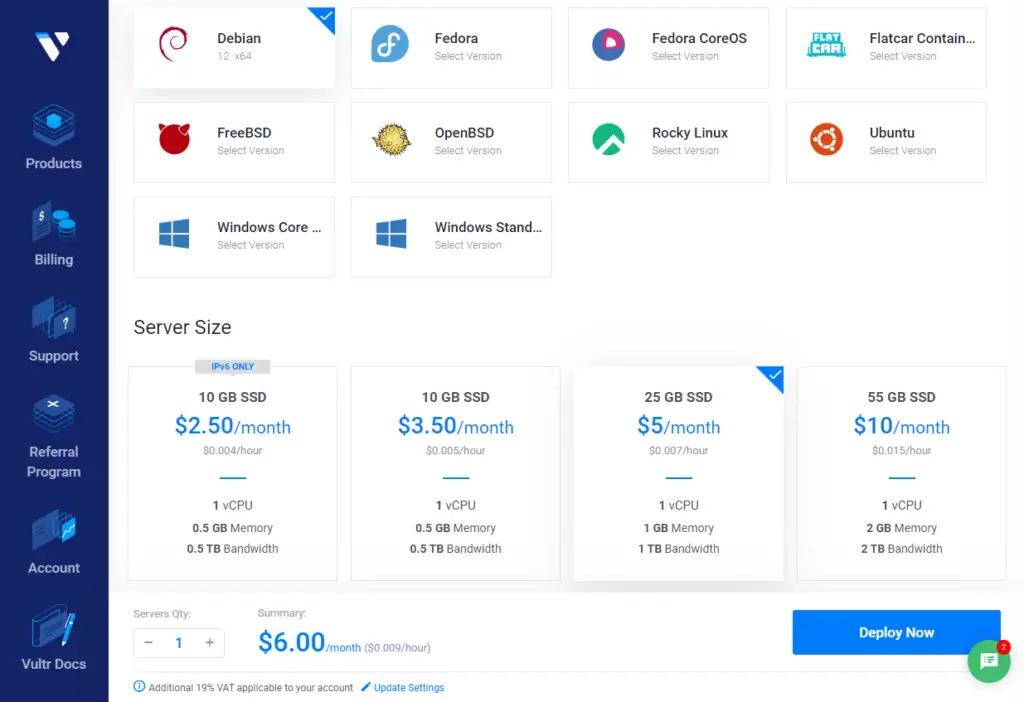
- Vultr: Very similar to DigitalOcean, offering 1GB VPS for $5, and currently hosts several of our websites and projects. I tend to use them more than DigitalOcean thanks to the $1 difference.
- Contabo: Known for their cost-efficient VPS, their servers are often used for various development and production tasks. The €10.49 option with 16GB RAM is particularly useful, though they have reported downtimes, especially in the Dusseldorf data center. Our detailed review here.
- Hetzner: A respected name in server hosting, offering 4GB RAM VPS from €4.51. Though we haven’t used them recently, I’m looking forward to using them in future projects.
- OVH: OVH is currently hosting nine projects for our team member, George. He got a great deal at about €2/mo for 9 x 1GB RAM VPS. He’s very happy with them. We’ve had many servers with them in the past as well. Buying a VPS may be difficult if you’re not a resident of the country where you’re making the purchase, and depending which OVH you’re buying from (OVH.de, OVH.fr, OVH.co.uk, etc)
3. Cloud Hosting
Cloud hosting has become an increasingly popular option for deploying websites, applications, and other IT solutions. It provides a flexible, scalable alternative to traditional on-premises infrastructure.
What is Cloud Hosting?
Cloud hosting involves the delivery of computing services, including cloud servers, storage, databases, networking, software, analytics, and more, over the internet.
When people refer to cloud hosting, they often mean cloud servers, which are similar to VPS. However, cloud hosting can also refer to other services like cloud storage, databases, and software. The term encompasses the full range of on-demand computing resources available on the cloud.
The term “cloud” is symbolic of the internet, which is often depicted in diagrams as a cloud-like structure.
Unlike traditional hosting where your website or application is hosted on a single physical server, cloud hosting involves spreading your data across multiple different servers, all connected via a network web.
These servers could be located all around the world, providing a global infrastructure for web-based services.
Cloud Hosting vs VPS Hosting
Traditional server hosting involves dedicating a single server (or multiple servers) to your website or application. This could be a virtual server or a dedicated server (which we’ll discuss later)
On the other hand, cloud hosting is fundamentally different in the way it operates. Instead of using a single server, your website or application uses the resources of several servers.
This is why cloud hosting is often associated with the terms ‘scalability’ and ‘redundancy’, as the resources can be easily increased or decreased based on demand, and your data is redundantly stored in multiple locations to ensure its safety and availability.
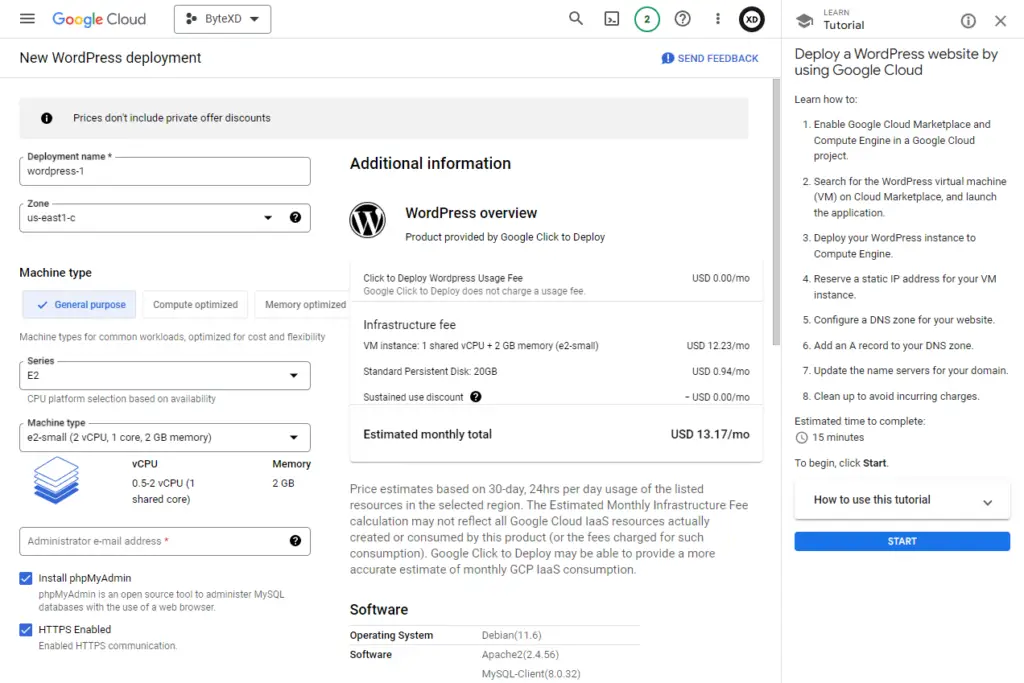
The difference between a VPS and a cloud server is virtually none. If you need a VPS, there is no reason to go for a VPS provider instead of a cloud hosting provider, as you can get comparable VPS services from a cloud host. (At least based on my experience).
I mostly use Digital Ocean and Vultr servers, which are cloud servers, but I think of them as VPS. That’s how similar they are.
Many traditional VPS providers are also rebranding themselves as cloud hosting providers, as the technology and infrastructure behind cloud servers and VPS is becoming similar.
Pay-As-You-Go Pricing Model
A key feature of cloud hosting is its pay-as-you-go pricing model. This means you only pay for the services and resources you use, when you use them.
This can be a game changer for many businesses, as it eliminates the significant upfront capital expenditure on IT infrastructure. You can scale resources up or down as needed, which results in significant cost savings.
Moreover, the model allows for server creation and destruction on demand, meaning you can create a new server for peak times and delete it when it’s no longer required.
This flexible pricing model lends itself well to business experimentation and rapid growth without a huge financial risk or commitment.
The way it usually works with cloud hosting is that you see the pricing for each type of server configuration and specs. You then decide how much funds to load into your account. As you spin up servers, the hourly usage is deducted from your loaded funds.
If you decide to delete all your servers, any remaining funds stay in your account to use later. You can come back even a year later and continue using the remaining funds. This is different from traditional VPS billing where you have to pay a fixed monthly subscription fee, so the pricing is not as flexible.
Infrastructure and Technology Behind Cloud Hosting
Cloud hosting relies on cutting-edge technology and infrastructure to function. This includes data centers located globally, interconnected networks, powerful servers, and advanced virtualization software.
This setup enables the pooling of resources from multiple servers, which can then be allocated and de-allocated in real time based on demand.
IaaS (Infrastructure as a Service) & PaaS (Platform as a Service)
Two popular forms of cloud hosting are Infrastructure as a Service (IaaS) and Platform as a Service (PaaS).
IaaS provides you with the fundamental computing infrastructure including servers, storage, and networking.
With IaaS, you get full control over the infrastructure components, but you are responsible for managing and maintaining the system yourself. This includes tasks like configuring servers, patching and upgrading software, allocating storage, and managing networking.
Popular IaaS providers include Digital Ocean, Vultr, Amazon Web Services (AWS), Microsoft Azure, and Google Compute Engine.
Example IaaS: Droplets (cloud servers) are a popular IaaS offering from Digital Ocean. With Digital Ocean droplets, you rent virtual server instances that you configure and control. You’re responsible for managing the guest OS, security patches, software installation, data backups, etc. But you don’t have to purchase physical servers or data center space. You have control over the virtual infrastructure.
PaaS provides a complete platform and environment for building, testing, deploying and managing applications in the cloud.
With PaaS, you don’t have to worry about procuring, installing or maintaining the underlying infrastructure including servers, storage, networking, operating systems, middleware, development tools, BI services, etc.
This is all handled by the PaaS provider. You just focus on coding and deploying your applications. Some common PaaS providers include Heroku, AWS Elastic Beanstalk, and Google App Engine.
Example PaaS: Heroku is a well-known PaaS provider. With Heroku, you deploy your web applications using Git, without having to manage any infrastructure. Heroku handles configuring the runtimes, provisioning servers, load balancing, scaling, etc. You just focus on coding in languages like Ruby, Node.js, Java, PHP, Python etc. and deploying your app using Heroku tools. The platform is optimized for building and running apps without infrastructure headaches.
The main difference is that IaaS gives you more control over the infrastructure, while PaaS abstracts away infrastructure complexities so you can focus just on application development and delivery.
Cloud Hosting (Servers) Setup & Management
I’m particularly talking about cloud servers in this context.
Cloud hosting providers offer a wide range of services including storage solutions, data analytics, machine learning tools, and various application services, each of which operates differently.
In this guide, however, we’ll focus on operating a cloud server, which is key for hosting websites or applications.
- Choose a Cloud Hosting Provider: Begin by selecting a cloud hosting provider that fits your needs. Some popular providers include Amazon Web Services (AWS), Google Cloud Platform (GCP), Microsoft Azure, Digital Ocean, and Vultr.
- Sign Up and Create an Account: You’ll need to create an account with your chosen provider. This usually involves providing some personal details and payment information.
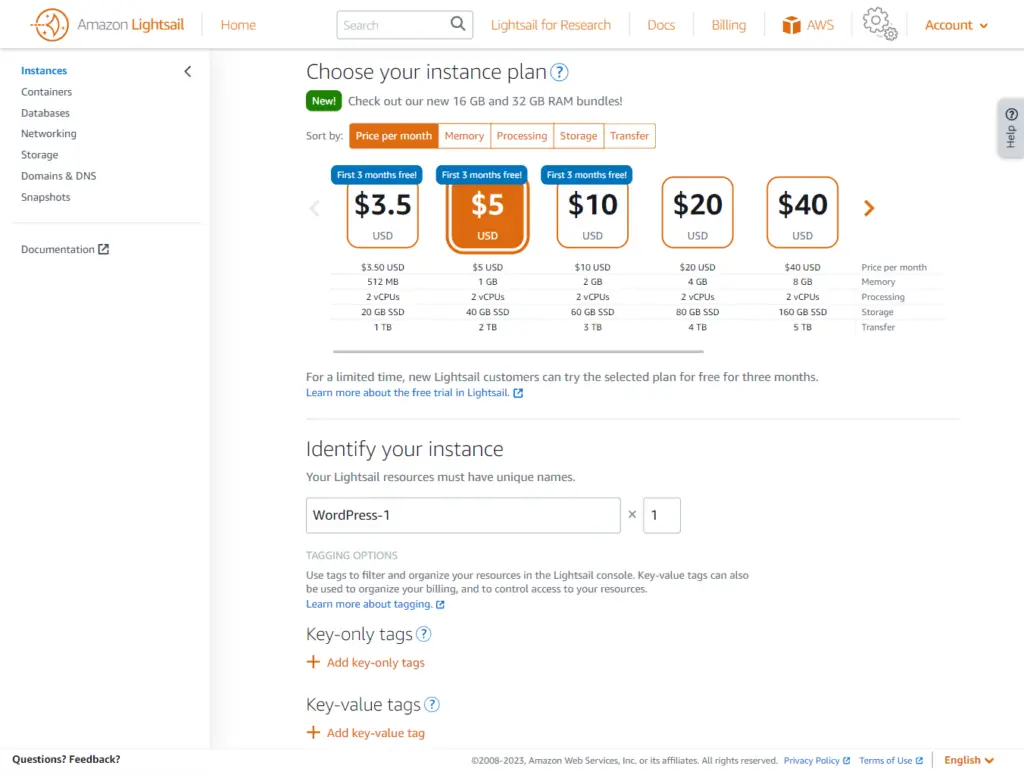
- Select a Service Plan: Next, you need to select a service plan that suits your requirements. Most cloud hosting providers offer a variety of plans, which vary based on factors like processing power, memory, storage, and bandwidth.
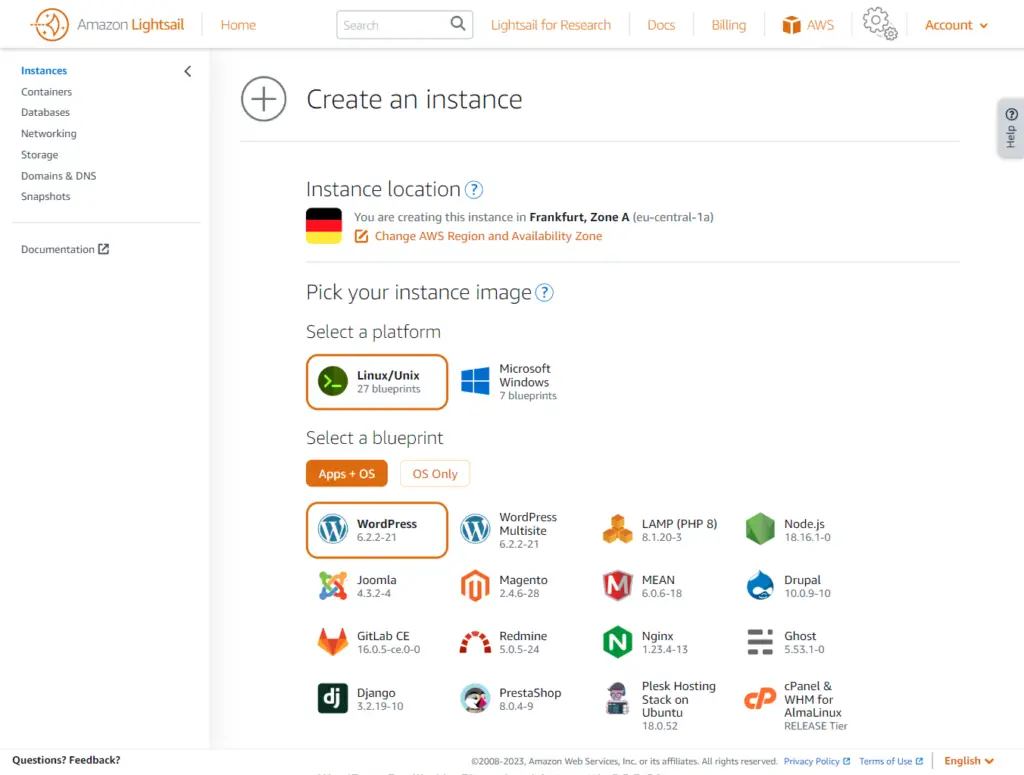
- Set Up Your Server: After selecting a plan, you’ll need to set up your server. The specifics of this process will depend on the provider, but it usually involves choosing a server location, picking an operating system, and configuring security settings. Many providers offer one-click installations of popular web platforms like WordPress, which can simplify this process.
- Access Your Server Using (optional): Once your server is set up, you can upload your website or application. This usually involves transferring files from your local computer to the cloud server, typically using a protocol like FTP (File Transfer Protocol). If you’ve installed a web platform like WordPress, you may be able to upload your site directly through the platform’s interface.
- Point Your Domain to the Cloud Server: To make your website or application accessible on the internet, you’ll need to point your domain name to your cloud server. This usually involves updating your domain’s DNS (Domain Name System) settings.
- Manage and Monitor Your Server: After everything is set up, you’ll need to manage and monitor your server to ensure it’s running smoothly. This can involve updating software, managing security, monitoring performance, and scaling resources as needed. Most providers offer tools and dashboards that can help with these tasks.
- You can connect to it using SSH (Secure Shell). This is a protocol that allows secure remote login from one computer to another. You can do this through a terminal on your local computer, or through a console provided by your hosting provider, which is a terminal-like interface in your web browser.
How to Host a Website on a Cloud Server
A cloud server isn’t much different from a VPS. It’s like a VPS with added features. Setting up a website on a cloud server is the same as setting one up on a VPS.
Cloud Hosting Pros/Cons
PROS
- Flexible scaling – Compute resources can be provisioned and deprovisioned on demand through APIs and web dashboards to meet changing needs. Helpful for workloads that are spiky or unpredictable.
- High availability – Data and applications are replicated across multiple physical servers and data centers to increase uptime. Provides protection against outages.
- Pay-as-you-go pricing – You pay only for the actual resources used without any upfront costs. Useful for short-term projects with budget constraints.
- Automation – Infrastructure can be programmatically managed using APIs and scripts without manual intervention. Allows faster provisioning and configuration.
- Disaster recovery – Recovering data is easier and faster by leveraging cloud data replication and backups. Critical for business continuity.
- Reduced costs – No need to invest in hardware that may sit idle. The cloud provides an economical and scalable model.
- Increased storage – Scalable cloud storage available on-demand allows storing large amounts of data. Useful for rapidly growing storage needs.
CONS
- Vendor lock-in – Migrating large complex applications between cloud providers can be difficult and expensive. But easier for smaller apps or websites.
- Learning curve – Larger cloud providers like AWS, GCP, and Azure can be difficult for beginners to operate compared to intuitive services like DigitalOcean and Vultr. The complexity arises from abundant configuration options.
- Cost management – Pay-as-you-go models can lead to unexpected charges if resource usage is not tracked diligently.
- Lack of support – Quality of customer service varies greatly between cloud providers.
Cloud Hosting Recommendations
Cloud hosting is vast, and isn’t limited only to cloud servers that work the same as VPS.
My experience with cloud hosting is mostly limited to small servers and hosting websites or apps on them.
Given that, I can recommend the following for hosting small scale servers or apps:
- Digital Ocean: I’ve trusted Digital Ocean with my hosting needs for about 8 years. In fact, this website you’re reading right now is hosted on a 2GB Digital Ocean server!
- Vultr: I’ve been a satisfied Vultr customer for around 7 years. Nowadays, if I need a small server, Vultr is my first choice.
- Amazon Web Services (AWS): AWS is arguably the most famous cloud hosting provider worldwide. Many of their services are very affordable. They even have a specific product for website setup named Amazon Lightsail, offering a 1GB VPS for just $5, and features 1-click installs for popular apps such as WordPress. While I haven’t personally used it yet, I’m planning on it for my upcoming project. Plus, they offer the first 3 months free for their smaller servers!
- Google Cloud Platform (GCP): Although I’ve only used GCP a few times, it might be a good fit for your needs. The platform is a bit more complex, but they do offer a $300 free credit for new customers. This means you can give them a try without any financial risk. Check out their free services at https://cloud.google.com/free.
- Microsoft Azure: Last but not least, Microsoft Azure is a decent option too. However, the sign-up process can be a bit frustrating. For some reason, I wasn’t able to create an Azure account, and I’m still not sure why. If you’re a student, they offer $100 in free Azure credits. So, if you’re okay with figuring it out on your own, Azure could be a good option. Find out more at https://azure.microsoft.com/en-us/free/students.
4. Dedicated Server Hosting
Dedicated servers are among the most powerful web hosting options available. They provide immense compute resources that can handle even very large and demanding workloads.
What are Dedicated Servers?
A dedicated server, as the name suggests, refers to a physical server that is dedicated solely to your use. This means all the hardware resources including processors, RAM, storage, and bandwidth are allocated only to your websites and applications.
Unlike shared or VPS hosting where resources are shared, a dedicated server guarantees exclusive access to the entire server capacity. This makes dedicated servers ideal for high-traffic websites and resource-intensive web apps.
Dedicated servers are typically housed in data centers and professionally managed by the hosting provider. However, you have full administrator access to customize software configurations and optimize performance as per your needs.


Dedicated Servers vs VPS / Cloud Hosting
Compared to VPS and cloud hosting, dedicated servers offer vastly higher compute power, storage, and memory. Where a mid-range VPS may offer 2-8 GB RAM, a dedicated server can pack anywhere from 16 GB up to 768 GB RAM.
Storage on dedicated servers can range from hundreds of GB to multiple TB, while VPS usually max out at a few TB. Network bandwidth is another area where dedicated servers excel, with options for 10 Gbps ports or beyond.
The amplified capacity makes dedicated servers suitable for large, complex and demanding workloads.
For simple websites and light applications, VPS or cloud hosting is usually enough and more cost-effective.
Dedicated Server Pricing
Dedicated servers are priced higher than VPS or cloud hosting. However, prices vary based on the hardware capabilities.
Some of the key hardware factors that determine dedicated server pricing are:
- CPU cores and processing power – More powerful CPUs allow supporting more websites and heavier workloads.
- RAM capacity – Dictates how many applications and databases you can efficiently run. Typically 16 – 256 GB RAM servers are common.
- Storage type and capacity – SSD storage offers faster performance while high capacity HDDs offer more storage for the price.
- Included IP addresses – Important if you need to host multiple sites and applications.
That said, it’s possible to find cheap dedicated servers starting from $50/month range, sometimes lower if you can find deals. These come with older generation hardware but pack a decent punch.
For example, for under $100 you can find dedicated servers with octa-core Xeon CPUs, 64GB+ RAM, 1TB SSD or 2TB HDD and a few 10TB of bandwidth. More than enough for many use cases.
Dedicated Server Deployment Timeframes
Deployment time for dedicated servers can range from near-instant provisioning to up to 72 hours depending on the provider’s infrastructure capabilities.
Some factors that affect dedicated server deployment time:
- Whether the hardware needs to be procured or is readily available
- Automation levels in the server configuration process
- Geographic location differences and availability of data center facilities
- The dedicated server provider’s overall technical expertise and experience
Dedicated Server Setup Process
The process of getting started with a dedicated server typically involves:
- Choosing a Provider and Plan: First, select a dedicated server provider and review their plan options based on hardware specs like CPU, RAM, storage, bandwidth etc.
- Sign-Up Process Hardware/Software Configuration: Customize the server hardware like CPU, RAM, drives etc. to suit your workload. Pick the operating system and any pre-installed software packages based on your use case. Linux and Windows servers are commonly offered. In the same process you also create an account, and complete the payment.
- Deployment Timeline: After order completion, the provider will deploy and configure the dedicated server which can take a few hours to a couple days depending on various factors.
- Server Access: Once ready, you will receive login credentials via email to access your dedicated server through remote tools like SSH, RDP, IPMI, or web-based control panels.
- Configuration and Optimization: You now have full control to configure the server, install required software, optimize performance, secure it, and manage it on an ongoing basis.
How Do You Use Dedicated Server Hosting?
Using a dedicated server is similar to having a physical server of your own, except it is housed remotely. You have full root access and administrator control over the operating system and software.
Common usage patterns include:
- Hosting a large website that needs abundant resources.
- Simultaneously hosting multiple medium-to-large sites on subdomains.
- Running complex web apps with dedicated databases that demand high CPU, RAM and storage.
- Leveraging the server’s resources to perform computing intensive tasks like data analytics, machine learning, rendering etc.
- Hosting game servers that require high bandwidth and compute performance.
How Do You Create VPS from Dedicated Server Hosting?
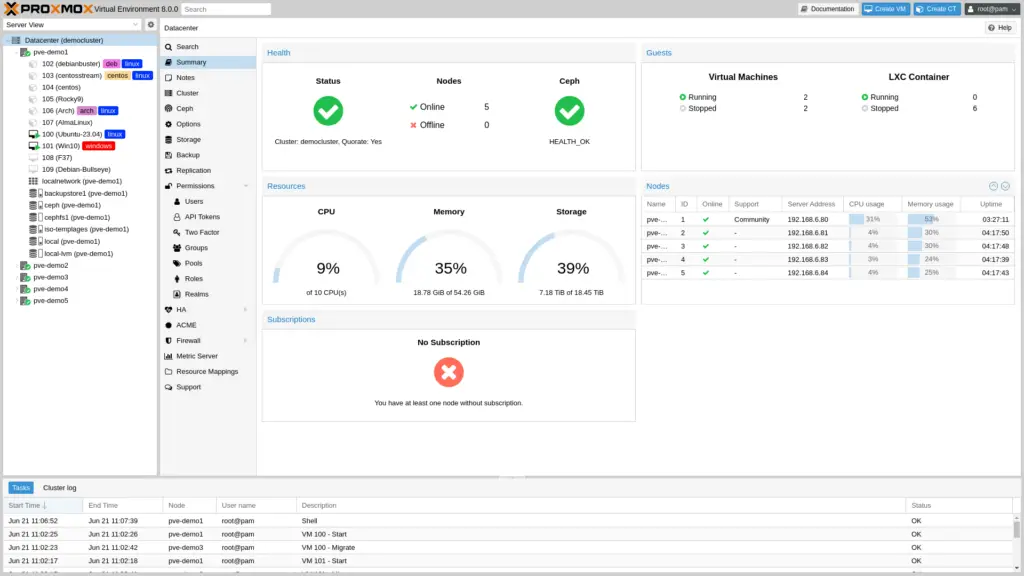
Dedicated servers can be portioned into multiple VPS using virtualization software such as Proxmox, OpenStack, Virtualizor, and others.
This helps maximize resource utilization and allows hosting providers to sell VPS carved from dedicated servers.
The process involves installing virtualization software on the dedicated server, allocating resources into separate VPS instances, and assigning dedicated IP addresses to each instance.
Proper allocation of ample IP addresses is crucial when creating multiple VPS from a dedicated server.
Dedicated Server Hosting Pros/Cons
Here are some benefits and drawbacks of dedicated servers, in comparison to VPS/Cloud/shared hosting:
PROS
- Highest performance in terms of computing power, RAM, storage and bandwidth.
- Complete control over the server OS, software, configurations etc.
- Ability to optimize the server precisely for your workload.
- Isolation and security since no other users share your hardware.
- Ideal for large, complex and resource-intensive workloads.
CONS
- More expensive than VPS/cloud/shared hosting if you just need to host a simple website or light application.
- Requires some technical expertise to manage and optimize, but you can learn if you have experience with other servers. There are also managed dedicated server options.
- Getting more resources than you need can lead to waste, so carefully evaluate the hardware capabilities required for your workload if costs are a concern.
- Lacks the flexible scalability of cloud servers that can auto-scale based on traffic. However, with expertise you can simulate your own cloud using multiple dedicated servers and automation software, but this is very time-consuming.
Dedicated Server Recommendations
We’ve got a fair bit of experience with dedicated servers, having providing VPS hosting to numerous projects requiring dedicated servers. We’ve evaluated them on everything from their specs and the number of IPs they offer to the quality of their support and other factors.
Also, it’s worth noting that some providers use the term “bare metal servers” for what we call dedicated servers.
Here are some providers we’ve tested and enjoyed working with, in no specific order:
- OVH.com – One of the major players in this industry, we’ve had over a decade’s worth of satisfying experiences with them. They also offer Kimsufi, an affordable option for smaller dedicated servers.
- Hetzner.com – We have only used their VPS, but we have acquaintances as well as numerous online reviews of their quality dedicated servers at an affordable price. They also auction dedicated servers, so you may find a great deal.
- Reliablesite.com – They have a great balance of competitive prices, excellent products, and reliable uptime. Their support is also top-notch.
- Budgetvm.com – Similar to Reliablesite, they offer great value with their pricing and product offerings, dependable uptime, and helpful customer support.
- Colocrossing.com – Their prices are reasonable, and while we didn’t use them for a long duration, they’re quite popular and known for their services.
- Quadranet.com – While our use of their services hasn’t been extensive, they have a strong reputation in the industry, and the feedback we’ve heard is overwhelmingly positive.
- Hostkey.com – We used their services some time back, and it seems they’ve grown since then. We had a very favorable impression of them.
- Leaseweb.com – A well-known name in the field. Our experiences with them were outstanding years ago, and we still recommend them if their server specifications align with your requirements.
- Server4you (US link, EU link) – We used their services in the past and were highly satisfied. They used to verify your account through a phone call, although this process may have changed over time.
5. Managed Hosting
Managed hosting is a type of service that offers an all-inclusive experience for those who want to focus more on their business or website content rather than the technical aspects of server management.
Managed hosting can apply to absolutely any type of hosting, whether shared, VPS, cloud, dedicated, WordPress, and many more specialized ones.
Managed hosting refers to the level of service provided, and not the hardware. The terms you’ll come across are “managed shared hosting”, “managed VPS hosting”, “managed WordPress hosting”, and so on.
What is Managed Hosting?
Managed hosting essentially takes the duties of server management, maintenance, and support off the user’s hands.
The hosting provider handles the technical tasks related to server management. This involves tasks such as setting up the server, installing and updating software, ensuring security measures, taking regular backups, and troubleshooting any issues that may arise.
Different hosting providers offer different levels of managed services. Some providers offer fully managed services, where they handle virtually all aspects of server management, while others provide partially managed services, where they handle certain tasks, but the user still has to take care of others.
Regardless of the specifics, the general goal of managed hosting is to free up the user’s time and resources so that they can focus more on their core business, website content, or projects.
How Do You Use Managed Hosting?
Using managed hosting is quite simple.
Once you sign up for a managed hosting plan, the hosting provider typically takes care of setting up the server environment and installing any necessary software for you. You will usually receive an easy-to-use control panel through which you can manage your hosted sites, email accounts, and other services.
Your hosting provider will handle server management tasks, including updates, backups, security, and troubleshooting. If you need help or encounter any issues, you can reach out to the provider’s support team.
Managed Hosting Pros/Cons
PROS
- Ease of Use: Managed hosting plans are designed to be user-friendly, even for those with minimal technical knowledge. You can focus on creating and managing your website or application without needing to worry about server management.
- Time and Resource Efficient: Since the hosting provider takes care of server management, you can devote your time and resources to your business or projects.
- Improved Security: Hosting providers typically have dedicated security teams that work to protect your data and your server against threats. They will ensure that the server software is kept up-to-date, configure firewalls, run regular malware scans, and perform other necessary security measures.
- Reliable Support: Managed hosting plans generally come with robust customer support. If you encounter any issues or have any questions, you can reach out to your hosting provider’s support team.
- Backups and Recovery: Many managed hosting providers offer regular backups as part of their service. In the event of data loss, the provider can restore your data from a backup.
CONS
- Cost: Managed hosting plans are generally more expensive than unmanaged ones. The additional cost is for the management services provided by the hosting provider.
- Limited Control: Since the hosting provider handles server management, you may not have as much control over your server as with an unmanaged plan. For most users, this won’t be an issue, but for those who want more control over their server’s configuration, it might be.
- Dependence on Provider: With managed hosting, you’re largely dependent on the hosting provider for technical support and server management. The quality of service can therefore vary greatly depending on the provider.
6. Colocation Hosting
Colocation hosting, often simply referred to as “colo,” is a type of web hosting service where you rent space in a data center to house your own server hardware.
In this setup, the colocation provider offers the building, bandwidth, power, cooling, and physical security, while the customer provides the servers and storage.
What is Colocation Hosting?
In a colocation hosting arrangement, you own your server hardware and have complete control over its operation, but you place it in a provider’s data center instead of maintaining a data center of your own.
The colocation provider handles the infrastructure requirements such as power, cooling, physical security, and internet uplink.
This model allows businesses to benefit from the economies of scale that come with large data centers — including redundant power infrastructure, on-site security, HVAC systems, and high-bandwidth network connections — without the high cost and complexity of managing such a facility on their own.
How Do You Use Colocation Hosting?
Using colocation hosting involves the following steps:
- Acquiring Server Hardware: Unlike other types of hosting, colocation requires you to own your server hardware. Depending on your needs, you might also need other equipment, such as switches, firewalls, load balancers, or storage devices.
- Choosing a Colocation Provider: Colocation providers offer a variety of plans based on how much space you need – typically measured in rack units (U) – and how much bandwidth you require. Some providers also offer additional services, like remote hands, hardware leasing, or managed services.
- Setting Up Your Equipment: Once you’ve chosen a provider, you’ll need to physically install your server hardware in their data center. This often involves shipping your equipment to the provider’s location, though some providers allow you to install the equipment yourself.
- Remote Management: After your equipment is set up, you can manage it remotely. Most servers allow for remote administration, letting you control your server as if you were physically present.
The Colocation Hosting Setup Process
Here’s a more detailed look at the process of setting up colocation hosting:
- Choosing a Provider and Plan: The first step is to select a colocation provider. Factors to consider include the provider’s location, the quality of their infrastructure, their pricing, and any additional services they offer.
- Purchasing and Preparing Your Equipment: After selecting a provider, you’ll need to purchase your server hardware and prepare it for installation. This could involve installing an operating system, configuring network settings, and setting up remote management.
- Transporting Your Equipment: Depending on the provider, you may be able to personally install your equipment, or you might need to ship it to the provider’s data center.
- Installation: Once your equipment arrives at the data center, it will be installed in a rack. The provider will connect it to power and an internet uplink.
- Ongoing Management: After installation, you can begin using your server. You’ll be responsible for managing and maintaining the server, though the provider will handle infrastructure-related concerns.
Colocation Hosting Pros/Cons
PROS
- Cost Savings: Operating your own data center can be extremely expensive. With colocation, you get the benefits of a large, well-run data center without the associated costs.
- Greater Bandwidth: Colocation facilities often have excellent network connections, allowing you to get more bandwidth and at a lower cost than you might be able to achieve on your own.
- Increased Security: Colocation providers usually have strong security measures in place, including physical security, fire suppression systems, and network security.
- Scalability: If your needs increase over time, it’s generally easy to rent additional space or bandwidth from your colocation provider.
CONS
- Initial Investment: While colocation can be more economical than running your own data center, there is still a substantial initial investment in purchasing your own server hardware.
- Remote Hardware Management: If something goes wrong with your server, you won’t be able to physically access it without traveling to the colocation facility. Some colocation providers offer remote hands services to address this issue, but it can be an additional cost.
- Limited Control Over Infrastructure: Although you have control over your own server, you don’t have control over the infrastructure of the colocation facility. If there’s an issue with power, cooling, or network connections, you’re reliant on the provider to resolve it.
7. Reseller Hosting
Reseller hosting is a unique type of hosting that’s primarily geared towards web developers, designers, agencies, or entrepreneurs who want to start their own hosting business or add hosting as an additional service for their customers.
When you sign up for a reseller hosting plan, you’re essentially server resources in bulk from a hosting provider, which you can then divide and resell to your own clients.
It’s an easy and cost-effective way to start a hosting business or add value to an existing one.
How Does Reseller Hosting Work?
As a reseller, you purchase a hosting package with a certain amount of resources. This package is then divided into smaller packages that you can sell to your customers.
One of the key benefits of reseller hosting is that while you’re responsible for managing your clients, you don’t have to worry about maintaining the server hardware or software—that’s all taken care of by the hosting provider.
The hosting provider also often takes care of server security, updates, and technical issues.
This allows you to focus on your clients and building your business. But remember, you will also need to provide support to your clients, as you are their hosting provider.
WHMCS and Reseller Hosting
When it comes to managing your clients, their hosting plans, and their billing details, a tool like WHMCS (Web Host Manager Complete Solution) is often integral. WHMCS is a comprehensive client management, billing, and support solution for online businesses.
WHMCS handles everything from signup to termination, with automated billing, provisioning, and management. It can automate the billing process, create and manage accounts, provide support tools, and handle domain registrations, transfers, and renewals.
This is all very important.
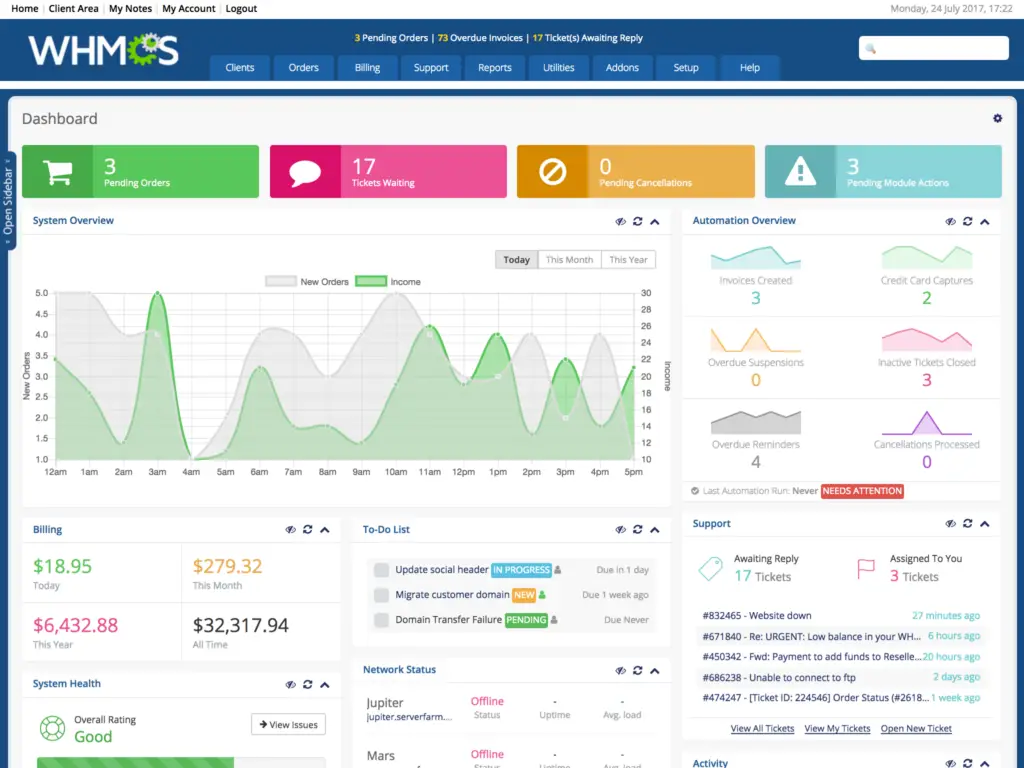
Most hosting providers that offer reseller packages also offer integration with WHMCS, given its comprehensive range of features and automation capabilities.
However, it’s important to understand that while WHMCS is a powerful tool, it comes with a learning curve.
So, if you decide to use it, you’ll want to invest some time in understanding how to get the most out of it.
Reseller Hosting Setup Process
To get started with reseller hosting, the process is as follows:
- Choose a Hosting Provider and Plan: This will be the company you buy the bulk hosting from. Look for providers that offer reseller hosting plans with the resources you need.
- Sign-Up Process: This usually involves creating an account, choosing your reseller plan, and making a payment.
- Create Hosting Packages: You’ll divide your bulk resources into smaller hosting packages. This could be based on the disk space, bandwidth, email accounts, and other resources.
- Setup WHMCS: If you choose to use WHMCS, you’ll need to set it up. This includes configuring the automation, billing, account setup, and support ticket systems.
- Market Your Services: Now, you’re ready to start selling. Market your services to potential customers, handle their signup and billing with WHMCS, and provide them with support as needed.
Reseller Hosting Pros/Cons
PROS
- Opportunity to create your own hosting business without the need to manage server hardware or software.
- Additional revenue stream for existing businesses.
- Greater control over resources and client management with tools like WHMCS.
- Can create custom hosting plans tailored to your clients’ needs.
CONS
- Responsibility for client support and handling of billing.
- Depending on the hosting provider, you may have limited control over server configurations.
- Cost of additional tools like WHMCS needs to be factored into pricing.
- Quality of the hosting service depends on the parent hosting provider.
Conclusion
While choosing the right web hosting might seem overwhelming, it ultimately boils down to your specific needs.
Consider the size, expected traffic, technical requirements, and growth potential of your project. Weigh these against the costs, resource allocations, performance, reliability, scalability, and level of technical expertise required by each hosting type.
The various types of web hosting can feel overwhelming at first, given the different types and features available. But with a bit of time and experience, you’ll find that it becomes more intuitive.
We hope this guide has provided you with a clearer understanding of the options and their best uses. If you have any further questions, don’t hesitate to leave them in the comments and we’ll get back to you as soon as we can.


