This article assumes you have no experience in how to set up a website, so we’ll try to give you an overview of the various ways you can create one and the resources you need to build your website.
I’ll try to keep explanations as short and to the point as possible.
It’s not a complicated topic, so don’t be intimidated by the long content. It’s just that there’s more than one way to make a site and I’m trying to give you a good overview of what your options are, so you can make an informed decision.
Also I don’t want to waste your time with my life story (shoutout to recipe sites), but I will just write a few sentences on the matter because I think it’s useful for anyone that’s intimidated by the amount of information online and by the unknowns of creating a website.
If you’re a complete beginner all these notions will probably seem intimidating, but it’s just difficult to grasp at first. You just need to go through the motions of setting up a site, and pretty soon you’ll develop an intuitive feel for creating and editing websites.
I was skimming the results and didn’t want to waste time reading each one of them. I just figured they’re low quality 5000 word blog posts full of fluff content that are ranking at the top of Google unfairly.
My thoughts were “can you just stop with all this WordPress stuff!? I don’t know or care what WordPress is! Just show me how to make a website!!”.
(WordPress is essentially a popular software that helps you build websites, but at first I didn’t get it because I was tired of fluff blog posts)
So if you’re feeling overwhelmed, just know that I know the feeling, so I’ll try to keep things clean and simple.
Table of Contents
What You Need to Build a Website
The resources you typically need to set up a website are the following.
A Domain Name
This is what the website name is called, like in my case bytexd.com.
A .com like bytexd.com usually costs ~$10 per year. Other extensions (.net, .io, .org, .xyz, etc) may have varying prices. You can also get domain names for as low as ~$2 (such as .xyz, for example).
The company you buy these from is called a registrar. My favorite registrar is namecheap.com. Almost all my domains are from them, and I recommend them.
Connecting a domain to a website builder or web host takes a few minutes. You just need to get comfortable with it. I know it’s a pain learning the ropes at first.
Web Hosting
Your website is basically a bunch of files hosted in a folder on a computer somewhere in the world, and exposed to the internet.
Web hosting represents that computer somewhere in the world.
For good and affordable shared web hosting I’d recommend NixiHost and the other web hosts recommended in the sidebar here https://www.reddit.com/r/webhosting/. I’m using NixiHost in this tutorial and I love it.
You can learn about the multiple types of web hosting here.
Shared hosting, which I consider to be typical beginner hosting, is about ~$3-6 per month, depending on the web host and if you pay monthly or over a longer period of time. If you pay for a longer period of time, the price will likely go down.
Types of Web Hosting
I don’t want to complicate this tutorial by throwing all sorts of info at you right away, but I think that it’s important to understand some things regarding web hosting earlier. We have a separate tutorial for a detailed look at the main types of web hosting.
There are a few types of web hosting:
Shared Hosting
Shared hosting is often the least expensive way to host a website, because the hosting company can place multiple websites on one server and divide the cost of the server among the websites. This type of hosting is good for small websites that do not receive a lot of traffic. It’s usually the go to web hosting for someone who doesn’t know or want to deal with handling their own server.
VPS (Virtual Private Server)
A Virtual Private Server (VPS) is a web hosting term used to describe a web hosting environment where the web hosting provider creates a virtual server that runs on one physical server. Users can install any software they like on their virtual server, and they are also responsible for maintaining their own system security.
Dedicated Hosting
Dedicated Hosting (or a dedicated server) is a web hosting service that is leased to a customer by the web hosting company. The customer is the only one who can use the server. This means that the customer is responsible for configuring and maintaining the server, and the web hosting company is not responsible for any issues that may occur. Dedicated servers are often used by businesses that require a lot of server resources, such as storage space and bandwidth, or by websites that receive a high amount of traffic.
Cloud Hosting
Cloud Hosting is a relatively new technology that has gained in popularity in recent years. It is a type of web hosting that uses clusters of servers to provide users with scalable and reliable hosting services. This means that if your website experiences a sudden surge in traffic, your host will be able to automatically add more servers to the cluster to accommodate the increase in demand. This makes cloud hosting a great choice for websites that experience high traffic volumes or that require a high degree of flexibility and scalability.
Cloud hosting also includes VPS hosting – instead of a cluster of servers you just launch one server.
Managed Hosting
Unless otherwise specified, web hosting is usually unmanaged. This means the provider ensures you receive your service as advertised, and you’re in charge of managing it.
However if it’s managed hosting, the provider takes care of things like server maintenance, security, and website performance, while the customer can focus on running their business. This gets a bit more expensive than regular hosting.
Creating Your Website
To create your website you can either use software that makes it easier for you to start making websites, or you can even start with a text file and write the code yourself.
Website Creation Software
This is the software that will help you easily set up your website. Website creation software is constantly improving and trying to meet everyone’s needs while becoming easier to use.
You’ll see this type of software called things like website builder, content management system (CMS), or something like that, depending on how they work. If you want to make an ecommerce website, the term for this type of software is typically ecommerce platform. But they’re all essentially software that help you make websites.
Some popular examples of this type of software are WordPress, Drupal, Shopify, Discourse, Wix, Squarespace, and others.
Pricing for website building software varies from free to $5/mo, $10/mo, $20/mo or more, depending on what it’s offering.
Services such as Shopify, Squarespace, Wix, and others, will most likely charge a monthly fee for their service and they’ll handle everything that has to do with web hosting, so you won’t have to worry about it. This is great for people who don’t have the time or inclination to deal with such things.
Creating Your Website from Scratch
You can also create your website without the help of website builders or content management systems like WordPress.
Like we said in the Web Hosting section, your website is basically a bunch of files working together, hosted on a computer somewhere in the world, and exposed to the internet.
You can write those bunch of files yourself, in a way that browsers understand, and you have yourself a site.
The languages you need to use (which may confuse you at first) are:
- HTML, which is the content and structure of a web page
- CSS, which then is used to manipulate the HTML, to decide how the content will look like, where it’s placed and how it’s sized
- Javascript, which is used to make a dynamic website by making it interactive. HTML and CSS mainly structure a website and make it pretty, but Javascript makes it more engaging for the user.
That short course really helped me develop intuition when I was confused about how HTML, CSS and JS work together.
If you’re completely new to these concepts then I highly recommend it. You don’t need to install anything, just login and follow what the guide tells you. It’s simple and fun.
Let me know how it goes!
Time (to customize your website)
After you’ve done the initial setup for your website, you’ll want to invest some time to get familiar with the software or service you’re using, and how to make various customizations to your site.
The great thing is, creating and customizing websites is easier than ever. Website creation software strives to become easier to learn and use, and you can find tutorials for just about any little thing you want to edit for each software or service.
It’s difficult to estimate how much time you’d require, because it depends on the software or service you’re using, how much knowledge you already have, what edits you want to make, and other such things that make it difficult to estimate.
How It All Comes Together
As an example we’ll assume you already bought a domain name – for example mywebsite.com
The next step depends on how you decide to build your website.
When Using a Website Builder (Shopify, Wix, Squarespace, etc)
If you’re creating your website using a website builder, then you don’t need to worry about web hosting and security.
Mostly everything is handled for you.
They may even sell domains with their website building plans so they may make the setup process seamless, because they instantly connect your domain name to your website.
If you don’t care about having a pretty domain, like yoursite.com ,the website builder will most likely provide you with a subdomain or something like that (such as https://hello010632.wixsite.com/bytexd-wix-demo). If you’re ok with that then that’s fine to skip the domain name.
Customizing Your Website
Using website builders you can start customizing your website right away, and you have various ready to go features, depending on the website builder you’re using.
Here’s how the Wix dashboard looks like.

Connect Domain Name to Website Builder
All you need to do is connect your domain name to your website builder. Website builders should have instructions for multiple scenarios, depending how you purchased your domain name. You may have purchased it from them or from a registrar like Namecheap.
You can search online for something like custom domain shopify, custom domain wix, or custom domain squarespace. You’ll find results like the following:
Connecting a third-party domain to Shopify
Connecting Your Own Domain Name | Help Center | Wix.com
Connecting a domain to your Squarespace site
Reputable website building services will offer good documentation about how to connect your domain name if you:
- bought the domain from them
- bought the domain from somewhere else and you need to connect it to them
- bought a domain from somewhere else and want to transfer it to them, so you can manage it just like you bought it from them
When Using a CMS (WordPress, Drupal, Magento) or from Scratch
If you’re using a CMS or creating a website from scratch then you’ll need to buy a domain and web hosting, then you’ll set up your website on your web hosting.
Most of the time you’ll want your own domain name, as opposed to using website builders, that at least give you some kind of subdomain to use for your website.
Connect Domain Name to Web Hosting
Now we want to connect the domain to your web hosting.
This is how I think of this:
Remember earlier when we said that your website is a bunch of files on a computer somewhere in the world, and your web hosting is that computer?
When we configure our web hosting to tell it that we have a site called mytestweb.site, we’re basically creating the mytestweb.site folder on the web hosting.
Then we point our domain name to our web hosting.
When someone visits mytestweb.site in their browser, the browser will check where the domain points and it will see it’s our web hosting. It will visit it, and the web hosting will serve our website to the browser, which will then be displayed to us to interact with.
Your registrar should have instructions on how to do this. You can search for something like [registrar_name] point domain to hosting.
In my case I’m using Namecheap. I’d search for something like namecheap point domain to web hosting. The first result is How to Connect a Domain to a Server or Hosting. There you’ll see instructions on how to navigate the Namecheap dashboard.
It’s an intuitive process once you get the hang of it. We’re assuming this is the first time you’re doing this, so we need to see some clear instructions.
Point Domain Name to Web Hosting
To point your domain to your web hosting you’ll need to go into your domain registrar’s dashboard and find the DNS section, or something indicating the change of Nameservers. If you can’t easily locate it then you can just Google something like [registrar name] nameservers or [registrar name] change dns. (For example here’s what I found for Namecheap – How to Change DNS For a Domain)
Your web host will instruct you to update something called nameservers.
As you can see in the screenshot below, the nameservers NixiHost told me to add to my domain are:
ns111.nixihost.com
ns112.nixihost.com
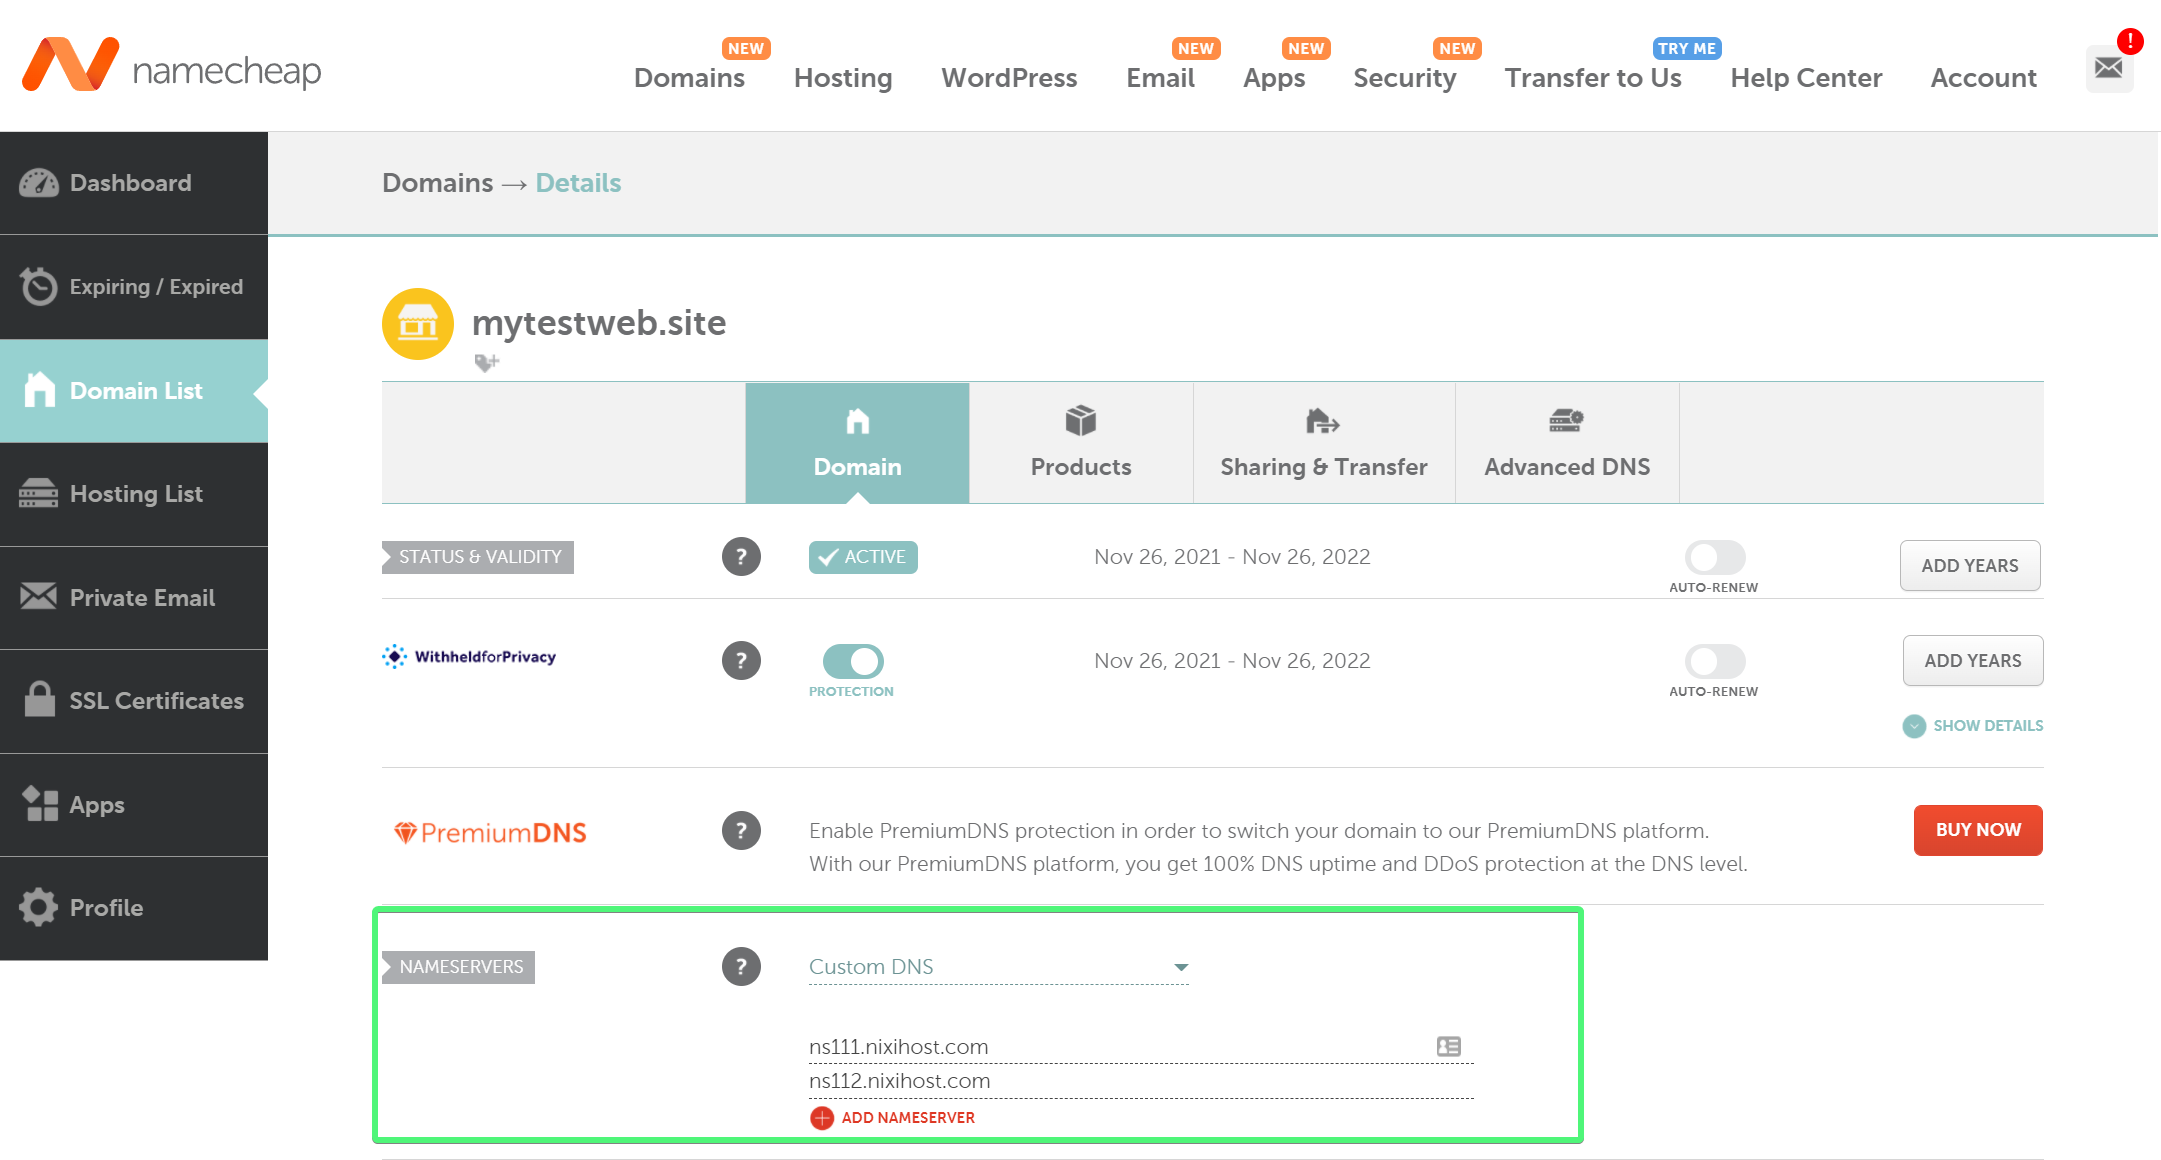
Add them and just click save in your registrar’s dashboard and that’s it.
Add Domain Name to Web Hosting
Upon Buying Web Hosting
If this is your first time buying web hosting and a domain, then most likely your web host will ask you to input your domain during the buying process.
For example, here’s how on NixiHost I’m asked for my domain name during the buying process.

From Your Web Hosting Control Panel
Depending on your web host, you should be able to create more than one website. Limitations vary between web hosts and the hosting plan you’ve bought.
If your web hosting plan allows more than one website, then you should also be able to add domain names from some kind of control panel.
The most popular web hosting control panel is called cPanel, and it’s very probable that the web host you’ve chosen is also using it.
Access cPanel (or another web hosting control panel)
You should find instructions on how to access your web host’s control panel in your email, or in your web hosts dashboard or documentation.
This is how cPanel first looks after you’ve logged in:

cPanel Appearance: The way cPanel looks may also depend on the default theme. Your cPanel may look different but mostly have the same functionality.
If I click on Domains I can see that NixiHost added the domain in cPanel (the domain I used when buying the web hosting).

Also, as you can see, there’s a button Create A New Domain. You can use that to add new domains to your hosting, so you can create multiple websites.

That’s the term used to describe the base folder of your website.
With cPanel, your document root will usually be /home/your_domain/public_html.
Set Up Your Website
Now that our domain is pointing to our web hosting, we can set up our website.
You can either create a website from scratch or install a platform like WordPress, Magento, Drupal, and others, that do most of the work for you.
Create a Website from Scratch
In this tutorial won’t create a site from scratch. If you’re not familiar with HTML, CSS, Javascript and setting up a website this way, then I recommend the following free resources:
- Learn to code HTML, CSS, and Javascript with Dash (Free). I have done this myself some years ago and I love that it’s short, fun, and to the point. The fact that it was fun was very important to me because I was very impatient.
- You can find awesome free videos on YouTube on this topic. For example HTML Full Course – Build a Website Tutorial from FreeCodeCamp.org. You can also just watch the video to get an idea of how things work, and then do one of the other courses mentioned above.
- Responsive Web Design Certification by FreeCodeCamp.org (Free) – this is a great interactive tutorial on HTML and CSS. I have also done it myself. You can learn JS in their next course on Javascript. I highly recommend FreeCodeCamp.org, because they’re genuinely offering excellent free tutorials with no strings attached. Just go there, log in, and let them guide you.
- MDN Web Docs by Mozilla (Free) – a fantastic resource to learn and get a deep understanding of web technologies. This might seem a bit more intimidating since it doesn’t offer an interactive tutorial, but if you start reading you’ll find that the people writing it are experts who know how to explain important concepts to beginners who have no experience in web development. Just give it a try and give it 10 minutes. I previously avoided it for years because it seemed intimidating and I regret it.
Create a Website using WordPress
We’ll install WordPress, which is free, and the most popular way of creating websites. (This website is made using WordPress)
You can also install website creation software manually, or automatically, if you have some other software that automates the entire process.
We’ll install WordPress automatically in this tutorial.
It’s very possible that your cPanel has a software installed called Softaculous. You should be able to find it somewhere near the bottom. (cPanel configuration may differ between web hosts, so yours may be located in some other section)

It doesn’t handle only WordPress, it handles many other website creation software.
It’s a feature that allows you to install a great deal of popular website platforms. Although WordPress is the most popular platform (or more appropriately content management system), there are other software for various purposes.
For example there’s Magento, for larger ecommerce sites, or phpBB for forums.
If you click on any icon in that area (doesn’t really matter which), it you’ll be taken to the Softaculous dashboard and you can explore the different software you can install from the left sidebar:

In the above image we’re in the Overview tab. If you click on the Install tab you’ll see something like this:

Assuming you’ve connected your domain to your web hosting, you can now set up your website. In my case, I have done this.
Configure SSL Certificate ( https:// )
At this point we can set up our website, but if we don’t have an SSL certificate set up for our domain, then we’ll only be able to visit our website as http://ourwebsite.com and not https://ourwebsite.com.
Nowadays it’s expected that websites have SSL enabled. We won’t get into why now, but you can read what an SSL is here. It’s not always necessary from a security point of view, but it’s best if you have it set up.
There are multiple SSL Certificate Authorities (that’s what the organizations that give you the SSL certificates are called). Some are paid, some are free. I always use a free SSL certificate from an authority called Let’s Encrypt.
The way you set up SSL for your site may depend on your web host. You can search for something like [web_host_name] ssl free or [web_host_name] lets encrypt.
For example, I’m using NixiHost and when I Google NixiHost ssl I find this result where I can see that they offer easy installing of Let’s Encrypt certificates.
Installing WordPress
If you have an SSL installed you can select https:// from the protocol dropdown. If not, you can still select http://

On the right you may have something like this:

This is where you set your admin username/password/email, with which you’d log into your WordPress website. This area may differ, depending on what website creation software you’re installing.
In the Select Plugin(s) area you can select what WordPress plugins you’d like installed at the same time when setting up your website. Plugins are essentially addons that enhance the functionality of your website. You can install them whenever you want, so we don’t have to install anything now.

Finally, you can select your WordPress theme. A theme is like the skin of your website. It adds various functionalities as well, and doesn’t only affect appearance usually. You can install and switch themese whenever you want, so there’s no need to decide now, if you don’t want to.
Lastly you can input the email where you’d like to receive installation details for your website.
Next click install and wait a few minutes and you’re done. The website is set up. If you got to this point then congratulations!
Now when you visit your website you should see it online, looking like the default theme that you’ve chosen.
[picture of website]Customizing Your WordPress Website
To make edits to your website we’ll first need to log into the WordPress dashboard. To do this visit your website at https://yourwebsite.com/wp-admin (or http://yourwebsite.com/wp-admin if you didn’t enable SSL) and you can enter your username or email, and your password.

After you’ve logged in, your dashboard will look something like this. It will probably have less stuff than mine, since I installed another theme and some other plugins, but we’ll get there soon enough.

Choosing and Installing a Theme for WordPress
A WordPress theme is like an addon that controls the look and feel of your WordPress website.
You can easily install a WordPress theme if you hover with your mouse in the left gray sidebar in Appearanc and click on Themes.
It should look something like this:

This is where you have your installed themes. If you want to install a new theme just click on Add New Theme and there you can search and choose out of ~4000 free WordPress themes.

To be honest I never liked or understood how the Preview function works. I don’t find it gives a good overview of how your site will look.
For example, here’s a preview of a theme called Botiga. The preview looks nothing like how the theme would ideally look like on your website. The preview image on the left paints a better picture.

I usually prefer to Google [theme name] wordpress theme and try to find the presentation website for that theme.
For example, if you scroll a bit (at the time of writing), one of the most popular themes is called Blocksy, which is also one of my favorite themes.
By Googling blocksy wordpress theme I ended up on their webstite https://creativethemes.com/blocksy/ where I can see demos and documentation to get a better idea about the theme.
I’ll go ahead and install it.
To apply a theme, you can hover over one of the themes you’re seeing, click Install and after it’s installed click on Activate.
Some themes will need extra plugins to properly function (we’ll talk about those later). After installing the theme you’ll most likely be guided by it to install any other plugin that’s required. For example, you can see here how Blocksy lets me know that it requires Blocksy Companion to be installed.

After I installed Blocksy Companion I’m taken to a screen where I can explore some of what Blocksy has to offer.
Starter Site/Starter Template

As you can see, I clicked on Starter Sites.
Starter Sites (or Starter Templates) is something you’ll see offered by some WordPress themes. They are basically pre-configurations of the theme, along with pre-written content, that will populate your site that you can import and will make your website into a demo site.
This is really useful. Instead of populating your site yourself and configuring it to try to make it beautiful and adding various features, you can import some Starter Site you like, and modify it as you like afterwards.
For example I imported the starter site called Garderobe. This starter site is aimed at being an online store, so it installed a plugin called WooCommerce, added various posts, products, images, menus, and such, and now I’ve got myself a beautiful store that I can tweak to my liking.
I can remove the existing demo products and add my own, change colors, adjust the layout, and things like that.

Here you can see demos for all available Blocksy starter sites.
Free WordPress Themes
You can easily find excellent free WordPress themes in the WordPress Theme Repository. Earlier, when we searched for a theme, we were browsing the WordPress Theme Repository from our website’s dashboard.
Paid WordPress Themes
Paid WordPress Themes are likely to have more functionality and customization options, along with support from the developer.
Some themes offer a free version and a paid version, such as with Blocksy. It’s a good example of how a theme can be great even if you’re using the free version. Themes that offer a Free and Paid version will usually have a pricing page outlining the differences between them. You can see Blocksy’s Free vs Paid differences on their pricing page.
You can check out many excellent premium WordPress themes in the following marketplaces:
- ThemeForest – this is the most popular marketplace for various themes and templates.
- CreativeThemes – this is also a popular marketplace. I haven’t used it, but that’s where they have Blocksy Pro, so I’m confident it’s great.
- There are other popular marketplaces that I probably don’t know about.
Recommended WordPress Blogging Video Tutorial
This is not a tutorial made by me, but I can’t help but recommend it. It is an excellent tutorial on starting to use WordPress in general, along with the Blocksy theme installed.
You can see for yourself, it covers many of the main aspects of using WordPress far better and more efficiently than I could in writing.
Conclusion
Hopefully this tutorial has at least given you an overview of how to start a website, along with the multiple ways you can set one up.
We know there are other aspects we probably missed and we’ll continuously try to improve on our website setup guide. If you have any questions or feedback of any kind then please feel free to leave it in the comments and we’ll get back to you as soon as we can.

