The grep command (global regular expression print) in Linux is used to search for text patterns in files or streams.
In this tutorial, we’ll go through how to use grep command along with its various parameters, using practical examples and beginner friendly explanations.
I’ll be using Ubuntu 20.04 for examples, but the grep command should work the same in all Linux distros.
[powerkit_alert type=”info” dismissible=”false” multiline=”true”]Note: Even though there’s slim chance that the grep command is not installed on the distro you’re using, you should to install it using your distribution’s package manager.[/powerkit_alert]
Let’s proceed to take a look at the grep command.
Table of Contents
- Prerequisites
- Overview to the grep Command
- The grep Command
- Using Grep and Ignoring Case (grep -i)
- Using Grep to Count Occurrences (grep -c)
- Use Grep to Find All Files Containing a Matching Text (grep -l)
- Use Grep and Show Only Matching Text/Pattern (grep -o)
- Use Grep and Show Lines and Line Numbers (grep -n)
- Use Grep and Show Only Match and Corresponding Line Numbers (grep -n -o)
- Use Grep and Show Only Lines that Don’t Contain Matching Text (grep -v)
- Use Grep and Display Lines Before/After Matching Pattern (grep -B or grep -A)
- Grep Recursively Through Subdirectories (grep -r)
- Mixing the Grep Command with Other Commands (somecommand | grep pattern)
- Conclusion
Prerequisites
- Access to a Linux machine
- Acting as a non-root sudo user to ensure a secure environment
Overview to the grep Command
As we said before, the grep command is used for finding words or patterns across files. Going forward, we will see some of its different use cases.
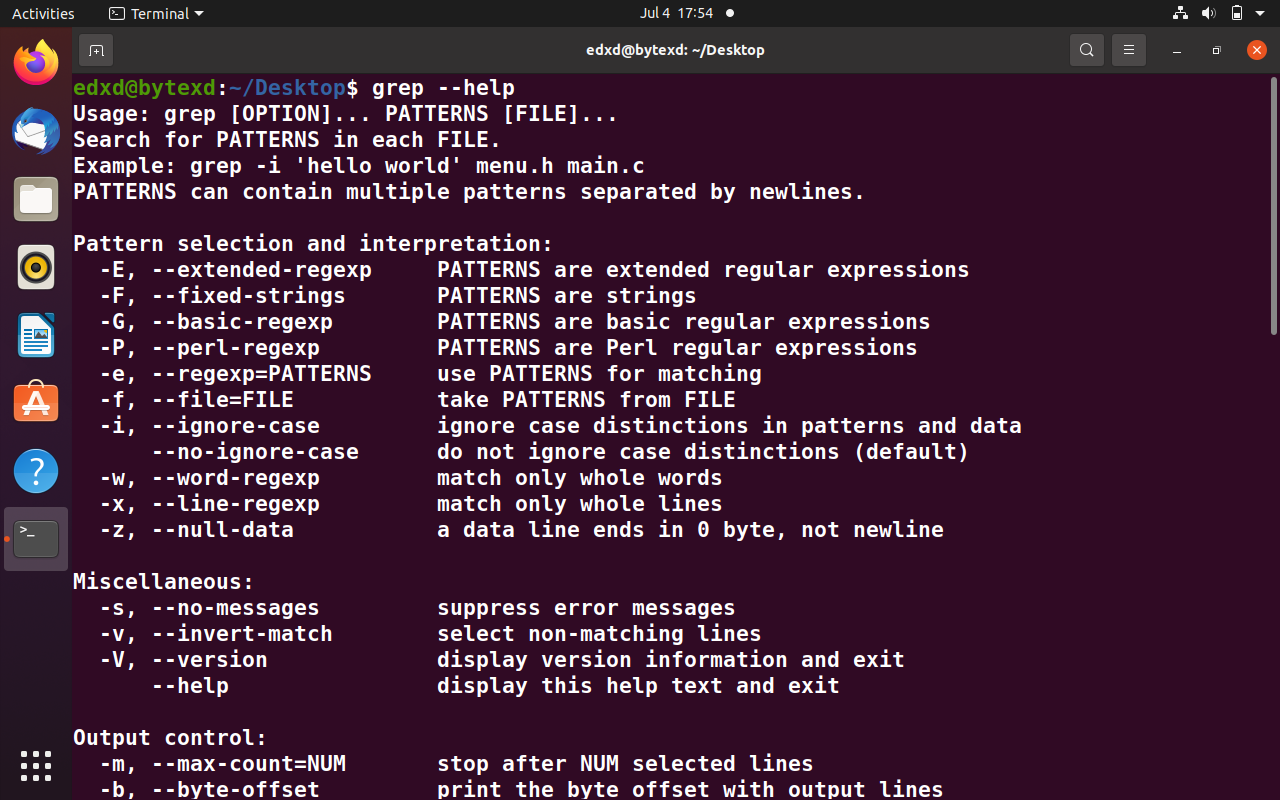
However, before moving forward, let’s look at the grep command and its parameter by viewing its detailed help.
To view the parameters available with the grep command, we need to use the –help parameter:
grep --help
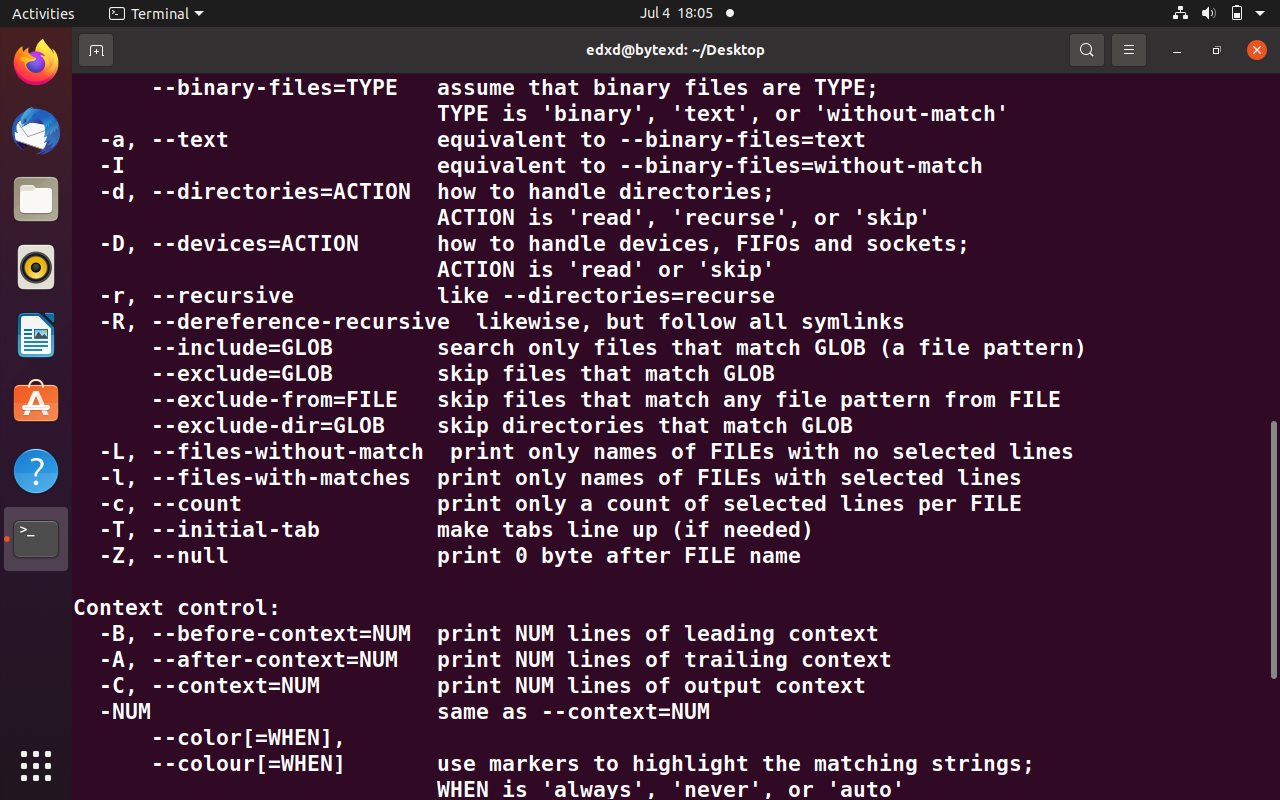
The output lists a series of parameters. Let’s scroll up and view some of the key parameters we will use in this tutorial.
[powerkit_alert type=”warning” dismissible=”false” multiline=”true”]Note: Unlike many other commands, the -h parameter does not display help on grep. You need to use the –help parameter.[/powerkit_alert]
The grep Command
Now that we have a basic understanding of the grep command, we will start using it.
First we need a relatively large text file to experiment on. We have two options: (1) either create this file or (2) simply use a dummy text file to search through.
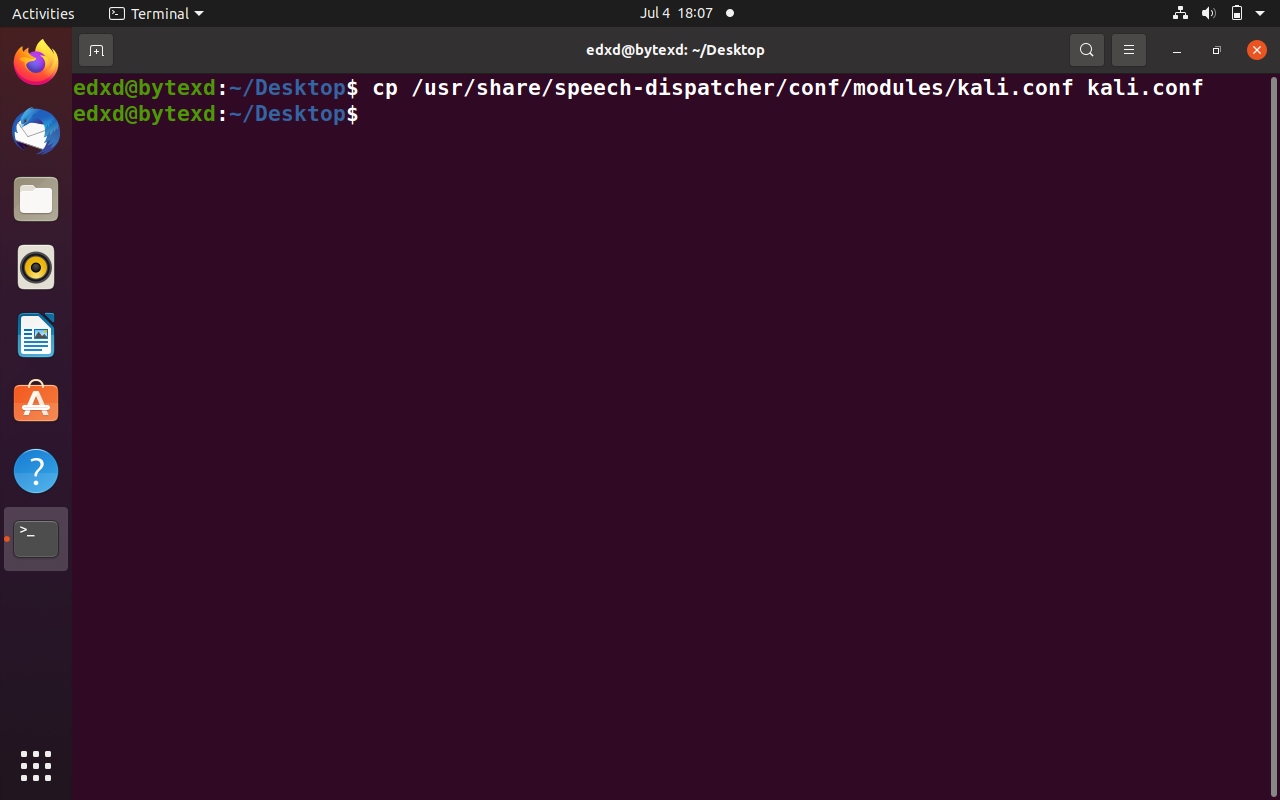
Let’s pick up a lengthy configuration file and copy it to the desktop. We can use the cp command to do this.
cp /usr/share/speech-dispatcher/conf/modules/kali.conf kali.conf
This should makes our life easier because instead of referencing the long path, we can simply use the kali.conf file on the desktop. Remember, with the real configuration files, you should not do this.
grep on]Using Grep and Ignoring Case (grep -i)
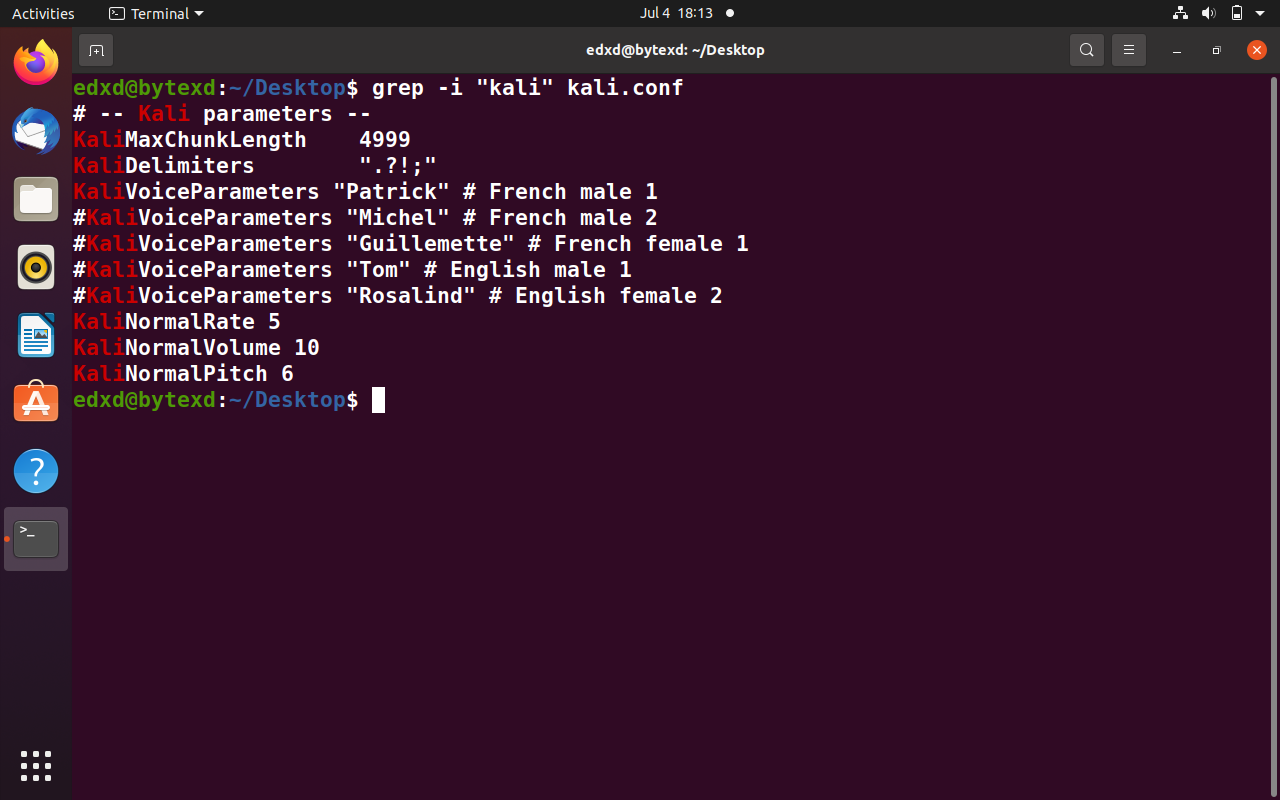
First, we will perform a case insensitive search, which means that it will find the searched word in any casing, be it upper, lower, or a mix of both. To do this, we need to use the -i parameter.
grep -i "kali" kali.conf
Notice that even though we had specified the word kali in lowercase, the kali.conf file included all words that were starting with an uppercase. Still, the grep command has been able to find the required word.
grep and ignoring case]Using Grep to Count Occurrences (grep -c)
We can even find the number of occurrences a word appears in a file.
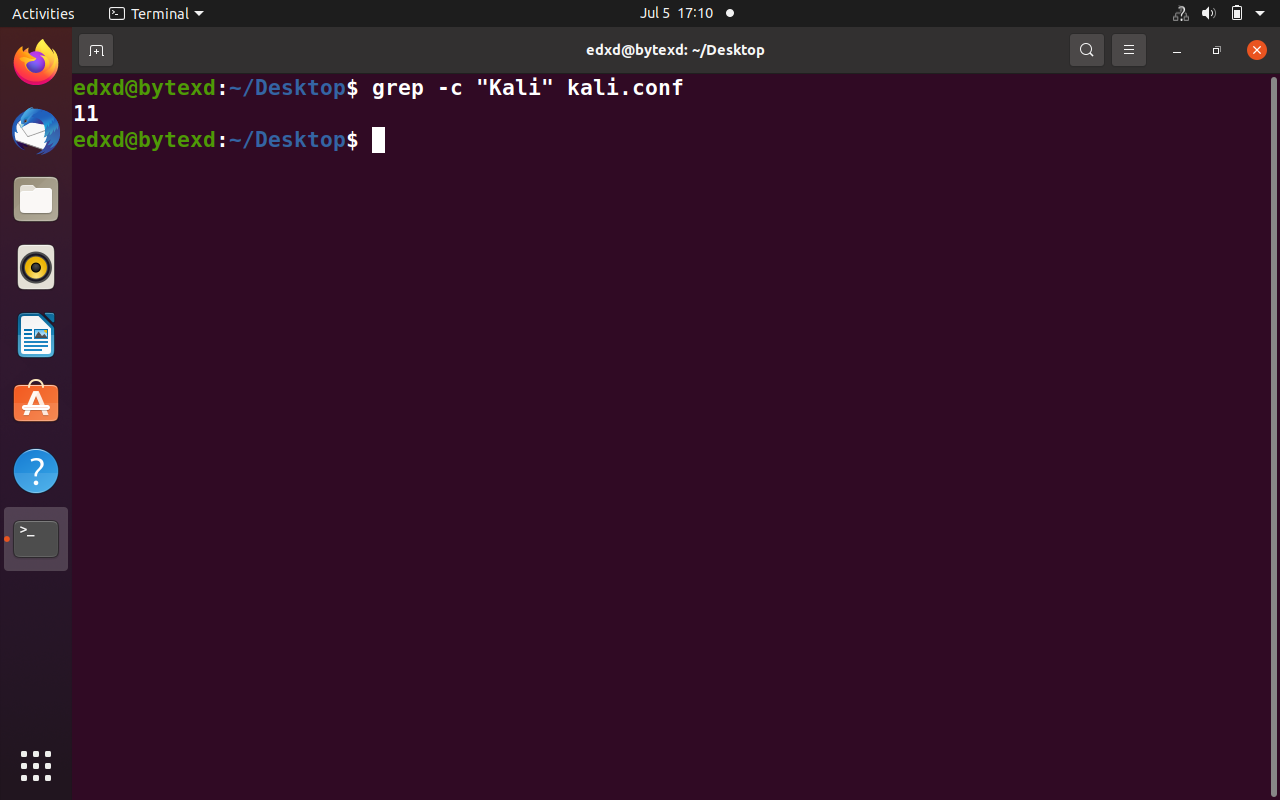
We will use the -c parameter to find the word “Kali” in the kali.conf file. To do this, we need to use the following command:
grep -c "Kali" kali.conf
Notice that even though we had specified the word kali in lowercase, the kali.conf file included all words that were starting with an uppercase. Still, the grep command has been able to find the required word.
As soon as we hit Enter, we get the response. There are a total of 11 occurrences of the word Kali in the kali.conf file.
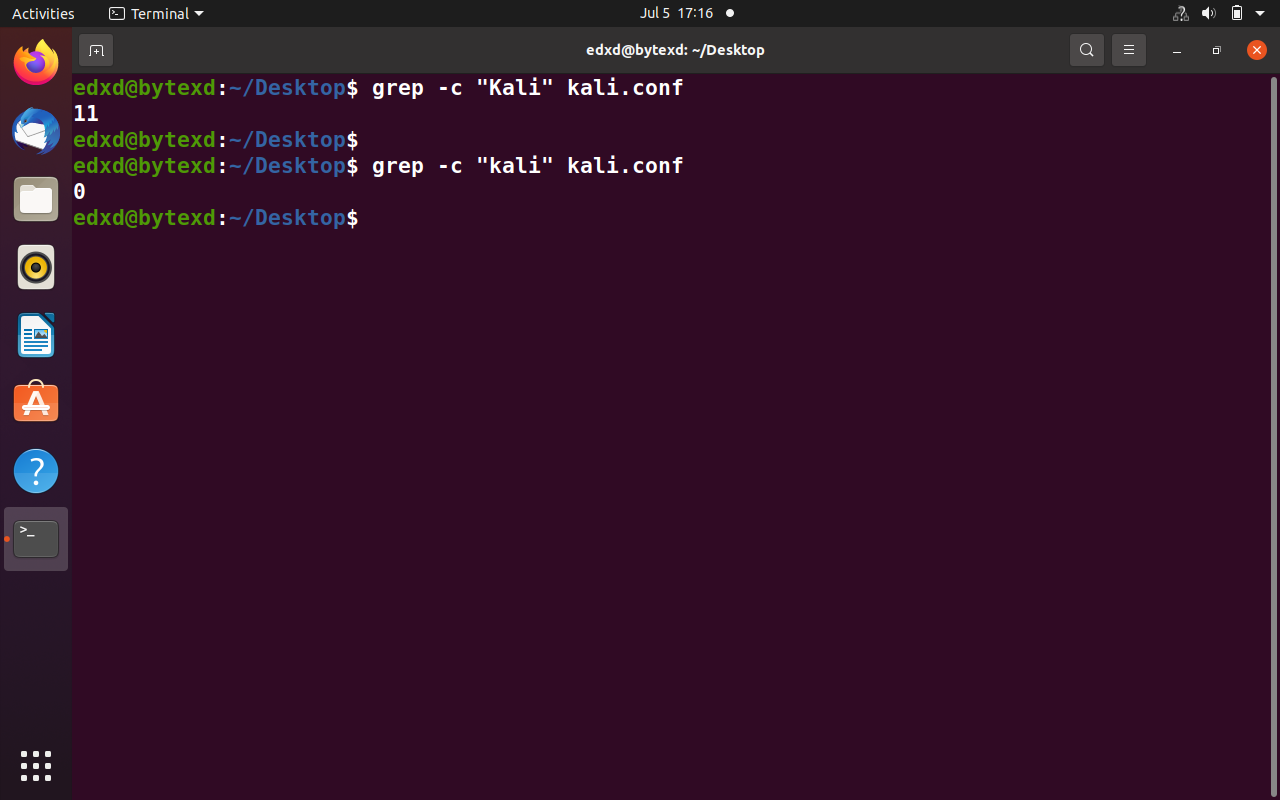
grep -c "kali" kali.conf
Notice that this time the result is 0. So, we should keep casing in mind when we are searching for text.
Use Grep to Find All Files Containing a Matching Text (grep -l)
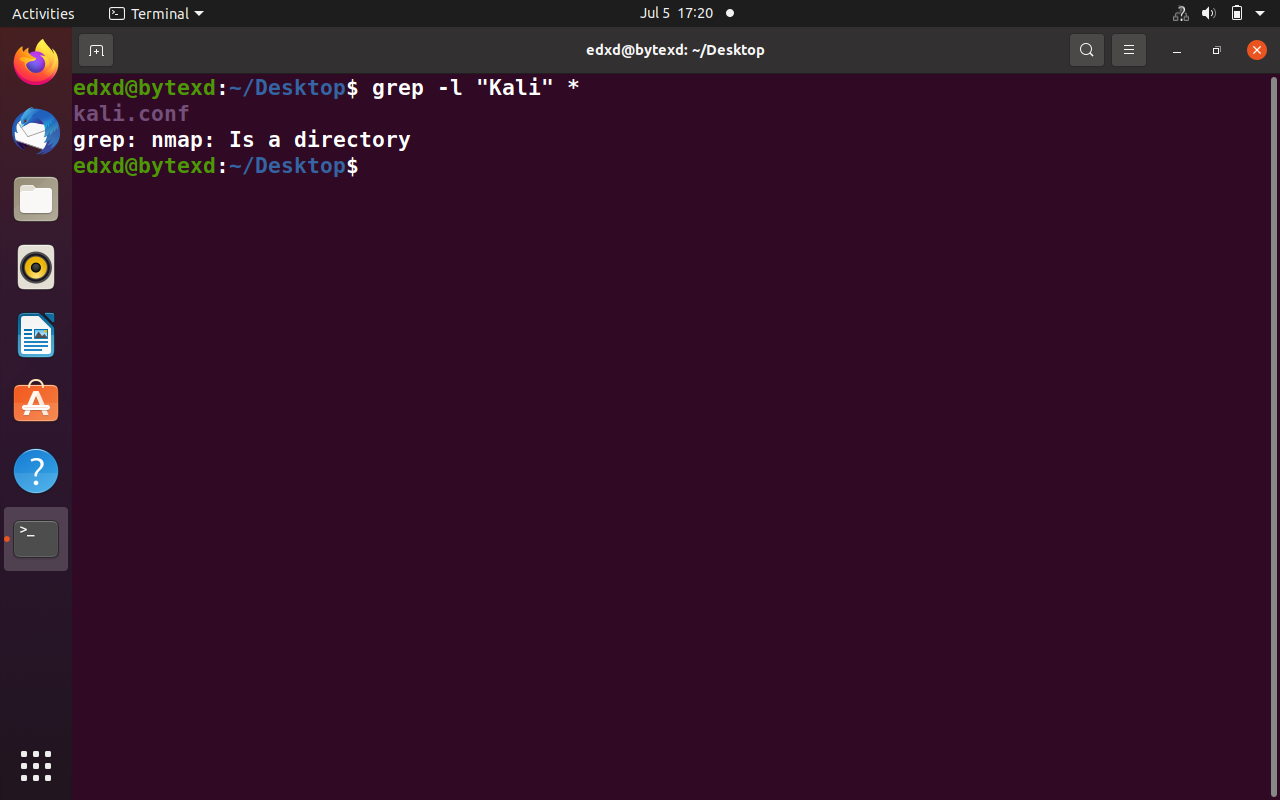
Let’s move ahead, and this time, we will find the files with a specific word or string of words. Until now, we were looking for words, but this time we will reverse our methodology to look for the files with the word “Kali”. To do this, we need to use the following command:
grep -l "Kali" *
Notice that the name of the file is found. With the -l parameter, the grep command searches in the current directory to find the files with the mentioned word.
Previously when we used the -i parameter, the grep command searched for the word and displayed the entire line of text.
Use Grep and Show Only Matching Text/Pattern (grep -o)
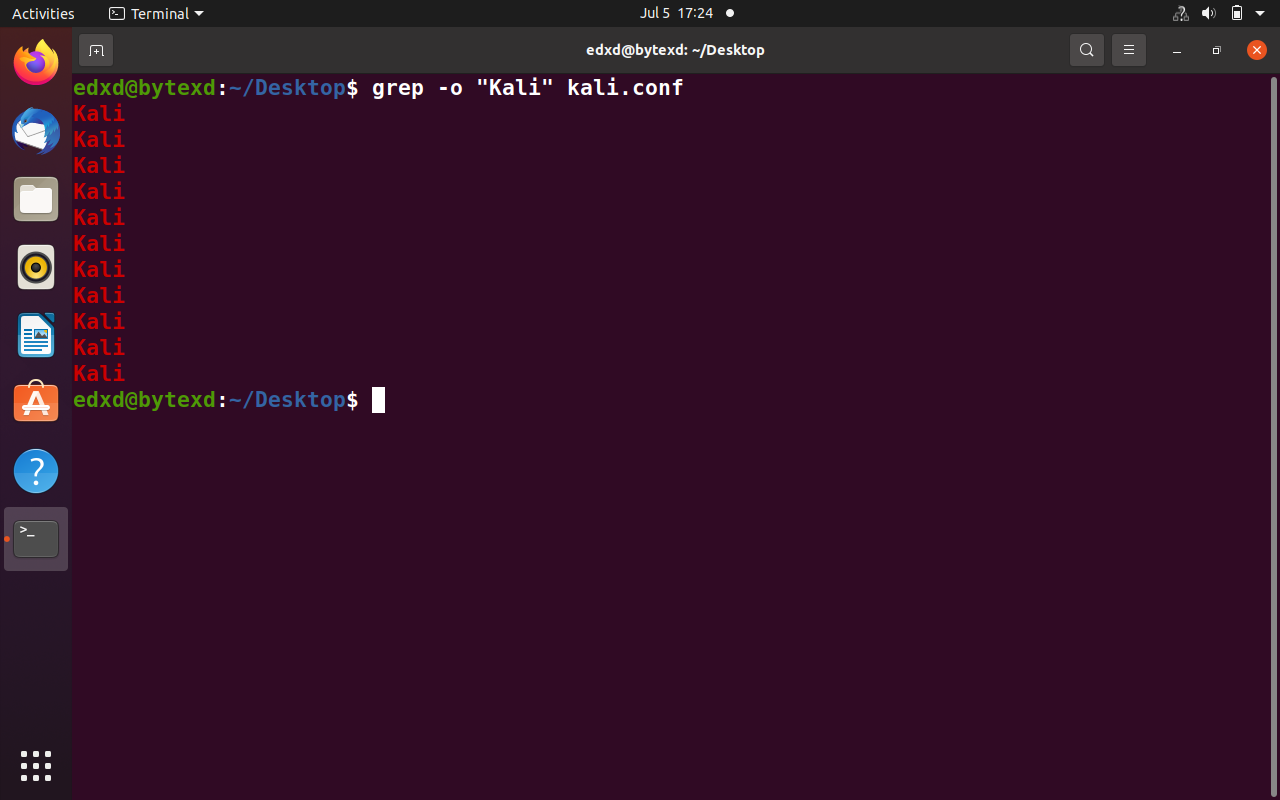
However, if we want to show only the word, we can use the -o parameter instead of -i.
grep -o "Kali" kali.conf
Notice that there are several instances of the word “Kali” listed but without the complete lines of text.
Use Grep and Show Lines and Line Numbers (grep -n)
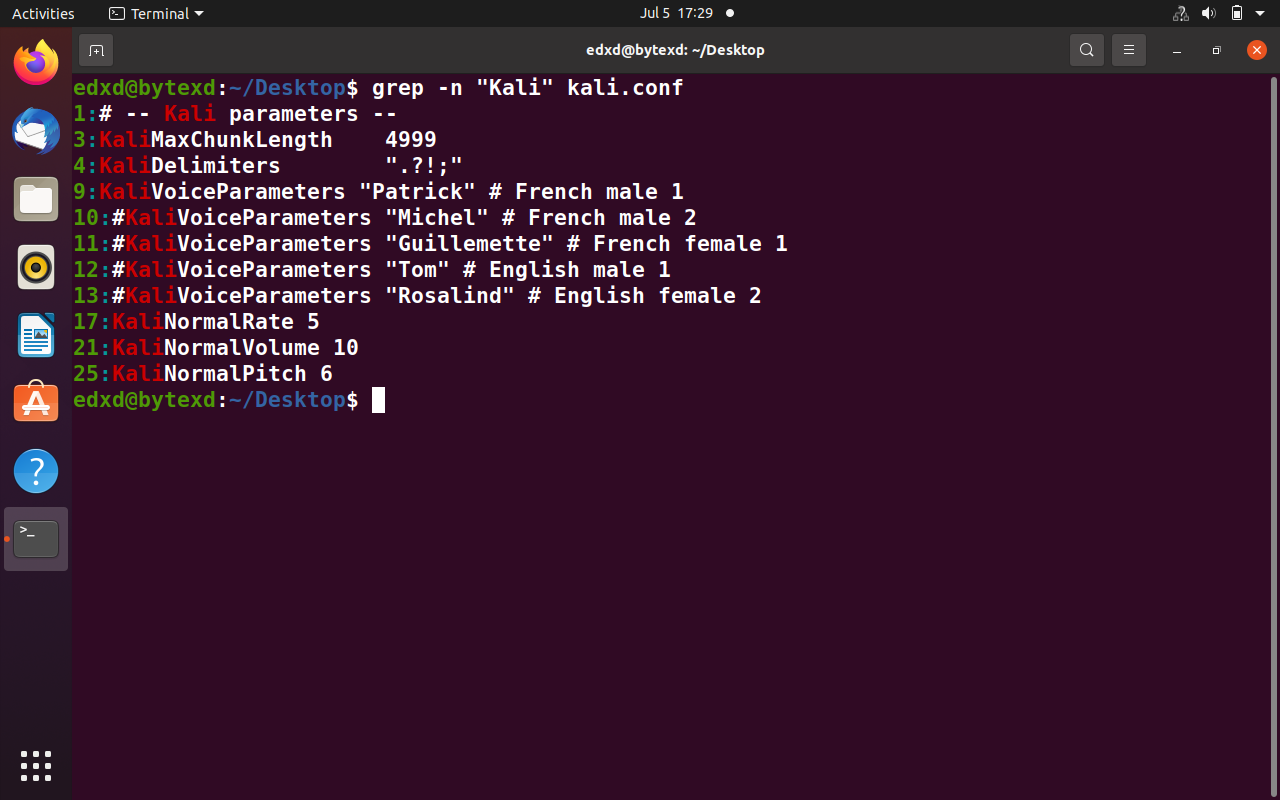
Alright, so far, so good! Let’s move ahead to display the line numbers along with the word or string matched. We can do this with the -n parameter:
grep -n "Kali" kali.conf
Notice that there are several instances of the word “Kali” listed with the complete lines of text.
Use Grep and Show Only Match and Corresponding Line Numbers (grep -n -o)
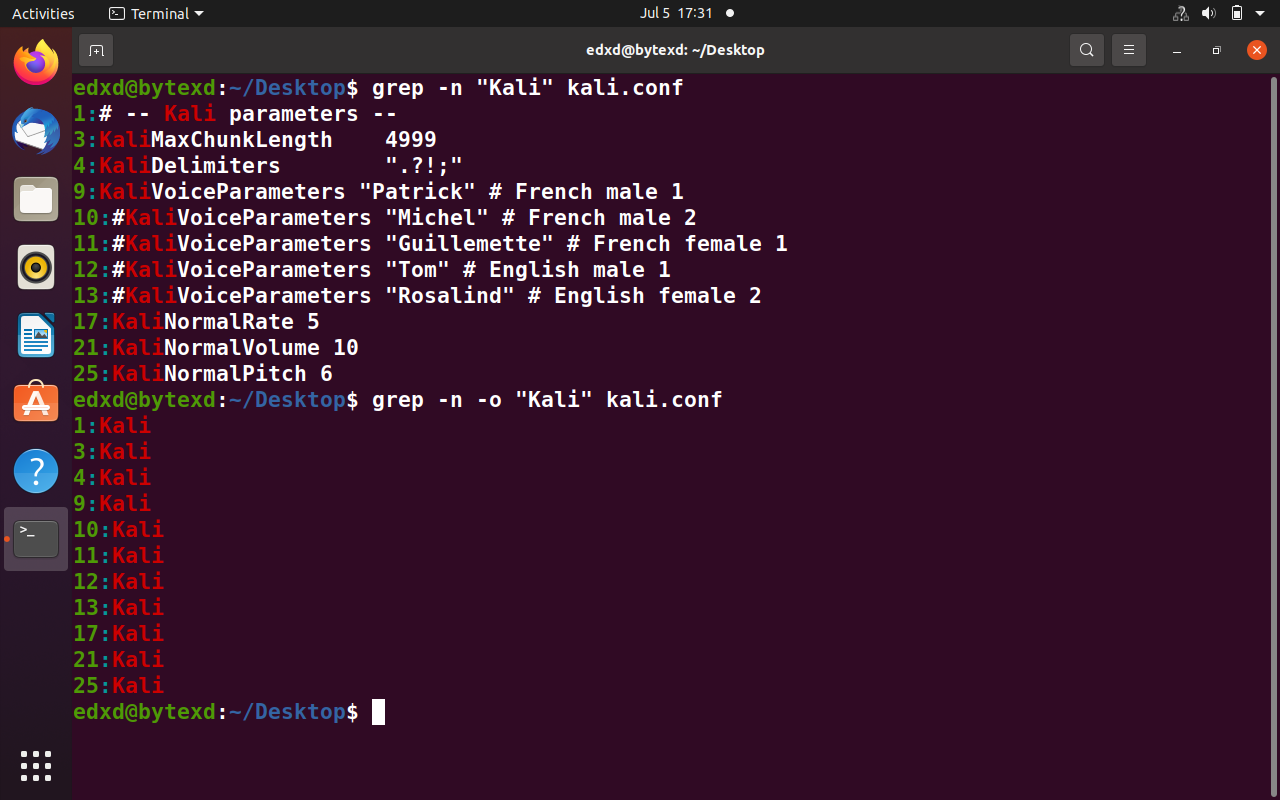
What if we only want to find the line numbers along with the word? We don’t want to see the complete lines of text. Well, to do this, we simply combine both, -n and -o, parameters:
grep -n -o "Kali" kali.conf
Notice that only the word “Kali” is displayed with the line numbers.
Use Grep and Show Only Lines that Don’t Contain Matching Text (grep -v)
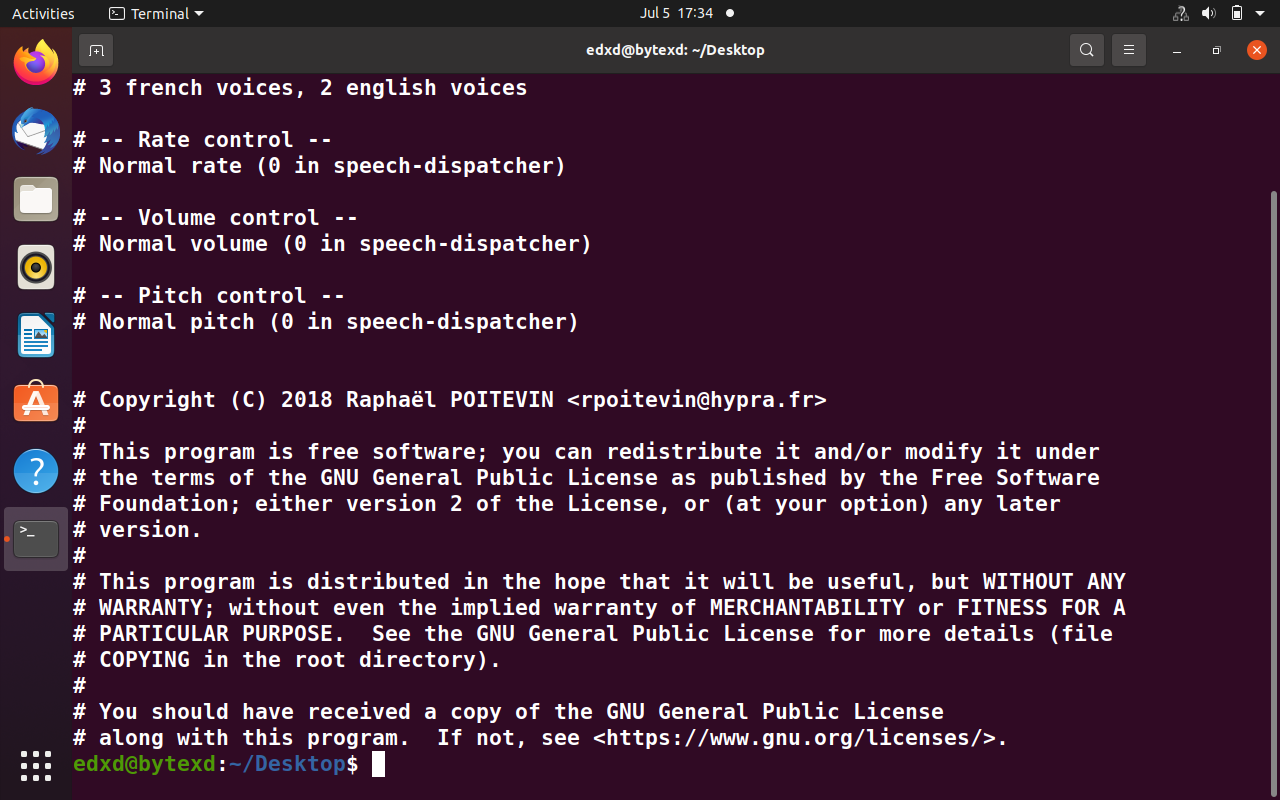
There may be chances when we don’t want to display the lines with the matching text but rather the lines that don’t have the word or string appearances. For example, we want to display all the lines that do not have the word “Kali”. To do this, use the following command with the -v parameter:
grep -v "Kali" kali.conf
Notice that all lines that do NOT have the word “Kali” included are displayed.
Use Grep and Display Lines Before/After Matching Pattern (grep -B or grep -A)
Let’s say that we want to display all lines that come before or after the appearance of a word or string of words.
If we want to display all lines after the word appearance, we need to use the -A parameter. To display the lines before the word appearance, we need to use the -B parameter.
Let’s first attempt the -A parameter with the grep command:
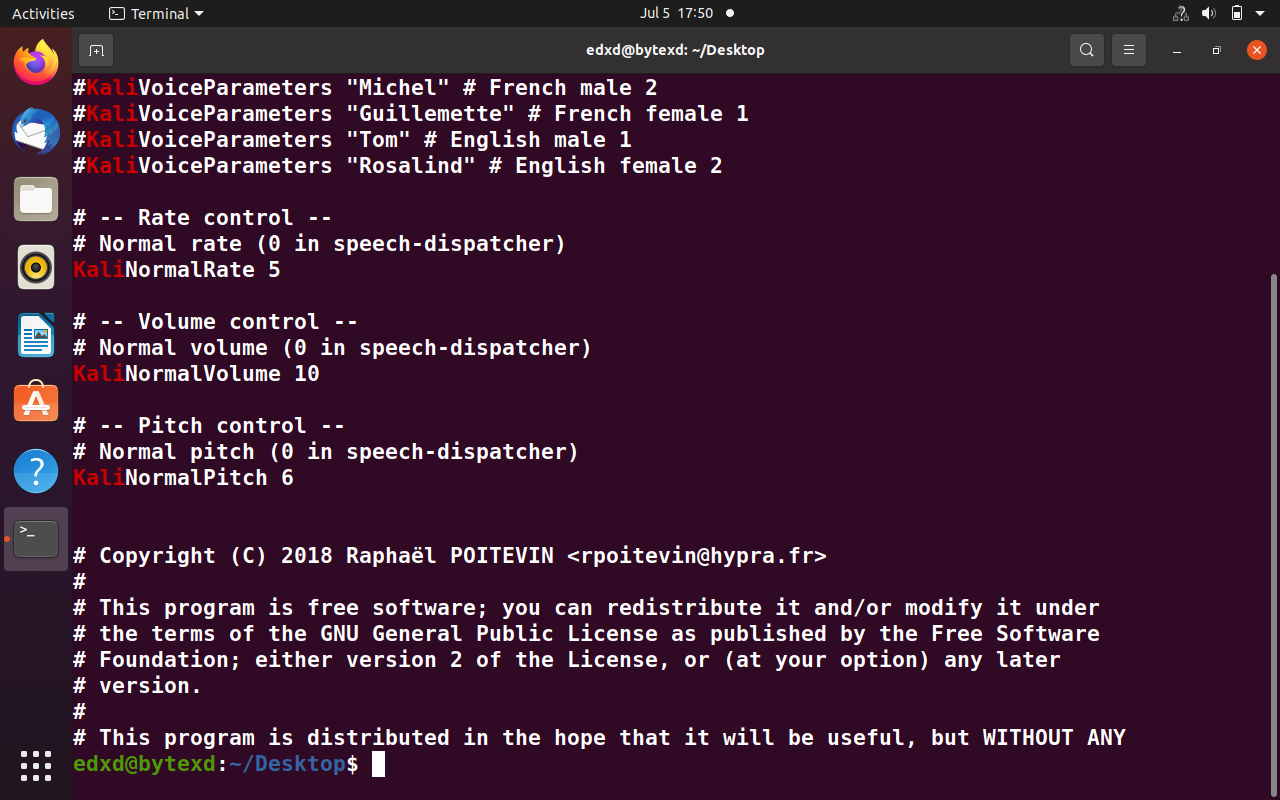
cat kali.conf | grep -A 10 "Kali."
Let’s explore the command we executed.
We used the cat command to read through the kali.conf file. Then, we passed the entire content to the grep command. With the -A parameter, we chose to get the 10 lines after the last occurrence of the keyword “Kali”. Remember, the kali.conf file has several occurrences of the word “Kali”. It will continue to display all occurrences, but it shows 10 more lines after that when it finds the last occurrence.
Notice that there are 10 lines displayed after the last occurrence.
It is important to remember that blank lines are also counted as part of the 10 lines. We can choose to display any number of lines with the -A parameter.
Grep Recursively Through Subdirectories (grep -r)
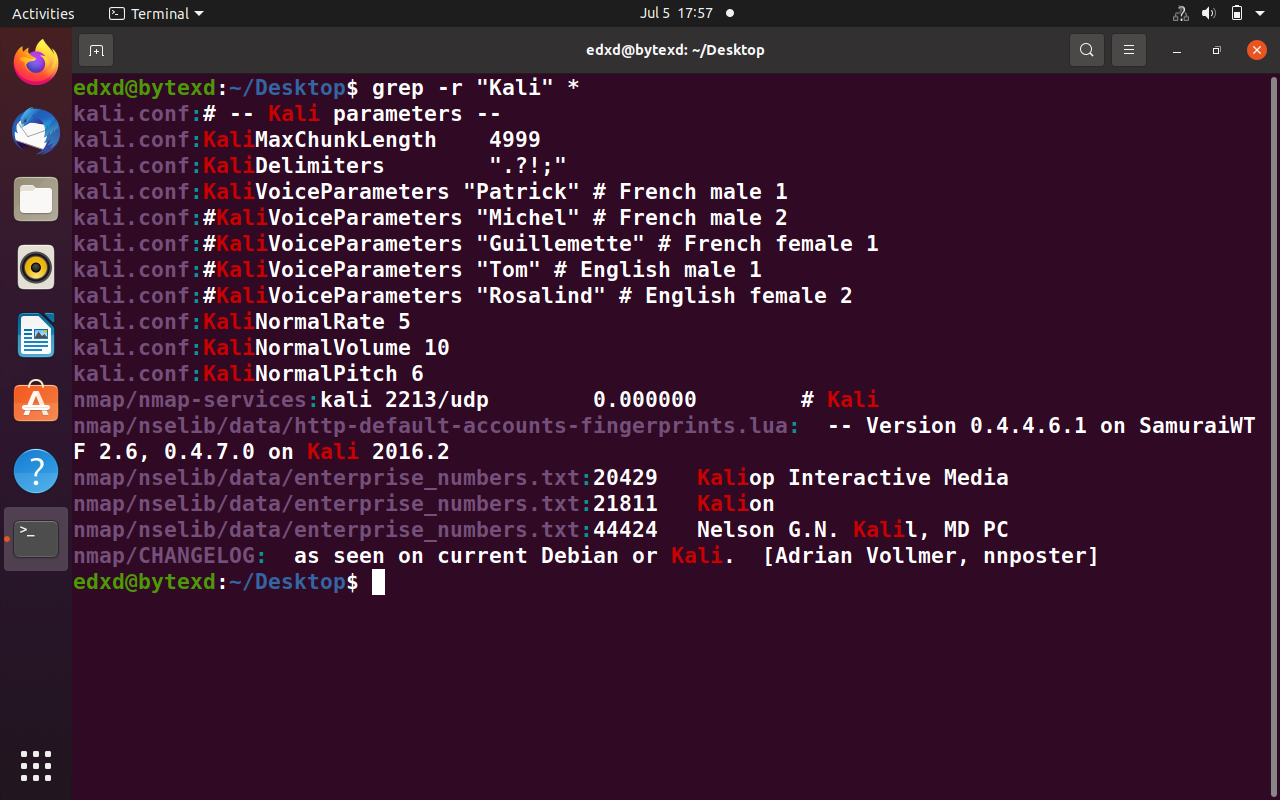
We can also perform a recursive search across all directories using the -r parameter. To do this, execute the following command:
grep -r "Kali" *
Notice that the word “Kali” is searched across all files residing in different directories.
Mixing the Grep Command with Other Commands (somecommand | grep pattern)
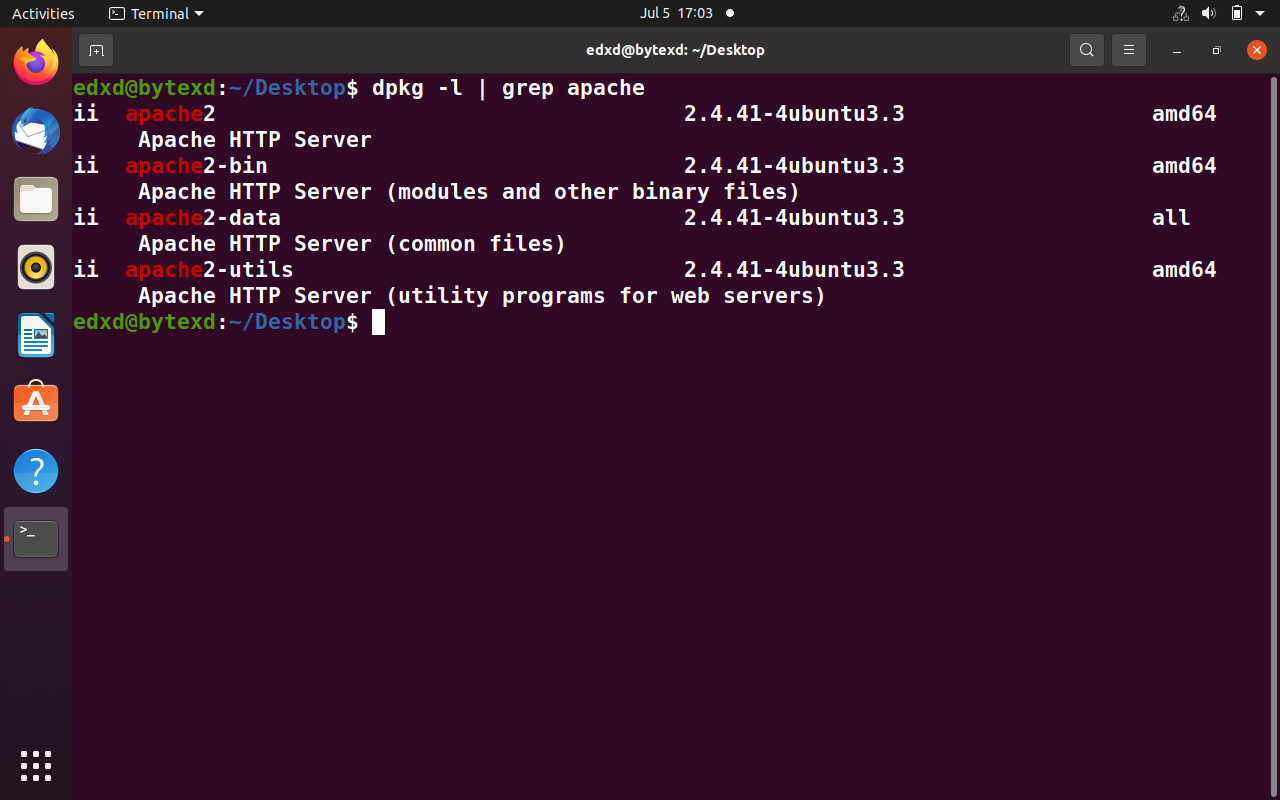
We can use the grep command with the other commands, such as dpkg or any other command. Using the dpkg command along with the -l parameter, we can list all the installed packages. Let’s say that we want to find all the installed Apache packages on our system.
Let’s say that we can take the output of the dpkg command and redirect it to grep to find us the Apache package. Here is the command that will do the trick:
dpkg -l | grep Apache
The dpkg command and the -l parameter will list all installed packages and send their output to the grep command, which will extract the Apache packages. Therefore, we don’t get to see the complete listing of packages found by the dpkg command.
Conclusion
Well done. Hopefully, this tutorial helped you understand the basics of the grep command in Linux. If you encountered any issues, please feel free to leave a comment or contact us, and we’ll get back to we as soon as we can.




Thank you 🙂
Hi Sree,
We’re happy the article was useful to you!