Rsync is a fast and extraordinary utility used to copy and synchronize files locally, copy files to a remote system or copy files from a remote server to your local machine.
Unlike the popular SCP command that copies files securely between two Linux systems, Rsync is much faster as it uses the “delta algorithm.” With this algorithm, Rsync does not copy an entire file over a network. Instead, it only copies parts of the file that were modified.
That feature greatly reduces network congestion as only a small amount of data is sent over the network. During file synchronization, Rsync uses the quick check algorithm, which checks for files that have changed in size or have been recently modified.
Below are some additional interesting Rsync features.
Table of Contents
Rsync Features
- Rsync supports copying additional file information like symbolic links, devices, owners, groups, and permissions.
- Support for exclude and exclude-from options similar to the GNU tar utility.
- Rsync does not require root (sudo) privileges, and any regular user can use the utility.
- It supports pipelining of file transfers which reduces latency costs.
- Rsync uses direct sockets, rsh, or ssh for transmitting data.
- Rsync supports the setting up of anonymous or authenticated daemons. This feature is pretty useful in mirroring.
Rsync Options
Since this post will look at several Rsync command examples, below are some Rsync options that you should know.
- -a: Also known as ‘archive mode,’ this option allows you to copy/ sync files while preserving important information like symbolic links, file permissions, user & group ownerships, and timestamps.
- -r: This option enables you to copy data recursively. It’s mainly used when copying/ syncing directories.
- -z: This option compresses data during transfer.
- -v: It’s also known as ‘verbose.’ It prints what’s happening behind the scenes of the Rsync command on your Terminal.
What is Rsync ‐‐dry-run?
As you have learned from the above section, you can use the Rsync utility to copy/sync files from one server to another using various command syntaxes. There are times when you might want to confirm what Rsync will send over to another server before copying the actual data. The feature that enables you to do this is called rsync --dry-run.
Rsync --dry-run allows you to simulate what would happen when copying the actual data. Therefore, this parameter does not send the data to the server. It only performs a simulation. Most of the time, the output of a Rsync --dry-run command will give you the same output you would get when sending data in a real-world scenario.
Rsync ‐‐dry-run Examples:
Up to this point, you have a good understanding of the --dry-run Rsync option and what it does. Let us look at some practical examples and how you can apply them in real-world projects.
Copy/Sync Files and Directories Locally
For this example, we have two directories on our server – Directory-One and Directory-Two. There is an ‘image.jpeg‘ file inside ‘Directory-One‘ that we need to copy to ‘Directory-Two‘ using the Rsync command. The command you would use to achieve that is
rsync -v Directory-One/image.jpeg Directory-Two/
However, since you want to do a --dry-run and see what exactly will be copied, you will write the command as follows.
rsync -v --dry-run Directory-One/image.jpeg Directory-Two/

From the image above, the command lists the files that will be transferred, including the total number of bytes. It also included the (DRY RUN) message at the end, which tells you that the operation was only a --dry-run and nothing was transferred.
If we wanted to copy the entire ‘Directory-One’ to ‘Directory-Two,’ we would use the command below.
rsync -rv Directory-One Directory-Two/
See the image below.

To perform a dry run of the above operation (syncing directories), you would use the command as shown below.
rsync -av --dry-run Directory-One Directory-Two/
You will get an output similar to the image below.

One interesting fact you will notice when you look closely at the two images above is that a --dry-run also shows the exact bytes that will be transferred. That is a good feature, as you can approximate the impact on the network of any Rsync operation you might want to perform.
Copy/Sync Files and Directory to a Remote Server
The above section has shown you how to perform a dry run on your local machine. This section will show you how to perform a dry run when syncing/ copying files between two servers.
For this particular post, there are two servers – Server-One and Server-Two. There are two directories on Server-One. Those are ‘Directory-One‘ and ‘Directory-Two,’ as seen in the image below.

If you wanted to copy/ sync the contents of ‘Directory-One’ to the remote ‘Server-Two,’ you would use the command below.
rsync -av Directory-One/ [email protected]:/home/server-two
/ that we added after ‘Directory-One.’ That specifies that we are syncing/ copying the files inside that directory, not the entire directory.The image below shows the output when you use the -v parameter.

To perform a dry run of the above Rsync operation, you would write the command as shown below.
rsync -av --dry-run Directory-One/ [email protected]:/home/server-two

When you look closely at the image above, you will notice that Rsync lists all the files that will be copied/synced to the remote server.
Rsync Dry Run With the ‐‐delete Option
The --delete Rsync option deletes any files or folders present in the target destination that was not present in the source. For example, if you sent some files from ‘Directory-One‘ to Directory-Two, any files and folders in ‘Directory-Two‘ but not in Directory-One will be deleted.
To check this out, create some dummy files and folders inside ‘Directory-Two‘ as shown below.

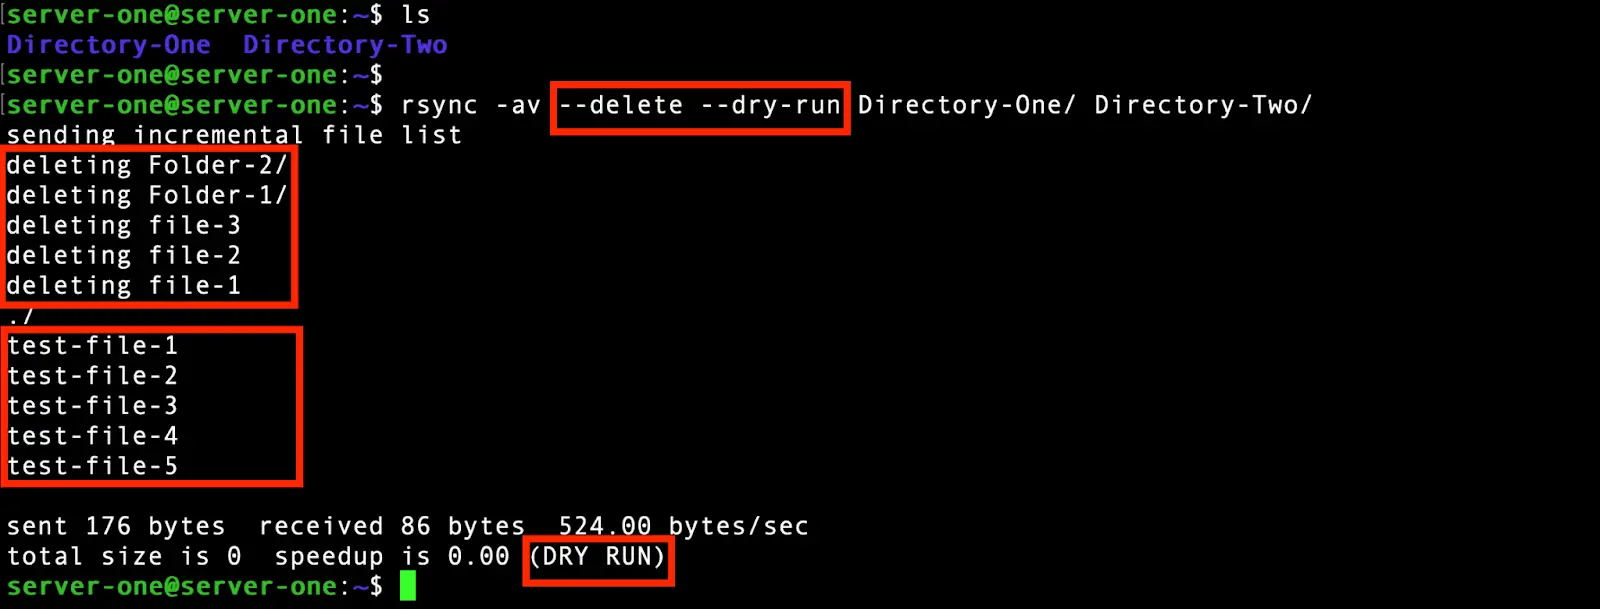
After adding the dummy files, try to copy/ sync files from ‘Directory-One‘ to ‘Directory-Two.’ Remember to add the --dry-run option, as we only want to simulate what would happen if we tried to actually send the files. Use the command below.
rsync -av --delete --dry-run Directory-One/ Directory-Two/
The image below shows the output we got after running the --dry-run command with the --delete option.

When you take a closer look at the highlighted section, you will notice that some files are being deleted while others are being sent. The files being deleted are those that were already present in Directory-Two but not in Directory-One (source directory).
Rsync Dry Run with the ‐‐remove-source-files Option
The --remove-source-files option deletes the copied/ synced files in the source after a successful transfer. This technique comes greatly in handy when dealing with backups. For example, if you have a local backup that you want to copy to a remote server, after a successful transfer, it would be best to delete the source file to create space on your machine.
For this post, we will copy a file from ‘Directory-One‘ to ‘Directory-Two‘ using the --remove-source-files option. See the command below.
rsync -v --remove-source-files Directory-One/test-file-1 Directory-Two/

To perform a dry run of the above operation, you would write the command below.
rsync -v --remove-source-files --dry-run Directory-One/test-file-1 Directory-Two/ test-file-1
The image below shows the output of the --dry-run command.

Conclusion
The Rsync is a free, powerful, and reliable utility that enables you to copy/ sync files either on your local machine or remotely. This post has given you a comprehensive guide on using the Rsync --dry-run command.
This option allows you to carry out (simulate) a Rsync operation without making changes to your system. Do you have any questions or comments? Don’t hesitate to let us know in the comments below.


