Rclone is a command-line utility for managing files in cloud storage in Linux. Using Rclone, users can sync files from a local storage to a cloud storage like Google Drive, Dropbox, OneDrive, etc. Rclone allows users to backup, download, and synchronize files to over 40 different cloud solutions.
This process can be divided into 3 steps that are as follows:
- Configure Google Drive.
- Configure Rclone.
- Backup Files using Rclone.
Table of Contents
Configure Google Drive for Rclone
But before we can utilize Rclone to backup files to Google Drive, we need to enable Google API and create Google Drive API credentials for Rclone.
Enable Google Drive API
Sign in to your Google Account by going to the address: https://console.cloud.google.com and then follow the steps below.
- Navigate to API & Services → Library.
- Search for the Google Drive API and enable it.
- Select the option Create Credentials and follow the next steps to configure the OAuth Consent Screen.
Create Google Drive API credentials
Choose the Oauth Consent Screen option from the left panel of the cloud console and configure it according to the following settings.
- User Type: External -> Create.
- Application name: rclone.
- Support Email – Enter your Google Account email.
- Add scopes: Google Drive API -> … / auth / drive.
Then select Create Credentials from the left side panel and follow the below steps.
- Click on the + Create Credentials menu and select Oauth client ID.
- Application type: desktop app.
- Name: rclone.
- Click Create.
- A client ID and secret will be generated. Please note these down as they will be required during the Rclone setup process.
Now that we have enabled the Google Drive API and created its credentials, we can move on to the next steps.
Configure Rclone
Install Rclone
We can execute an installer script to install Rclone. For installing Rclone on Linux, BSD, and macOS systems, execute the following command in the terminal.
curl https://rclone.org/install.sh | sudo bash
The above script will first check if Rclone is already installed on the system. If it is already present on the system then it will terminate without reinstalling Rclone.
Setting up a remote connection or remote is a prerequisite for connecting to each cloud service. This can be done using the command line.
Configure Rclone via Command Line
Execute the following command to authorize Rclone to access Google Drive.
rclone config
When the above command is executed, the terminal will take you through an interactive setup process in which the client will ask you for the following information related to the remote
- name
- Storage
- client_id
- client_secret
- scope
- project_number
- service_account_file
- access public files
- object_acl
- bucket_policy_only
- location
- storage class
For more details on how to properly configure Rclone, refer to the steps and figures below.
rclone config
2022/06/24 00:31:55 NOTICE: Config file "/home/ahsan/.config/rclone/rclone.conf" not found - using defaults
No remotes found, make a new one?
n) New remote
s) Set configuration password
q) Quit config
n/s/q>
First, Rclone searches for the available remotes i.e. Cloud Providers. But since we are setting up Rclone for the first time we have to create a new remote.
To create a new remote, type n and hit Enter. Then the prompt will ask for a name for the remote. We have named our remote googleR, as shown in the picture below.

After we name the newly created remote, a list of all available cloud solutions will be displayed.
Option Storage.
Type of storage to configure.
Choose a number from below, or type in your own value.
 1 / 1Fichier
   \ (fichier)
 2 / Akamai NetStorage
   \ (netstorage)
 3 / Alias for an existing remote
   \ (alias)
 4 / Amazon Drive
   \ (amazon cloud drive)
 5 / Amazon S3 Compliant Storage Providers including AWS, Alibaba, Ceph, China Mobile, Digital Ocean, Dreamhost, IBM COS, Lyve Cloud, Minio, Netease, RackCorp, Scaleway, SeaweedFS, StackPath, Storj, Tencent COS and Wasabi
   \ (s3)
 6 / Backblaze B2
   \ (b2)
 7 / Better checksums for other remotes
   \ (hasher)
 8 / Box
   \ (box)
 9 / Cache a remote
   \ (cache)
10 / Citrix Sharefile
   \ (sharefile)
11 / Compress a remote
   \ (compress)
12 / Dropbox
   \ (dropbox)
13 / Encrypt/Decrypt a remote
   \ (crypt)
14 / Enterprise File Fabric
   \ (filefabric)
15 / FTP Connection
   \ (ftp)
16 / Google Cloud Storage (this is not Google Drive)
   \ (google cloud storage)
17 / Google Drive
   \ (drive)
...........
Choose the cloud solution of your choice, which in our case is Google Drive. So we type 17 which is the number associated with Google Drive and hit Enter. Then the prompt will ask you for a client_ID and client_secret, that we created at the start of this tutorial.
Enter a Google Drive client_ID and client_secret if you have created one. In case you don’t want to create a client ID and its secret, you can skip this step and continue to the next steps as shown in the prompt below.
But we learned how to create a client_ID and client_secret so it is recommended to create and enter this information. But since it is sensitive information and I don’t want to post it on the internet, I am skipping this step.
This will be more clear after you refer to the picture below.
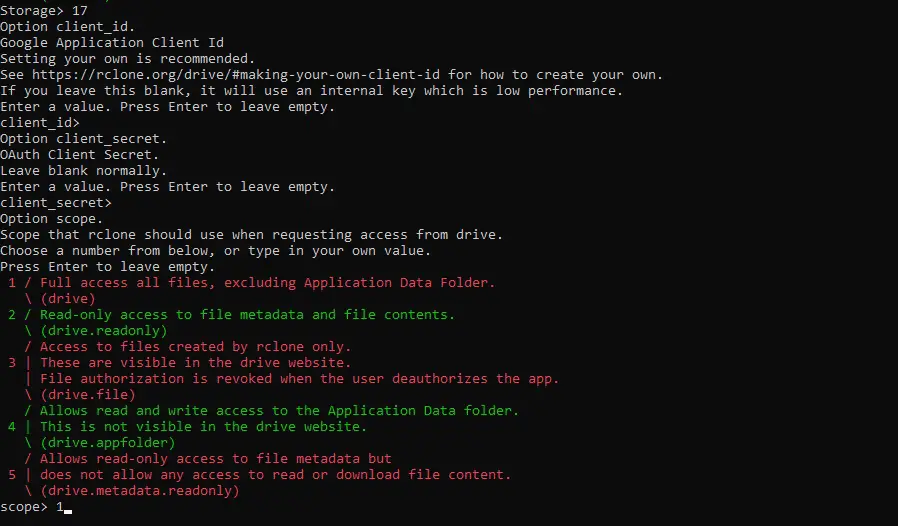
After client_ID and client_secret, you will be asked for the scope of the project. As shown in the picture above, we have selected the first option for the scope which is Full access to all files, excluding Application Data Folder.
Option root_folder_id.
ID of the root folder.
Leave blank normally.
Fill in to access "Computers" folders (see docs), or for rclone to use
a non root folder as its starting point.
Enter a value. Press Enter to leave empty.

root_folder_id>
Option project_number.
Project number.
Optional - needed only for list/create/delete buckets - see your developer console.
Enter a value. Press Enter to leave empty.

project_number>
Option service_account_file.
Service Account Credentials JSON file path.
Leave blank normally.
Needed only if you want use SA instead of interactive login.
Leading '~' will be expanded in the file name as will environment variables such as '${RCLONE_CONFIG_DIR}'.
Enter a value. Press Enter to leave empty.

service_account_file>
Option anonymous.
Access public buckets and objects without credentials.
Set to 'true' if you just want to download files and don't configure credentials.
Enter a boolean value (true or false). Press Enter for the default (false).

anonymous>
As it is clear from the above prompt we can also skip the project_number, service_account_file, and access_public_buckets options.
The last option will is going to determine obj_acl and we can not skip this step. Chose your desired option, which in our case is 1. Type 1 and hit Enter and the prompt will take you to the next step as shown in the figure below
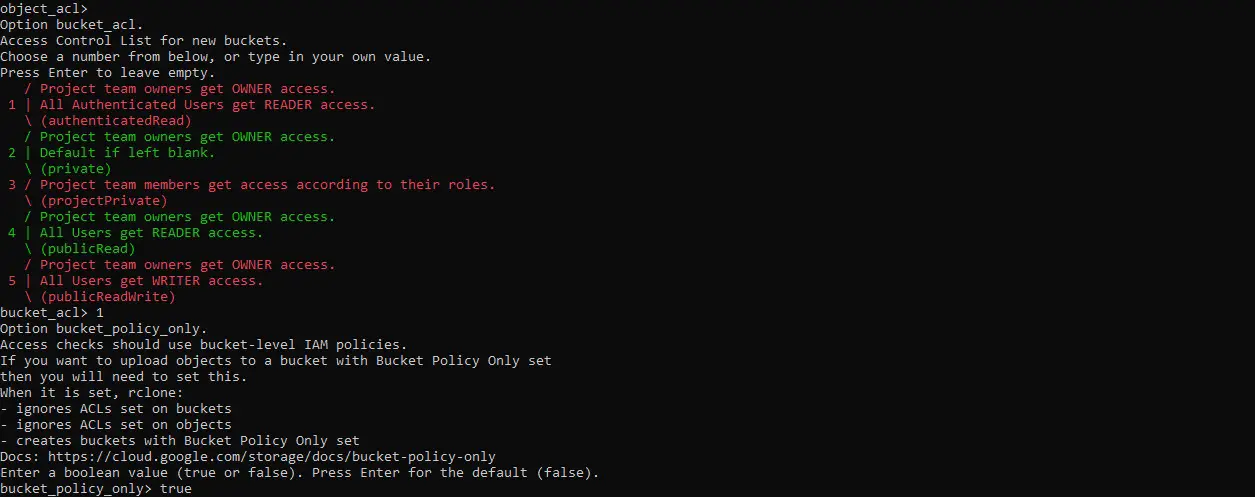
Set the bucket_policy_only to true or false, depending on your use. Then the prompt will ask you for a location for the newly created buckets. Simply type the number associated with your desired location and hit enter.
After that, the prompt will ask you for the storage class to be used for storing objects. Refer to the prompt below for more clarification.
Option storage_class.
The storage class to use when storing objects in Google Cloud Storage.
Choose a number from below, or type in your own value.
Press Enter to leave empty.
 1 / Default
   \ ()
 2 / Multi-regional storage class
   \ (MULTI_REGIONAL)
 3 / Regional storage class
   \ (REGIONAL)
 4 / Nearline storage class
   \ (NEARLINE)
 5 / Coldline storage class
   \ (COLDLINE)
 6 / Archive storage class
   \ (ARCHIVE)
 7 / Durable reduced availability storage class
   \ (DURABLE_REDUCED_AVAILABILITY)
storage_class> 1
Edit advanced config?
y) Yes
n) No (default)
y/n> n
Use auto config?
 * Say Y if not sure
 * Say N if you are working on a remote or headless machine

y) Yes (default)
n) No
y/n> y
2022/06/24 01:20:38 NOTICE: If your browser doesn't open automatically go to the following link: http://127.0.0.1:53682/auth?state=YQGn4PjpKp1caslg8Q32xg
2022/06/24 01:20:38 NOTICE: Log in and authorize rclone for access
2022/06/24 01:20:38 NOTICE: Waiting for code...
Exit the configuration and go to the web address provided in the terminal if your web browser does not automatically open.
As soon as you log in to your drive and give access to Rclone in the web browser, it will automatically give the code to your terminal and your configuration will be complete. The prompt will ask you whether you want to keep this remote, edit it, or delete it. Select the first option as shown in the picture below.
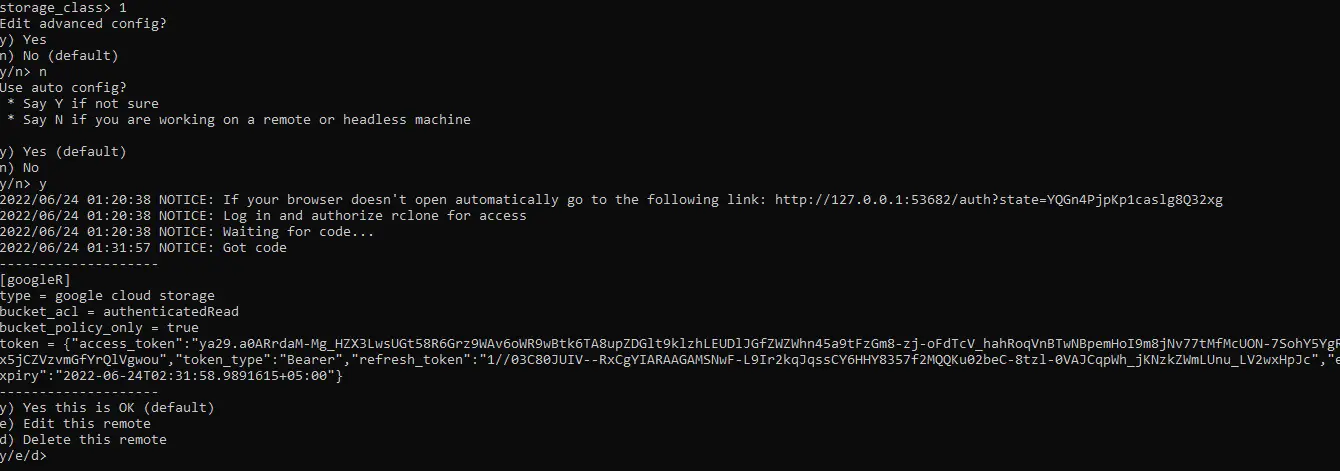
Type n and hit Enter. The configuration is complete now. Now exit the configuration by typing in the respective option.
A new remote googleR has been created. If you wish to create another remote for another cloud solution provider, follow the same procedure again.
To check the list of all the configured remotes, execute the following command.
rclone listremotes
Sample output:
googleR:
Backup Files using Rclone
There are different options that Rclone commands give us to backup files to Google Drive. Let’s go through them one by one to learn what suits best in which situation.
Rclone Copy
The copy command copies the source to the destination without deleting files from the destination. The copy command will skip over files that are already present at the destination i.e. Google Drive. The basic syntax of a Rclone copy command looks as follows.
rclone copy <flags> source:sourcepath dest:destpath
Let’s look at a more specific copy command and break it down to better understand it. The following command
rclone copy --transfers 20 --retries 5 "/home/kiv/h" "googleR:/mybackup"
The above command will backup contents of local subdirectory /home/kiv/h to Google Drive location googleR:/mybackup. googleR is the alias to Google Drive as we configured it during the Rclone configuration process and mybackup is the target location within the Google Drive root directory.
--transferstranslates to the number of file transfers performed in parallel.--retriestranslates to the number of times to retry failed operations.
Rclone Sync
The Sync command is different from the copy command in the sense that the copy command creates duplicates from the source at the destination while the sync command will create a replica of the source at the destination.
In other words, if some files are deleted from the source and we sync the source and the destination, the sync command will also remove the deleted files from the destination. The basic syntax of a sync command is as follows.
rclone sync <flags> SOURCE remote:DESTINATION
Let’s take a look at a more specific command to better understand Rclone sync.
rclone sync "/home1/<username>" "googleR:ProjectD"
The above command will sync our local home directory to the ProjectD folder in Google Drive.
Bonus Trick
Mount Google Drive using Rclone
We need to mount Google Drive in order to access its contents using our file manager. To do this, create a mount point by executing the below command. We are creating a mount point named point.
mkdir ~/point
Now execute the following command to mount Google Drive to the mount point we have created.
rclone mount googleR: ~/point/
In the above command, googleR is the remote and point is the mount point.
Now when you open your file manager you will find a new folder named googleR mounted on the left side. Click on it to access the contents of your Google Drive via your file manager.
Conclusion
In this tutorial we learned how to enable the Google Drive API and create its credentials, then we installed Rclone on our system and configured it to connect with Google Drive (or any other cloud of our choice), then we went through the different options to back up files to Google Drive using Rclone. Finally, we learned about how we can mount Google Drive using Rclone to view it from our file manager.
