Has there been a scenario in which you had to perform a task repeatedly on a single system or multiple systems?
If we are into IT support or an IT administrator, it could be well assumed that the answer is YES.
We manage about 100 Linux systems in our organization. We have a new project that requires us to create a directory structure on these systems.
We have two options: manually create the same structure on 100 systems or use an automated method.
It is possible to do it manually, but there are visible drawbacks.
- First, it is going to take time.
- Second, there are high chances of human errors, such as spelling errors or incorrect directory structure.
Let’s talk about the second option, which is using shell scripts in Linux.
Objectives
This tutorial will cover the fundamentals of shell scripts on Linux. We will learn about the process to create them. We will also learn to execute the scripts and change permissions.
Table of Contents
Prerequisites
- Access to a Linux machine
- Acting as a non-root sudo user to ensure a secure environment
Introduction to Shell Scripts
We typically use scripts to perform repetitive tasks. A script contains a series of commands, and we can run that script daily so we don’t need to type those commands in the console again and again.
To make life even easier, we can schedule the script to run at a specific time.
For example, say we created a shell script that performs daily backups from a fileserver. We have to perform the backup at 6 PM every day.
Rather than manually running the shell script, we can just schedule it.
The same script will run at exactly 6 PM every day.
Now, let’s get to the shell script and understand what it is. A shell script is a simple text file that has an extension .sh. It contains a series of commands that need to be executed sequentially.
Whenever we need to perform a repetitive task, we can create a shell script.
Let’s look at a basic shell script, and then we will elaborate it piece by piece.
#!/bin/bash
echo "Hello World!"
Every time we run this script, it will display the same Hello World! message. If we schedule it to run at a specific time, it will run and display the message based on the defined schedule.
The above example is probably the simplest example of a shell script.
So, does this mean a shell script is meant for repeatable tasks, which are smaller or perhaps easier to do? The answer is NO.
A shell script can be as easy as shown above and can also be highly complicated. In the real-world scenario, the experienced Linux users would write a complicated shell script to achieve a task or automate something.
For example, we can write a shell script that finds empty files residing in the filesystem on a Linux system.
Anatomy of a Shell Script
In the definition section, we had a glimpse of a basic shell script. Let’s now look at different components that make a shell script.
#!/bin/bash
echo "Hello World!"
Notice the first line. It contains the following:
#!/bin/bash
For a script to work in a shell environment, we need to specify the shell. Here, we are defining bash as the script interpreter. It is not necessary that we must use the bash interpreter.
Various other interpreters are available. However, bash is usually the preferred one, and we would find this in almost every shell script that we would encounter.
The next statement contains the following:
echo "Hello World!"
Here, we specify a command, which is echo, to print a statement on the terminal window. We will need to use the echo command if we want to print on the terminal window.
Other than bash and echo command, we can include virtually any command in the shell environment. For example, we can include a command as simple as ls:
#!/bin/bash
ls -l
Let’s look at the test.sh shell script. We use a command named cat to read the test.sh shell script.
To do this, we run the following command:
cat test.sh
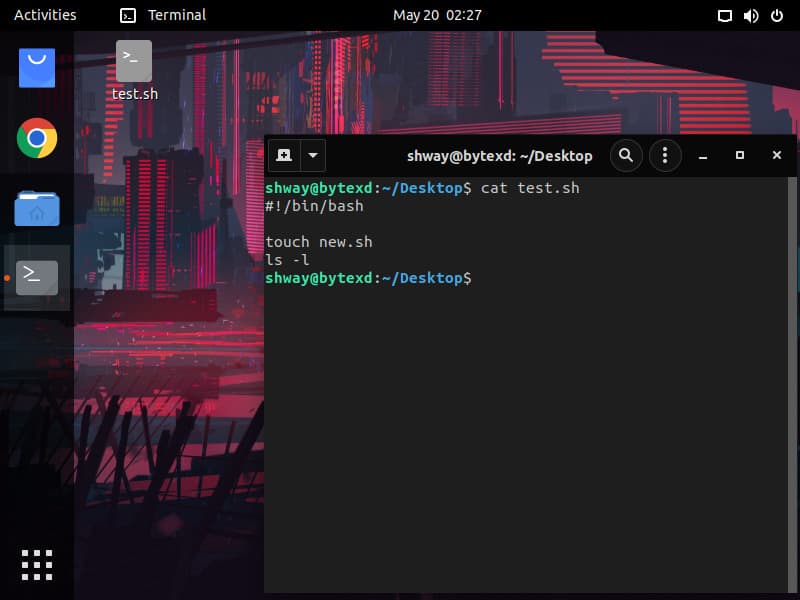
#!/bin/bash


touch new.sh
ls -l
The first line is for the bash interpreter. The second and third lines are as follows:
touch new.sh
This line uses the touch command, which is used to create empty files, such as text files or shell scripts. When we execute this script, it will first create a new shell script with the name new.sh.
Then, we have the third line:
ls -l
This line will list the files and directories in the existing directory where the shell script is stored. For example, we ran the shell script from the Desktop directory, and it listed all the files.
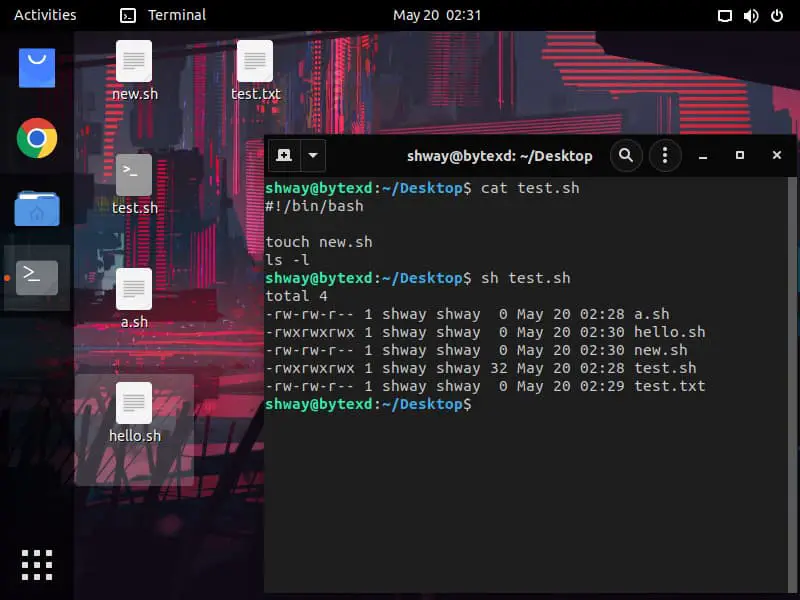
test.sh script, it will continue to create the new.sh script and list the directory structure. Even if the new.sh script exists, it will continue to overwrite the existing new.sh file. We can check for the existence of the new.sh file, and if it exists, we can list the files in the existing directory.
The scripts can be highly customized to our needs. Depending on our requirements, we can use various commands and loops, which can be if-else, while, and so on.
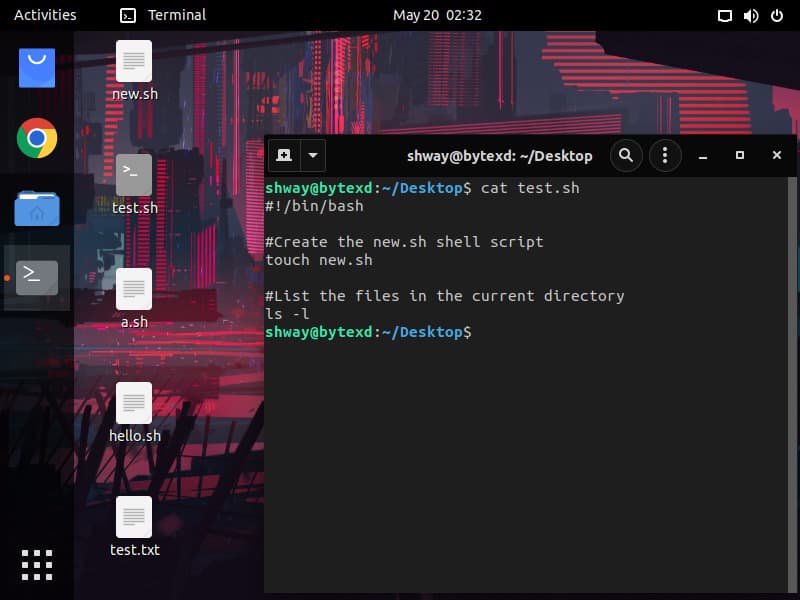
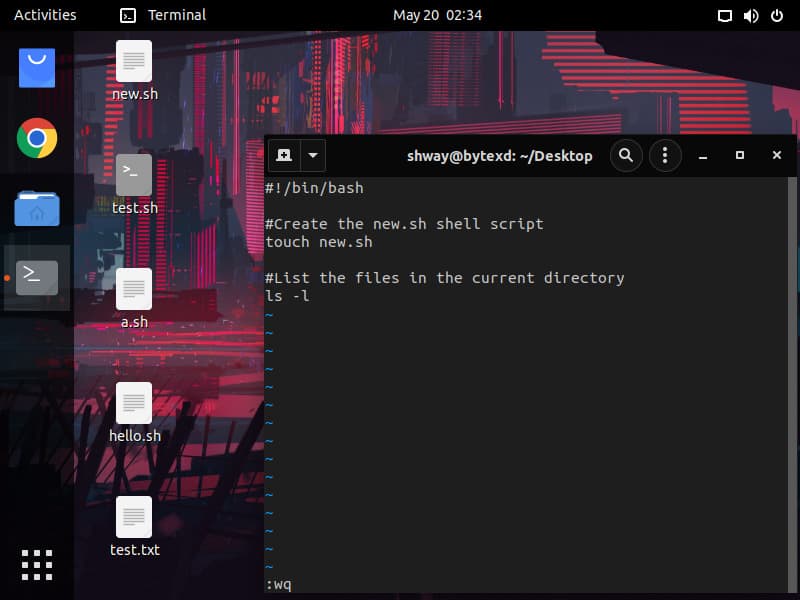
The next part of the script is commenting. We need to use the # symbol. For example, let’s say that we want to comment that these commands do.
#!/bin/bash
#Create the new.sh shell script
touch new.sh

#List the files in the current directory
ls -l
It is important to note and understand that comments do not get displayed when the shell script is executed.
They are optional, but they should exist because of the programming guidelines.
Let’s now move ahead to save the file. After writing the script, we need to save the file. Each shell script needs to have the .sh extension.
Shell Script Environment
Bourne Again Shell or most commonly known as the BASH is a command-line interpreter.
When we open a terminal window, we need to have an interpreter to understand and execute the command. In most cases, it is the BASH interpreter that does this job.
It is probably the most widely used interpreter that is used by every Linux variant or flavor. Other than BASH, there are other interpreters, such as Ksh, sh, and Csh.
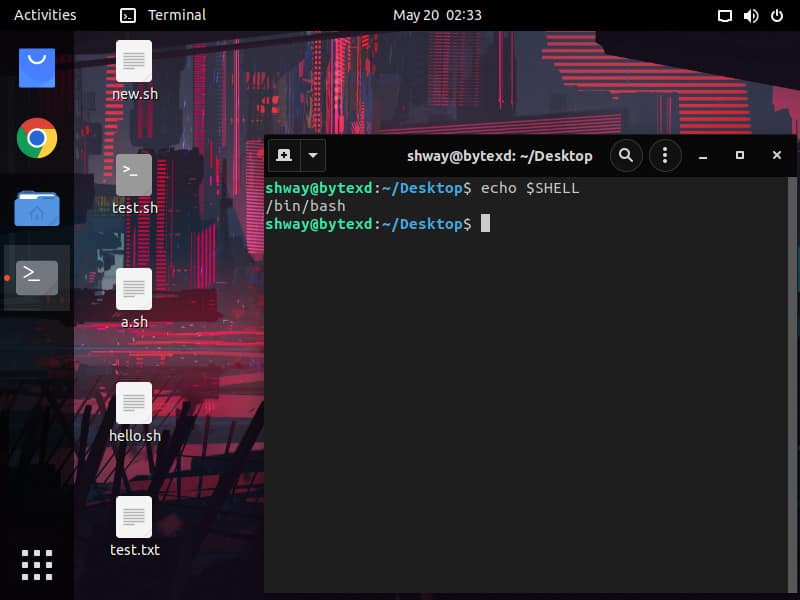
We can quickly check for the interpreter that we are using. To do this, type the following command:
echo $SHELL
The result displays the name of the interpreter.
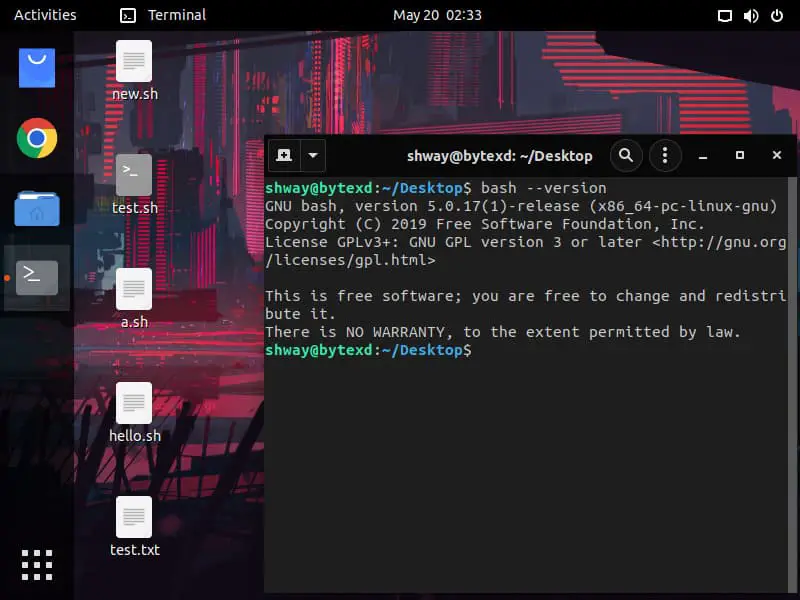
bash --version
The output displays the name and version of the interpreter.
#!/bin/bash
This is why you need to know the interpreter you are using.
#!
The #! symbols inform the operating system about the interpreter being used. Therefore, this becomes critical as the first line in the script. You may even see a variant of bash:
#!/bin/sh
It all depends on the interpreter being used.
Process for Creating a Shell Script
Now, we have established the connection between BASH and the shell script. We need to understand the process of creating a shell script.
First, we need to use a text editor. It could be vi, gedit, or any text editor available within the Linux environment. Most experienced Linux professionals use vi as the preferred text editor.
However, there is no limitation to which one we can use.
I’ll be using vi as the text editor for this example. We have two options:
We can create the shell script with .sh extension first using the touch command or directly use the vi text editor to create the file. We need to execute the following command:
vi script.sh
- Remember, the name of the shell script can be anything. However, we should always give a meaningful name. We also need to ensure that there is the
.shextension that is suffixed with the shell script name. - Second, when the file is created, we need to start writing the script. The first line in the shell script should always start with
#!/bin/shor#!/bin/bash. Here, we need to define the interpreter. - Third, we need to write some code in the shell script. After all, we are writing the shell script to perform a specific task. We need to ensure that the code is bug-free, or else the shell script will generate an error. We also need to remember to comment on the code with the
#symbol. - Fourth, after we are done with writing the code, we need to save the shell script.
Let’s assume that we are using the vi editor. We need to press the ESC key and then type the following command:
:wq
This command saves the shell script and then closes it. This command works with any file that you are creating with the vi editor.
Permissions for Execution
For a script to execute, it needs to be executable.
By default, when we create the script, the script has read and write permissions for the owner who created it. However, there are no execute permissions. Therefore, the script cannot be executed.
Let’s look at the default permissions that the script has.
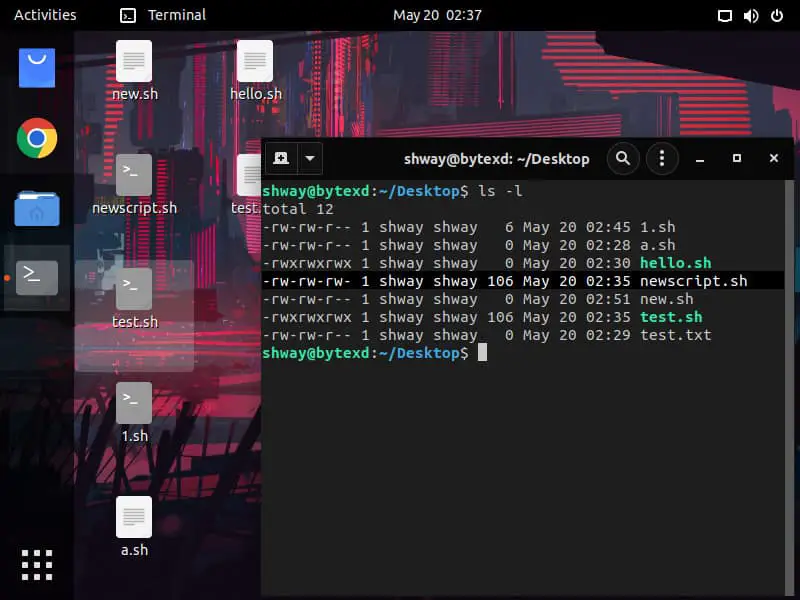
newscript.sh file that is highlighted in the graphic above. It is created without the execute permission. Even the owner does not have the permissions to execute it.
Executing a Shell Script
So far, we have written a basic script and understood the basic parts of it. Now, we need to execute the script.
There are two methods that we can use to execute the script. Let’s look at both methods.
Using The BASH Interpreter to Execute the Script
The first method is using the bash interpreter itself to execute the script.
Even if the script does not have the execute permissions, you can still execute the script.
Let’s look at the command:
bash newscript.sh
/bin/bash interpreter.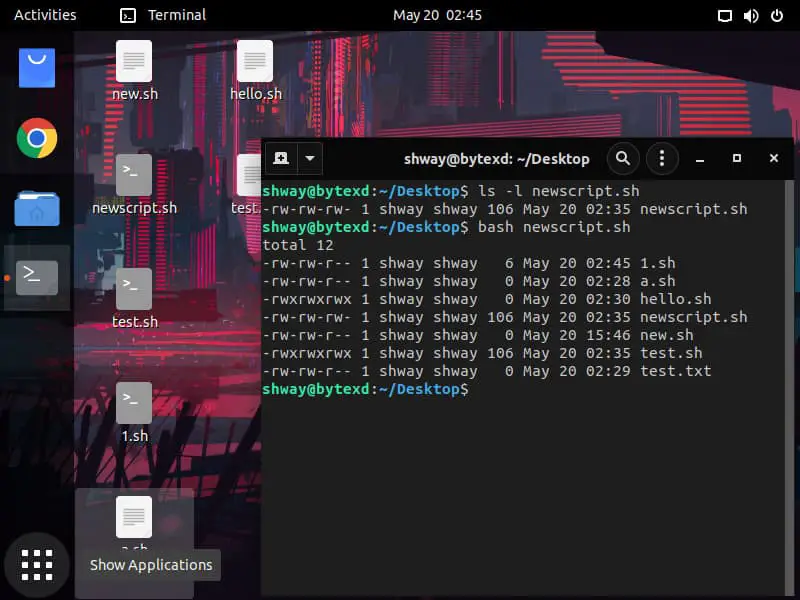
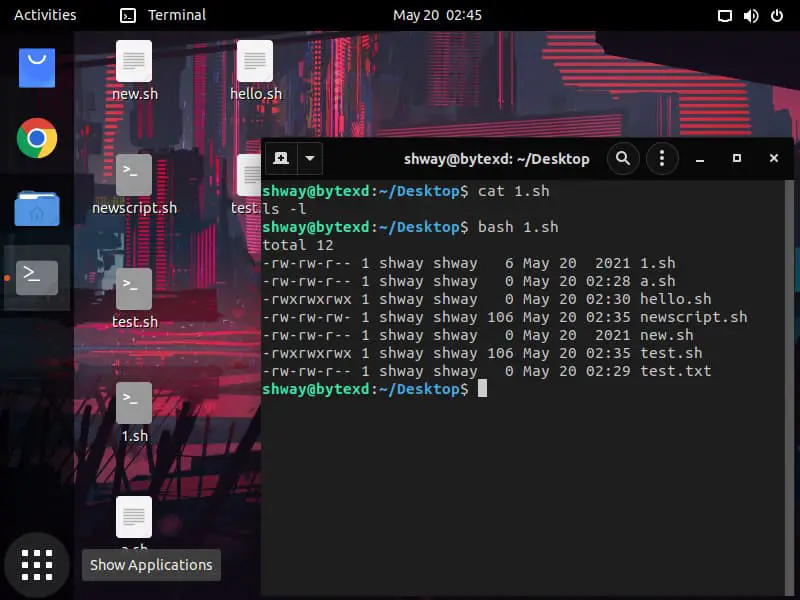
1.sh file. There is no /bin/bash statement, but it will still execute. To view the content, we need to type the following command:
cat 1.sh
We are using a different shell script this time for the demonstration purpose. Notice that the file contents contain only one command, which is:
ls -l
There is no /bin/bash statement, and we can still run it:
Using The Dot-Slash (./) Method to Execute the Script
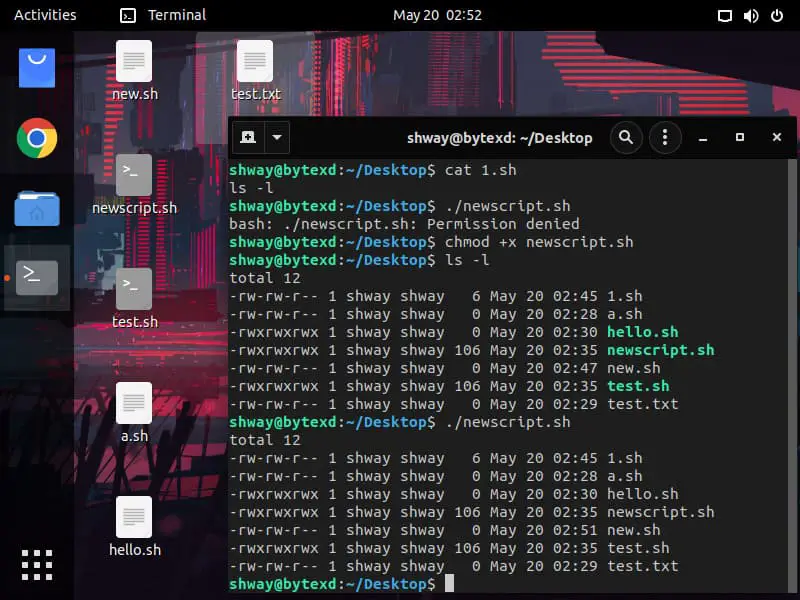
Now, let’s try the second method with the newscript.sh file. We need to execute the following command:
./newscript.sh
Notice that a permission denied error is generated. This is because this shell script does not have to execute permissions.
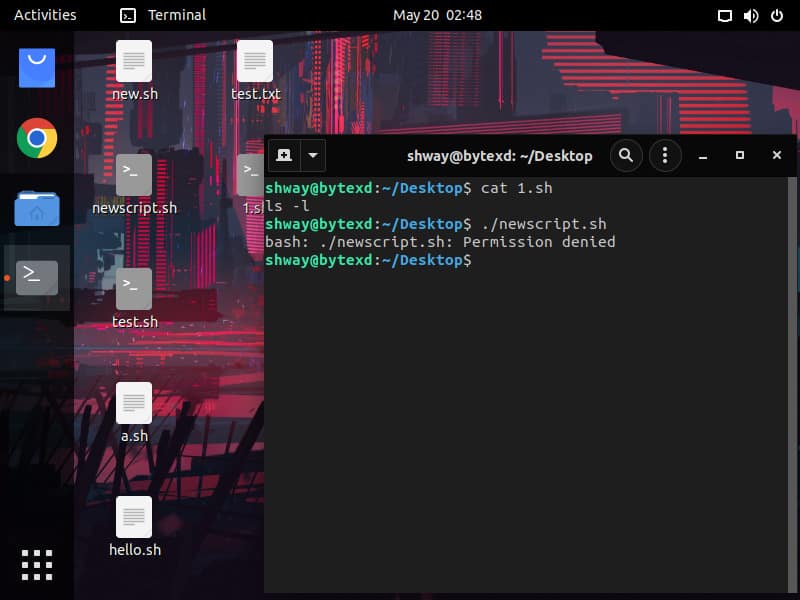
./ method. To assign the execute permissions, we need to use the chmod command, which is used for changing the permissions.
We need to type the following command:
chmod +x newscript.sh
The +x parameter assigns the execute permissions to the user. Now, let’s quickly verify the permissions by running the following command:
ls -l
Notice that the execute permissions are now assigned.
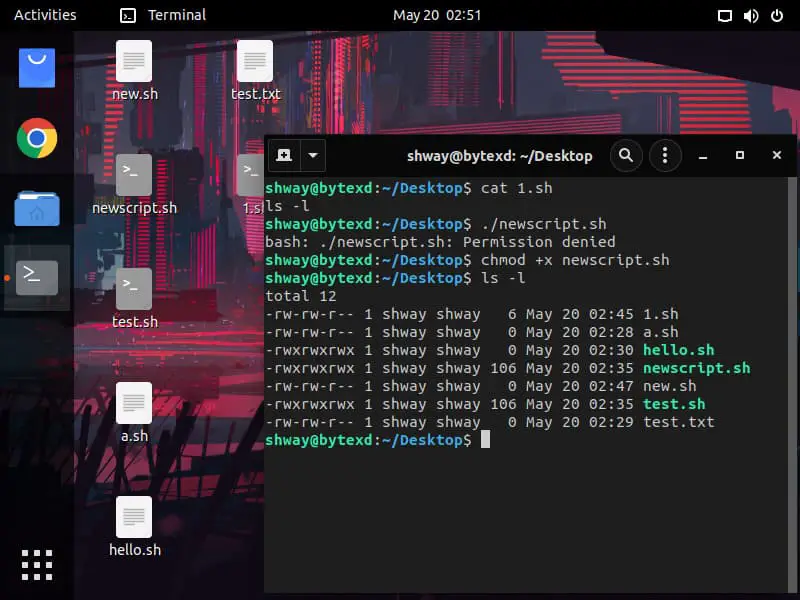
newscript.sh file has execute permissions, and therefore, we should not get the permission denied error.
Let’s try to execute the file:
./newscript.sh
This time the script executes without any error. If you use any other interpreter or intend to use ./ to execute a shell script, remember to change the permissions first.
Conclusion
Well done. Hopefully, this tutorial helped us understand the fundamentals of shell scripting in Linux. If you encountered any issues, please feel free to leave a comment or contact us, and we’ll get back to we as soon as we can.
