Git, short for git protocol or git version control system, is an open-source distributed version control system that allows you to track changes to a project’s files and interact with other developers. Linus Torvalds initially developed git in 2005 as an internal tool for Linux kernel development. It has since been widely adopted across the software development community and projects.
Git is both a distributed and free software, released explicitly under the terms of the GNU General Public License version 2 (GPLv2). However, most Linux distributions provide a pre-packaged git client.
Table of Contents
Why Do You Need Git?
Git offers several great features:
- Easily keep track of your code changes, revert to any version, and work through any branching or tagging issues.
- Access to remote repositories/projects. You can work on your code in a project you have no access to or even collaborate with other developers that are geographically remote.
- Security: It is easy to use public and private keys to protect commits or branches; thus, only the right people can commit to your server.
Setting Up a Private Git Server on Ubuntu
In this article, I will show you how you can set up an accessible and secure Git server on a Debian-based system. The following steps will help you set up a private Git server for your projects on a Linux-driven server, allowing you to host them (and keep them secure) outside the public GitHub or Bitbucket.
Step 1: Update Your System
As a rule of thumb on any Linux OS, you need to update the system before installing any additional packages. Execute the commands below.
sudo apt update
sudo apt upgrade
Step 2: Install Git
Use any of the commands below to install Git, depending on your current distribution.
Debian-based and Ubuntu-based distributions
sudo apt install git
Install Git on RHEL, CentOS, and Fedora
sudo yum update
sudo yum install git
Install Git on Arch Linux and Arch-based distros like Antergos and Manjaro
sudo pacman -S git
After a successful installation, you can verify whether GIt was successfully installed by running the version command as shown below.
git --version

Git Shell Path
Git can be accessed through the command-line tool or a graphical application. If you would like to check if git-shell is already set up in /etc/shells, run this command and see the results:
cat /etc/shells

/etc/shells directory. If you experience such a scenario, try to find its location using the command below.which git-shell

This command above shows you where your git-shell is located. In our case, the git-shell path is /usr/bin/git-shell.
You can add this path to the /etc/shells by editing the file using an editor like Vim or Nano. Use the command below to edit the /etc/shells file with the nano editor.
sudo nano /etc/shells
Paste the output of the ‘which git-shell’ command and save the file (Ctrl + S). Close the file using the keyboard combination (Ctrl + X).

Tip: In case you would like to install to a specific location, you can use these commands:
sudo apt install git in /usr/bin
Directory (for non-root users) or this command:
sudo apt install git -y /usr/bin/git
Step 3: Setup a dedicated (non-sudo) git user
Now we want to create a dedicated (non-sudo) user to be used for Git. In our case, we will create a user called git. You can use different ways to add users to Linux systems. For this post, we will use the adduser command. Execute the command below.
sudo adduser git
You will be prompted to set a user password for this new user.

After successfully creating the new user (git), switch to git user using this command:
sudo su git
git) we just created.Now, we need to create an SSH directory where we will store our SSH keys.
cd
mkdir ~/.ssh && chmod 700 ~/.ssh
Since this is a hidden directory (the filename starts with a dot (.) character), you will need to use the ls -a command to see the file. We are also assigning permission 700 on this directory which denies other users access to the file while ensuring the git user has full access (read, write and execute).

Now we need to create the authorised_keys file inside the SSH directory, which will hold our public keys. We will also assign permission 600 to the authorised_keys file, ensuring only the file owner (Git) has read and write permissions over the file. Execute the commands below.
touch ~/.ssh/authorized_keys
chmod 600 ~/.ssh/authorized_keys
Now, open this file using the nano editor and add the public keys of users who you want to access your private Git server.
nano ~/.ssh/authorized_keys
Step 4: Create Individual Repo Directories
We want to create individual repo directories that we will use for our Git server and assign them permissions.
sudo for this.Change to the home directory using the change directory command (cd):
cd /home/git
Now, let’s create a directory for our repository:
sudo mkdir website-one.git
Initialize our git repository by running this command:
cd website-one.git
git init --bare
cd ..
Change ownership of the directories and files available to git using this command:
chown -R git.git website-one.git
Step 5: Use your Private Git Repository
Up to this point, we have successfully set up a private Github repository in our system, and it’s ready for use. In our case, we created the repository on Ubuntu 20.04 LTS under the git user. Now there are different ways you can use this repository.
- Access the repository from your local machine but with a different user
- Access the repository from a different computer
We will look at all the two scenarios.
(Scenario 1) Access the Repository from your Local Machine
In this step, we are assuming that both the project you are working on and the private git server are on the same computer. If that’s the case for you, follow the steps below.
- Login with your normal user. Don’t log in with the new
gituser we created. - Generate SSH Keys by executing the command below.
ssh-keygen -t rsa

That will generate the private and public keys to connect to a remote system. Now we need to copy the public key to our
gituser SSH directory. You can manually copy the file or use utilities like thescpcommand or an FTP application like FileZilla. In this post, however, we will use thessh-copy-idcommand as shown below.ssh-copy-id -i ~/.ssh/[your-public-key] git@[your-pc-IP-Address]
e.g.,
ssh-copy-id -i ~/.ssh/id_rsa.pub [email protected]

- If you don’t see any error, that means the SSH key was successfully copied. Now navigate to the the project you are working on. In our case, we don’t have any. Let’s create a new directory that we will use for demonstration.
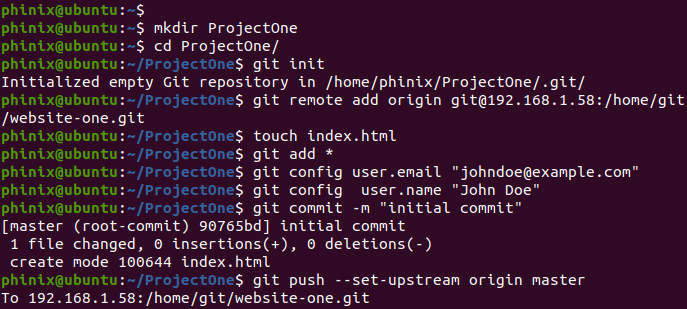
mkdir ProjectOne
- Navigate inside this directory using the cd command and initialize an empty GitHub repository.
cd ProjectOne
git init

- Let’s make our project directory aware of the private repository we created on our system. Execute the command below.
git remote add origin git@[your-IP-address]:[path-to-your-provate-repo]
git remote add origin [email protected]:/home/git/website-one.git
- Now let’s create a sample file inside our project directory that we will push to our private repository.
touch index.html
- Now from this step, we will execute the usual Git commands that you need to push changes to a remote repository. First, add all the files you need to commit. In our case, we will add everything by executing the command below.
git add *
Next, we need to set our identity by adding an email and username. See the commands below.
git config user.email "[email protected]"
git config user.name "John Doe"
After adding your username and email, make your first commit.
git commit -m "Initial Commit"
Now, push your changes to the remote repository.
git push --set-upstream origin master

(Scenario 2) Access the Repository from Another Computer
In our case, we want to access our private Github server from our Raspberry Pi. However, the steps described here should work for any other PC or operating system.
- On your other computer, execute the command below to generate SSH keys needed to connect to your remote Github server.
ssh-keygen -t rsa

- Now, we need to copy the generated public keys to our remote private Github server. Use the syntax below.
ssh-copy-id -i ~/.ssh/[your-public-key] git@[your-pc-IP-Address]
ssh-copy-id -i ~/.ssh/id_rsa.pub [email protected]

- Now, navigate inside your project directory and initialize a Git repository by executing the command below.
cd ProjectTwo
git init

- Let’s make our project directory aware of the private repository we created on our system. Execute the command below.
git remote add origin git@[your-IP-address]:[path-to-your-provate-repo]
git remote add origin [email protected]:/home/git/website-one.git
- Let’s create a simple file that we will commit to our private repository.
touch main.css
- Next, we will need to set our identity by adding an email and username. See the commands below.
git config user.email "[email protected]"
git config user.name "John Doe"
- Next, add all the files you wish to push to your remote Github repository. In our case, we will add everything by executing the command below.
git add *
- Commit the changes using the command below.
git commit -m "First Commit"
- Finally, push your changes to the private Github repository using the command below.
git push --set-upstream origin master

Conclusion
And there we have it! A DIY Git server for private use. You can read more about working with Git from the official Git documentation. Did you encounter any errors? Or do you have any comments regarding this post? If so, please let us know in the comments below.


So what about changing to git-shell? Changing the /etc/shells file is only part of the solution there. How do you change it on the git account?
You should be able to change it with
sudo chsh $USER -s $(which git-shell)