In Linux, you often need to run lengthy processes to execute in the background and independently (such as ping commands to a server for an extended period of time) .
- The first reason for why lengthy processes should run in the background is that these processes don’t require any interaction with the user.
- Secondly, if a process is launched from a terminal session, it will occupy the terminal. You cannot use the same terminal to execute other commands.
- Finally, you may not want unnecessary windows opened on your desktop.
You can handle these situations by sending your processes to execute in the background and start and control multiple sessions of terminals with the help of the screen utility provided in Linux.
In this tutorial, we’ll learn about the screen command in Linux in detail. After reading this tutorial, you will be able to install and use the screen command. Also, you will know how to establish a new screen session, check the list of all sessions, detach, reattach, and exit a session.
Table of Contents
Introduction to the Linux Screen Command
This is very useful if you want to execute a process for a long time in the background, or you want to share sessions with other users. The screen command will keep running your processes even if you log off.
The screen command is also helpful to prevent data loss when you are working on a remote computer. In case the network connection is dropped due to any reason or you terminate the SSH, your screen session will still run.
Using some keyboard shortcut keys and parameters of the screen command, you can easily perform different operations with the created screen sessions.
Configuring the Screen Command in Linux
In many Linux distributions (such as Ubuntu server), the screen command is installed by default. This means most Linux packages come up with default screens. But in other versions, you have to install it by yourself.
Check if Screen Is Installed on Your System
To check whether the screen is installed in your system, run the following command.
The first thing is to check the version of the screen. You can do this by issuing the following command.
screen --version

If the screen is not installed, you will get a message 'screen' not found. In this case, you need to install the screen first. If the screen is already installed, this command will show you the version of the screen. Then, there is no need to install the screen.
Install Linux GNU Screen
In case screen is not installed on your system, you can install it using the following command, if you’re running a Debian-based distro, such as Debian or Ubuntu.
Install Screen on Debian/Ubuntu-based Systems
sudo apt install screen
Install Screen on Red Hat/Fedora Systems
In Red Hat systems (such as Fedora, CentOS, Rocky Linux, AlmaLinux) use dnf instead of apt.
sudo yum install screen
I’m using Ubuntu in our example.
Enter your password, then press enter. Then, you will be asked to grant permission if you want to continue the installation. Type Y to continue installation otherwise type N to cancel the installation and then press the enter key.

When you press Y, the installation will start. The Screen utility is very simple and installs very quickly.
Once the installation is completed, you can check whether the screen command is properly installed by again using the version parameter.
screen --version

This time, it is showing the screen version instead of giving any error message. This indicates that the screen command is successfully installed.
How to Use The Screen Command
This section provides information regarding different operations you can perform with the screen command.
When you type the screen command like this.

It will open a welcome message showing copyright information in front of you. You can remove the welcome message displayed by hitting the enter key.

Now, you have to create instances of the screen session. The details of creating a screen session are provided in the next section.
How to use Screen to run a process in the background (create a new session)
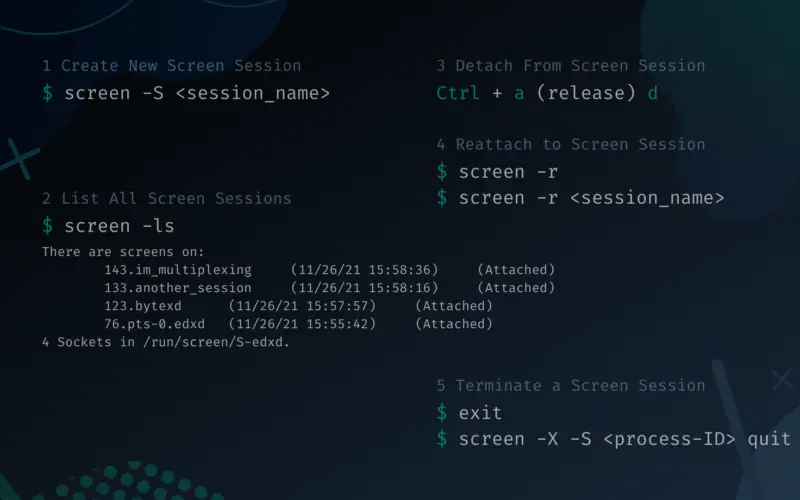
As the basic function of the screen command, you can run any process in the background. To do this you have to create a new screen session first. This can be achieved by using the -S parameter with the screen command as shown below. You can give a custom name to the session you create.
screen -S <session_name>

Here the cmf is the name of the session. You can give any name of your choice, then press enter key to create a session.
Now you can run any process in this newly created session (such as opening Vi editor, issuing the top command, etc.). It will run in the background until you terminate the session.
When you have created multiple sessions, you can move between them by using keyboard shortcuts Ctrl + a + n (next session) and Ctrl + a + p (previous session).
Show Background process list
You can check the listing of all screen sessions currently running by issuing the following command.
screen -ls

The above output shows that there is no session running as the background process. It means that you have to create a session first, which you can put as a background process using the screen command. Then, any other operation can be performed in that session.
Consider the case when several sessions are running as background processes. Now you want to see the listing of all these sessions, then the ls parameter can be used with the screen command. Through the ls parameter, you can see the lists of all background screen sessions.
screen -ls

Lists of sessions are shown after using the ls parameter with the screen command. Here the cmf and cmg are the session names given by the user.
How To Detach And Reattach To A Screen Session
Once you create a new session, you will be attached to that session. You can detach from an active screen session by using keyboard keys Ctrl + a + d.
This will bring you back to your terminal from where you initially issued the screen command.
Remember that you are only disconnected from the process, but it is still running in the background.
The r parameter is used with the screen command to reattach to the background process again.
screen -r
In case of more than one session running, you have to specify the name of the session at the end of this command.
The following syntax should be followed for reattaching a screen session if more than one session is running.
screen -r <session name>

Terminate A Screen Session
To terminate a session, you can use the exit command from the session.
exit

After using the exit command, the terminal will terminate successfully.
Alternatively, you can use the -X and -S parameters and quit command with the session command. An example is given below to terminate the session from the screen using the process ID.
screen -X -S <process-ID> quit
Conclusion:
The screen command in Linux is very easy to use. It keeps the shell active even when the session is terminated or due to network disturbance. Another advantage is that we can connect and disconnect it from different locations.
In this tutorial, you learned how to install the screen command and how to establish a new session, check its listing, detach, reattach, and exit a session.
If you encounter any issues or have any questions then feel free to leave a comment below and we’ll get back to you as soon as we can.


