In this article you will learn how to use autojump to navigate easily between directories without specifying their full path or executing numerous cd commands.
Table of Contents
What Is the Autojump Tool, and How Does It Work?
Linux operating system is always related to skilled and knowledgeable command line users. These users prefer and interact most of the time with the terminal.
Though executing tasks through the command line can be convenient and enjoyable most of the time, however there are always those situations that will render the command line tasks tedious and time consuming.
Every Linux user had to find themselves navigating and moving between directories using a combination of cd and ls the commands; and for more advanced users, the tasks that involves moving between directories back and forth, and listing their contents can be very frustrating.
To solve the problem of directory navigation using command lines; the autojump tool has been created exactly for this purpose.
Autojump is a command line utility written in Python that serves as an advance version of the cd command or we can call it a cd command that learns. This Linux tool allows the user to jump directly to a previously visited path (or manually added) from any location in the system.
Autojump can be described as a faster solution to navigate (or to jump) to the user favorite directories. This helpful utility saves the frequently visited directories (i.e. History) from the command line into a database, in order to render filesystem navigation possible and quite easy just by typing small patterns.
The Autojump Command Syntax
Directories must be visited first or added manually, before they can be jumped to.
j [or] autojump <option(s)> <directory)>
Autojump Commands Used in This Article
-a, --add <directory> |
Add path to the database |
-i, --increase [weight] |
Increment the weight of current directory |
-d, --decrease [weight] |
Reduce the weight of current directory |
--purge |
Discard non-existent directories frrom autojump |
-s, --stat |
Display the directories and their wheight |
-v, --version |
Display the current version of autojump |
Prerequisites
- Your system’s Python install should be Version 2.6+
Getting Started With Autojump
In this section we will get to know more about autojump characteristics for example: a self learning tool based on the users navigation history – No need to type sub- directories name – easy to download and install in most of Linux distros.
How to Install Autojump
To install autojump it is recommended to update the apt database:
sudo apt update
The next step is to install autojump, we can do that by using the same apt tool:
sudo apt install autojump
Check if the autojump tool is installed correctly by running the following command:
autojump -h
usage: autojump [-h] [-a DIRECTORY] [-i [WEIGHT]] [-d [WEIGHT]] [--complete]
                [--purge] [-s] [-v]
                [DIRECTORY [DIRECTORY ...]]

Automatically jump to directory passed as an argument.

positional arguments:
  DIRECTORY             directory to jump to

optional arguments:
  -h, --help            show this help message and exit
  -a DIRECTORY, --add DIRECTORY
                        add path
  -i [WEIGHT], --increase [WEIGHT]
                        increase current directory weight
  -d [WEIGHT], --decrease [WEIGHT]
                        decrease current directory weight
  --complete            used for tab completion
  --purge               remove non-existent paths from database
  -s, --stat            show database entries and their key weights
  -v, --version         show version information

Please see autojump(1) man pages for full documentation.
Or by using the -version option.
The other way to install autojump is to clone the git repository just as demonstrated below:
git clone git://github.com/joelthelion/autojump.git
cd to the autojump directory and make the python script executable then run the script as demonstrated:
cd autojump
chmod 755 install.py
./install.py
Manually Activating Autojump
To activate the autojump utility we should add the following line to the .bashrc file : . /usr/share/autojump/autojump.sh. Simply open it using the following:
nano .bashrc
Or without complicating things just copy the below mentioned command to your terminal and execute it.
echo ". /usr/share/autojump/autojump.sh" >> ~/.bashrc
>> symbol will append the output of the echo command to the .bashrc file.Final step is to source the .bashrc file.
source .bashrc
Now we can move to the interesting stuff about autojump.
Start Jumping With Autojump
We’ve mentioned before that autojump keeps a history of the frequently visited directories from the command line. To understand this concept, we could use the -s , --stat argument to show database entries and their key weights. Check the mentioned below results:
j -s
0:       total weight
0:       number of entries
0.00:    current directory weight

data:    /home/edxd/.local/share/autojump/autojump.txt
Naturally the database has no information since we didn’t visit any directories using the cd command after installing autojump.
j command is equivalent to autojump.To understand how to use autojump for your advantage it’s better to create multiple directories and subdirectories, then pay a visit to each of those folder using the cd command, then navigate back to your home directory when you’ve reached the last sub directory. Follow the given example for better understanding:
mkdir autojump_testlab
cd autojump_testlab/
mkdir -p hello/world
mkdir -p world/hello
cd hello/
cd world/
cd ~
cd autojump_testlab/
cd world/
cd hello/
Now check the autojump stats by adding the -s , --stat command option.
10.0:   /home/edxd/autojump_testlab/hello
10.0:   /home/edxd/autojump_testlab/hello/world
10.0:   /home/edxd/autojump_testlab/world
10.0:   /home/edxd/autojump_testlab/world/hello
14.1:   /home/edxd/autojump_testlab
________________________________________

54:      total weight
5:       number of entries
10.00:   current directory weight

data:    /home/edxd/.local/share/autojump/autojump.txt
You’ll be able to observe all visited directories and their new weight number.
Based on the directories that we’ve created we want to navigate to the hello child directory from our home directory without typing the full path. Simply run the following:
j w h
/home/edxd/autojump_testlab/world/hello
Notice that autojump understood the given pattern above (w h) and changed the current directory to /world/hello
Now let’s change the current directory to the world child directory
j h w
/home/edxd/autojump_testlab/hello/world
Jump to the Subdirectories
Autojump offers us the c option to jump to the current child directory. Take a gander at the content of our current directory.
tree
.
├── hello
│   └── world
│       └── world
│           └── world
│               └── world
└── world
    └── hello

7 directories, 0 files
Check the following autojump commands for better understanding the concept of the c option
Without the c switch:
As you can notice when running the j w command without adding the c option. We jumped to autojump_testlab/world. But when running jc w from that exact location, we jumped to world child directory.
How about if we specified only hello to autojump? In this case autojump will change the current directory to either the parent (/autojump_testlab/hello/) or the child (autojump_testlab/world/hello) “hello” directory. Check the following set of autojump commands:
autojump will jump to the directory that hold the greater key weight. Check your autojump stats to get a good idea about your favorite locations.Open the File Manager
We can open the file manager using autojump instead of changing the current directory simply by adding the o command argument.
jo hello
Adding New Directories to Autojump
We can also add new directories to the autojump database without even using the cd command to change the current directory. For this example we will create a new directory then add its path to autojump with the help of the -a , --add switch.
Control Autojump Priorities by Increasing or Decreasing Weight
As we know autojump favorite the most visited directory in case we have decided to jump to a directory that shares the same name with other directories. However the autojump utility offers us the possibility to prioritize these directories in a manual way
Increase Weight
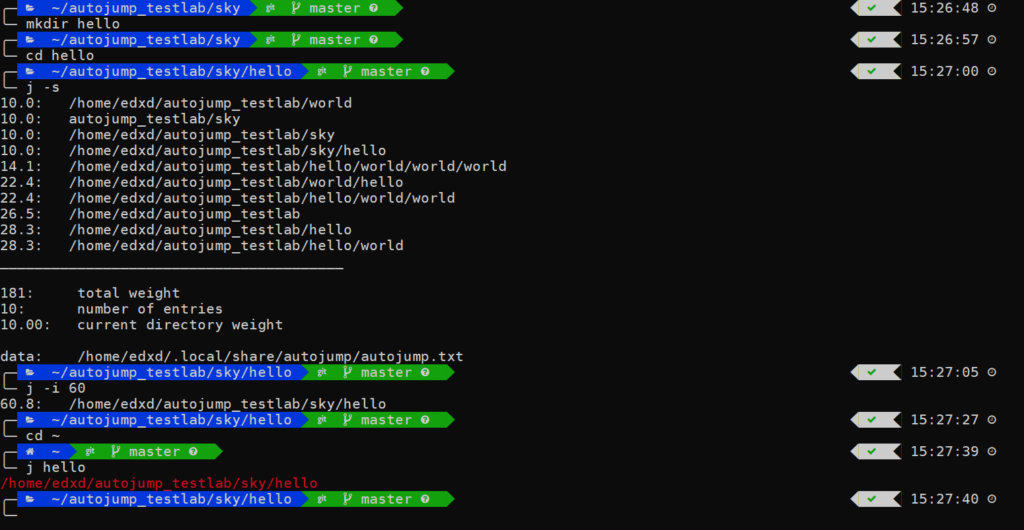
Suppose you have a new folder named hello, and you want autojump to recognize that directory as your first choice when you type hello. We can achieve that by increasing the weight of this new directory. All you have to do is check the other directories that has similar name (e.g. hello) and give this new directory a greater weight than the others. Check the following set of commands for better understanding:
Notice that we give the hello sub directory a weight of 60. So now after using autojump to navigate to a hello directory, the utility will recognize /sky/hello as the first choice.
Decrease Weight
We can also decrease the weight of a directory in order to render it less favorable or for whatever reason you have in mind. To achieve this we can use the -d switch just as so:
autojump database : /home/edxd/.local/share/autojump/autojump.txtRemove Non-existent Directories From Autojump
Suppose you removed a number of directories from your system, after that you are now obliged to implement these changes into autojump in order to avoid unexpected errors. As you might have guessed this method could be tedious and counter-productive.
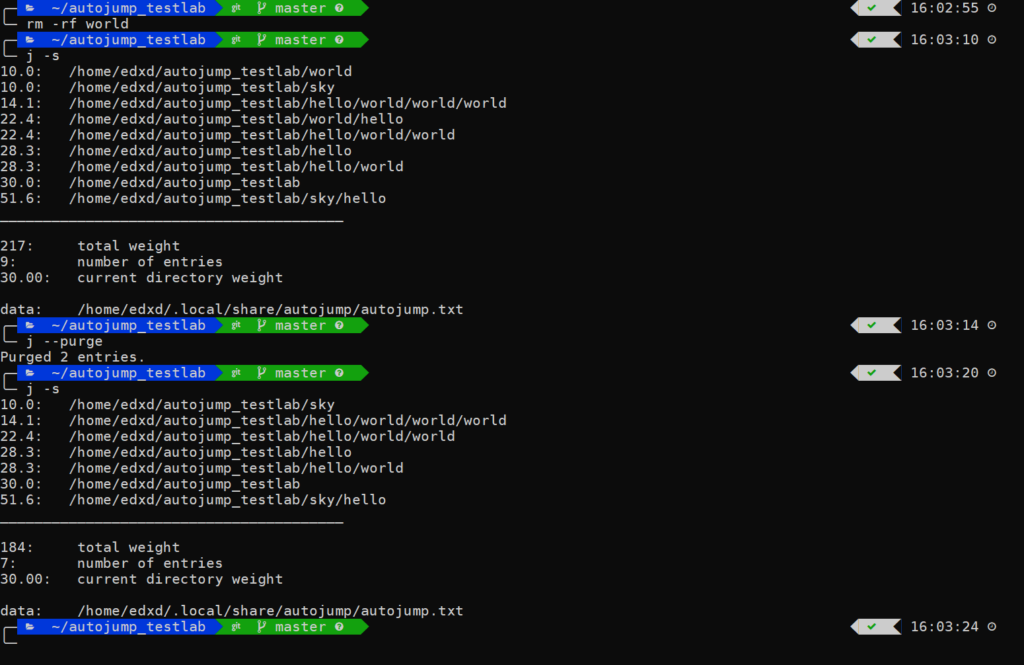
Fortunately we can use the --purge option to automatically remove non-existent directories from autojump‘s database. Take a gander at the example below:
rm -rf world/
As you’ve noticed in the above example, we deleted the world directory, then we ran the autojump with the --purge option to clear any obsolete directories from our database.
Conclusion
In this article we’ve seen how to setup autojump, add directories to its database, prioritize directories and also to discard the non-existent one. And most important we showed you how to navigate easily between your favorite directories without having to type the full path or execute multiple cd commands. If you encountered any issues or have any questions feel free to let us know in the comments.
![How to Use Autojump Advanced Navigation in Linux 1 j [or] autojump](https://bytexd.com/wp-content/uploads/2022/07/How-to-Use-Autojump-Advanced-Navigation-in-Linux-800x500.png)


